


Many Windows 10 users have recently experienced issues while updating their Windows 10 system.
A lot of the time, Windows Update fails to install updates for their system. But what also happens frequently is their computer is not working properly or crashes when the updates have been installed.
If you’re experiencing the same problems, you’re no doubt very frustrated, but the good news is you should be able to fix it. We’ve put together some suggestions to help you fix your problems with Windows 10 updates.
Fixes to try
You may not have to try them all; just find your case, then work your way down the list until you find the one that works for you.
a. If Windows Update fails to install updates:
- Run Windows Update Troubleshooter
- Download and install the update manually
- Reset the Windows Update related components
- Set your Windows Update services to start automatically
b. If issues occur after the updates are installed:
- Run System File Checker
- Check your device drivers
- Check for software conflicts
- Reset your Windows 10 computer
Fix 1: Run Windows Update Troubleshooter
Windows 10 has a built-in troubleshooter that can detect and fix issues with Windows Update. You should try running the troubleshooter to see if this fixes your update issues.
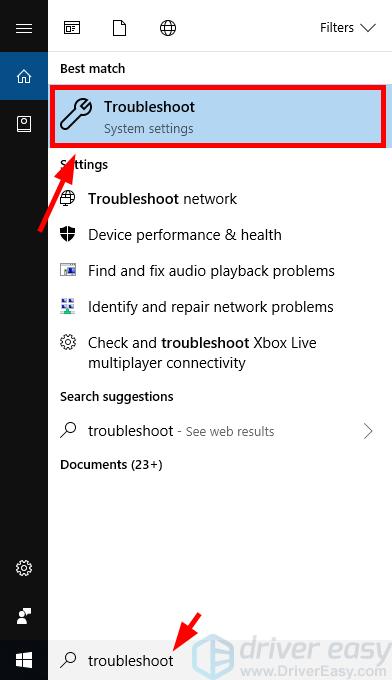
- Press the Windows key on your keyboard, then type “troubleshoot” and click Troubleshoot in the list of results.
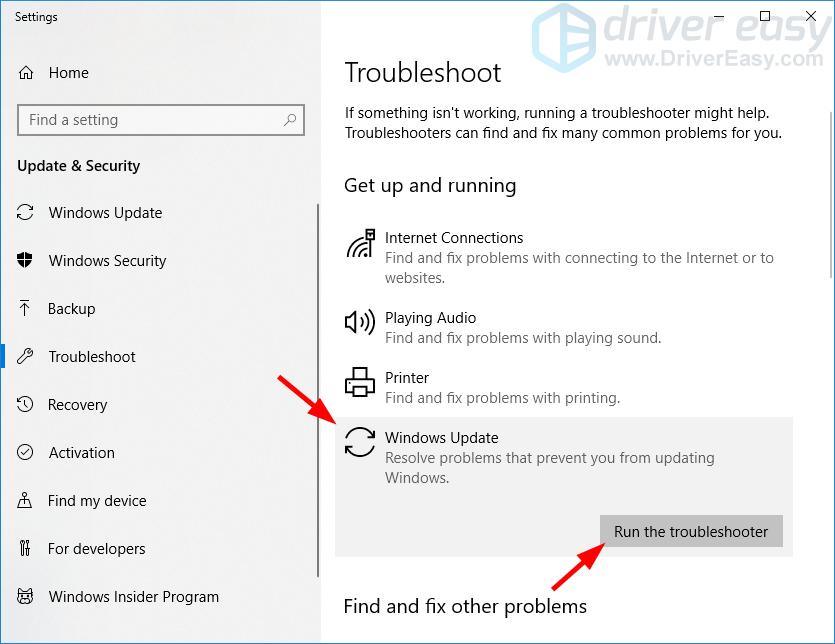
- Click Windows Update and then click Run the troubleshooter.
- Follow the on-screen instructions of the troubleshooter to check and fix your Windows Update issues.
Hopefully this fixes your issues. But if not, there are still other fixes you can try…
Fix 2: Download and install the update manually
If Windows Update fails to install any update for you, you can download and install it manually. Here’s how you can do it:
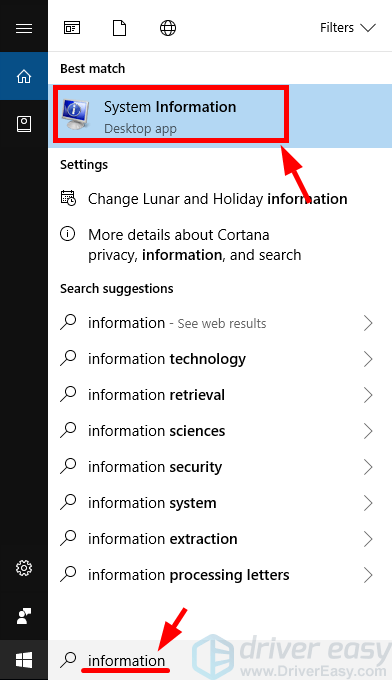
- Press the Windows logo key on your keyboard and type “information“. In the list of results, click System Information.
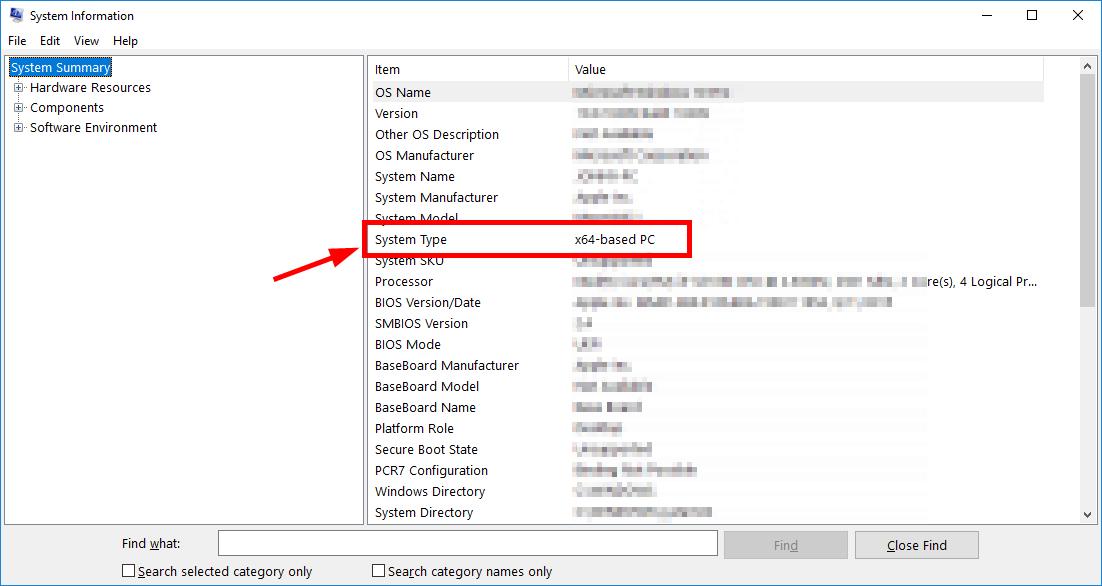
- View your System Type In the System Information window. Its value is usually x64-based or x86-based (or sometimes ARM64-based). This is an important piece of information and you should note it down. It will be useful when you are looking for the right updates for your Windows 10 system.
- On Windows Update, click View update history, then note down the system updates that failed to install. (You may need to get the information from the update history.)
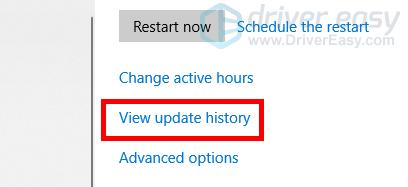 Note down the update code that starts with “KB“.
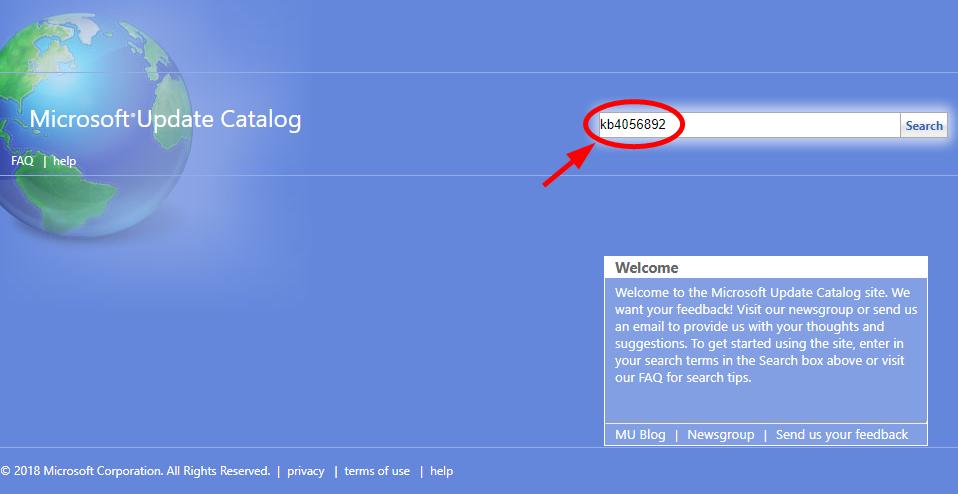
- Go to Microsoft Update Catalog. Then search for the update you’ve failed to install.
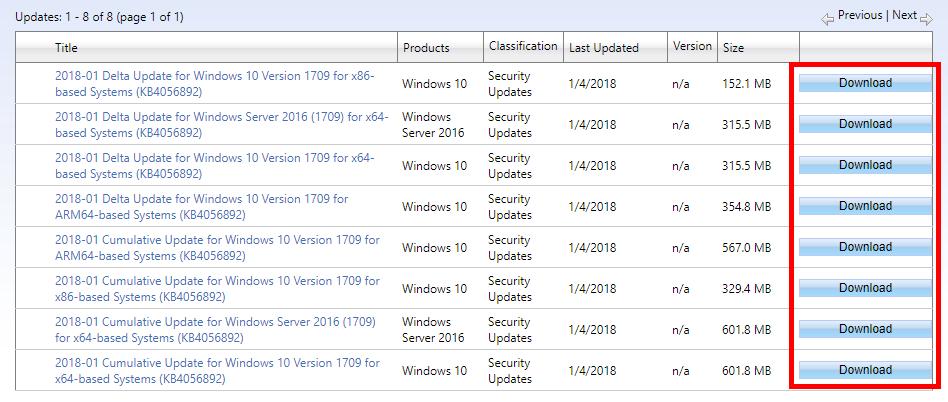
- In the search results, find the update that matches your operating system and system type (x86-, x64- or ARM64-based). Then click Download next to the update.
- Click the link on the new window to download the update.
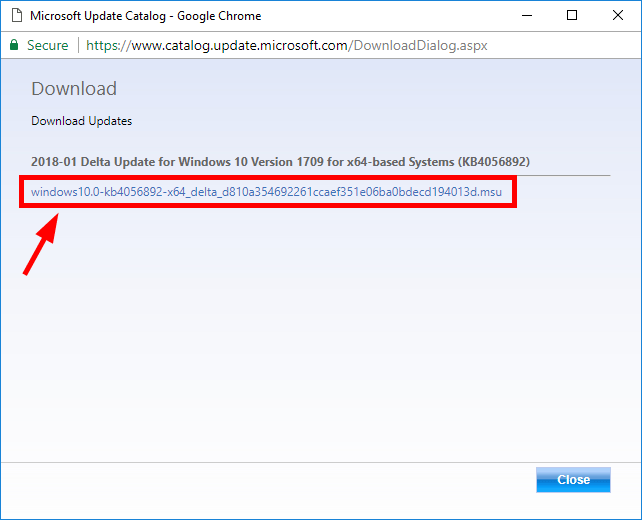
- Open the file you’ve just downloaded and follow the on-screen instructions to install the update.
If you’re able to install the update, great! But if not, there are still two fixes for you to try…
Fix 3: Reset the Windows Update related components
Your Windows Update may fail to install the updates because its components are corrupted. These components include the services and temporary files and folders associated with Windows Update. You can try resetting these components and see if this fixes your problem.
To reset these components:
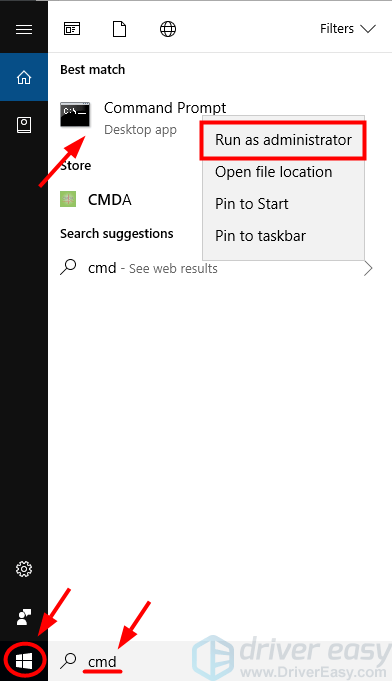
- Click the Start button in the lower left corner of your screen, then type “cmd“. In the list of results, right-click Command Prompt and select Run as administrator.
- In Command Prompt, type the following lines of command and press Enter on your keyboard after typing each:
net stop bits
net stop wuauserv
net stop appidsvc
net stop cryptsvc
These commands will stop the services that Windows Update requires to download and install updates. - Type these lines of command and press Enter after typing each in Command Prompt:
ren %systemroot%\softwaredistribution softwaredistribution.old
ren %systemroot%\system32\catroot2 catroot2.old
This will rename the SoftwareDistribution and catroot2 folder which are used by Windows Update to store data and temporary files. Your system will detect that these folders are missing, and then it’ll create new ones. The purpose of this is to force the system to use the new SoftwareDistribution and catroot2 folders so that Windows Update can avoid issues with the old ones. - In Command Prompt, type these commands and press Enter after each to restart the services you closed just now:
net start bits
net start wuauserv
net start appidsvc
net start cryptsvc
- Check your Windows Update to see if it’s able to install your update.
If it is, then you’ve solved your problem. But if not, you may need to…
Fix 4: Set your Windows Update services to start automatically
You may have your issues with Windows Update because its services are not configured to start automatically on startup. In this case, you should set it to start automatically. To do so:
- Click the Start button in the lower left corner of your screen, then type “cmd“. In the list of results, right-click Command Prompt and select Run as administrator.
- In Command Prompt, type the following lines of command and press Enter on your keyboard after typing each line:
SC config bits start= auto
SC config cryptsvc start= auto
SC config trustedinstaller start= auto
SC config wuauserv start= auto
- Close the Command Prompt window and restart your computer
Now your Windows Update should be able to install updates for you.
Fix 1: Run System File Checker
You may have issues after installing updates because of corruptions in your Windows 10 system files. You can try running the built-in Windows utility System File Checker to scan for and restore those corruptions.
Here’s how you can do it:
- Turn off your Windows 10 computer.
- Turn on your Windows 10 computer, and then when the operating system is loading (a circle of dots spinning with a black screen), shut down your computer.
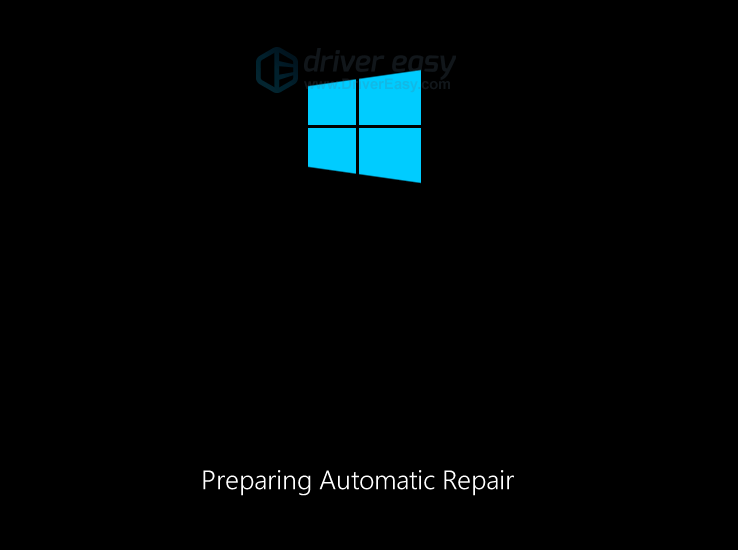
- Do step 2 until you see a message “Preparing Automatic Repair“.
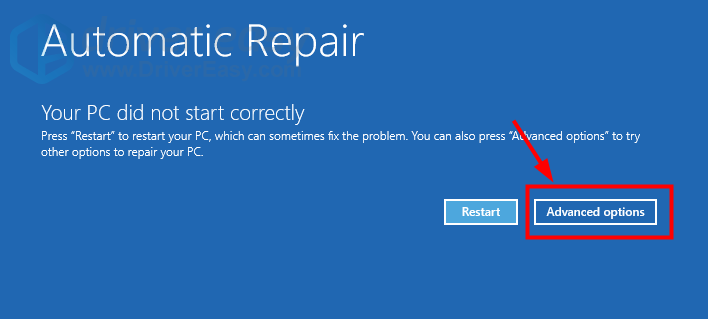
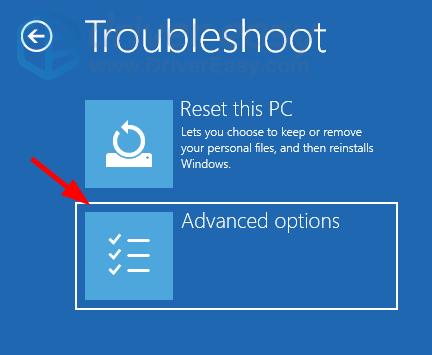
- Click Advanced options.
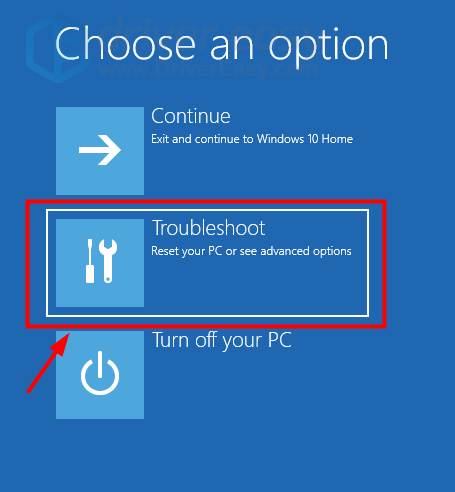
- Select Troubleshoot.
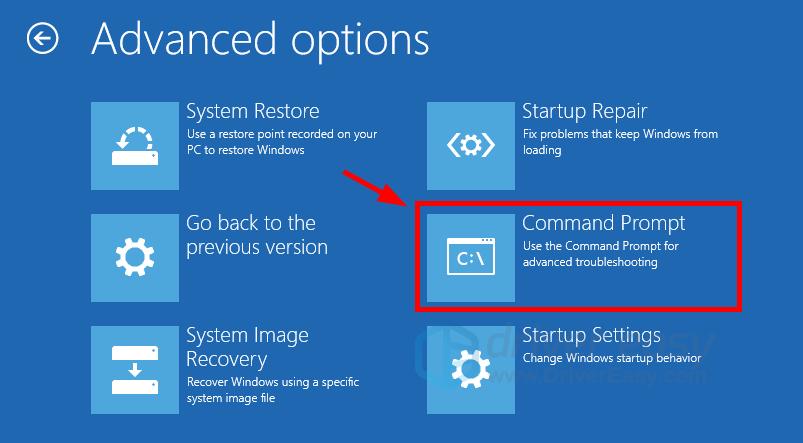
- Select Advanced options.
- Click Command Prompt.
- Type “sfc /scannow” and press Enter on your keyboard.
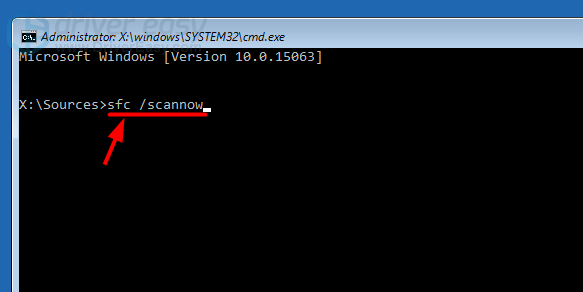
- Wait for the scanning process to complete.
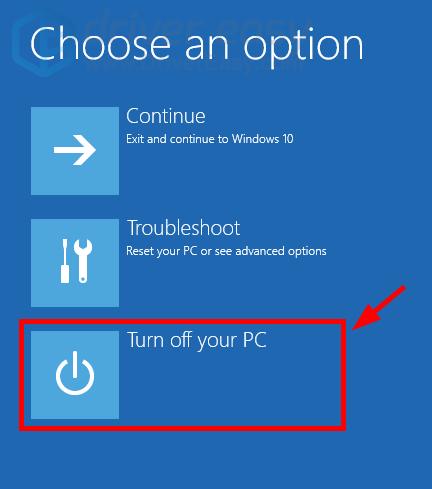
- Close Command Prompt, then select Turn off your PC.
- Turn on your computer again, then check to see if this fixes your issues.
If it does, great! But if not, don’t worry. There are still other fixes you can try…
Fix 2: Check your device drivers
If you’re using a wrong or outdated device driver (especially audio driver and graphics driver), there may be conflicts between the update you install and the driver. You should check your device drivers and try updating to see if this solves your update problems.
If you’re unable to log in your Window 10 system, you should first start your computer into safe mode. Or you should skip the steps below and directly update your drivers.
To boot into safe mode
- Turn off your Windows 10 computer.
- Turn on your Windows 10 computer, and then when the operating system is loading (a circle of dots spinning with a black screen), shut down your computer.
- Do step 2 until you see a message “Preparing Automatic Repair“.
- Click Advanced options.
- Select Troubleshoot.
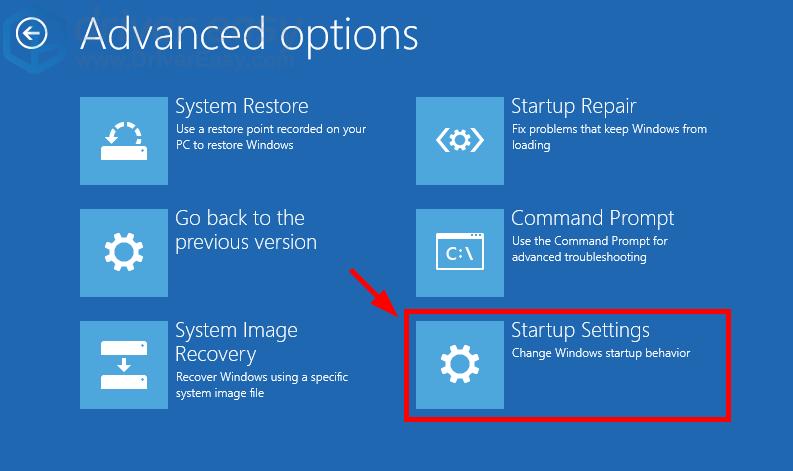
- Select Advanced options.
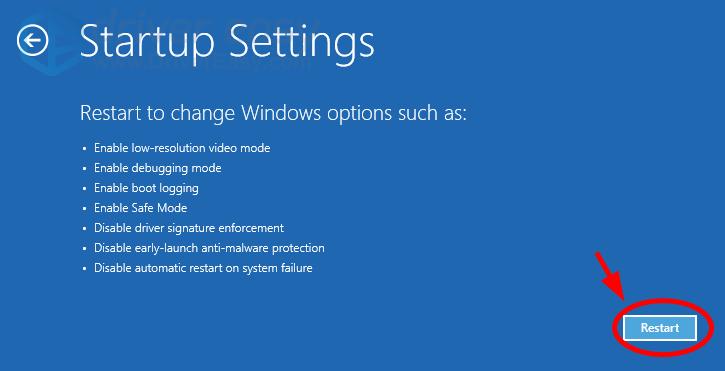
- Click Startup Settings.
- Click Restart.
- Wait for your computer to restart.
- Press 5 on your keyboard (to select Enable Safe Mode with Networking).
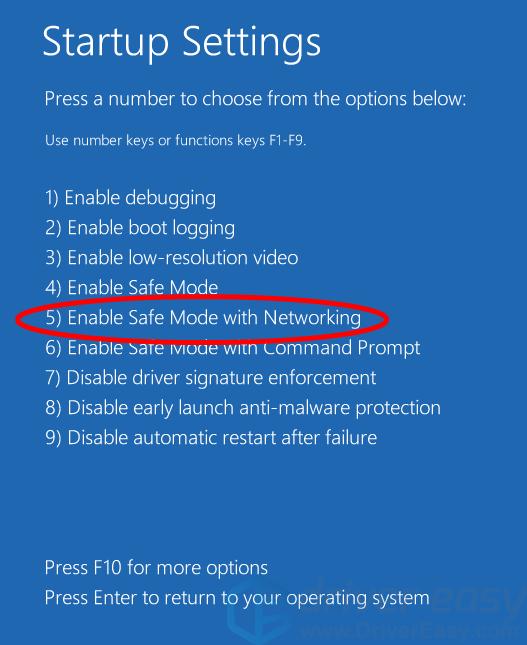
Now you are in safe mode, with network connection. Then you can check your device drivers
To update your device drivers
You can find the latest driver on your device manufacturer website. But if you don’t have the time, patience or computer skills to play with your drivers manually, you can do it automatically with Driver Easy.
Driver Easy will automatically recognize your system and find the correct driver for it. You don’t need to know exactly what system your computer is running, you don’t need to risk downloading and installing the wrong driver, and you don’t need to worry about making a mistake when installing.
You can update your driver automatically with either the FREE or the Pro version of Driver Easy. But with the Pro version it takes just 2 clicks:
- Download and install Driver Easy.
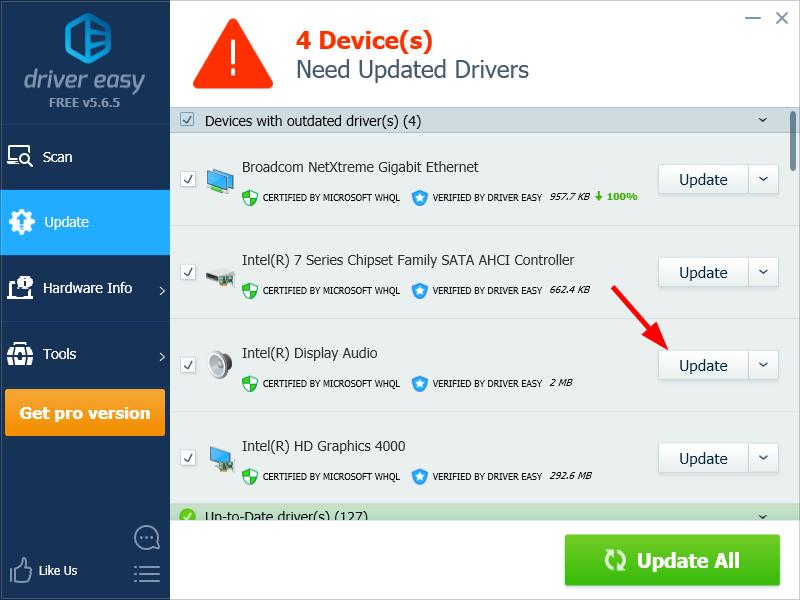
- Run Driver Easy and click the Scan Now button. Driver Easy will then scan your computer and detect any problem driver.

- Click the Update button next to your device to download the latest and correct driver for it, then you can manually install it. You can also click Update All to automatically download and install the correct version of all the driver that are missing or out of date on your system (this requires the Pro version – you’ll be prompted to upgrade when you click Update All).
You can do it for free if you like, but it’s partly manual.
Fix 3: Check for software conflicts
You may be having problems with Windows 10 updates because of interference from the programs on your computer. To see if that’s the case for you, try performing a clean boot on your Windows system.
To do so:
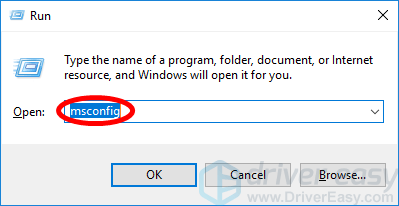
- Press the Windows log key and R on your keyboard to invoke the Run dialog.
- Type “msconfig” and press Enter on your keyboard.
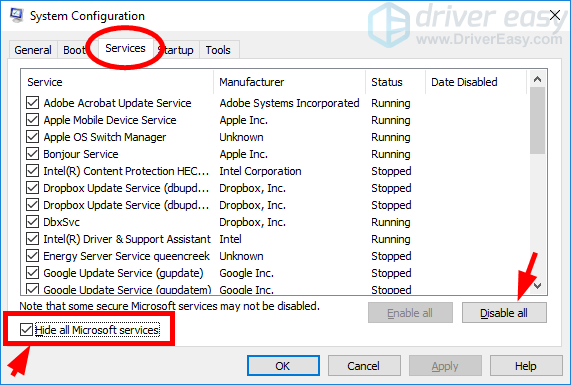
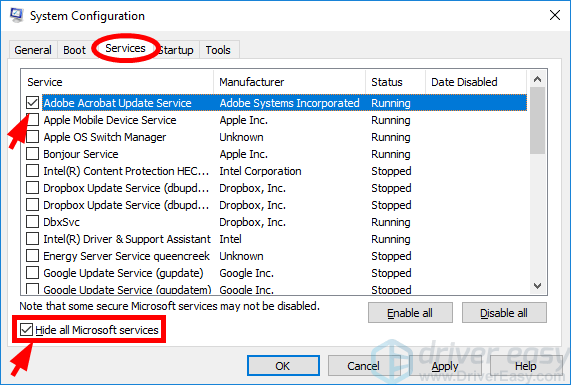
- Click the Services tab. Then check Hide all Microsoft services (FIRST) and click Disable all. After that, click OK.
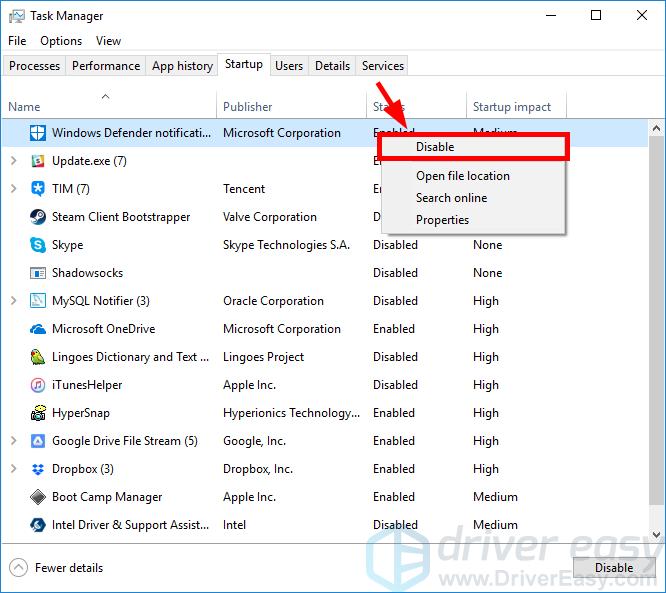
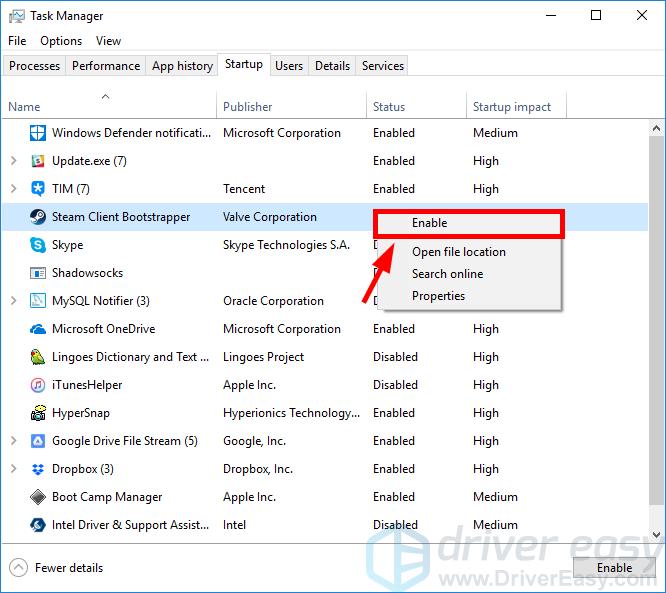
- Click the Startup tab, then click Open Task Manager.

- Right click each enabled Startup item, then click Disable. After that, close Task Manager.
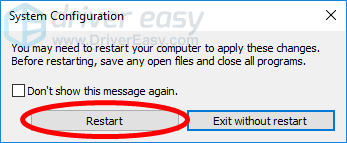
- Click OK.
- Click Restart.
- Check to see if you are having any update issue. If no, proceed to the next step to find out the application or service that causes trouble. Otherwise skip all the steps below and try other methods.
- Press the Windows log key and R on your keyboard. Then type “msconfig” and press Enter on your keyboard.
- Click the Services tab. Check Hide all Microsoft services. Then enable any disabled service (by selecting its checkbox) and click OK.
- Click Restart.
- Check to see if your Windows 10 update issue occurs. If it doesn’t, repeat step 9 to 11 until you find out the service that causes the issue. If none of these services is the culprit, try the steps below. If there’s any service that causes your Windows 10 update issues, you should do some research on the Internet to see what program is this service related to. Then contact the vendor of this program or your system for advice, or use an alternative solution.
- Press the Windows log key and R on your keyboard. Then type “msconfig” and press Enter on your keyboard.
- Click the Startup tab, then click Open Task Manager.
- Right click one (only) disabled Startup item, then click Enable. After that, close Task Manager.
- Click OK and then click Restart.
- Check to see if your update issue occurs. If it doesn’t, repeat step 13 to 16 until you find out the startup item that causes the issue. If there’s any startup item that causes the update issue, you should see what program is this item related to. Then contact the vendor of this program or your system for advice, or use an alternative solution.
If clean boot helps you find out the source of your problem, great! But if this fix doesn’t work for you, then you may need to…
Fix 4: Reset your Windows 10 computer
If none of the fixes above works for you, you may need to try resetting your Windows 10 computer to see if this solves your Windows 10 update problems. To reset your computer:
- Turn off your Windows 10 computer.
- Turn on your Windows 10 computer, and then when the operating system is loading (a circle of dots spinning with a black screen), shut down your computer.
- Do step 2 until you see a message “Preparing Automatic Repair“.
- Click Advanced options.
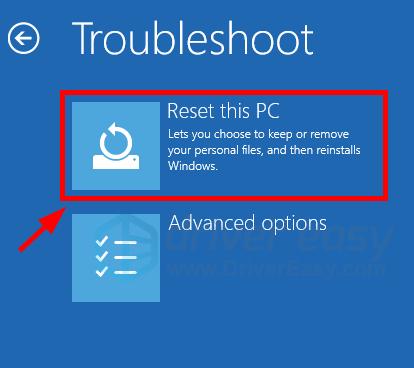
- Select Troubleshoot.
- Select Reset this PC.
Select an option to reset your computer.
You may need to read the descriptions of both options to decide which one do you choose.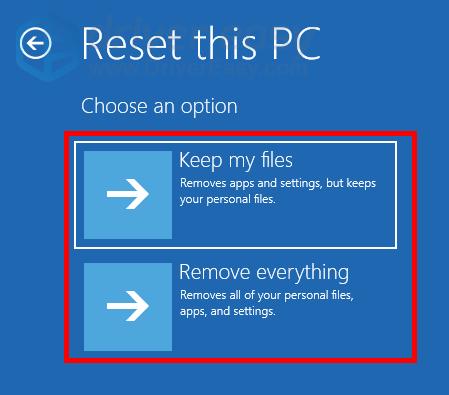
- Click the Reset button to reset your computer.

- Wait for the reset process to complete.
Now you should be able to solve your Windows 10 update problems.
Hopefully one of the fixes above works for you. If you have any questions, feel free to leave us a comment below.