


The in-game voice chat feature in VALORANT is pretty important to communicate with your teammates. But sometimes it may not be working as expected. In this post, we’ll guide you on how to fix it.
Try these fixes
You may not need to try them all; simply work your way down the list until you find the one that works for you.
- Double-check your input and output device
- Allow your game to access your microphone
- Update your audio driver
- Reset your game’s audio settings
- Run VALORANT as administrator
- Perform a clean boot
Fix 1: Double-check your input and output device
There is a possibility that your input and output device isn’t the one you’re using. To check that, follow the steps below.
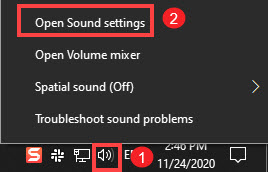
1) On the taskbar, right-click on the sound icon and select Open Sound settings.
2) In the Output section, make sure it’s set to your headsets or headphones.
In the Input section, make sure it’s set to the microphone that you want to use.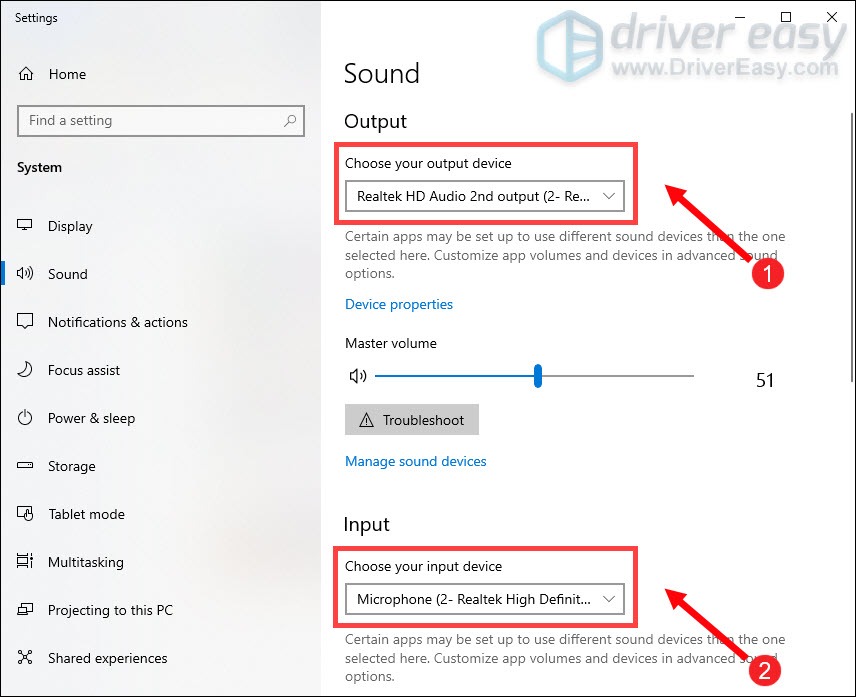
After you’ve selected your output and input devices, try to use voice chat in VALORANT to check if it works. If not, move on to the next fix.
Fix 2: Allow your game to access your microphone
Sometimes your game may not have access to your microphone because the option Allow desktop apps to access your microphone is not turned on. If that’s your case, take these steps:
1) On your keyboard, press the Windows logo key to open the Start menu. Then click on the gear icon to open Settings.
2) Click on Privacy.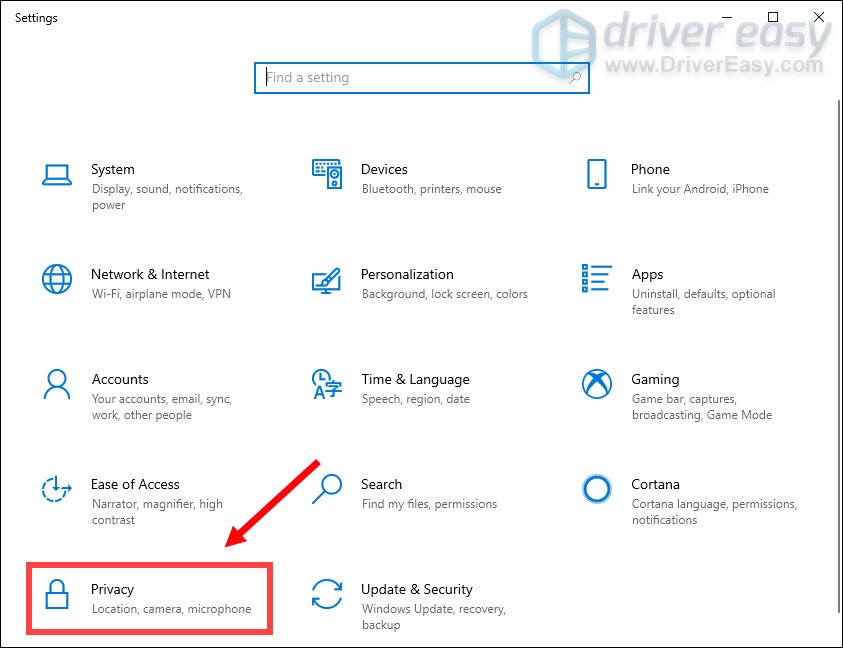
3) From the left pane, select the tab Microphone. Under the Allow desktop apps to access your microphone section, click to toggle it On.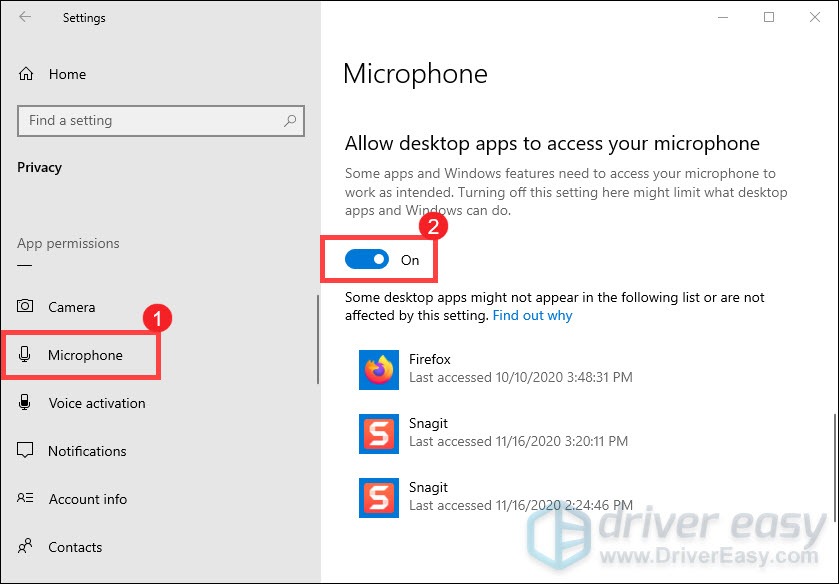
After you’ve done these, try and run VALORANT as an administrator.
Fix 3: Update your audio driver
When your voice chat in VALORANT is not working, one of the most important troubleshooting steps you should take is to check if your audio driver is outdated. As it will dramatically impact its performance especially when you can’t remember when was the last time you had updated your device drivers.
There are mainly two ways you can update your audio driver: manually and automatically.
Option 1: Manually update your audio driver
To update drivers manually, you can go to the PC manufacturer’s website or the sound card’s website to check for the latest audio driver for your system. If you are using a branded computer, it is recommended to go to the PC manufacturer’s website first, as they may customize the driver. Before you get started, ensure that you know the PC model or the device model and the specific operating system that you are using.
Option 2: Automatically update your audio driver (recommended)
If you don’t have the time, patience, and computer skills to update drivers manually, you can do it automatically with Driver Easy. It’s a useful tool that automatically detects any outdated drivers, then downloads and installs the latest drivers for your system. You don’t need to know exactly what system your computer is running or risk downloading and installing the wrong driver.
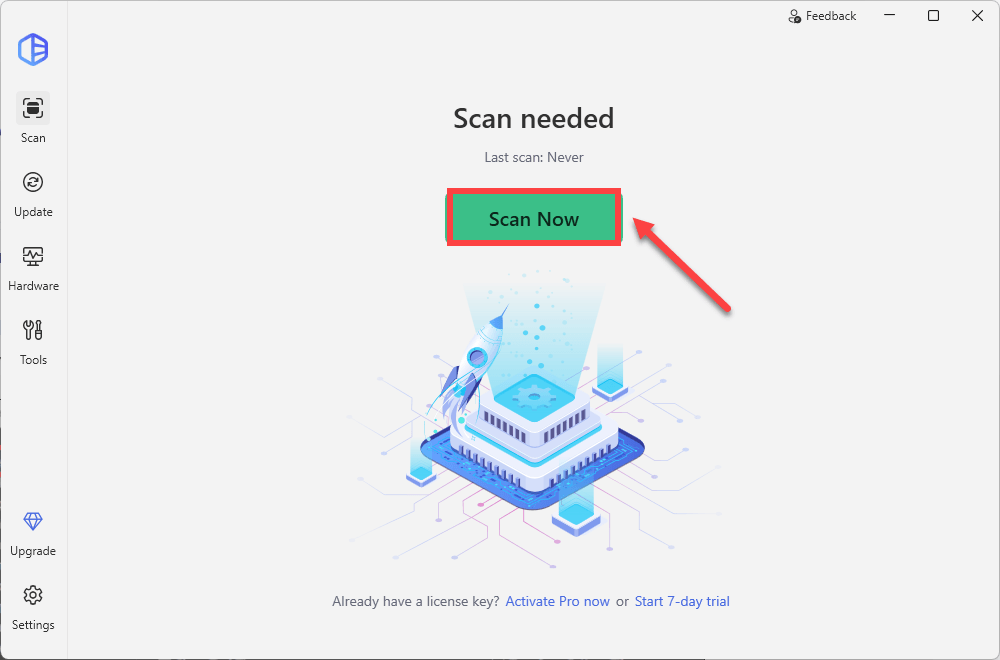
1) Download and install Driver Easy.
2) Run Driver Easy and click the Scan Now button. Driver Easy will then scan your computer and detect any outdated drivers.
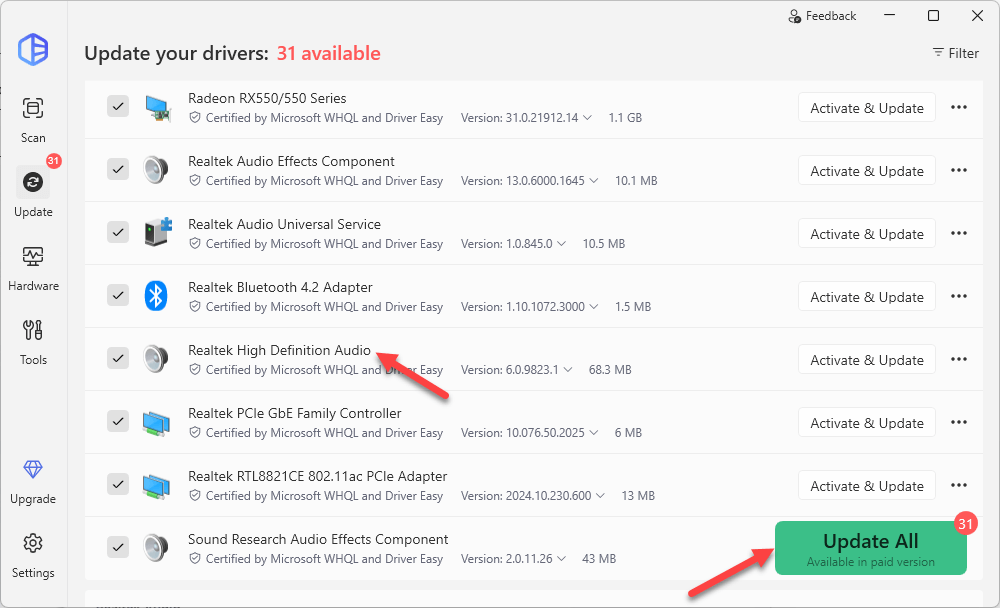
3) Click the Activate & Update button next to the flagged device to automatically download and install the correct version of this driver.
Or click Update All to automatically download and install the correct version of all the drivers that are missing or out of date on your system (You’ll need the Pro version for this – when you select Update All, you’ll get a prompt to upgrade. If you’re not ready to purchase the Pro version, Driver Easy offers a 7-day free trial that provides access to all Pro features, including high-speed downloads and easy installation. No charges will be incurred until the trial period ends.)
After updating your drives, restart your computer for them to take effect. Then you can try to use voice chat to check if it works.
Fix 4: Reset your game’s audio settings
If your game’s audio settings aren’t set up correctly, you can’t use the function properly. To fix it, take these steps:
1) Launch your game. In the top left corner of the screen, click on the gear icon.
2) Click on SETTINGS.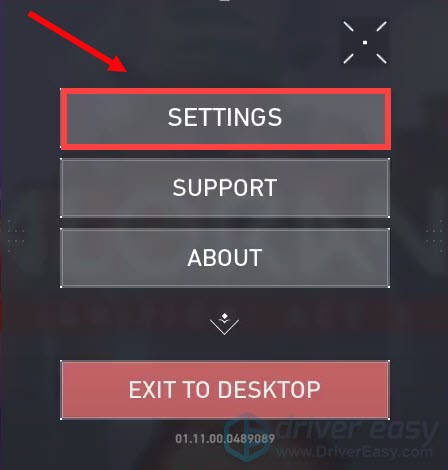
3) Select AUDIO > VOICE CHAT.
Set the Output Device and Input Device as Default System Device.
If it’s still not working, you can specifically select the device you want to use.
Then set your Incoming Volume and Mic Volume level to at least 50%.
Also, make sure Party Voice Chat and Team Voice Chat are turned On.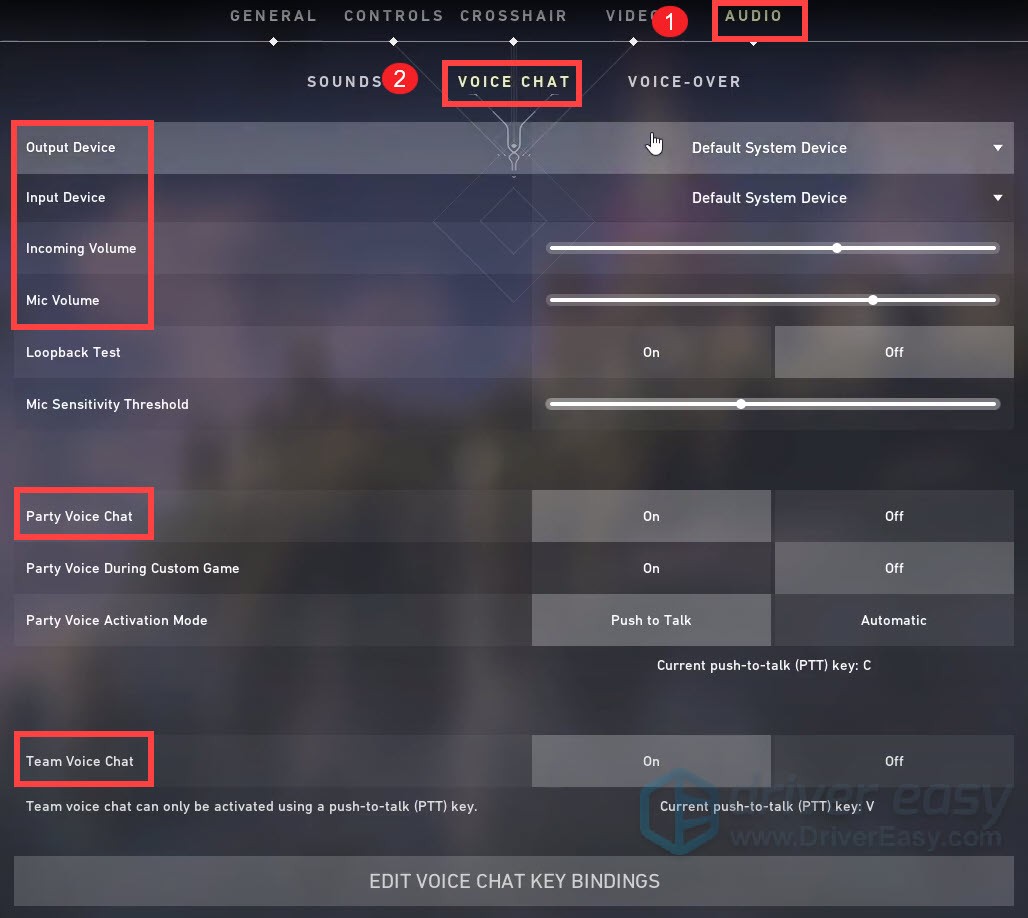
After applying the changes, launch VALORANT and test the voice chat. If it’s still not functioning properly, try the next fix below.
Fix 5: Run VALORANT as administrator
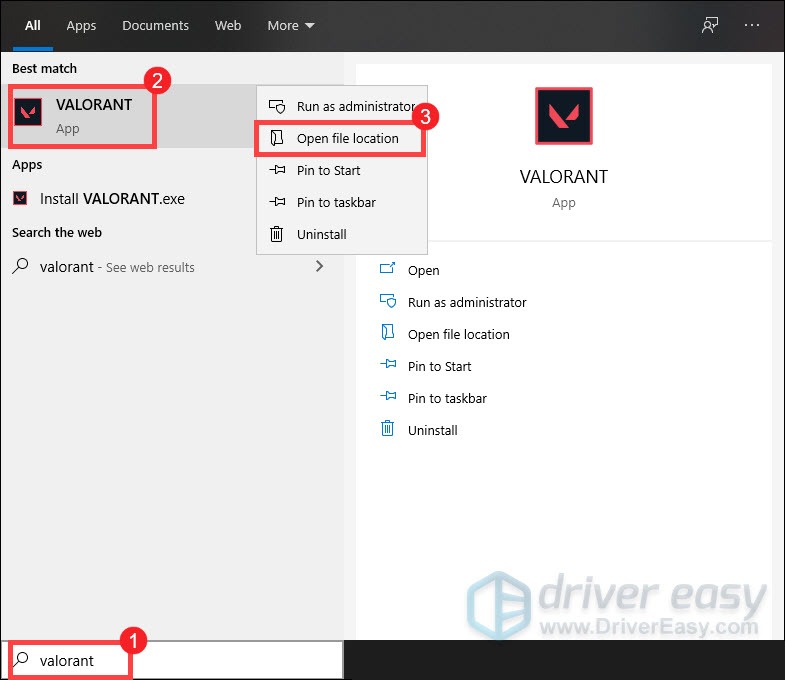
1) In the Search box, type valorant. Right-click VALORANT and select Open file location.
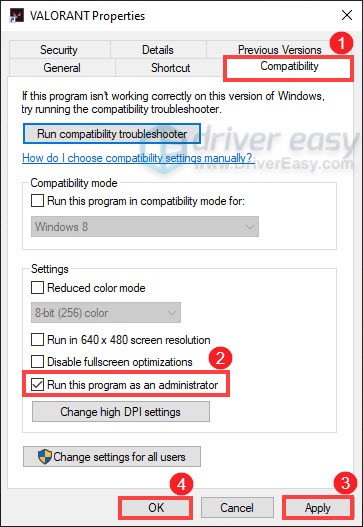
2) When the window opens, right-click on VALORANT Shortcut and select Properties.
3) Select the Compatibility tab. Check the box Run this program as an administrator. Then click Apply > OK.
After applying the changes, try to use voice chat to check if it works.
Fix 6: Perform a clean boot
Windows applications coexist in the Windows environment with other third-party applications and share the system resources. If an essential resource for VALORANT gets blocked due to a conflict, then the voice chat of the game may not work. To rule out any software conflict, it will be a good idea to clean boot your system. To do this, follow the instructions below:
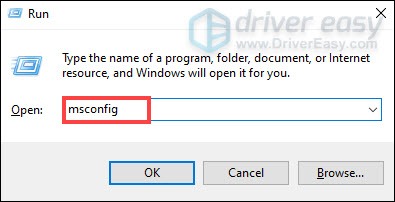
1) On your keyboard, press the Windows logo key and R at the same time to open the Run dialog box.
2) Type msconfig and press Enter.
3) Click on the Services tab. Check Hide all Microsoft services. This will help you from accidentally disabling a key process which obviously you don’t want to do.
Click Disable all. Then navigate to vcg and check it.

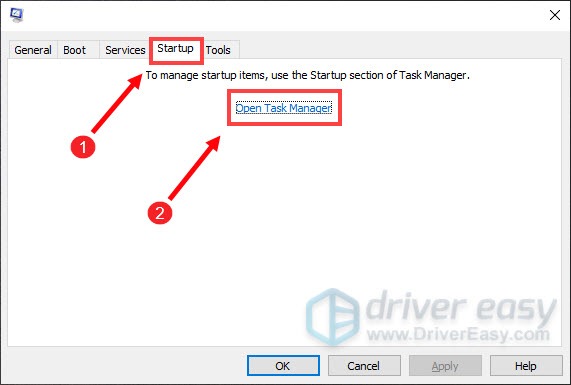
4) Click on the Startup tab. Then click Open Task Manager.
5) When the Task Manager opens, try to disable all the programs on the list. Once you’ve done that, go back to System Configuration and click Apply.
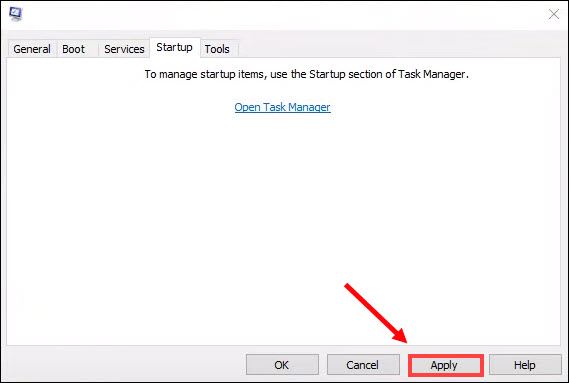
Then restart your computer and this should fix your issue.
Hopefully, you are able to communicate properly and effectively in your competitive games now. If you have any ideas or questions, feel free to leave us a comment below. We’ll get back to you ASAP.

