


War Thunder is an intense combat game where every frame matters for precise targeting and maneuvering. When FPS drops hit during crucial moments, it can ruin your entire gaming experience. Don’t worry though – we’ve gathered the most effective fixes that have helped thousands of players get back to smooth gameplay.
Fixes to try:
Each fix in this article targets a different cause of FPS problems. You may not have to try them all; just start with Fix 1 and work your way down until you find what works for you.
- Use dedicated GPU
- Update your graphics driver
- Shut down unnecessary applications
- Change your computer’s power plan
- Adjust the in-game graphics settings
- Reinstall War Thunder
Fix 1 – Use dedicated GPU
Many gaming PCs have two graphics processors – integrated and dedicated. If you got two GPUs for your PC but still face see major FPS drops, it could be because War Thunder runs on the weaker integrated GPU. In this case, you should manually switch to your dedicated GPU to tackle the computer’s graphical needs
Here’s how:
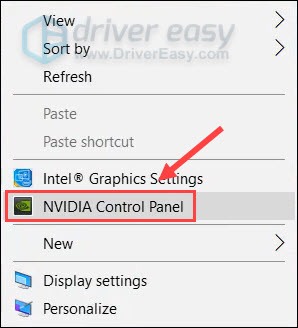
1) Right-click any empty space on the desktop and click NVIDIA Control Panel.
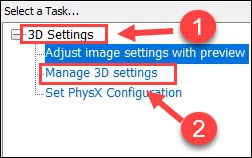
2) Click 3D settings > Manage 3D settings in the left pane.
3) Select the Program Settings tab and select War Thunder from the drop-down list. Then, select High performance NVIDIA processor.

If you have an AMD dedicated graphics card and hope War Thunder to run with it, please refer to the official guide here: How to Configure Switchable Graphics using Radeon Settings.
Test how War Thunder works with the dedicated GPU. If the low FPS remains, you can move on to the next fix.
Fix 2 – Update your graphics driver
Getting random FPS drops after a game update? Outdated drivers could be the culprit. Your graphics card can’t perform at its best with old drivers, leading to poor frame rates and stuttering. To gain a smooth and optimal gaming experience, you should update your graphics driver on a regular basis.
There are two ways you can do this: manually or automatically.
Option 1 – Update the graphics driver manually
Graphics card manufacturers keep updating drivers. To get them, you need to go to their websites such as AMD and NVIDIA, then find the drivers corresponding with your specific flavor of Windows version (for example, Windows 32 bit) and download the driver manually.
Once you’ve downloaded the correct drivers for your system, double-click on the downloaded file and follow the on-screen instructions to install the driver.
Option 2 – Automatically update the graphics driver
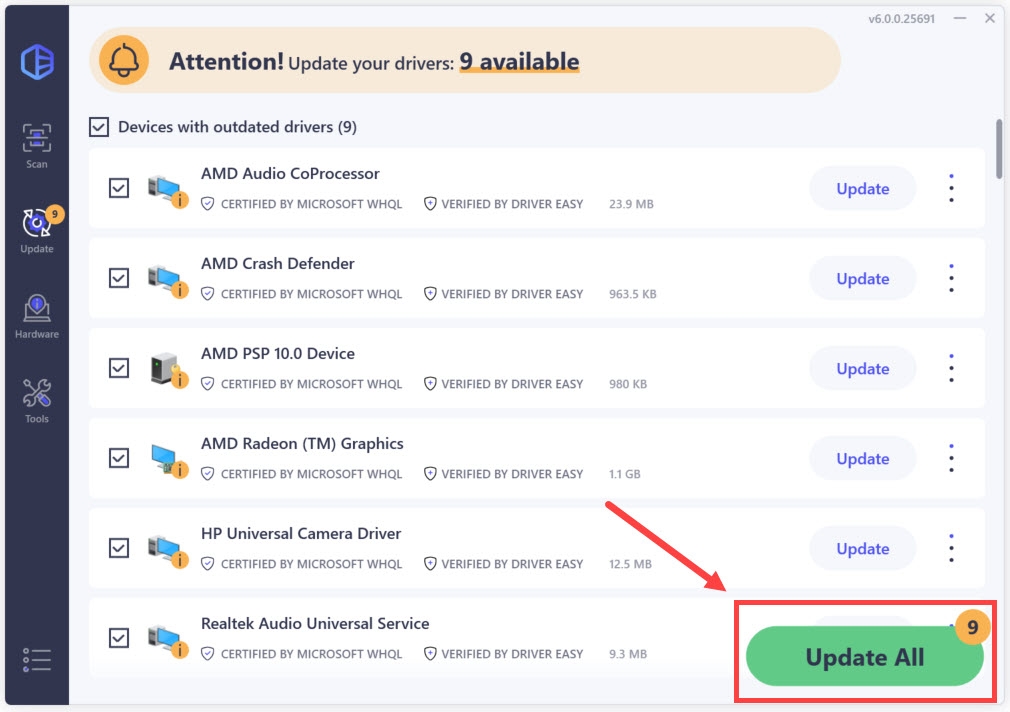
If you don’t have the time, patience or computer skills to update the graphics driver manually, you can do it automatically with Driver Easy.
Driver Easy will automatically recognize your system and find the correct drivers for it. You don’t need to know exactly what system your computer is running, you don’t need to risk downloading and installing the wrong driver, and you don’t need to worry about making a mistake when installing.
You can update your drivers automatically with either the 7-day free trial or the Pro version of Driver Easy. But with the Pro version it takes just 2 clicks:
1) Download and install Driver Easy.
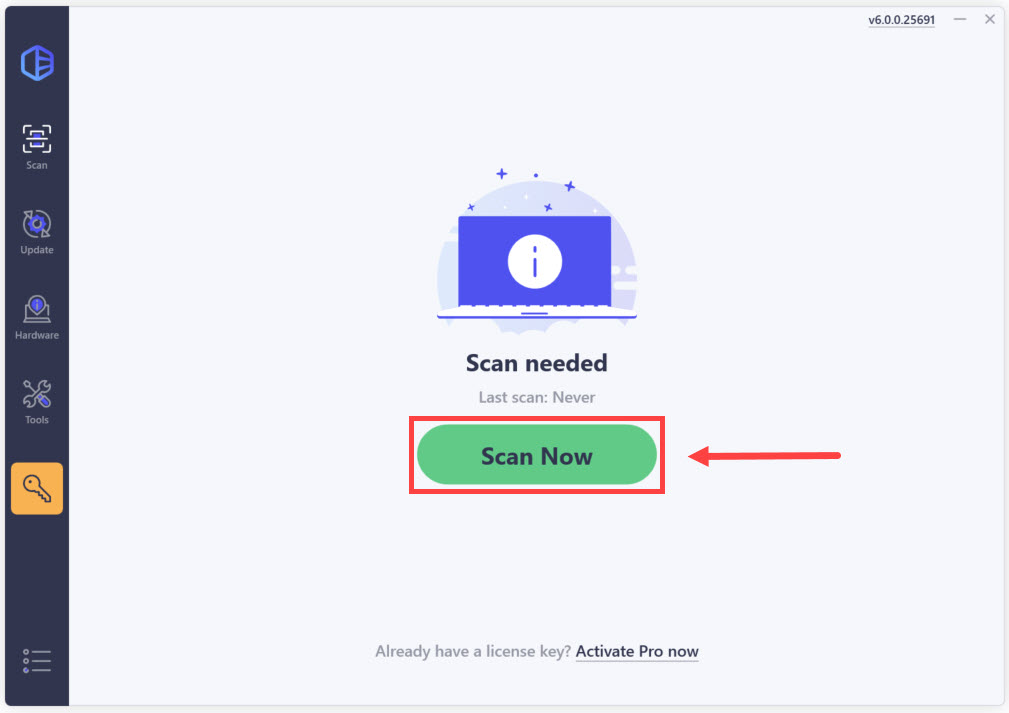
2) Run Driver Easy and click the Scan Now button. Driver Easy will then scan your computer and detect any problem drivers.
3) Click Update All to automatically download and install the correct version of all the drivers that are missing or out of date on your system.
(This requires the Pro version which comes with full support and a 30-day money-back guarantee. You’ll be prompted to upgrade when you click Update All. If you’re not ready to buy the Pro version, Driver Easy offers a 7-day free trial which includes access to all the Pro features such as high-speed download and one-click install. You won’t be charged anything until your 7-day trial has ended.)
Start gaming in War Thunder to test the updated graphics driver. If it couldn’t mitigate the FPS drops, try the next fix below.
Fix 3 – Shut down unnecessary applications
War Thunder needs consistent access to your CPU and RAM. When other programs hog these resources, your FPS suffers. Closing unnecessary background apps can give you an immediate performance boost, particularly on systems with limited RAM.
1) Right-click the taskbar and click Task Manager.
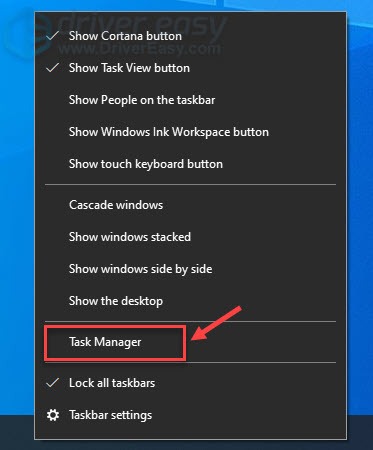
2) Right-click the application you want to close and click End task.

Now that you’ve left only War Thunder open, it should work as smoothly as possible. If this fix doesn’t help either, please proceed to the next method.
Fix 4 – Change your computer’s power plan
Windows sets your computer to the Balanced power plan by default. There’s no problem with this option, but if you constantly run into decreased gaming performance like FPS drops, you should adjust the power settings.
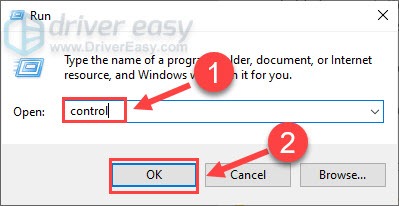
1) On your keyboard, press the Windows logo key and R at the same time to invoke the Run box. Then, type control in the field and click OK.
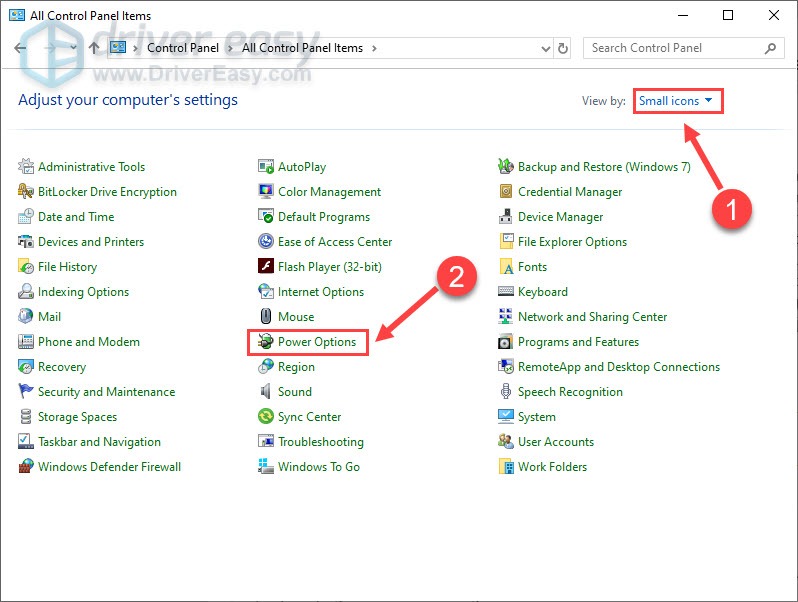
2) Select Small icons from the drop-down menu next to View by and click Power Options.
3) Click High performance.
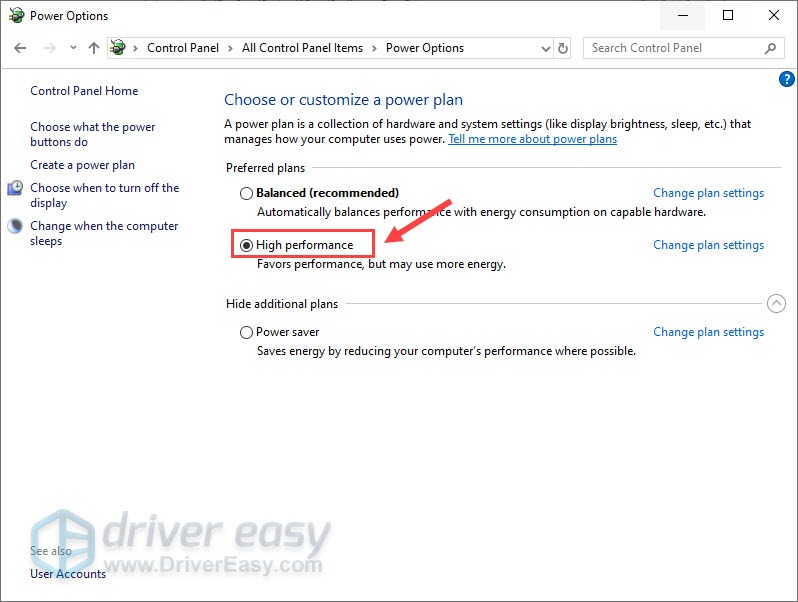
Restart your computer so that the changes will take effect. Then, launch War Thunder to check if the FPS drops are still there. If yes, there are two more fixes below.
Fix 5 – Adjust the in-game graphics settings
High or ultra graphics settings sometimes won’t give you the visual effect you want, but make the game perform worse, especially if your rig is barely above the minimum requirements. If so, the very solution is to lower the settings.
1) Open War Thunder. Then, click the gear icon to enter the Settings menu.
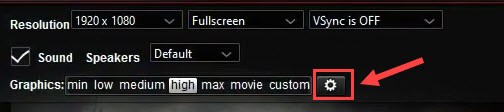
2) Turn off VSync. Then, set each option under Advanced Settings to the lowest, as shown in the picture below.
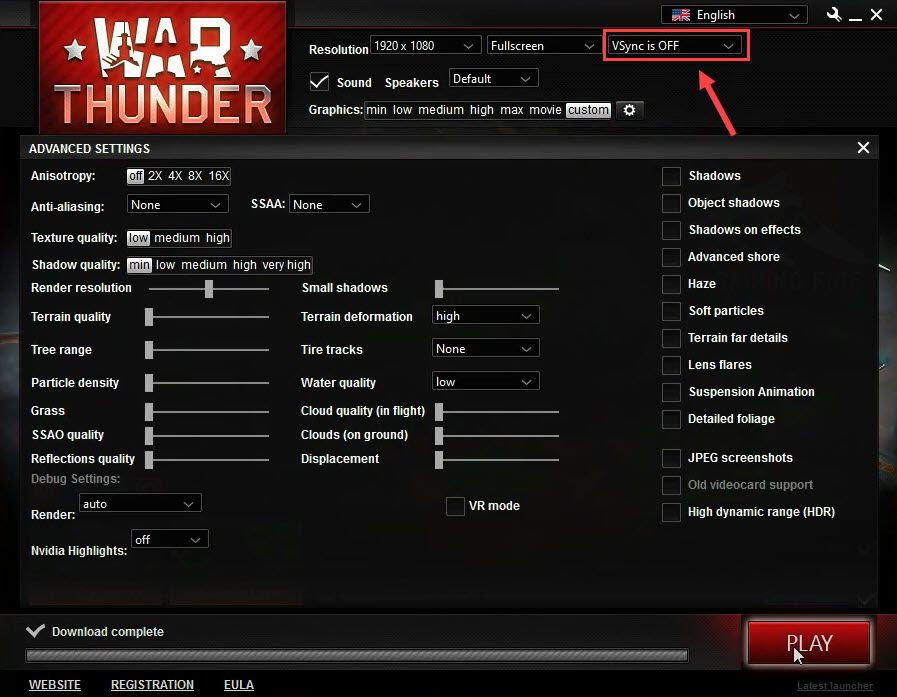
After those tweaks, play War Thunder again and see if the FPS improves. If yes, you could lift the settings a bit until you find the best combination that works. If not, turn to the last fix.
Fix 6 – Reinstall War Thunder
Sometimes, no matter what settings you tweak, the game just won’t run right. This usually happens when game files get corrupted over time or settings get stuck in a bad state. A fresh installation clears out any problems that might be dragging down your performance and potentially fix the crashing issue.
1) Launch Steam, and navigate to the Library tab.

2) Right-click War Thunder from the game list and click Uninstall.
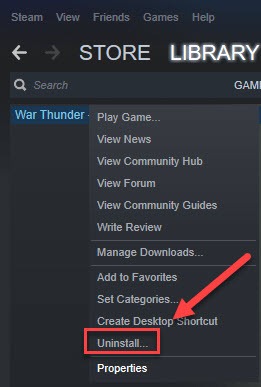
3) Click Delete to confirm.
After the uninstallation completes, exit Steam. Also, you need to remove the remaining game files.
4) On your keyboard, press the Windows logo key and E at the same time to open File Explorer. Then, Paste C:\Program Files (x86)\Steam\steamapps\common on the address bar and press Enter.

5) Click the War Thunder folder and press Delete.
Reinstall War Thunder from Steam again, and the newly installed game should be free of the low FPS issue.
Hopefully you’ve fixed War Thunder low FPS with one of the methods above. If you have any questions or suggestions, feel free to leave a comment below.