


Quite a number of people bump into the dreaded blue screen of death (BSOD) 0xc00000e error when they are trying to install or upgrade their Windows operating system. The operation fails, accompanied with “Your PC/Device needs to be repaired. This isn’t enough memory available to create a ramdisk device” error. If you are in the same boat, don’t worry. It’s fixable…
Five Fixes For 0xc00000e Your PC Needs To Be Repaired
Here are five fixes that have helped other users resolve the 0xc00000e Your PC needs to be repaired issue. You may not have to try them all; just work your way down the list until you find the one that works for you.
- Disconnect all external devices
- Disable your antivirus programs temporarily
- Update your device drivers
- Run SFC and DISM
- Check and clean bad memory entries in BCD store
Fix 1: Disconnect all external devices
The system update or upgrade progress may not run smoothly if there is a conflict among the external devices. So if you have any of these external devices plugged in, such as a USB, DVD or SD card reader, you can remove them all.
After that, you can reboot your computer and check whether the error 0xc00000e is solved. If yes, then great! If the issue persists, please try Fix 2, below.
Fix 2: Disable your antivirus programs temporarily
It’s possible that your antivirus program detects this Windows upgrade and regards it as a threat to your computer hence bringing the upgrade to a halt. If you happen to be running these antivirus programs on your computer, it’s recommended that you disable them temporarily, to eliminate this as a possibility.
Once you have disabled them, you can continue the operation to see if the upgrade succeeds this time. If yes – it completes successfully without the 0xc00000e BSOD, you can determine that your AV is cause of the problem. If the re-operation still gives you the 0xc00000e error, please move on to Fix 3, below.
Fix 3: Update your device drivers
One of the common causes of the 0xc00000e error is corrupt or missing device drivers. So you should update your drivers to see if it fixes your problem. If you don’t have the time, patience or skills to update the driver manually, you can do it automatically with Driver Easy.
Driver Easy will automatically recognize your system and find the correct drivers for it. You don’t need to know exactly what system your computer is running, you don’t need to be troubled by the wrong driver you would be downloading, and you don’t need to worry about making a mistake when installing. Driver Easy handles it all.
All it takes is 2 clicks:
1) Download and install Driver Easy.
2) Run Driver Easy and click the Scan Now button. Driver Easy will then scan your computer and detect any problem drivers.

3) Click Update All to automatically download and install the correct version of all the drivers that are missing or out of date on your system (this requires the Pro version – you’ll be prompted to upgrade when you click Update All).

Alternatively, you can start a 7-day Free Trial, which gives you access to all premium features. After the trial, you can upgrade to the Pro version.
4) Restart your computer for the changes to take effect.
5) Check to see if the blue screen error is resolved. If yes, then congrats! If it still occurs, please move on to Fix 4, below.
Fix 4: Run SFC and DISM
Sometimes this blue screen of death error may occur if there is corrupt or missing system files on your computer. Luckily, Windows has come with it handy system tools System File Checker (SFC) and DISM (Deployment Image Servicing and Management ) to help you scan your system for errors and fix them if this is the case.
Here is how to run System File Checker:
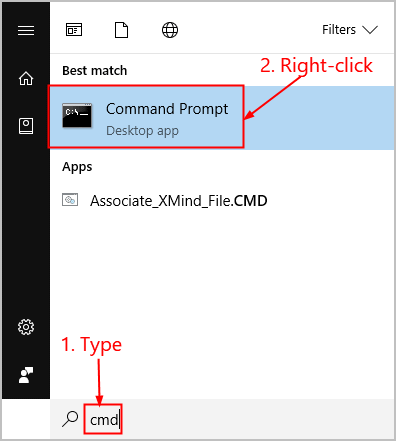
1) On your keyboard, press the Windows logo keyand type cmd. Then right click on Command Prompt and click Run as administrator.

2) Click Yes when you’re prompted to confirm.
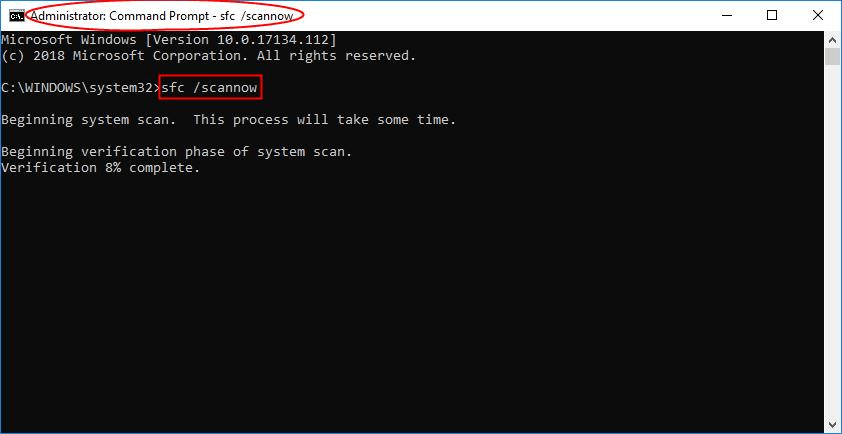
3) In the command prompt window, type sfc /scannow and press Enter.
It’ll take some time for SFC to replace the corrupted system files with new ones if it detects any, so please be patient.

4) Restart your computer for the changes to take effect.
Here is how to run DISM:
1) On your keyboard, press the Windows logo key and type cmd. Then right click on Command Prompt and click Run as administrator.
2) Type the following command and press Enter:DISM.exe /Online /Cleanup-image /Restorehealth.
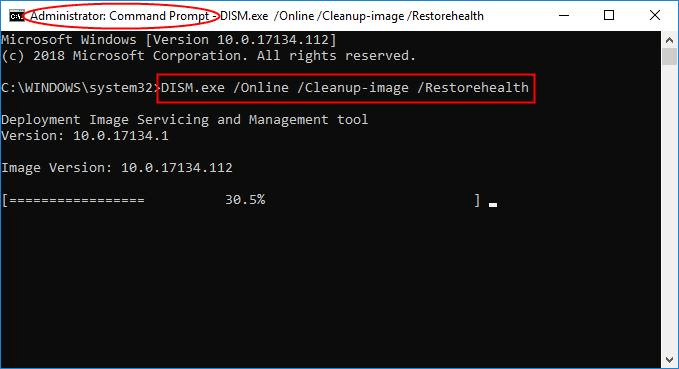
Wait a while for the whole process to finish.
3) Restart your computer for the change to take effect.
4) Check to see if the 0xc00000e blue screen error still occurs. If it doesn’t occur, then great – you’ve fixed the issue! If it’s still no joy, please try Fix 5, below.
Fix 5: Check and clean bad memory entries in BCD store
This issue may occur is situations where there are bad memory blocks during the upgrade process. So you can use command prompts to check and clean bad memory entries in the BCD store to see if this is the problem (and fix it).
Here is how to check and clean bad memory entries in BCD store:
1) On your keyboard, press the Windows logo key and type cmd. Then right click on Command Prompt and click Run as administrator.
2) Click Yes when asked to confirm.
3) In the Command Prompt window, type the following lines and press Enter after each.
bcdedit /enum {badmemory}
bcdedit /deletevalue {badmemory} badmemorylist
4) When the process finishes, restart your computer for the changes to take effect.
5) Perform the system upgrade again to see if the error is solved.
That’s it! Hopefuly, this post has pointed you in the right direction in resolving the 0xc00000e error. Your PC needs to be repaired. If you have any ideas, suggestions or questions, please do not hesitate to let us know in the comments. Thanks for reading!