


SteelSeries Arctis 9 and SteelSeries Arctis 9X are premium gaming headsets that allow users to connect to the PC through the use of an adapter. Recently, quite a few players are reporting the mic not working problem on their SteelSeries Arctis 9 or 9X gaming headsets. If you happen to be in the same boat, don’t worry. It is not hard to fix at all…
How to fix SteelSeries Arctis 9/9X Mic Not Working on PC
Here are five fixes that have helped other players resolve the SteelSeries Arctis 9/9X Mic Not Working on PC problem. You may not have to try them all; just work your way down the list until you find the one that does the trick for you.
- Perform some basic troubleshooting
- Update your audio drivers
- Allow access to microphone
- Modify your audio settings
- Install the latest SteelSeries Engine software
Fix 1: Perform some basic troubleshooting
Whether it is that you cannot hear voice from the other end, or you can’t get heard, the first thing you should check is whether your headset is connected properly.
You should make sure the volume is set to an audible level, check that the adapter you use to connect your headset to the PC (such as bluetooth, Micro USB port or the Xbox dongle) is in working condition.
SteelSeries Arctis 9/9X also has a hardware reset switch that allows you to reset the headphone. Press it and hold it down for around 1 second.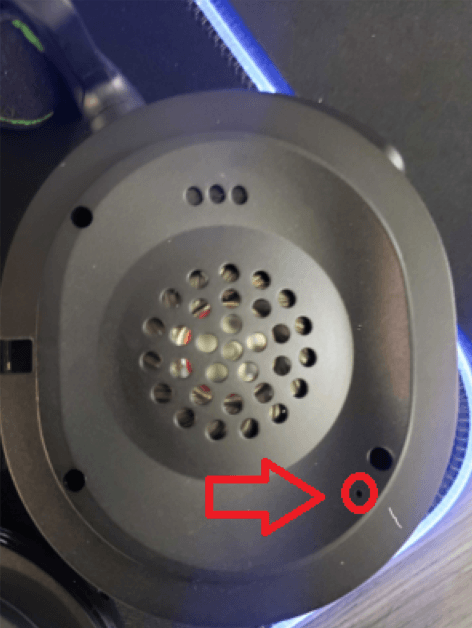
Once you have double-checked these items, test your mic to see if it’s working properly. If yes, then great! If the problem persists, please move on to Fix 2 below.
Fix 2: Update your audio drivers
One of the most common causes of this problem is an outdated or a faulty audio driver. So you should always make sure to keep the latest audio driver up-to-date. If you don’t have the time, patience or skills to update the driver manually, you can do it automatically with Driver Easy.
Driver Easy will automatically recognize your system and find the correct drivers for it. You don’t need to know exactly what system your computer is running, you don’t need to be troubled by the wrong driver you would be downloading, and you don’t need to worry about making a mistake when installing. Driver Easy handles it all.
You can update your drivers automatically with either the 7 days free trial or the Pro version of Driver Easy. It takes just 2 clicks, and you get full support and a 30-day money-back guarantee with the Pro version:
- Download and install Driver Easy.
- Run Driver Easy and click the Scan Now button. Driver Easy will then scan your computer and detect any problem drivers.

- Click the Activate & Update button next to the flagged device to automatically download and install the correct version of this driver.
Or click Update All to automatically download and install the correct version of all the drivers that are missing or out of date on your system (You’ll need the Pro version for this – when you select Update All, you’ll get a prompt to upgrade. If you’re not prepared to purchase the Pro version yet, Driver Easy provides a 7-day trial at no cost, granting access to all Pro features like fast downloads and easy installation. No charges will occur until after your 7-day trial period ends.)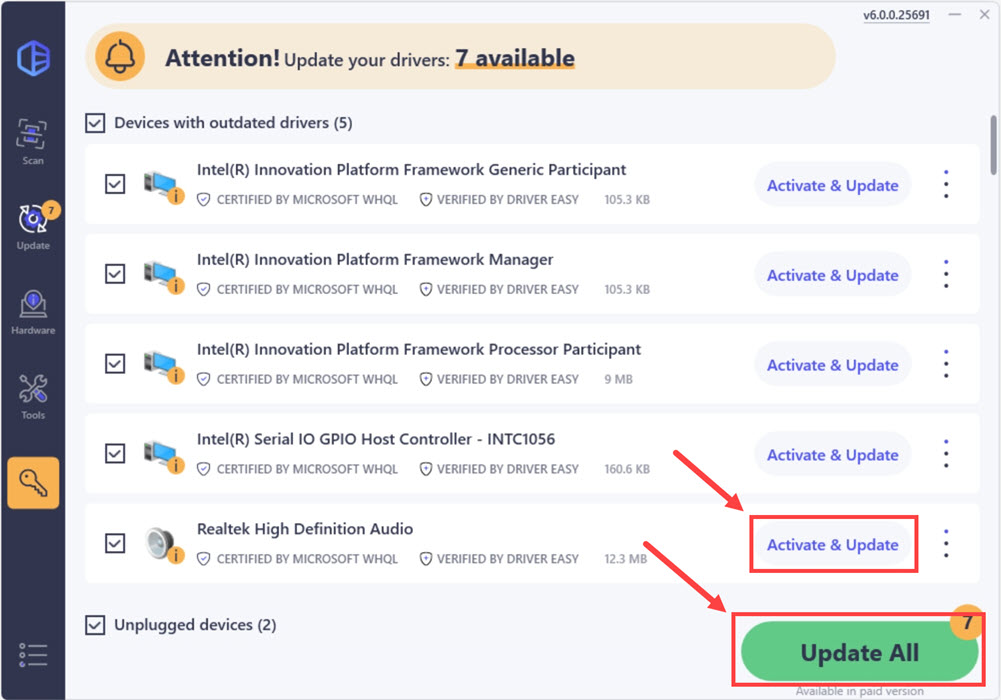
- Restart your computer and check if the mic not working on your SteelArctis 9/9X problem is resolved. If it’s no joy, head onto Fix 3, below.
Fix 3: Allow access to microphone
When you want to use mic, you should make sure that you give apps permission for access to your microphone. Otherwise, you’ll not be able to communicate from that specific app.
- On your keyboard, press the Windows logo key
 , and type privacy. Click on Microphone privacy settings when it pops up as a matching result.
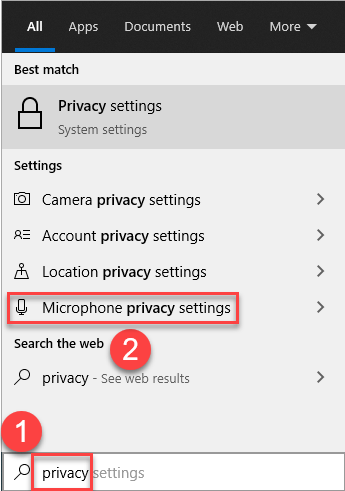
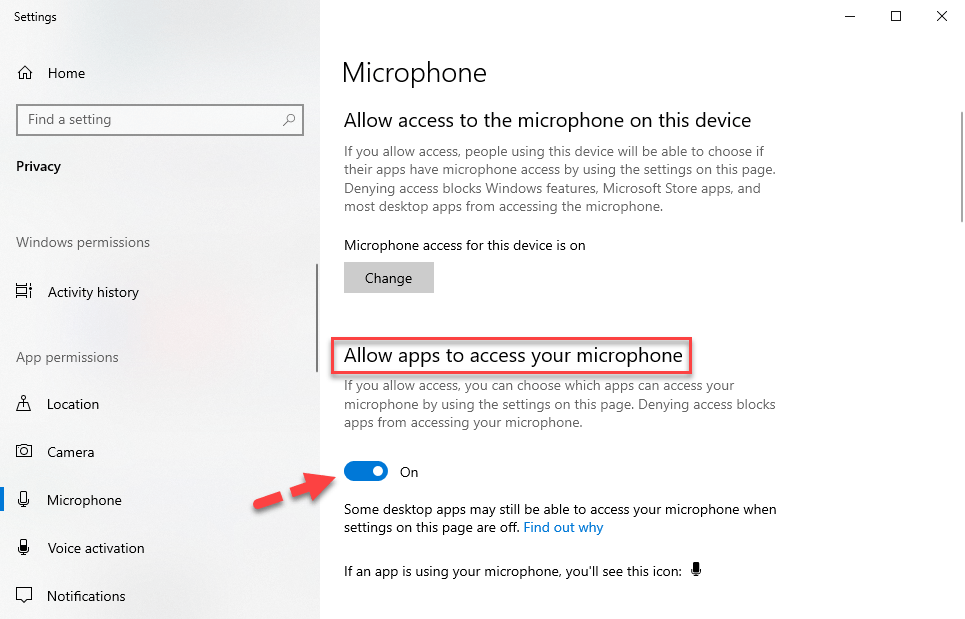
- In the Allow Apps To Access Your Microphone section, make sure the toggle is On.
- Scroll down to Choose which app can access your microphone section, and make sure that you have turned on the toggles for all the apps through which you need the microphone function.

- Test your mic to see if it’s working properly. If yes, congrats – you’ve resolved the issue! If the problem persists, please try Fix 4, below.
Fix 4: Modify your audio settings
You may not be able to hear any voice if you have misconfigured your audio settings.
So in this fix, you can follow the steps below to check:
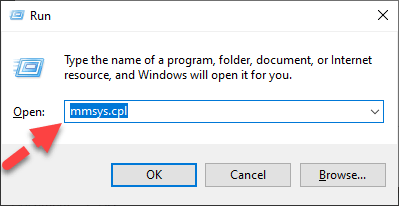
- On your keyboard, press the Windows logo key and R at the same time to bring up the Run box. Then type or paste mmsys.cpl and press Enter.
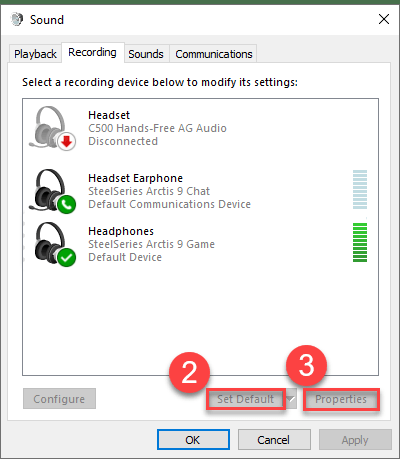
- Click the Recording tab. Then make sure that your SteelSeries Arctis 9/9X mic is set as Default Device and click Properties (Here I just attach a screenshot as a reference of instruction).
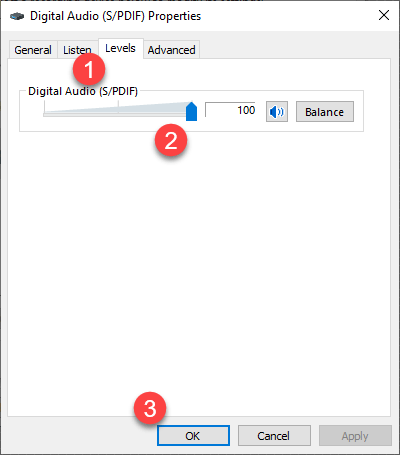
- In Levels, make sure you have slided the Digital Audio (S/PDIF) bar to an appropriate level. Then click OK.
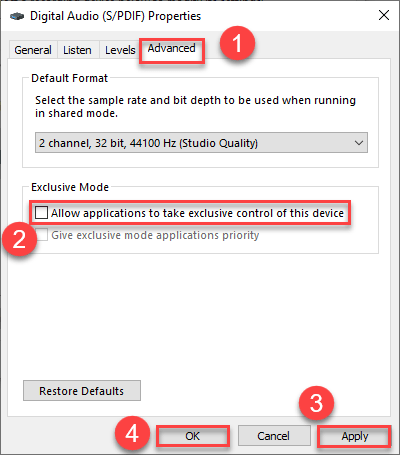
- Click the Advanced tab. Under the Default Format section, choose a different sample rate and bit depth and click Test. Repeat this process until you find a format that works for you. Then, make sure the box for Allow application to take exclusive control of this deviice is unticked. After that, click Apply > OK.
Fix 5: Install the latest SteelSeries Engine software
SteelSeries Engine is a software program that’s designed to support and tweak typical aspects of the gaming gear for optimal game performance. It’d be ideal if you install the latest software to make sure you bring the best out of your SteelSeries Arctis 9/9X headset.
Here’s how to uninstall the current version and install the latest for your computer:
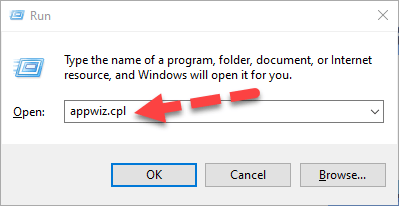
- On your keyboard, press the Windows logo key and R at the same time to invoke the Run box. Then type appwiz.cpl and press Enter.
- Right-click on SteelSeries Engine and click Uninstall.
- Navigate to SteelSeries Engine page. Then choose the download that’s corresponding to your version of Operating System.

- Once complete, run this executable file and follow the on-screen instructions to install Engine.
- Restart your computer for the changes to take effect.
- Try your Steel Arctis 9 or 9X headphone to see if the microphone function is restored.
That’s it – hopefully this post helped. If you have any questions, ideas or suggestions, you’re more than welcome to leave us a comment below.