


Want to take a screenshot, but nothing happens after pressing the Windows logo key + Shift + S shortcut? Maybe the screen dims, but no screenshot is saved, or the Snipping Tool shortcut suddenly stops responding. This can be very annoying. But don’t worry. This guide will walk you through the most effective solutions, starting with a few quick checks to help identify the cause before you change any Windows settings.
How to fix Windows + Shift + S not working
You don’t have to try all of them; just work your way down the list until you find the one that works for you.
- Quick checks before you start
- Enable notifications
- Turn on clipboard history
- Reset Snipping Tool or Snip & Sketch
- Reinstall Snipping Tool or Snip & Sketch
- Check for Windows updates
- Use an alternative to take screenshots
- Check if the Windows key is disabled
Quick checks before you start
Before trying the fixes below, spend a minute narrowing down the cause. These quick tests can help determine whether the issue is related to your keyboard, Windows settings, or the Snipping Tool itself.
1: Check the Windows key
You can simply press the Windows key + E to see if it opens File Explorer or press the Windows key + R to see if it invokes the Run command. If neither shortcut works, your Windows key may be disabled, which is common on gaming keyboards with Game Mode or Windows Lock enabled.
You can disable Game Mode by pressing the dedicated Game Mode button (if it’s available), or a keyboard shortcut such as Fn + Windows or Fn + F12, which will vary by manufacturer. Test if the Windows key works.
2: Test both the left and right Shift keys
If only one Shift key works, the other may be physically damaged or remapped by keyboard software.
3: Try another Windows user account
Create a temporary local account or sign in with a different Windows user account, then test whether Windows + Shift + S works.
If the shortcut works normally in the other account, the issue is likely specific to your current Windows profile or settings. Check out the fixes below.
4: Try another keyboard
If you’re on the laptop, you can try the shortcut on the laptop instead of the external keyboard. Or you can connect another keyboard or simply use the on-screen keyboard (you can open it by entering osk in the Windows search bar) to see if the shortcut works. If yes, your original keyboard may have a faulty Windows or Shift key.
5: Does the screen dim after pressing Win + Shift + S?
If yes, the shortcut is probably working. The issue is more likely related to notifications or the clipboard. Keep reading the fixes below…
Fix 1: Enable notifications
Normally, when you take a screenshot by hitting the Windows logo key + Shift + S, a notification that says Snip saved to the clipboard appears in the lower right corner of your screen. However, if you’ve turned off notifications for the snipping tool on Windows 11 or Snip & Sketch on Windows 10, you’ll have to turn them on again. Here’s how to do it:
Windows 11
- On your keyboard, press the Windows logo + I keys simultaneously to open Settings.
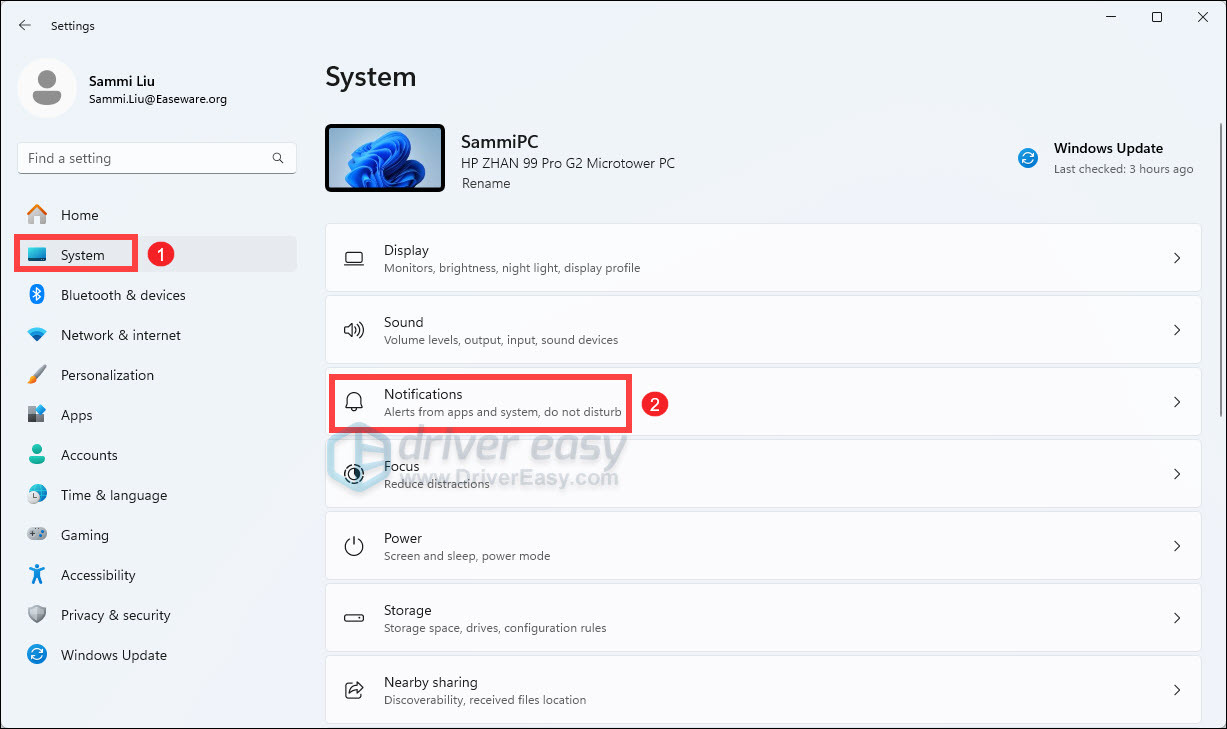
- Select System from the left panel. Then click Notifications.
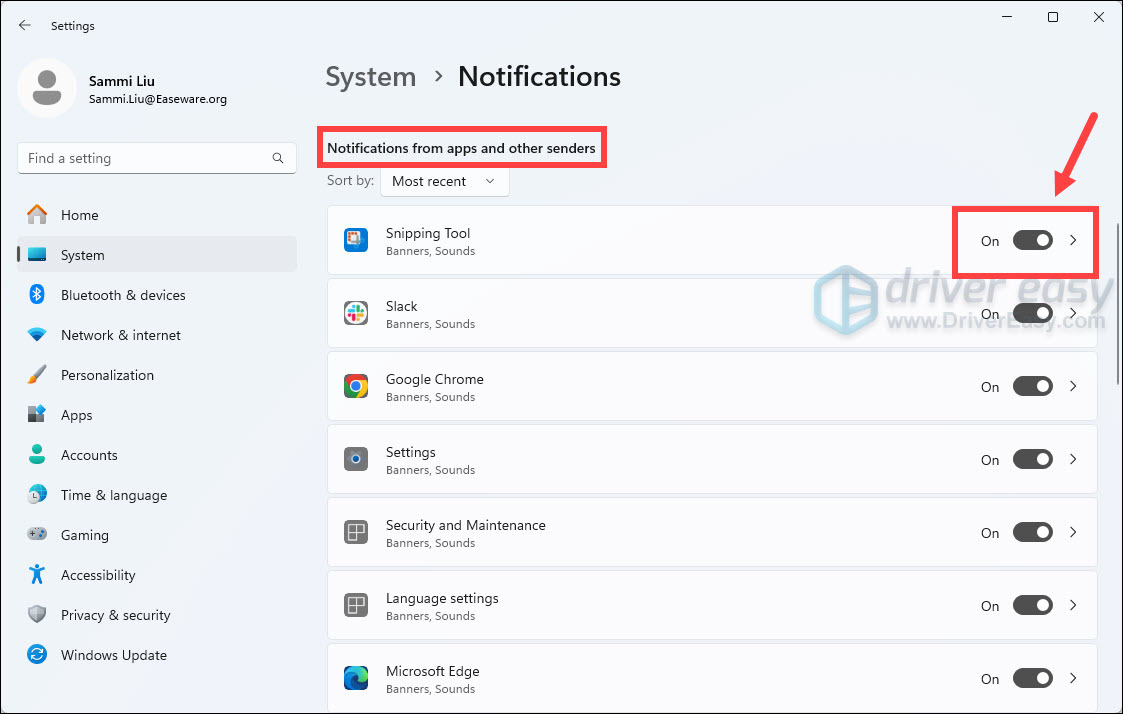
- Under the Notifications from apps and other senders section, make sure the Snipping Tool is On.
Windows 10
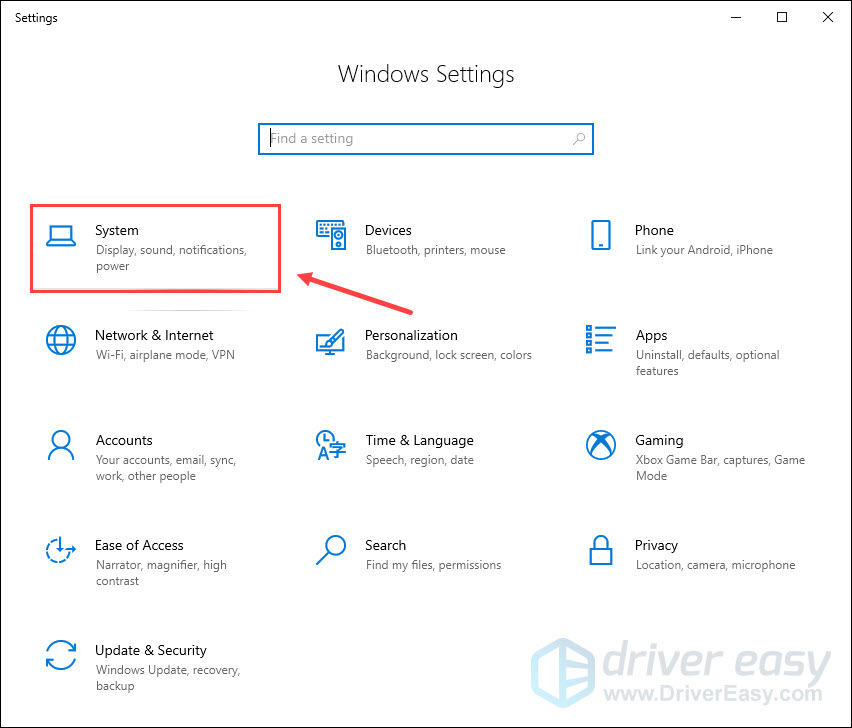
- On your keyboard, press the Windows logo key + I simultaneously to open Windows Settings, then select System.
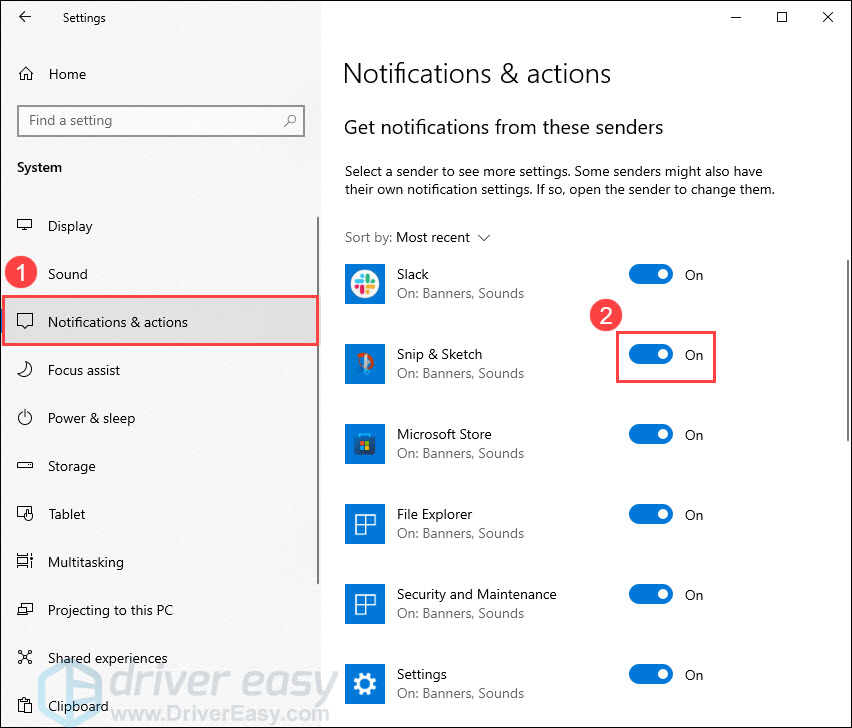
- In the left panel, select Notifications & actions. Under Get notifications from these senders, locate Snip & Sketch and make sure it is set to On.
If you’ve enabled notifications and it still doesn’t work properly, check out the next fix.
Fix 2: Turn on clipboard history
The screenshot you captured will be automatically copied to your clipboard. To view the screenshot, you can turn on the clipboard history. Here’s how:
Windows 11
- On your keyboard, press the Windows logo + I keys simultaneously to open Settings.
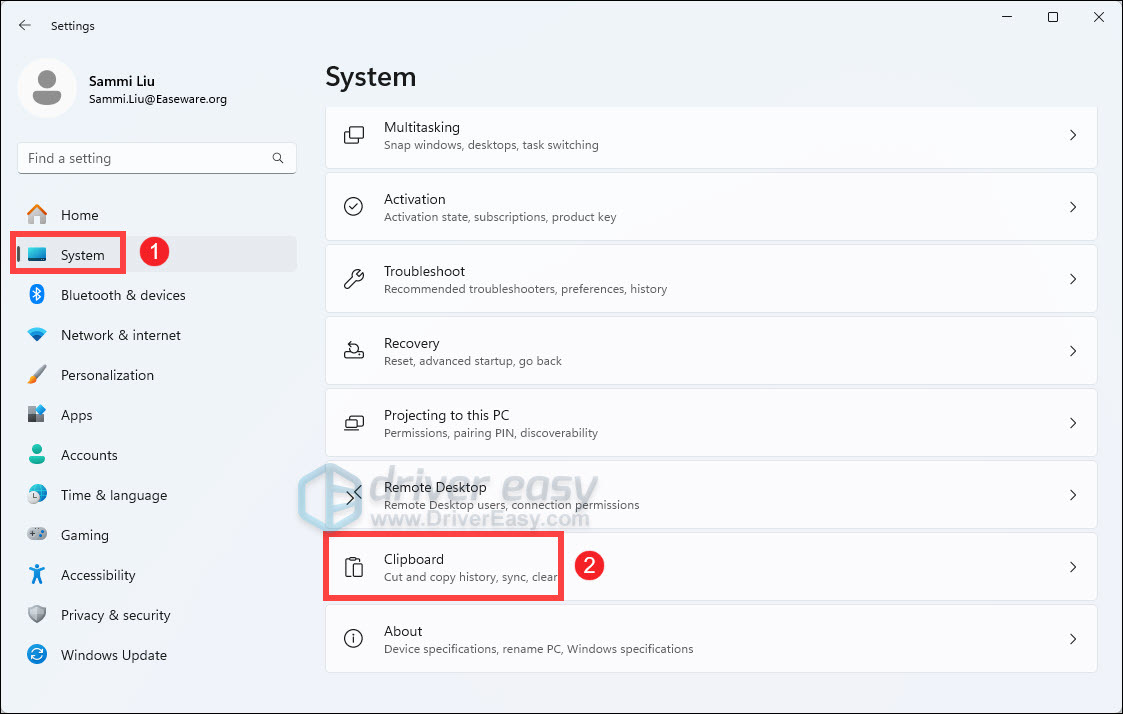
- Select System. Then on the right side, scroll down until you find Clipboard. Click on it.
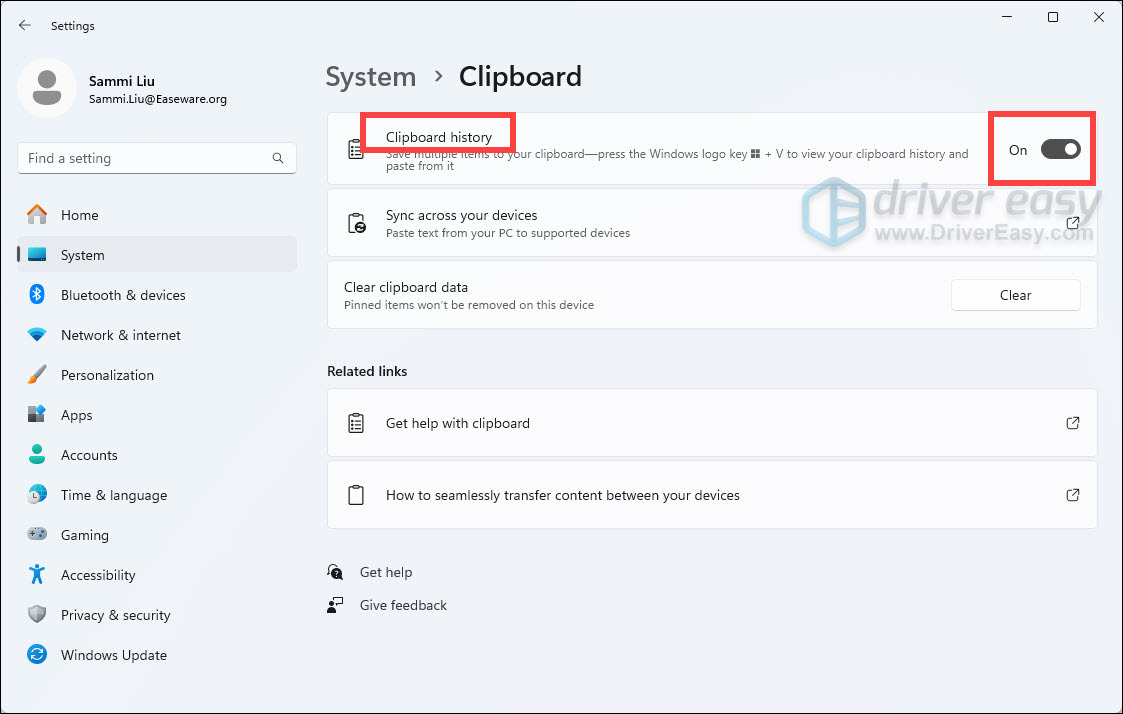
- Turn on the Clipboard history switch.
Windows 10
- On your keyboard, press the Windows logo key + I simultaneously to open Windows Settings, then select System.
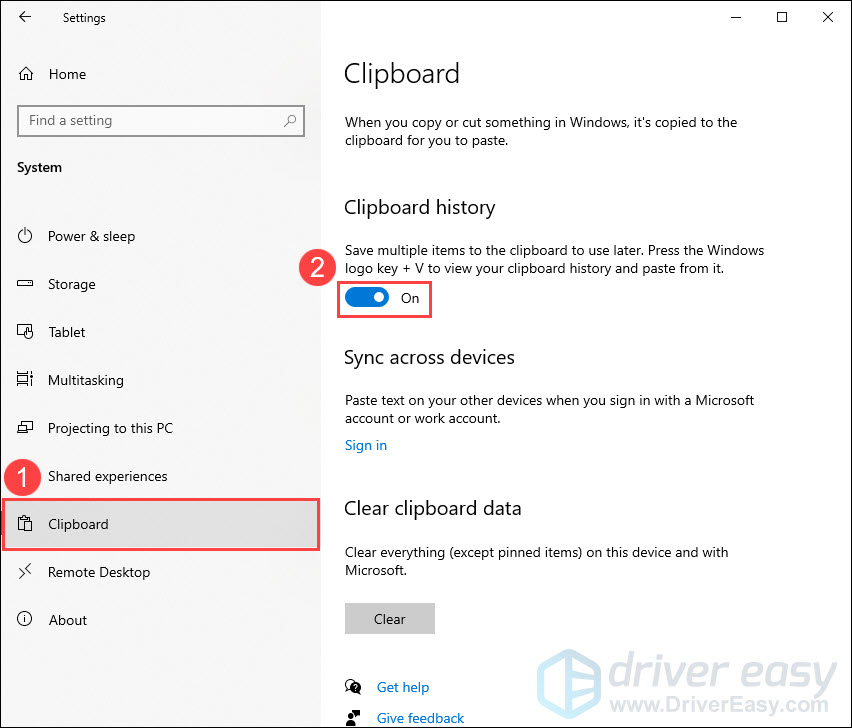
- In the left panel, select Clipboard, then turn on Clipboard history.
Now press the Windows logo key + Shift + S to take a screenshot and check if the screenshot appears on the clipboard by hitting the Windows logo key + V.
Fix 3: Reset Snipping Tool or Snip & Sketch
The Windows logo key + Shift + S allows you to take a screenshot without starting Snip & Sketch. But if this keyboard shortcut isn’t working right, you can try resetting the Snipping Tool on Windows 11 Snipping Tool or Snip & Sketch on Windows 10.
Windows 11
- On your keyboard, press the Windows logo + I keys simultaneously to open Settings.
- Select Apps from the left pane. Then click Installed apps from the right side.
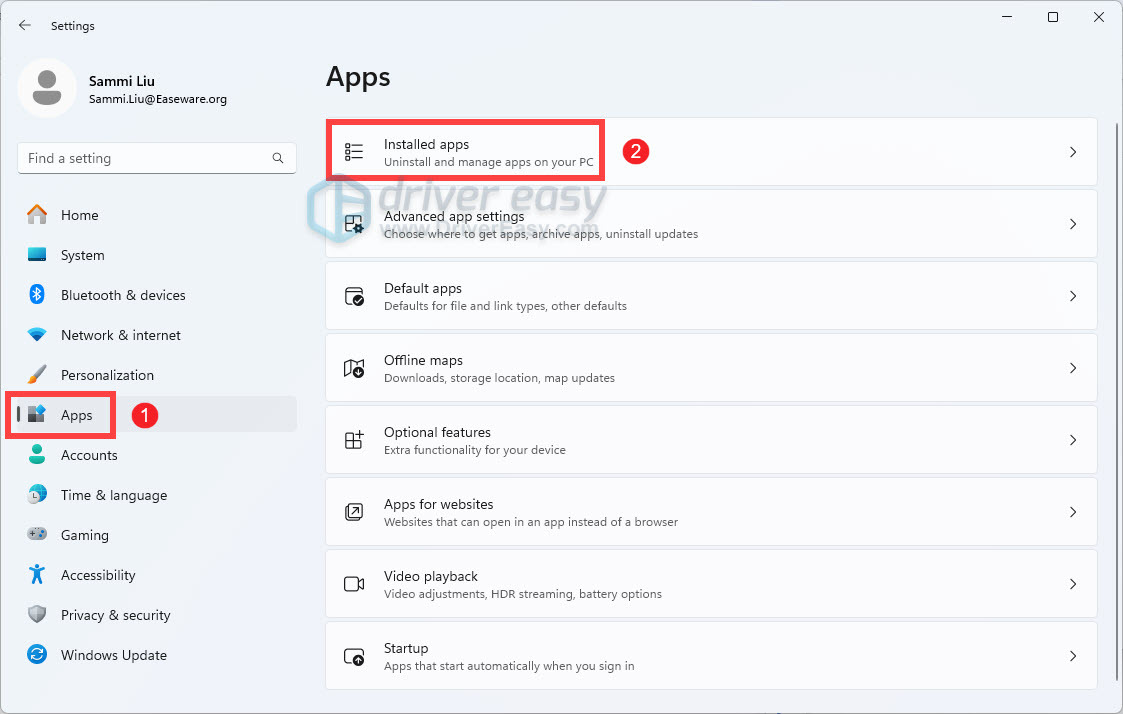
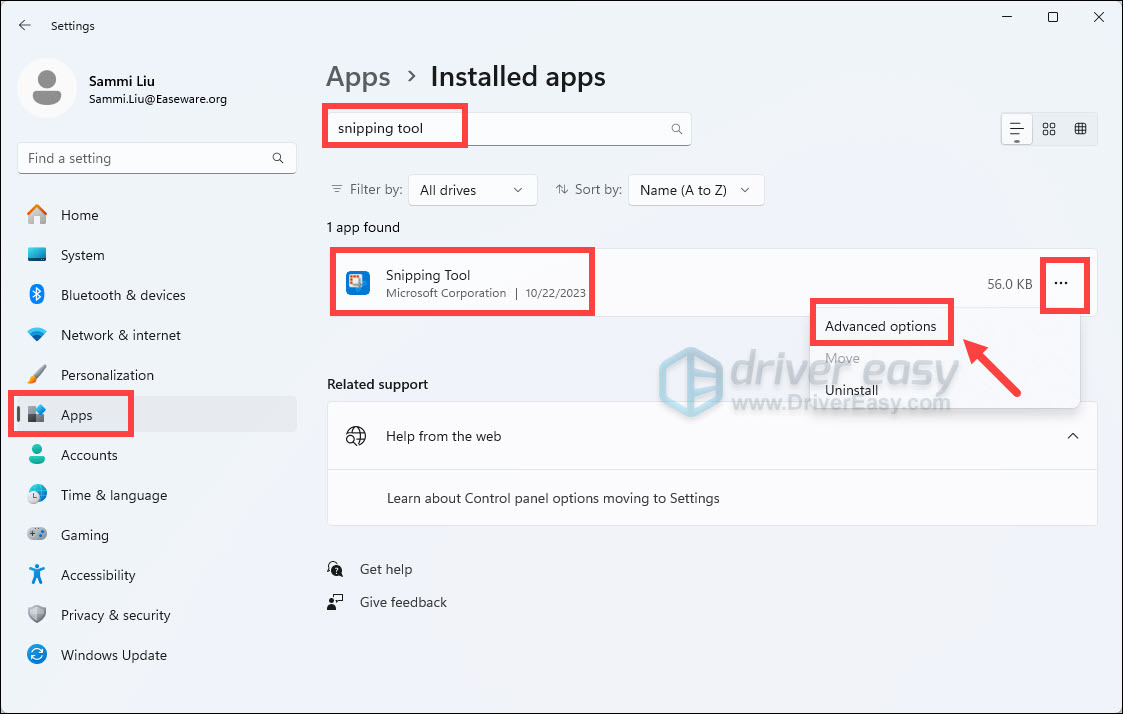
- Scroll down the list of apps to locate the Snipping Tool. Or you can type snipping tool in the search bar to quickly locate it. Once you find it, click on the three vertical dots next to it and select Advanced options.
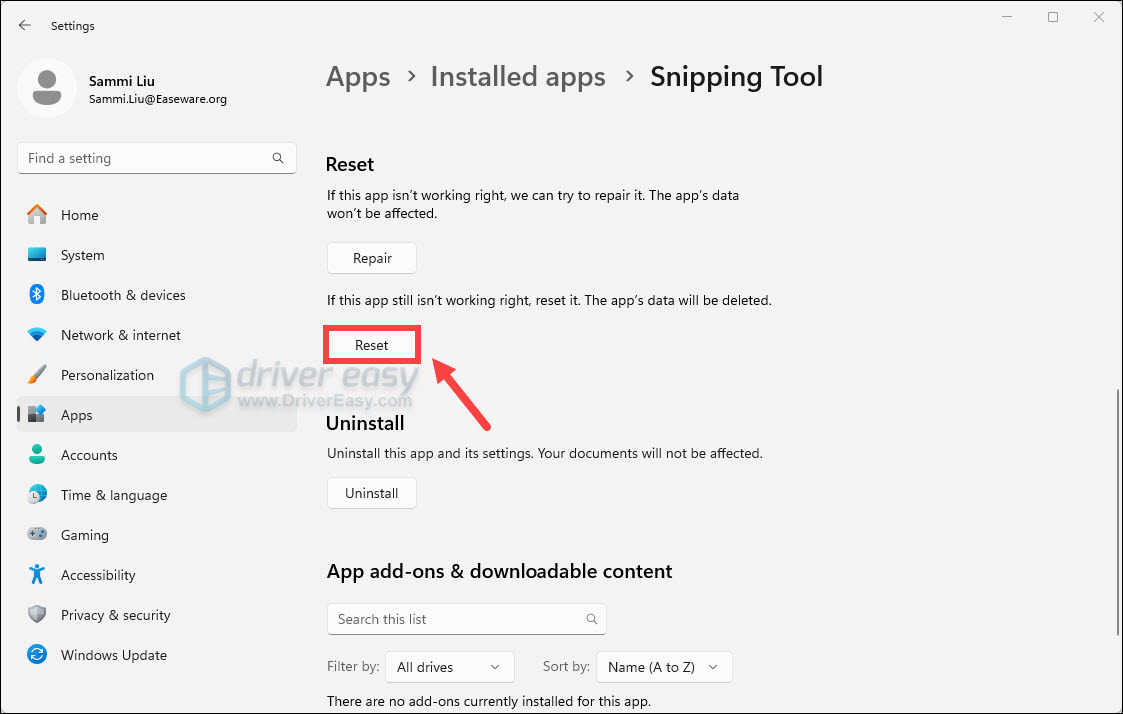
- Now, scroll down and click on the Reset button.
Windows 10
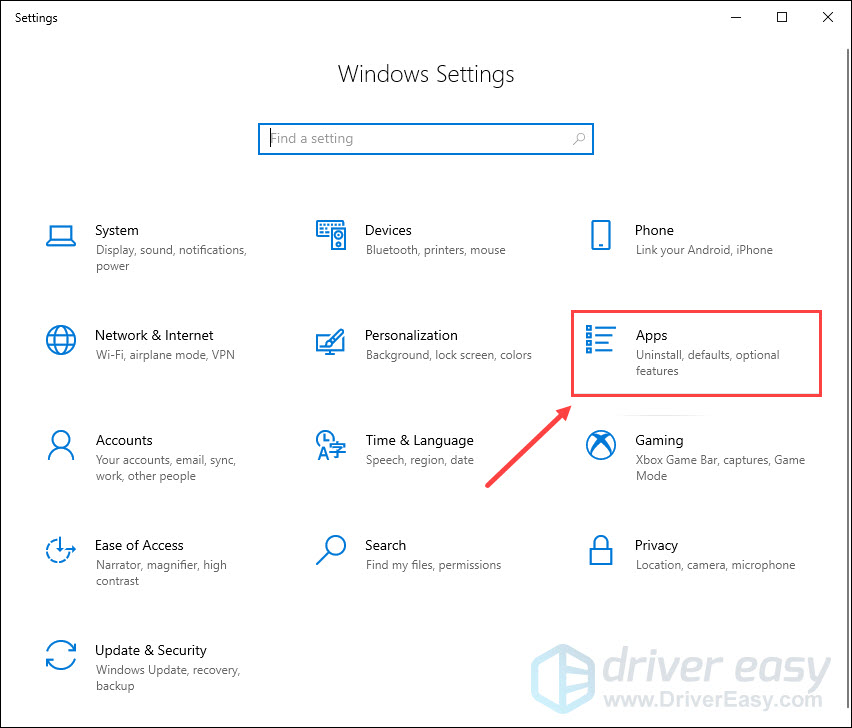
- On your keyboard, press the Windows logo key + I simultaneously to open Windows Settings, then select Apps.
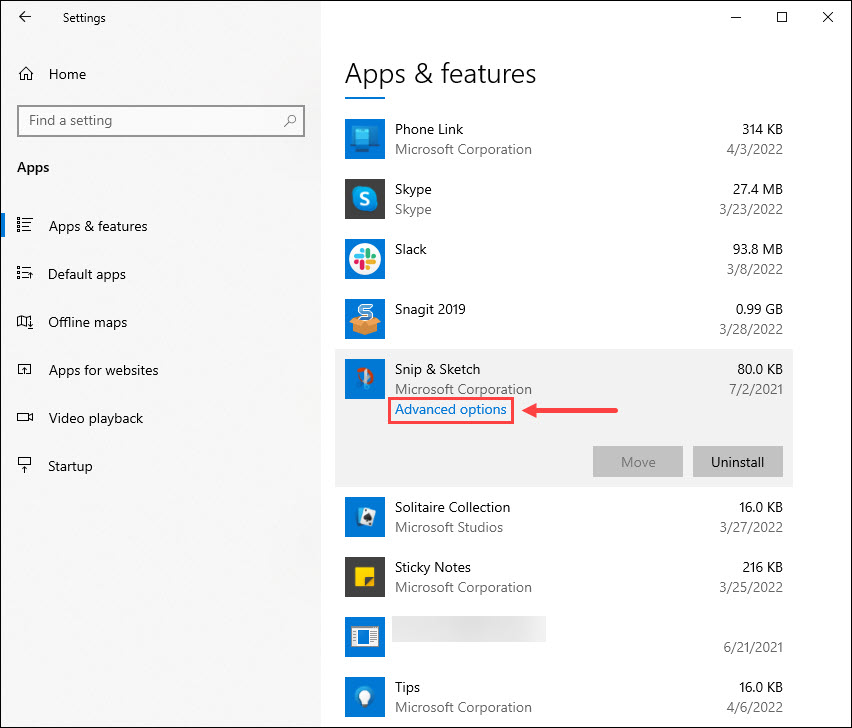
- Under Apps & features, scroll down the page and click Snip & Sketch. Then select Advanced options.
- Click Reset.
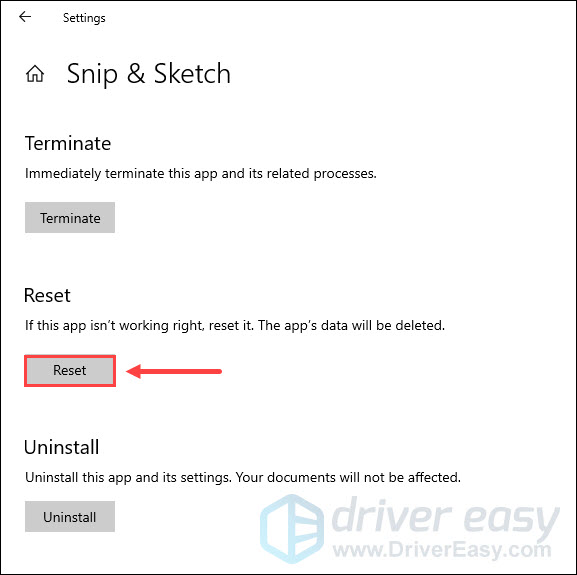
- When prompted to confirm your action, click Reset again.
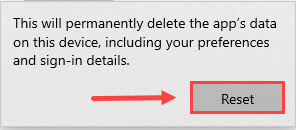
Once the process is finished, restart your computer and check if the Windows logo key + Shift + S hotkey works properly. If not, take a look at the next fix.
Fix 4: Reinstall Snipping Tool or Snip & Sketch
If resetting it doesn’t help, try reinstalling this app. To do so:
Windows 11
- On your keyboard, press the Windows logo + I keys simultaneously to open Settings.
- Select Apps from the left pane. Then click Installed apps from the right side.
- Scroll down the list of apps to locate the Snipping Tool. Or you can type snipping tool in the search bar to quickly locate it. Once you find it, click on the three vertical dots next to it and select Advanced options.
- Now, scroll down and click on the Uninstall button.
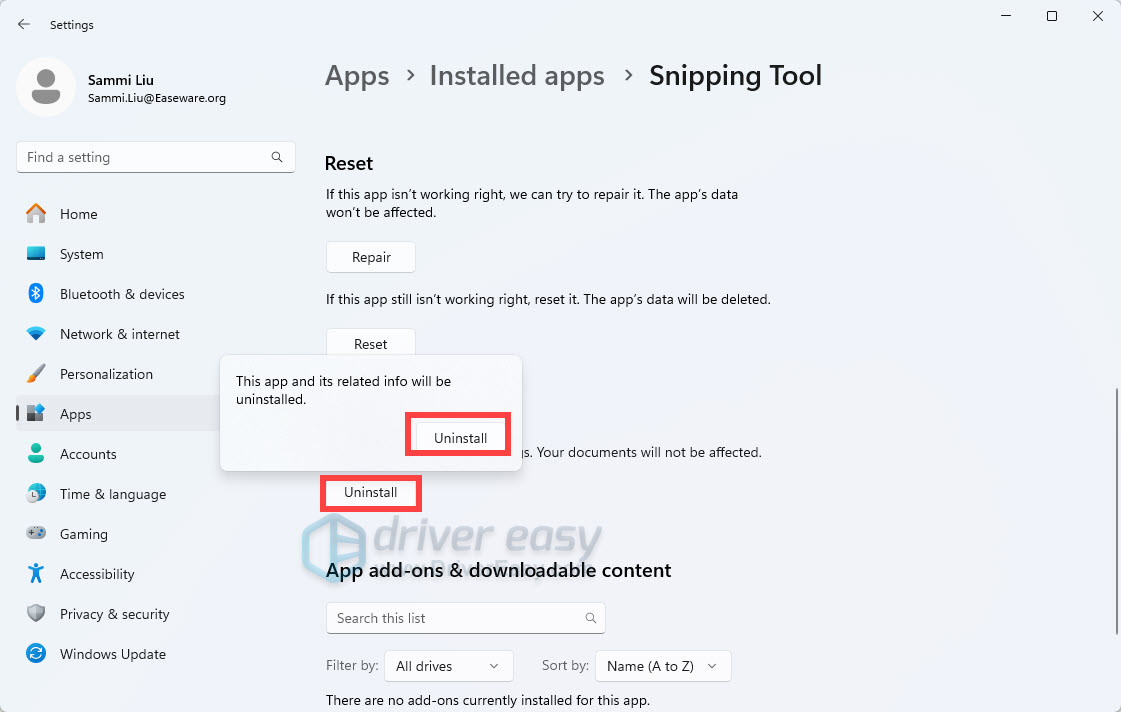
- After uninstalling the Snipping Tool, go to Microsoft Store to download and reinstall the app again on your system.
Windows 10
- On your keyboard, press the Windows logo key to open the Start menu. Then right-click Snip & Sketch and select Uninstall.
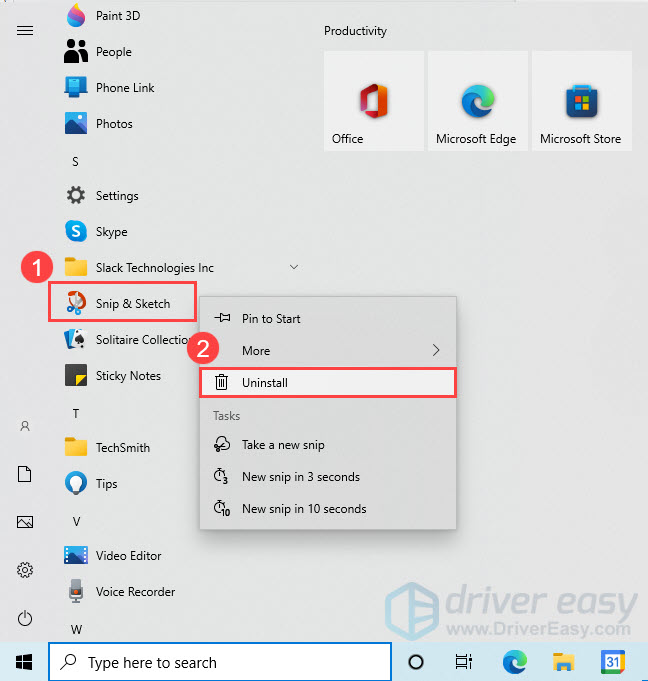
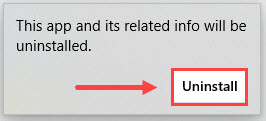
- In the pop-up window, click Uninstall again.
- After uninstalling Snip & Sketch, go to Microsoft Store to download and reinstall the app again on your system.
Once you’ve reinstalled the app, press the Window logo key + Shift + S to see if it works properly. If not, check out the next fix.
Fix 5: Check for Windows updates
Windows updates often contain bug fixes and security improvements. To ensure the snipping tool works properly, you should install the latest updates on your system. Here’s how to do it:
Windows 11
- On your keyboard, press the Windows logo + I keys simultaneously to open Settings.
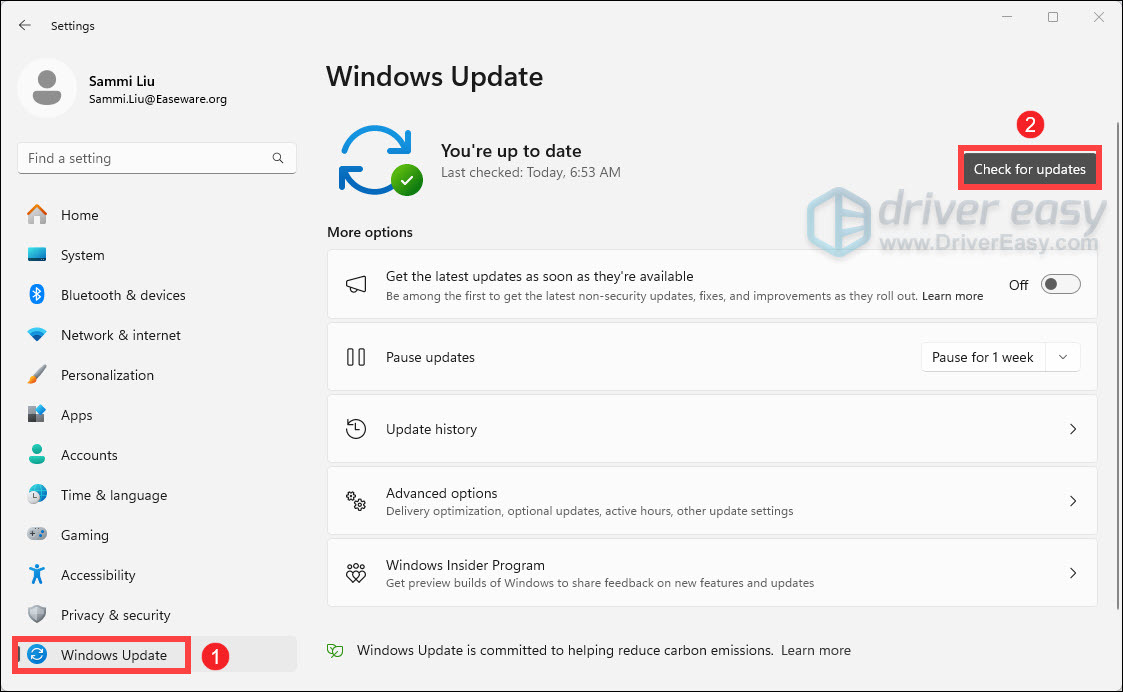
- Select Windows Update from the left panel. Then click on the Check for updates button from the right side.
Windows 10
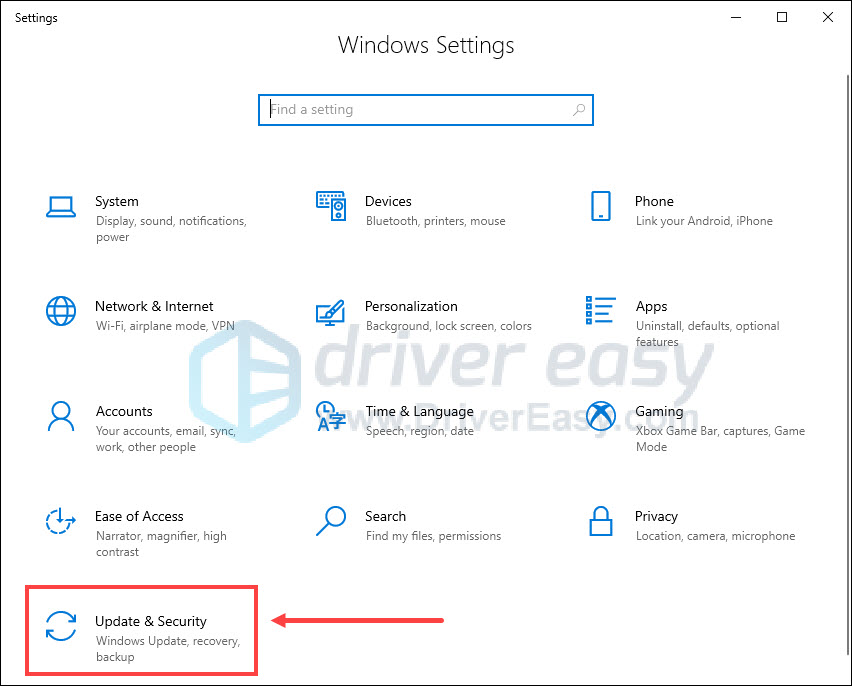
- On your keyboard, press the Windows logo key + I at the same time to open Windows Settings. Then select Update & Security.
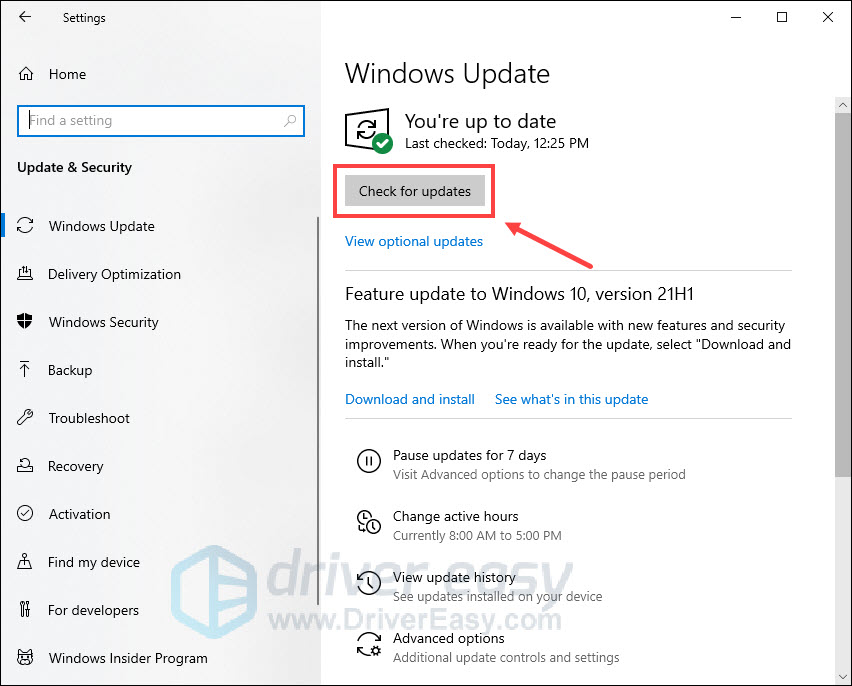
- Under Windows Update, click Check for updates. Windows will automatically scan for, download and install the available updates.
After installing all available updates, restart your computer and check if the Windows logo key + Shift + S shortcut works fine.
If this keyboard shortcut is still not working, consider using an alternative to take screenshots.
Fix 6: Use an alternative to take screenshots
If all the above methods fail to solve your problem, you can try either of the following ways to take screenshots.
Option 1 – Print Screen shortcut on Windows 10
The Print Screen or PrtScn key on Windows 10 allows you to capture an image of your entire screen. To use this button, you need to enable it in settings. Here’s how:
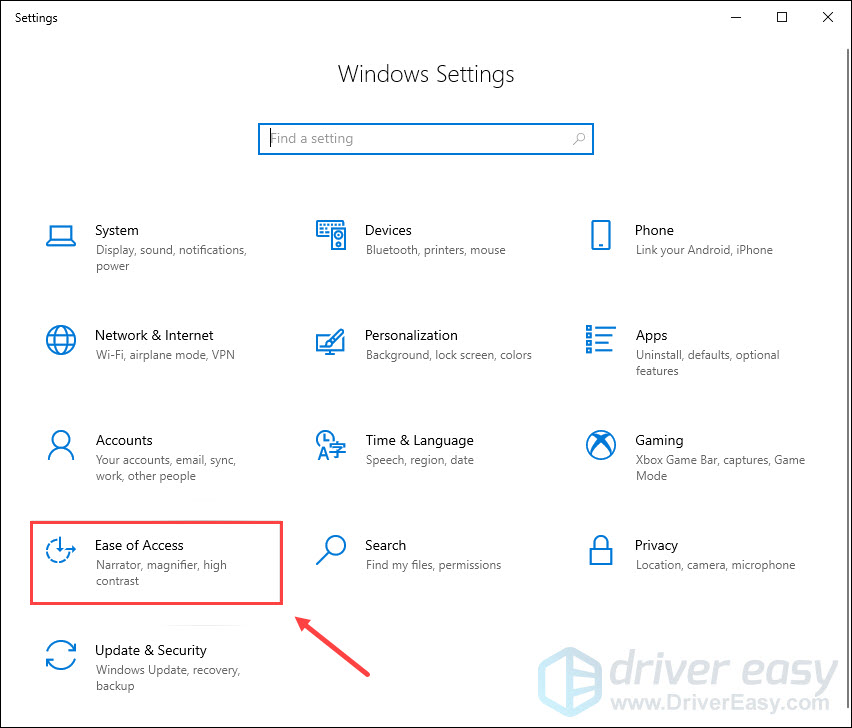
- On your keyboard, press the Windows logo key + I at the same time to open Windows Settings. Then select Ease of Access.
- In the left panel, select Keyboard. Under Print Screen shortcut, toggle the switch to On.
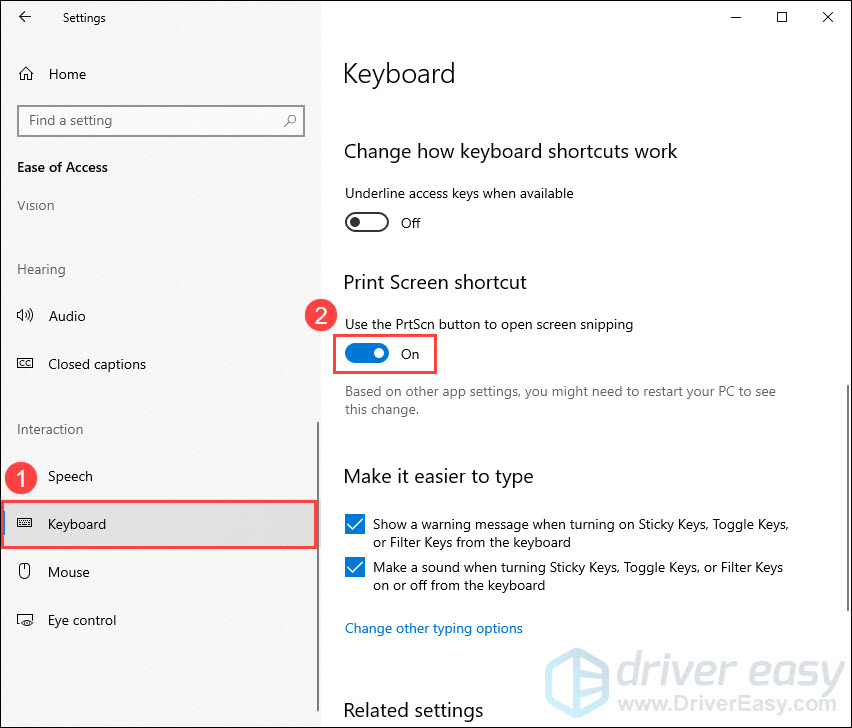
Now you can use the PrtScn key to open screen snipping.
Option 2 – Snagit (Windows 11 or Windows 10)
Snagit is a simple and powerful screen capture and recording software. With Snagit, you can quickly take screenshots, add additional context, and share images, GIFs, or videos across your preferred platforms.
To take a screenshot with Snagit:
- Download and install Snagit.
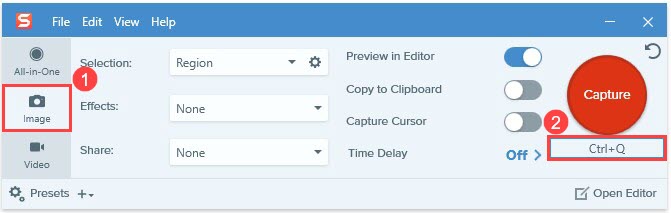
- Open Snagit. Then select Image, click the Shortcut field, and press the desired key combination on your keyboard. The new keyboard shortcut will appear in the field.
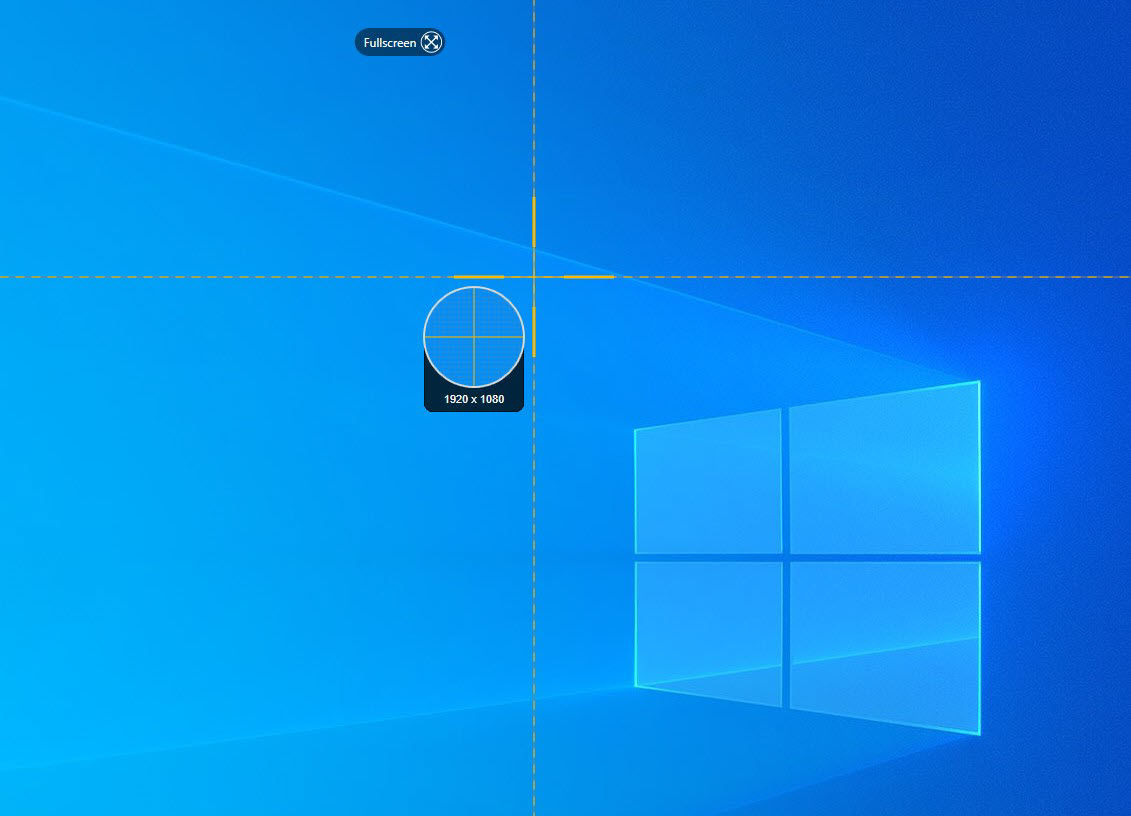
- Press the new shortcut you set in Step 2. The screen will be grayed out allowing you to select the screen area for capture by dragging the orange crosshairs.
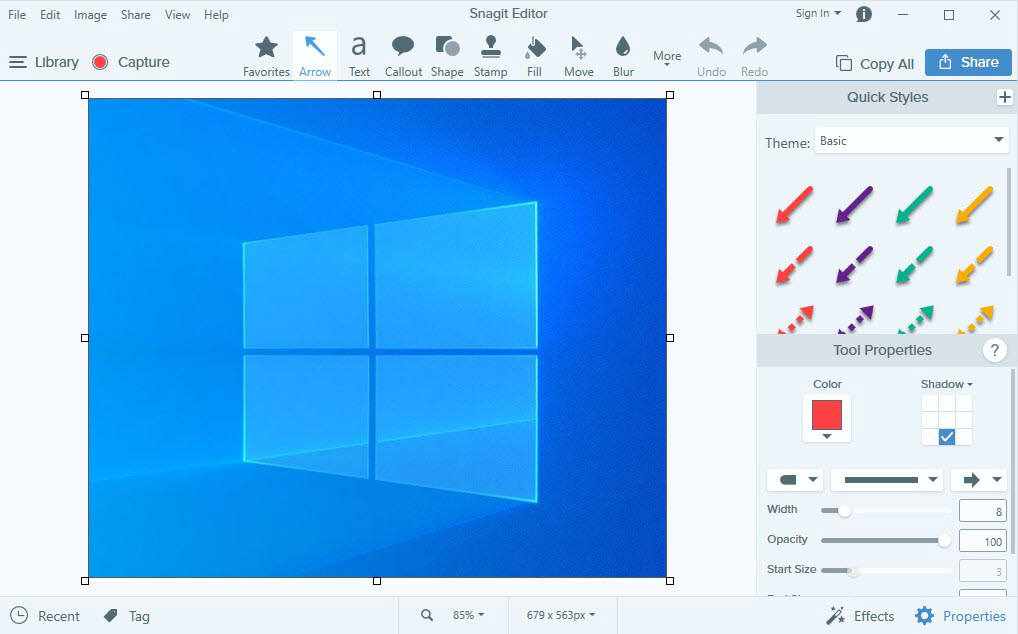
- Once taken, the screenshot will open up in the Snagit Editor. From there, you can edit the image, such as cropping the image, blurring particular areas, and adding arrows, shapes, icons or text. Once done, you can choose to save it on your desktop, copy it to your clipboard, email it to someone or share it online.
That’s all for now. Hopefully, this post helped you solve the snipping tool shortcut (Windows + Shift + S) not working issue. If you have further questions or suggestions, feel free to drop us a line.