


If you’ve been playing your favorite game (e.g., Rust) or running a demanding application and suddenly see strange visual glitches — like flickering textures, random lines, or distorted colors, you’re not alone. These issues are commonly referred to as GPU artifacting. While this can be an unsettling experience as you may start to wonder if your GPU is dying, the good news is that you’re in the right place for a solution.


Common Causes of GPU Artifacting
Before diving into the detailed troubleshooting steps, it’s essential to have a glimpse of the reasons why you might experience GPU artifacting. Below are the main culprits:
- Overheating
Your GPU generates a lot of heat, typically during demanding tasks like gaming or rendering high-definition videos. When it gets too hot (typically above 85℃), it starts to malfunction, and the first sign of trouble usually shows up as artifacting — those strange color distortions or flickering textures. - Driver Problems
Your graphics driver is a set of files that tells the graphics card how to function by communicating with the operating system1. If they’re outdated or corrupted, they can cause your GPU to malfunction and trigger artifacting. - Overclocking
Overclocking allows you to push your GPU’s clock speed beyond its factory settings, boosting performance. However, if you push it too far, it can cause instability and result in artifacts. - Software Conflicts
Sometimes, specific software or game settings simply don’t play well with your GPU. This can lead to artifacting in certain applications or games. - Hardware Defects
This can be the worst-case scenario and there might not be something you can fix with software or adjustments. Hardware defects, such as a failing GPU or damaged VRAM (video memory), can lead to persistent artifacting that software tweaks can’t resolve.
How to Fix Artifacting Issues
Now that you have some idea of what’s going on with your device and what might be causing it, let’s move on to troubleshooting.
- Monitor Your GPU Temperatures
- Update Your Graphics Driver
- Undo the Overclocking
- Lower In-Game Settings
- Disable Background Applications
- Seek Professional Help
1. Monitor Your GPU Temperatures
Overheating is one of the leading causes of artifacting.
Whenever you run a graphics-intensive game or applications like Adobe Premiere Pro that are resource-intensive, it’s recommended to use tools like MSI Afterburner or HWMonitor to monitor your GPU’s temperature in real-time and potentially alert you if it exceeds the safe limit.

Note that the maximum temperature varies by GPU, and you can refer to the graphics card product page for individual GPU specifications. For instance, in the NVIDIA GeForce RTX 5090 product page, you can check that the Maximum GPU Temperature is 90℃.

If your graphics card is constantly running over the maximum temperature, that’s a red flag and you should consider:
Clean the Dust
Over time, dust can accumulate inside your PC, especially on components like fans and heat sinks, blocking the airflow and causing your system to overheat. For instance, when the fans are clogged with dust, they can become less effective in cooling the GPU and other components, leading to higher temperatures. To address the issue, consider the following:
- Turn off and unplug your PC.
- Use a soft brush to gently remove loose dust from the fans and heat sinks. Make sure the fan blades are not spinning while cleaning. If there’s remaining dust, use a can of compressed air to blow it out.
Amazon Best Sellers – Best Sellers in Compressed Air Dusters
- To ensure maximum airflow, you may also want to clean other parts of your PC.
Improve Your Case Airflow
Good airflow inside your PC case is critical to keeping your GPU and other components cool. Without proper ventilation, hot air gets trapped inside and thus raises the temperature of your GPU and other components.
For optimal airflow, take the steps as follows:
- Start by checking the current airflow. Make sure that your case has intake and exhaust fans properly set up.
The intake fans are the ones that draw cool air into the PC case, which typically sit at the front or bottom of the case.
While the exhaust fans are the ones that expel hot air from inside the PC case to the outside, which are usually placed at the top or back of the case.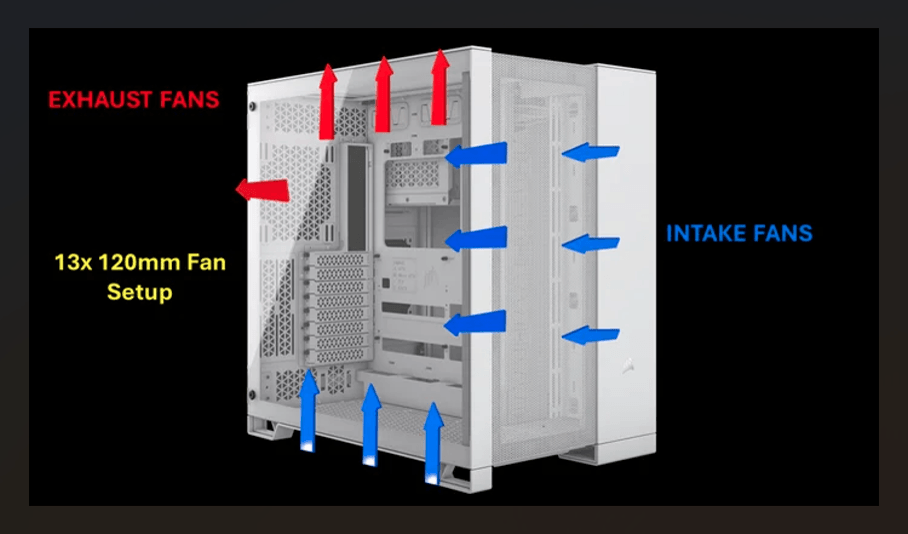
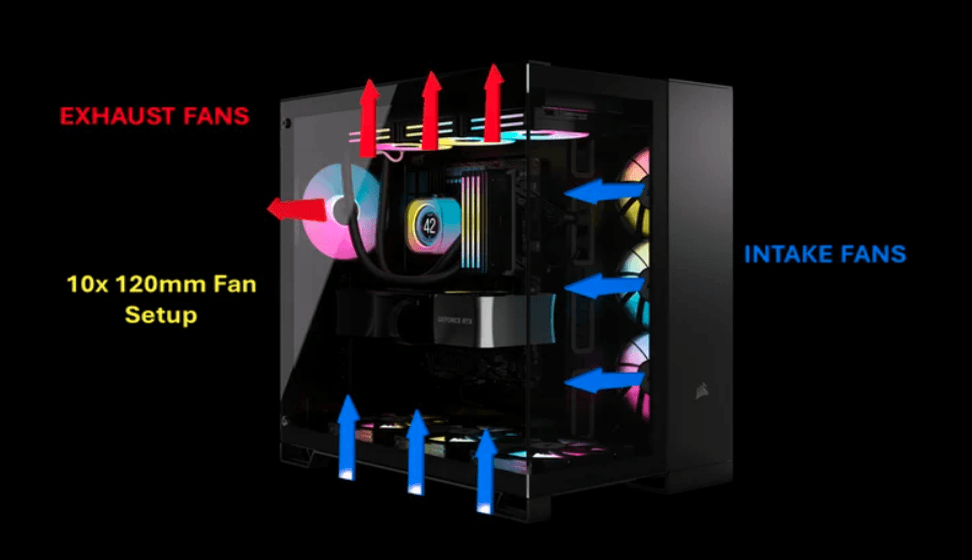
Image Source: Corsair.com - Messy cables can obstruct airflow. Be sure to organize the cables and keep them out of the airflow path.
- Ensure that your PC is equipped with an adequate number of fans, all running at appropriate speeds. If you don’t have any more physical room to add one, you may consider upgrading to a larger case with ample cooling options. Some of the leading providers of PC cases are Corsair, Fractal, LIAN LI, and NZXT.
Reapply Thermal Paste
Thermal pastes, also known as thermal compound, is a substance applied between the GPU (or CPU) and its heatsink. It helps transfer heat from the processor or graphics card to the heat sink. Over time, thermal paste can degrade and its effectiveness in transferring heat diminishes2. If your GPU is overheating, it’s worth considering reapplying fresh thermal paste.
Before you begin, you need to gather the following materials:
- Isopropyl alcohol (at least 90%)
- Lint-free cloth
- Cotton swabs
- New thermal paste
- Gently remove the heatsink from the GPU.
- Moisten the lint-free cloth with isopropyl alcohol. Note that you should not soak the cloth, just make it slightly damp. Then use the cloth to carefully clean the old thermal paste off both the GPU and the heatsink. For any hard-to-reach areas such as the edges, use cotton swabs.
- Apply a small, pea-sized amount of fresh thermal paste to the center of the GPU. Make sure you do not apply too much, otherwise it will spread unevenly.

Image Source: Corsair.com - Attach the heatsink back to the GPU and make sure everything is secured.
2. Update Your Graphics Driver
An outdated or corrupted graphics driver often leads to visual glitches. You can head to your GPU manufacturer’s website to download and install the latest driver compatible with your system version. Or you can use proprietary software such as the NVIDIA App to get the latest driver updates.
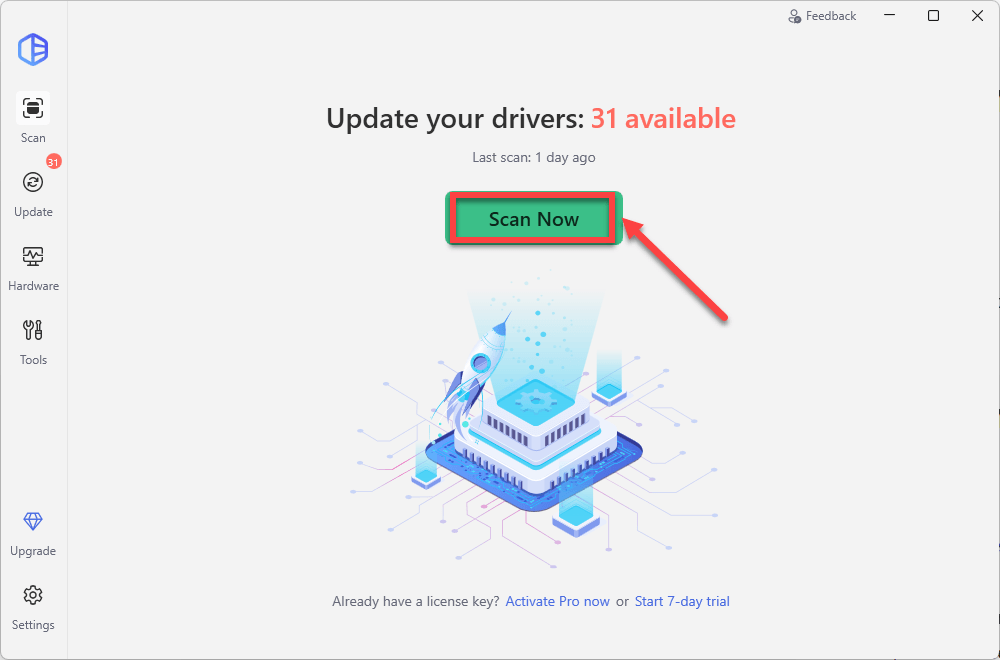
If you’re short on time or you prefer a hassle-free way to update drivers, Driver Easy comes into play. It’s an easy-to-use driver updater tool that automatically detects the missing or outdated drivers on your system, then downloads and installs the latest versions for your system, direct from the manufacturers.
To use Driver Easy:
- Download and install Driver Easy.
- Run Driver Easy and click the Scan Now button. Driver Easy will then scan your computer and detect any problem drivers.
- Check if your graphics card model is flagged in the scan results. If it is, click Activate & Update to start a 7-day free trial or upgrade to Driver Easy Pro. Either option will automatically download and install the latest graphics driver for you.

- Restart your computer for the changes to take effect. Then check if your problem is solved.
3. Undo the Overclocking
If you’re playing games, you probably overclock your GPU using overclocking tools like MSI Afterburner for enhanced gaming experience. However, this can put a lot of strain on your GPU, as you’ve pushed your GPU beyond the default/factory settings and it might not always be able to handle the load. In this case, you should reset your clock speeds back to default settings. If the issue persists, try underlocking your GPU.
4. Lower In-Game Settings
If you’re playing graphically demanding games, try lowering the settings (anti-aliasing, texture quality, resolution) to reduce the load.
5. Disable Background Applications
Too many applications running in the background can consume a significant amount of system resources and cause conflicts. You can disable the ones that you do not necessarily use:
- Press Ctrl + Shift + Esc to open the Task Manager.
- Go to the Processes tab. Look for any non-essential or resource-intensive programs. Right-click on each of them and select End task. You can close cloud storage services like OneDrive, Google Drive, or Dropbox. Or you can disable Discord or other non-essential third-party software. Avoid disabling critical system processes or essential services, as this can lead to system instability.

6. Seek Professional Help
If you’ve tried all these steps and the artifacting continues, your GPU may be failing. In such cases, it’s time to seek help from a technician. They can perform more in-depth diagnostics.
If you need additional help from us or the community before considering resorting to technicians, please share the following details: your GPU model, the specific scenarios where artifacts occur (such as particular games or applications), and the frequency and of these artifacts. This information will help in troubleshooting the issue more effectively.
1. Understanding Computer Drivers: A Complete Guide for PC Users. https://www.hp.com/in-en/shop/tech-takes/post/what-are-computer-drivers↩
2. Thermal Compound. https://www.lenovo.com/us/en/glossary/thermal-compound/↩