




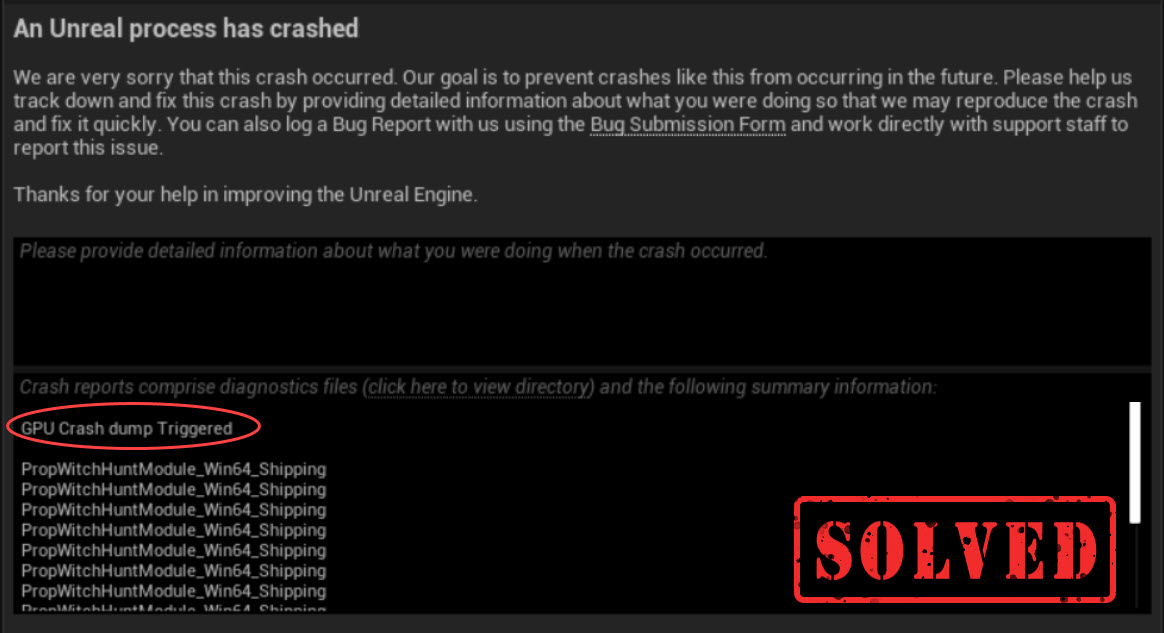
Your game freezes, the screen goes black, and then it hits you: GPU crash dump triggered. Whether you’re playing The Finals, Star Wars: Zero Company, or any Unreal Engine-based game, this error usually means your graphics card hit a serious snag. But don’t worry! It’s fixable!
In this article, we will walk you through the fixes that actually work, so you can get back to gaming as soon as possible.
What is the GPU Crash Dump Triggered error?
GPU Crash Dump Triggered means the game encountered a serious problem while communicating with your GPU or graphics driver and generated a crash dump for troubleshooting. The message itself doesn’t tell you exactly what went wrong.
The crash can be triggered by several factors, including a bug in the game or Unreal Engine, an incompatible or corrupted graphics driver, shader compilation issues, a problematic graphics API or feature, unstable GPU settings, or hardware instability. In some cases, a recent game or driver update can also introduce compatibility problems.
9 simple fixes for the GPU Crash Dump Triggered error
Here are 9 practical methods to fix the GPU crash dump triggered error. Just work your way through the list, starting with simple graphics settings and drivers and moving toward more advanced diagnostics and hardware checks.
- Turn off frame generation and use FSR/DLSS
- Update or roll back your GPU driver
- Reset the shader cache
- Disable hardware-accelerated GPU scheduling
- Switch launch options
- Turn off overlays
- Verify game files
- Lower GPU core clock
- Run the game on the dedicated GPU
Fix 1: Turn off frame generation and use FSR/DLSS
If the crash happens when frame generation or an advanced upscaling mode is enabled, temporarily turning those features off can help determine whether a particular rendering path is involved.
- Open the game’s Video, Graphics, or Display settings.
- Set upscaling to FSR or DLSS and choose Quality mode if available.
- Turn Frame Generation off. If you’re using AMD hardware, temporarily disable AMD Anti-Lag as well.
- If you’re using an NVIDIA RTX GPU and the game supports DLSS, DLSS Quality can reduce the rendering workload while maintaining good image quality.
If the game becomes stable, re-enable the features one at a time to identify which setting is contributing to the crash.
Fix 2: Update or roll back your GPU driver
One of the most common culprits for the crash dump is an outdated or corrupted GPU driver. When the driver fails to handle complex Unreal Engine features like real-time lighting, particles, or FSR/DLSS, the GPU can crash and generate a dump file.
To rule this out, try updating your graphics driver to the latest stable version. You can manually search for updates through the NVIDIA, AMD, or Intel websites. But if you’d rather avoid the hassle of manual searching — and the risks that come with it — you can update automatically with Driver Easy. Driver Easy is a trusted driver updater that makes the process effortless. It automatically detects the exact drivers your system needs and installs them correctly, without the risk of picking the wrong version.
You can start with the free trial, which gives you 7 days of access to all Pro features. During this time, you’ll be able to automatically download and install the correct drivers with just a few clicks—no payment required unless you decide to keep using the Pro version.
All it takes is just a few clicks:
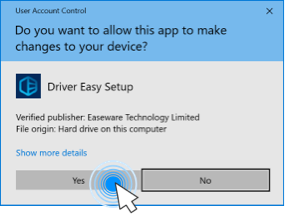
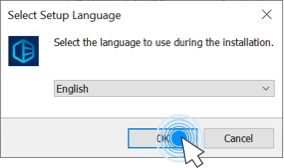
- Download and install Driver Easy.
- Run Driver Easy and click the Scan Now button. Driver Easy will then scan your computer and detect any problem drivers.

- Check if your graphics driver is flagged in the scan results. If it is, click Activate & Update next to your graphics driver to update it. This will prompt you to start a 7-day free trial or upgrade to Driver Easy Pro. Either option will automatically download and install the latest drivers for you.

If Driver Easy reports outdated or missing DirectX runtime packages, update those as well. Keeping these components up to date can help rule out certain DirectX-related compatibility issues that may contribute to game crashes.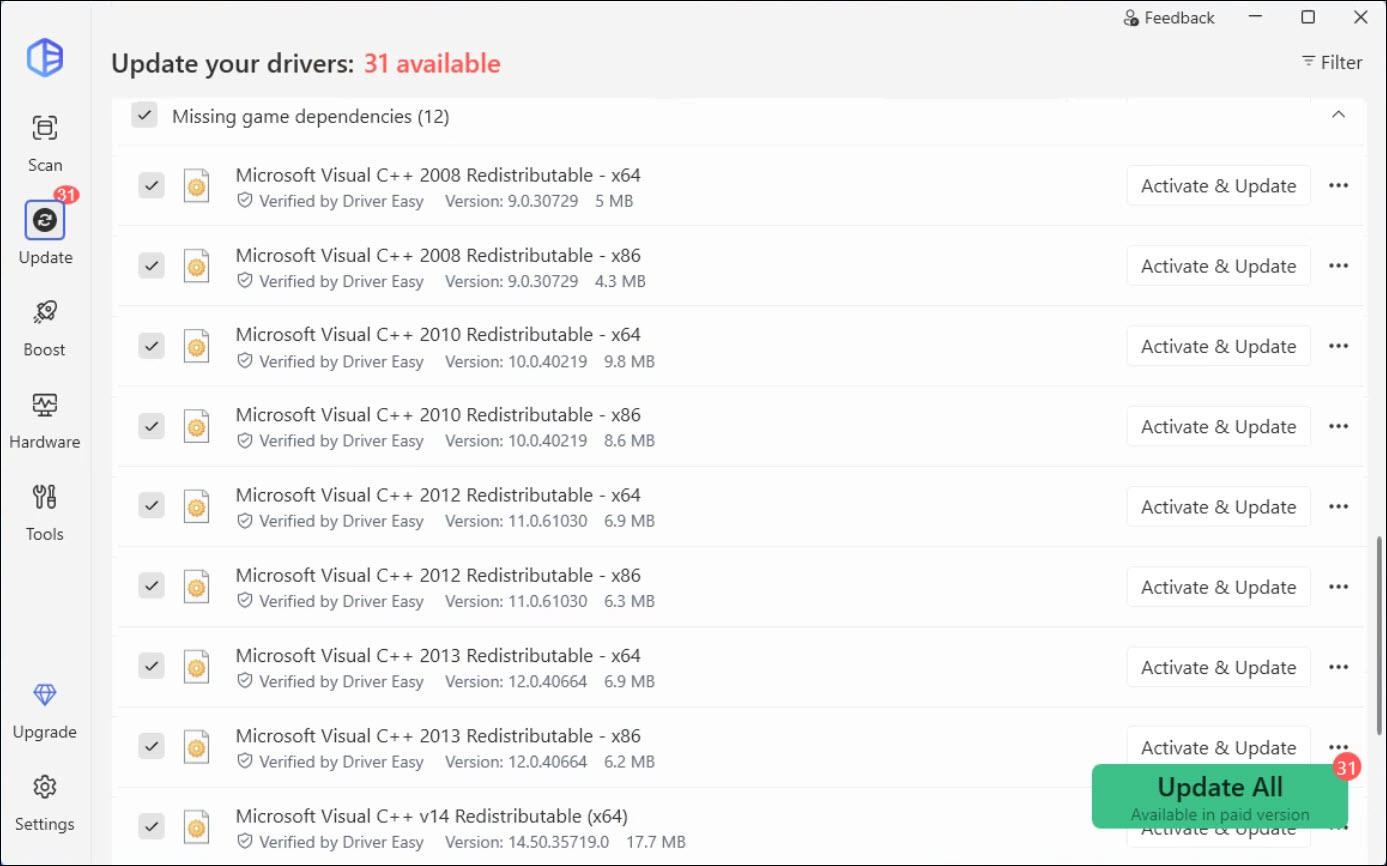
- Restart your computer for the changes to take effect.
- Check to see if the GPU Crash dump Triggered issue is resolved.
Choose a more stable previous driver version
Newer driver versions aren’t always the most stable. If you experience a GPU crash error after a driver update, you might prefer an older, more stable version. With Driver Easy, you can easily view all available driver versions for your GPU and select one that’s proven to be more reliable, rather than the latest release that may not yet be fully tested.
- Click the three-dot icon next to a specific driver (RTX 5090 in this case), select All available versions.
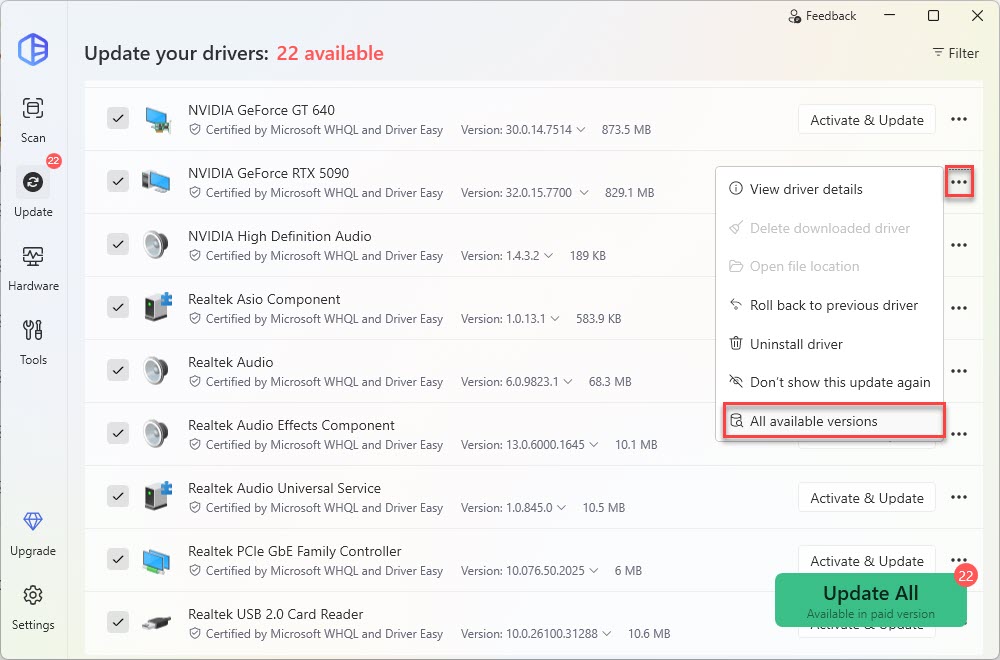
- Try out different versions until you find the one that works best for your system.
Fix 3: Reset the shader cache
Shader compilation can expose graphics-driver or game-engine problems, particularly after a game update or driver change.
If your game provides a shader compilation step during startup, let it complete rather than repeatedly interrupting it. If the game becomes stuck during shader compilation or starts crashing afterward, try resetting the shader cache.
For NVIDIA users
1. Open the NVIDIA Control Panel or the NVIDIA app, go to Manage 3D Settings, find Shader Cache, set it to Disabled, and click Apply.
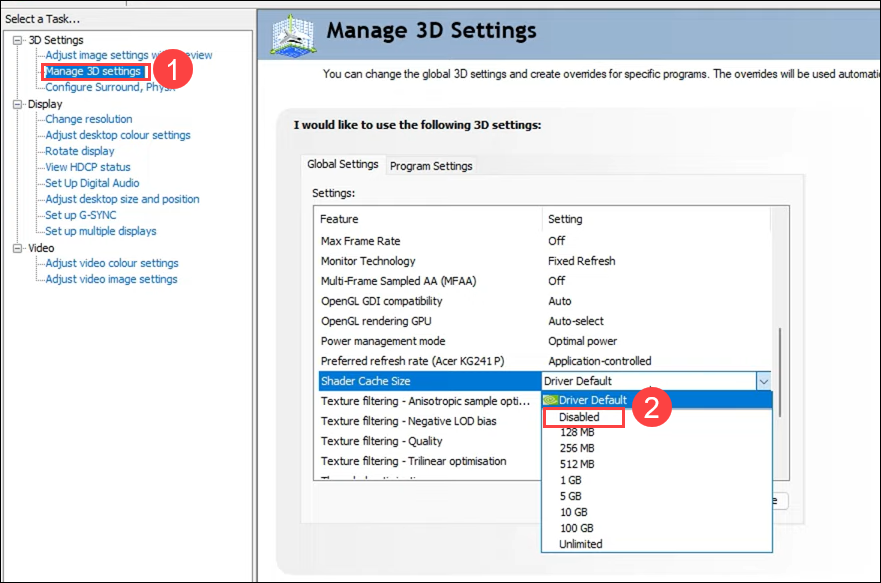
2. On your keyboard, press the Windows logo key and R to open the Run dialog. Type %localappdata% and hit Enter.
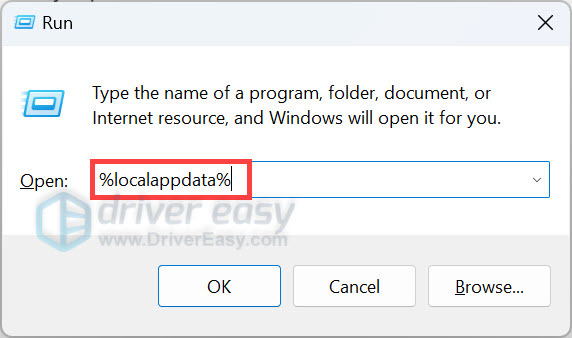
3. Open the NVIDIA folder. Open the DXCache and GLCache (if available) folders, and delete all the files inside them.
4. Go back to the NVIDIA Control Panel and re-enable the Shader Cache (Driver Default/On).
For AMD users
1. Open your AMD Software: Adrenalin Edition. Then go to Gaming > Graphics.
2. Click the Reset button next to Perform Reset, and click OK to confirm.
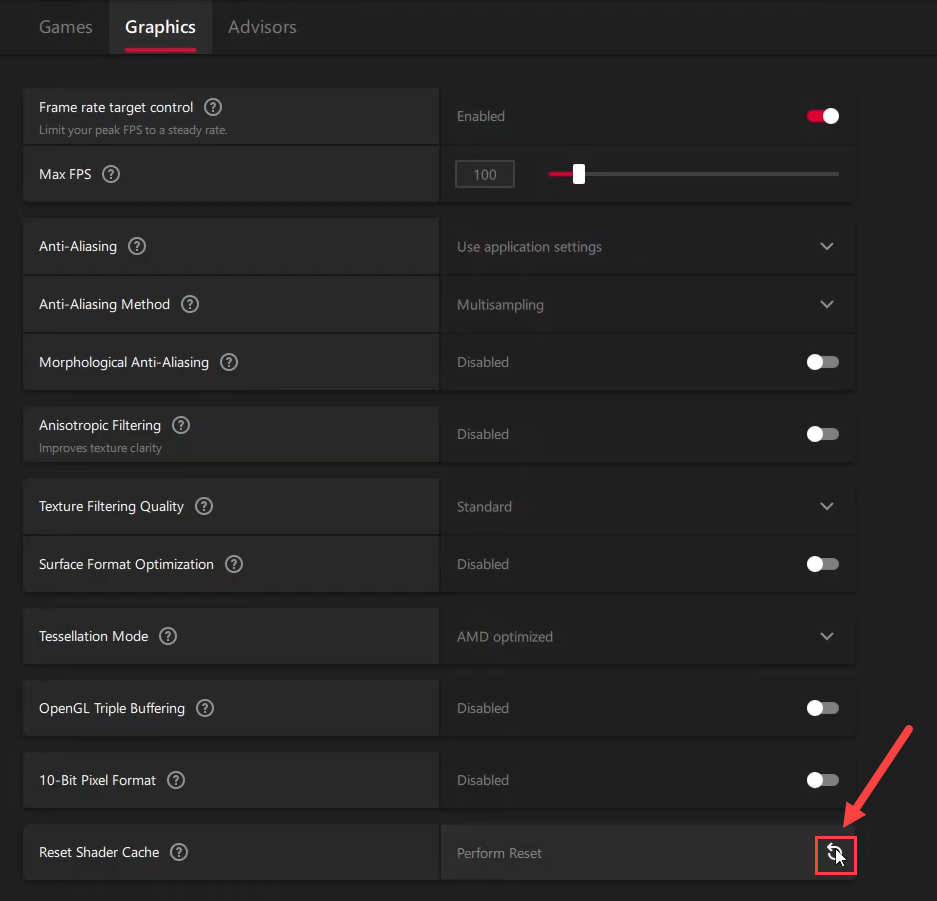
Restart your PC after deleting the shader cache. The next time you launch the game, the shader cache will be rebuilt automatically. The first launch may take a little longer than usual, which is expected. If the crashes still happen, check out the next solution.
Fix 4: Disable hardware-accelerated GPU scheduling
Hardware-accelerated GPU Scheduling is a feature that offloads certain GPU-related tasks from the CPU to the GPU. While it can boost performance by reducing CPU bottlenecks, it may cause instability on some systems, especially with older GPUs or incompatible drivers. When misconfigured or unsupported, this feature can overload the GPU and lead to crashes, including the GPU Crash Dump Triggered error.
Disabling it can reduce GPU stress and may help prevent these crashes:
- On your keyboard, press the Windows logo key and I simultaneously to open Settings.
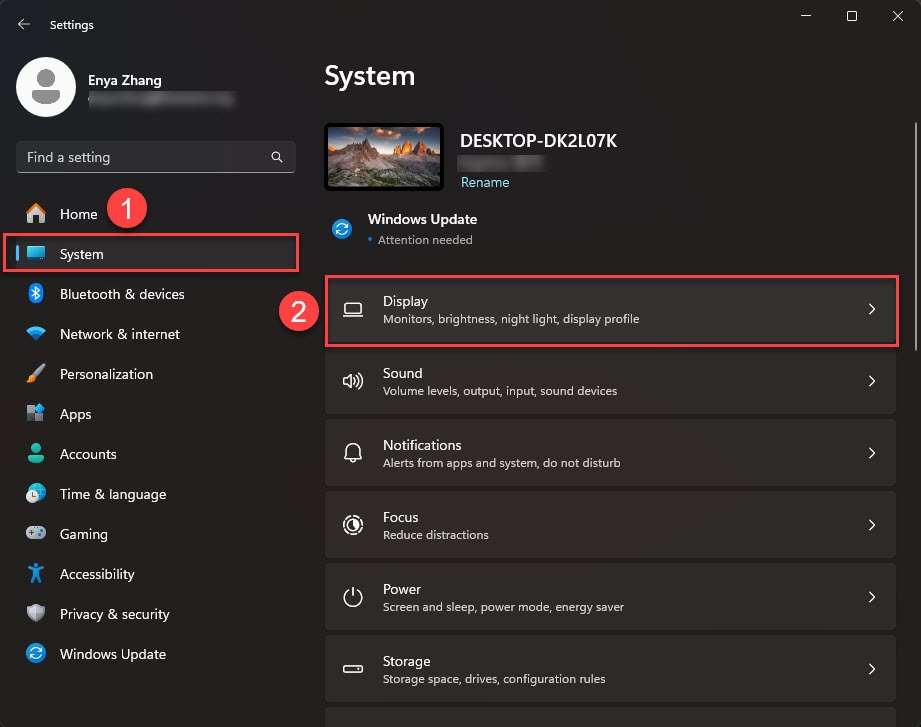
- Navigate to System > Display.
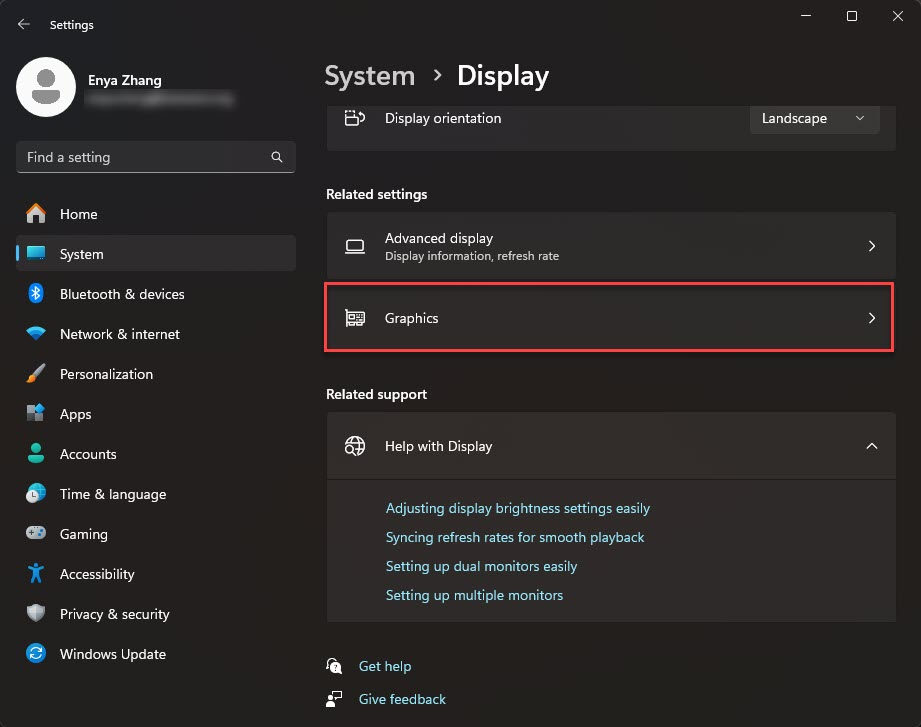
- Scroll down to Related settings and click on Graphics.
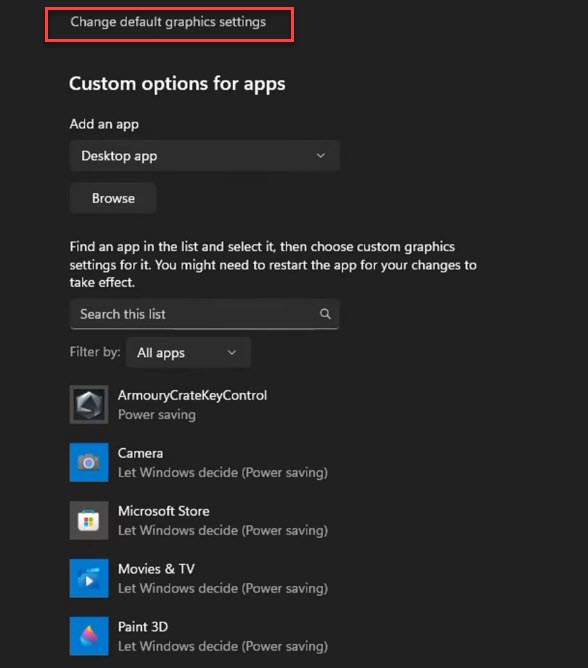
- Click Change default graphics settings.
- In the Graphics Settings window, toggle the Hardware-Accelerated GPU Scheduling option to Off.
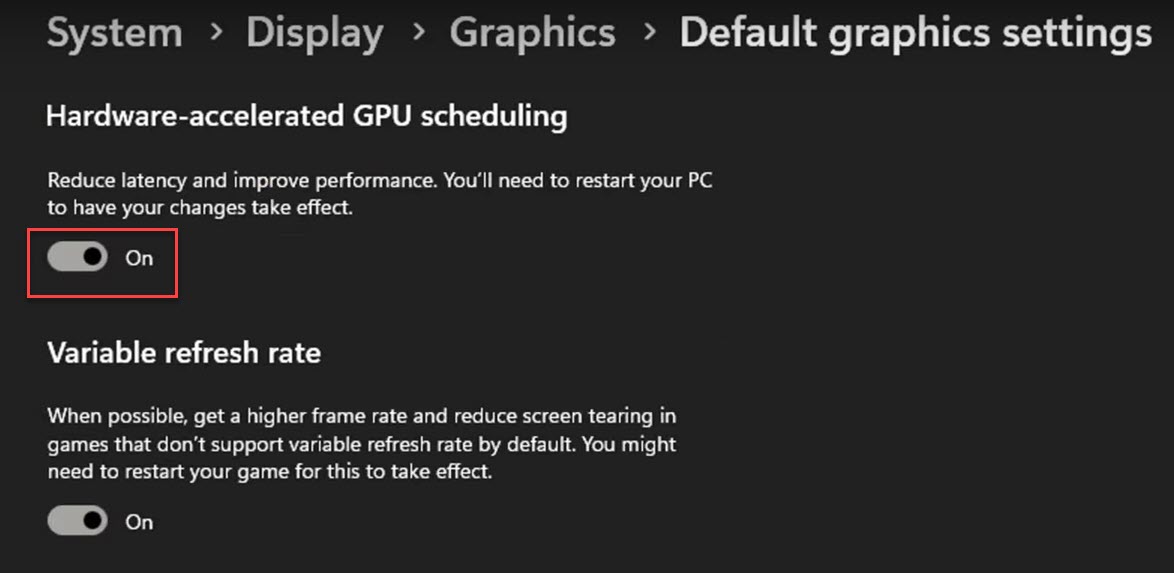
- Restart your computer to apply the changes.
- Check to see if the GPU crash problem is fixed. If yes, great! If it still crashes, please try the next fix.
Fix 5: Switch launch options
Some games let you choose between different graphics APIs like DirectX 11 and DirectX 12. While DirectX 12 offers advanced features and better performance for some systems, it can also introduce stability issues, especially if your GPU or driver doesn’t handle it well. If you’re encountering the GPU Crash Dump Triggered error, switching to an older but more stable API like DirectX 11 might help.
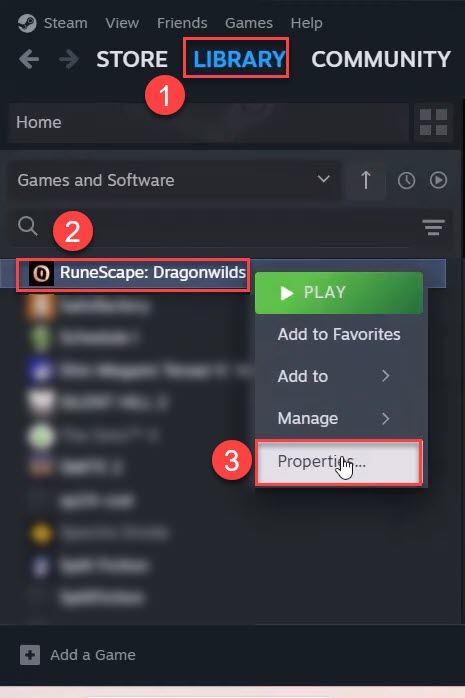
If your game doesn’t have an in-game option to change the API, you can set it manually through the game’s launch options. Here I’ve used Steam as an example, but the process is nearly identical across other launchers like Epic Games and Ubisoft Connect.
- Launch Steam.
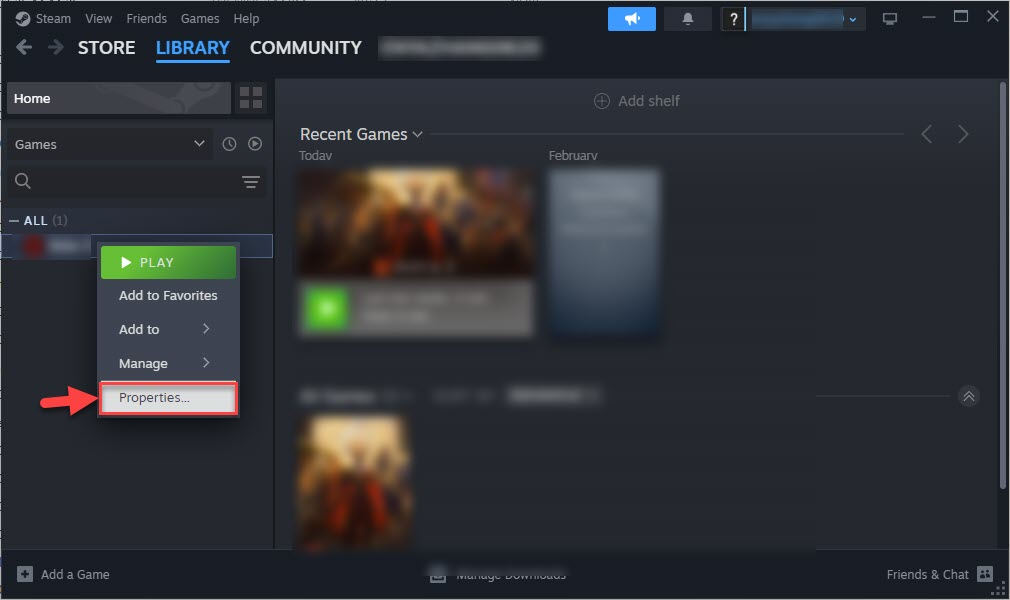
- In LIBRARY, right-click on your game and select Properties.
- In the Launch Options field, type
-dx11to force the game to use DirectX 11. (You can try-dx12if you want to switch back later.)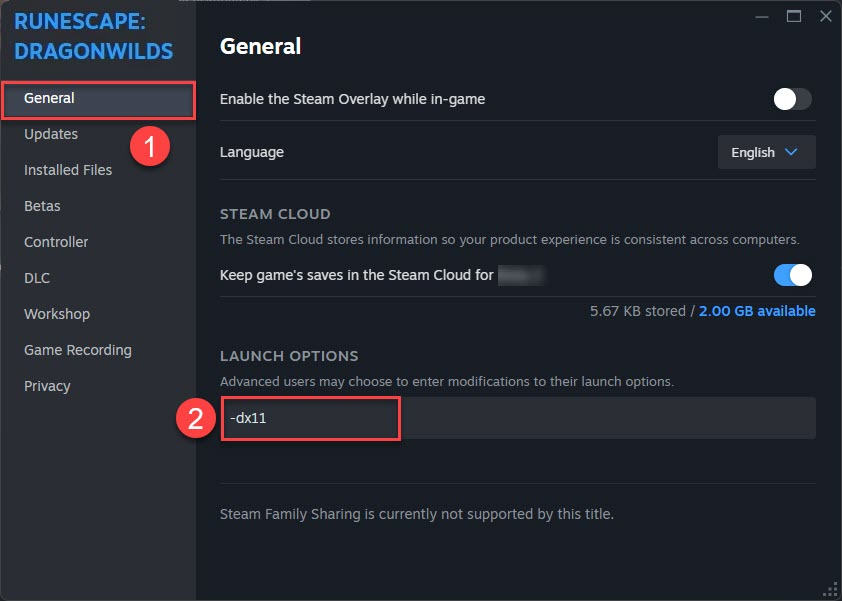
- Close the window.
- Start your game to check if the crash still happens. If everything runs smoothly, you’re good to go! If not, you can clear the launch option and move on to the next fix.
Fix 6: Turn off overlays
Overlays from apps like Steam, Discord, NVIDIA GeForce Experience, and Xbox Game Bar can sometimes interfere with your game, putting extra load on your GPU and causing crashes like the GPU Crash Dump Triggered error. Disabling them can help improve stability and potentially fix the error.
Here’s how to turn off common overlays:
Steam overlay:
- Launch the Steam client and select the tab LIBRARY.
- Right-click on your game and select Properties.
- Select GENERAL and uncheck the box Enable the Steam Overlay while in-game.
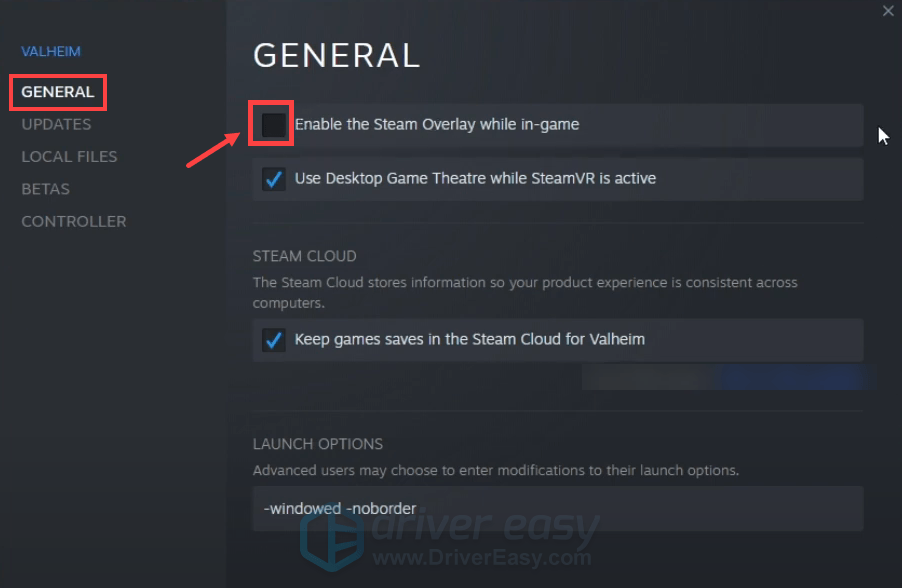
- Apply the changes and exit Steam.
Ubisoft Connect Overlay:
- Open Ubisoft Connect and go to Settings.
- Under General, uncheck Enable in-game overlay for supported games and click Close.
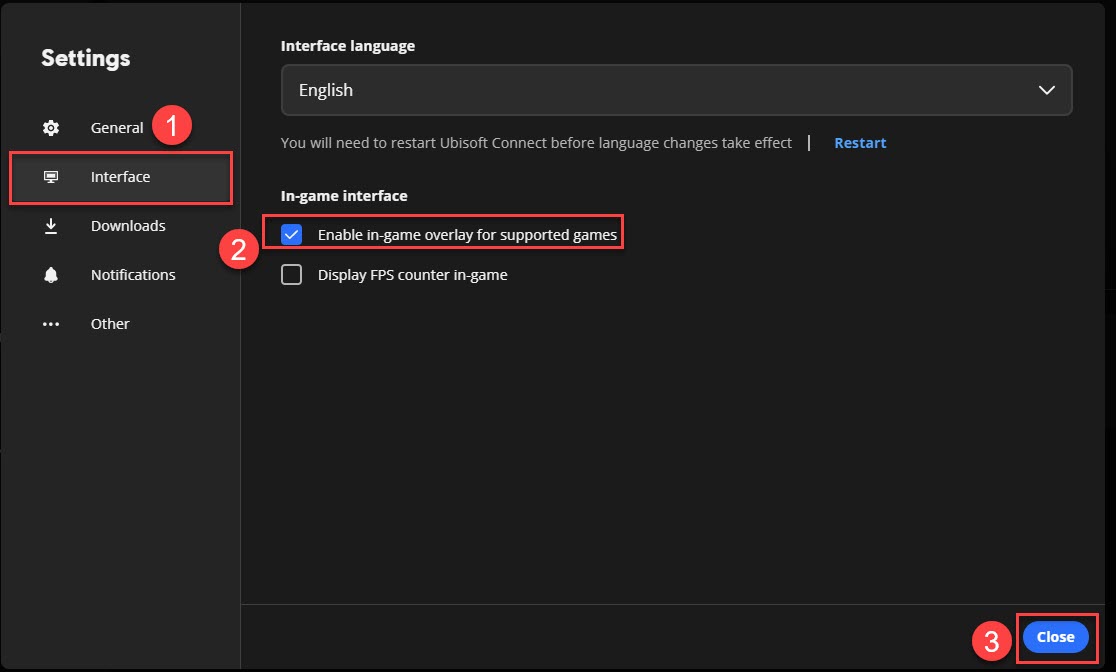
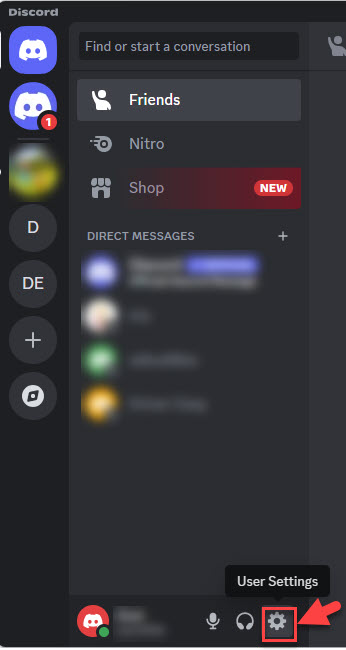
Discord Overlay:
- Click on the User Settings icon.
- Locate and click on Game Overlay. Then toggle off the option Enable in-game overlay.
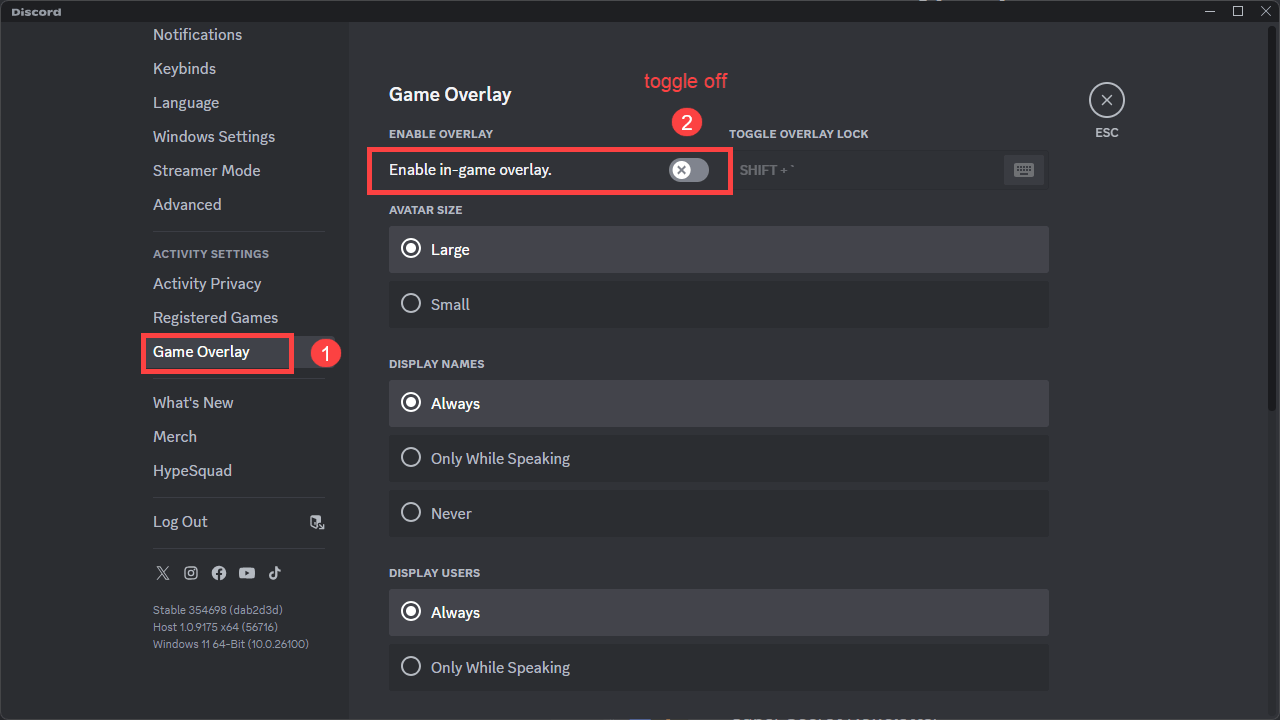
- Apply the changes and exit Discord.
GeForce Experience in-game overlay:
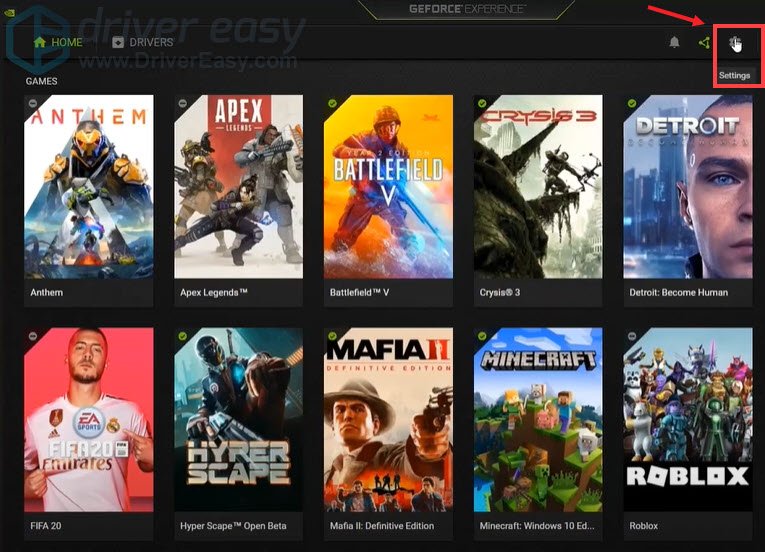
- Click on the Settings icon.
- Under the GENERAL tab, scroll down and switch IN-GAME OVERLAY to OFF.
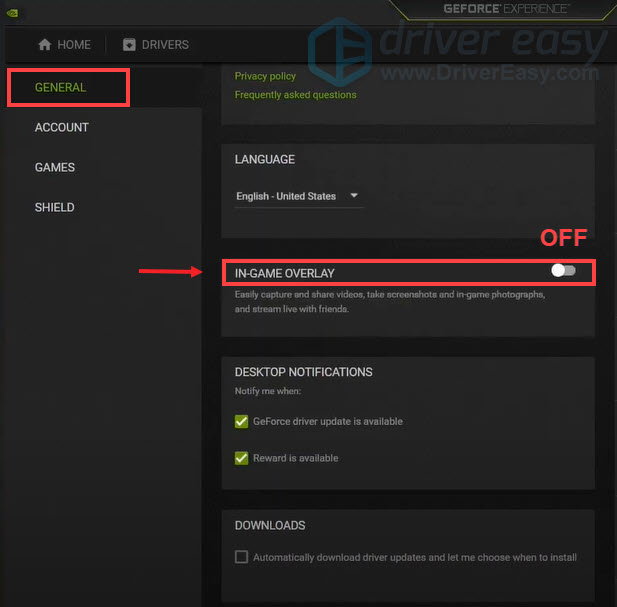
- Apply the changes and exit GeForce.
Also close unnecessary GPU-intensive applications such as screen recorders, monitoring utilities, video editors, and other programs that use hardware acceleration.
Restart your game and see if the crashing issue improves. If it’s still no joy, please proceed to the fixes below.
Fix 7: Verify game files
Corrupted or missing game files are a common cause of crashes, including the GPU Crash Dump Triggered error. These issues can happen if certain files become damaged or are missing due to installation errors, interruptions, or updates.
Most game platforms, like Steam and Epic Games, offer built-in tools to verify the integrity of your game files. This process checks for any corrupted or missing files and replaces them automatically.
Steam:
- Open Steam and go to LIBRARY.
- Right-click on your game and select Properties.
- In the Installed Files tab, click Verify integrity of game files.
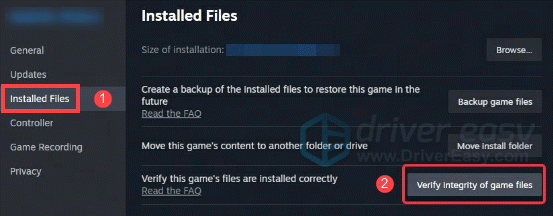
- Wait for the process to complete, then restart your PC and launch the game.
Ubisoft Connect:
- Open Ubisoft Connect and go to My games.
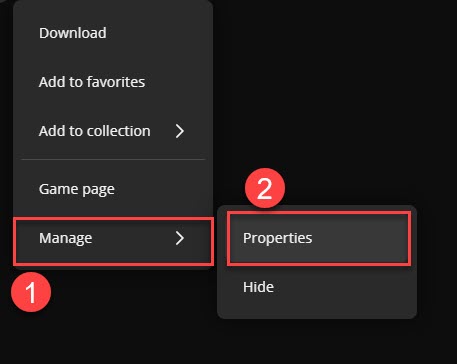
- Click the three-dot icon next to your game, then click Manage > Properties.
- Under Local files, click Verify files.
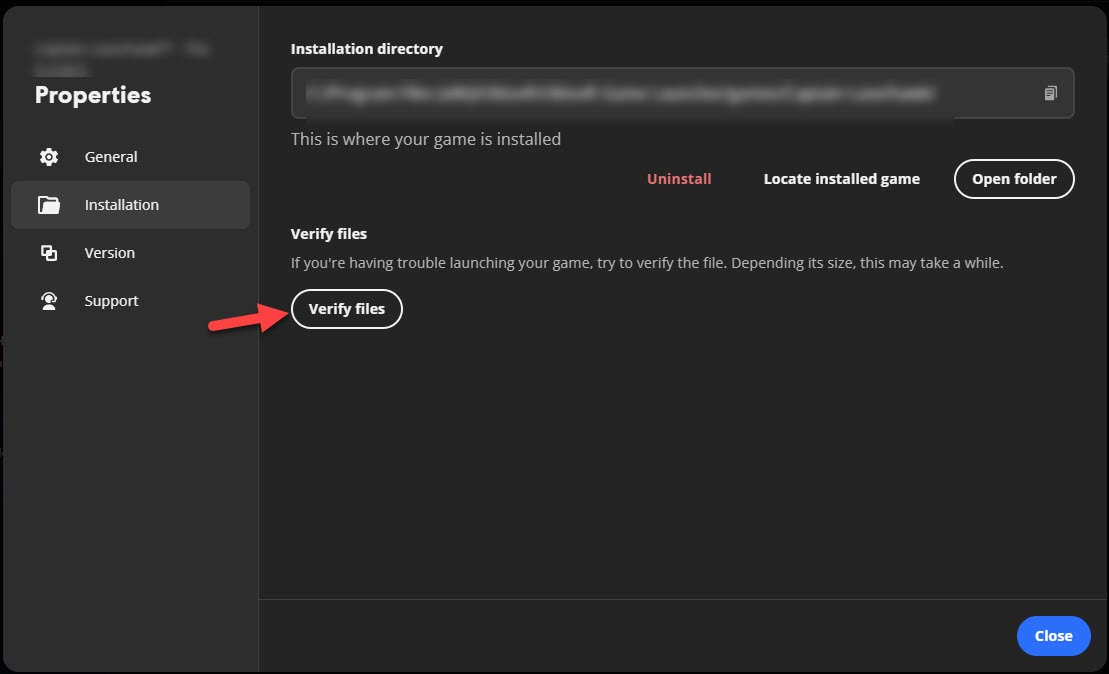
- Once the scan is complete, relaunch the game.
Epic Games Launcher:
- Open Epic Games Launcher and go to Library.

- Click the three dots next to your game and select Manage.
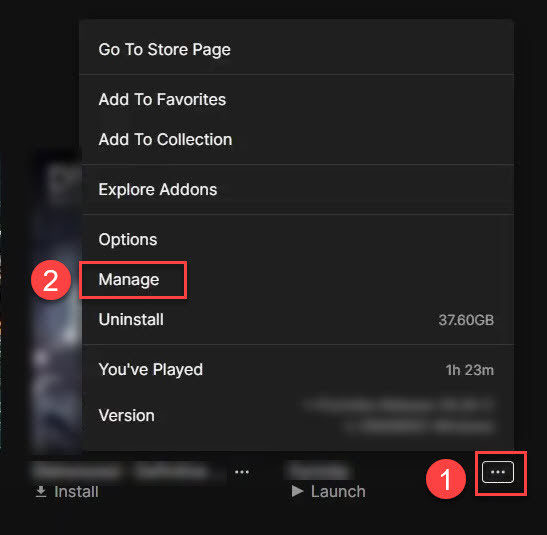
- Scroll down and click VERIFY.
- After verification, restart your PC and try launching the game.
Fix 8: Lower GPU core clock
If your GPU is running too close to its performance limits, it can become unstable and trigger errors like the GPU Crash Dump Triggered crash. This is especially common in games that heavily load the GPU, or if your card is factory overclocked. Slightly lowering the GPU Core Clock can ease the stress on your GPU and help stabilize performance without a noticeable loss in visual quality.
When to try it:
- You’re using a factory-overclocked card: Some factory overclocks aren’t 100% stable across all games and workloads.
- You’re experiencing frequent crashes under heavy load: If crashes mainly happen during graphically intense scenes, it could be a stability issue.
- You’ve recently updated drivers: Sometimes, newer drivers can introduce instability with existing clock speeds.
To lower the GPU core clock: First, download and install MSI Afterburner, a trusted tool for GPU tuning. Once installed, launch MSI Afterburner and locate the Core Clock (MHz) slider. Gently reduce the Core Clock by -50 MHz to start. Apply the settings and then test your game. If crashes persist, you can try lowering it a bit further (in small increments like -25 MHz each time) until the crashes stop.
Remember, don’t make large adjustments all at once — gradual changes are safer and easier to control.
If lowering the Core Clock improves stability, you can keep it at the slightly reduced setting without any noticeable drop in everyday performance.
Fix 9: Run the game on the dedicated GPU
If you’re using a laptop with integrated and dedicated graphics, Windows or the laptop manufacturer’s graphics-switching system may determine which GPU an application uses.
Instead of directly disabling the integrated GPU, make sure your game or the affected application runs on the dedicated GPU. Here’s how:
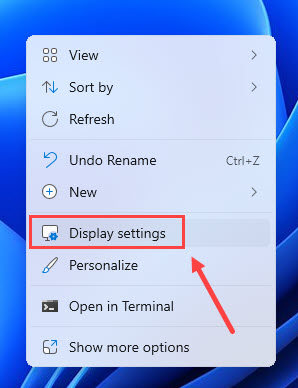
- Right-click on the empty space on your desktop. Then select Display settings.
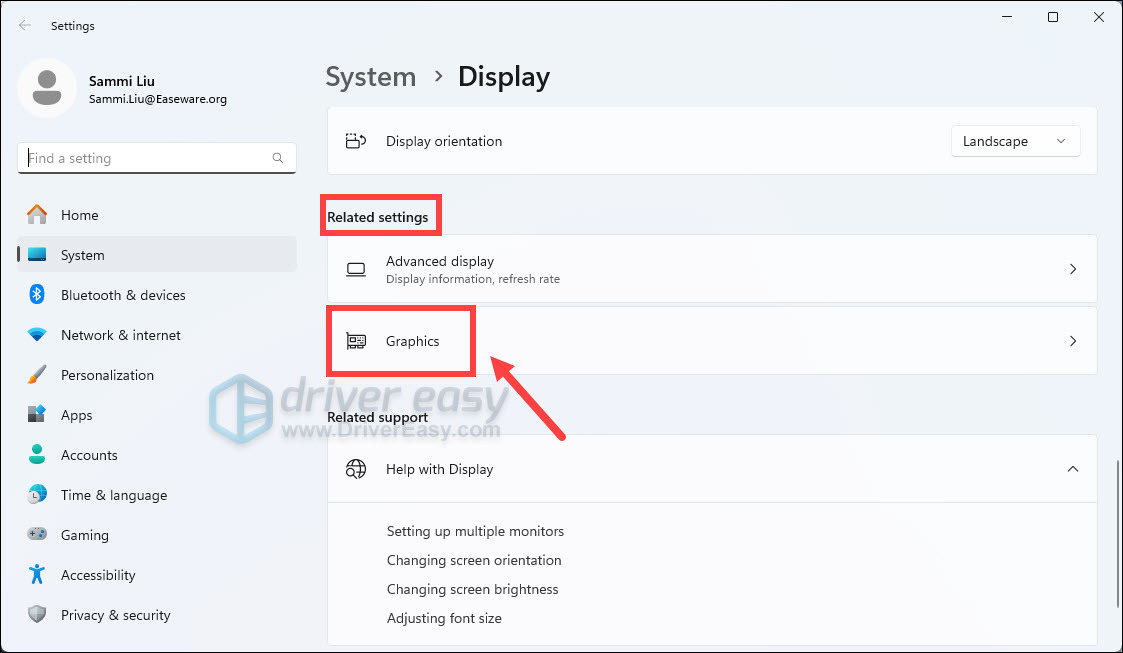
- Scroll down. Under the Related settings section, click on Graphics.
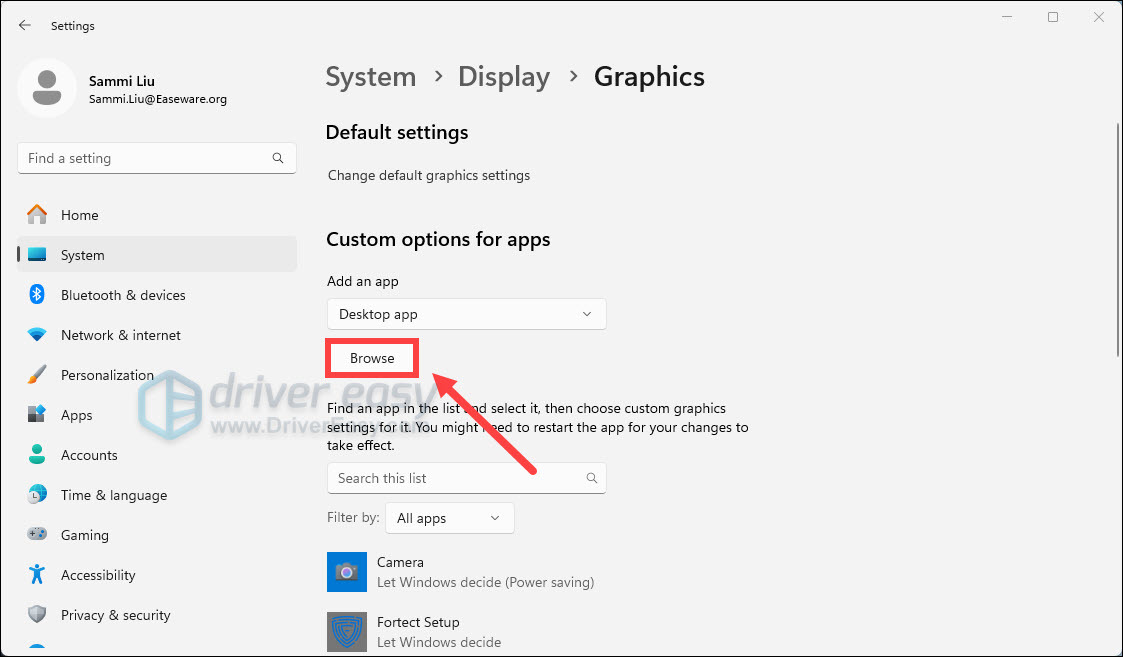
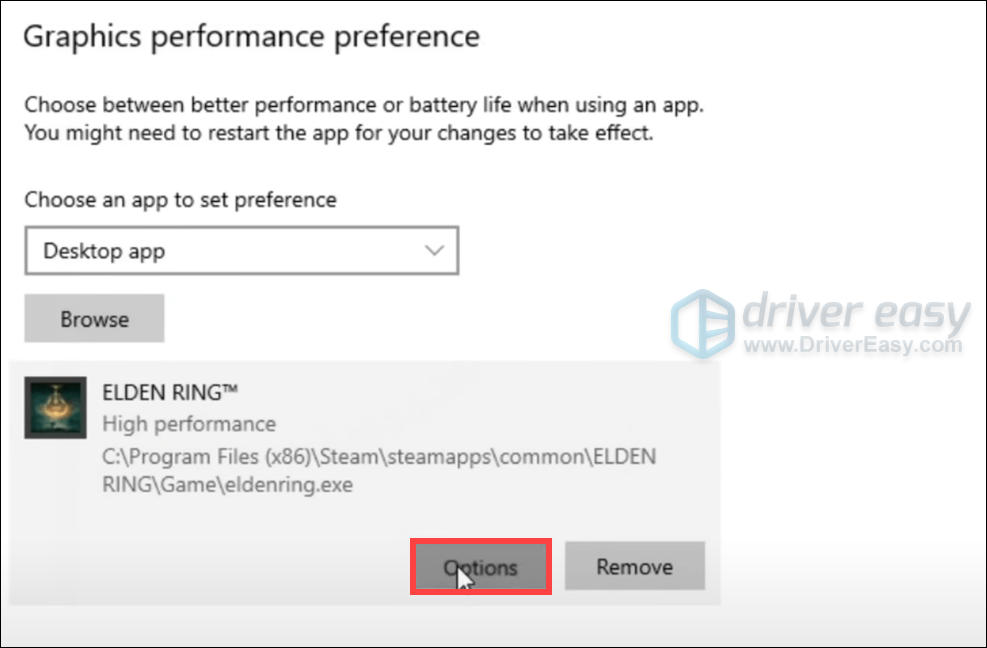
- Click Browse and select the executable file of the program you want to use the dedicated GPU.
- Once added, click on the Options button.
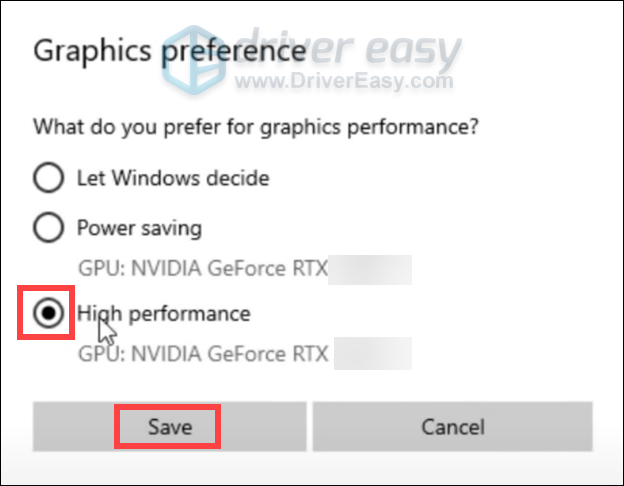
- In the pop-up window, select High performance and click Save.
Restart your game to see if it works as expected now.
Wrap up
The “GPU Crash Dump Triggered” error can be fixed through a variety of methods, from updating drivers to adjusting settings like GPU scheduling and graphics APIs. Hopefully, one of these methods has helped you resolve the issue. If the error persists, try reinstalling the game or contact the GPU manufacturer or game support for further assistance.