


Keep getting the error code 4128 in Call of Duty WW2? This is quite annoying and you’re certainly not the only one who faces it. Many players are reporting this issue. But the good news is that you can fix it. This article is going to show you how to fix the error code 4128 quickly and easily.
Check server status
When something went wrong with your game, the first thing you need to do is to check the server status for Call of Duty: WW2.
If the servers are showing as down, it could be for maintenance, or there could be a problem on the developers’ end. You can contact the game’s developers for assistance.
If all the servers are showing as up, it’s likely something else is going on.
Select your gaming platforms first
If nothing goes wrong with the servers, select your gaming platform and check for the fixes.
Fixes for COD PC Players
Here are some fixes that are useful for many Windows users. You may not have to try them all. Just work your way down the list until you find the one that works for you.
- Log out of Steam and log back in
- Restart your computer
- Run Steam as an administrator
- Verify the integrity of your game files
- Clear Steam cache and cookies
- Update your graphics driver
- Reinstall your Steam client
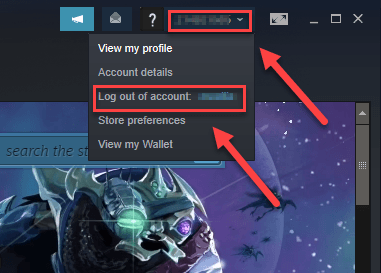
Fix 1: Log out of Steam and log back in
If you’re playing the game on Steam, sometimes the error code 4128 is triggered by a temporary issue that you can fix by logging out your Steam account, then logging back in. Follow the instructions below:
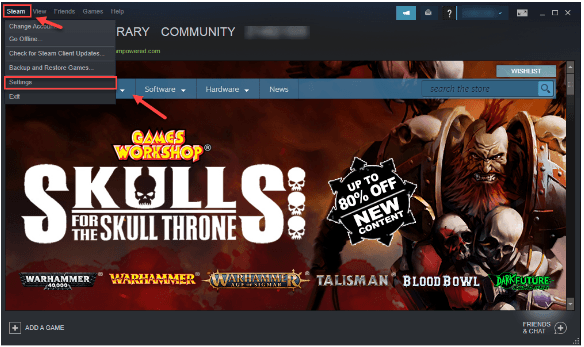
1) Click your account number on the top right corner, then click Log out of account.
2) Click LOGOUT.
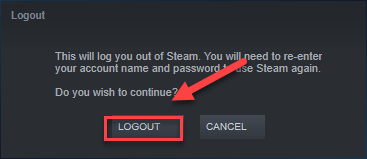
Relaunch Steam and enter your account name and password. Then, try launching your game again to test your issue. If you still receive the error code, don’t worry. There are still 6 fixes to try.
Fix 2: Restart your computer
Some programs may conflict with your game or Steam client, resulting in the error code 4128 while you’re gaming. In this case, restarting your computer might be able to fix your issue.
Relaunch your game after the reboot to see if this worked for you. If not, read on and try the fix below.
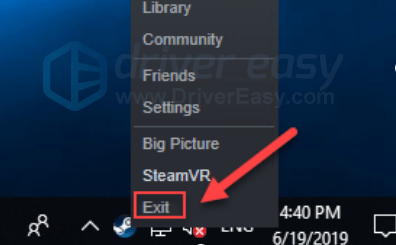
Fix 3: Run Steam as an administrator
Steam sometimes requires the administrator privilege to perform certain functions. Try running your game with administrator privilege to see if that fixes your problem. Here is how:
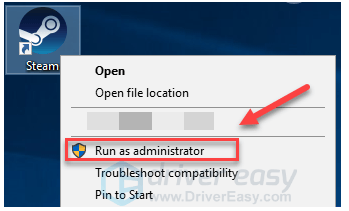
1) If your Steam is running now, right-click the Steam icon on the taskbar and select Exit.
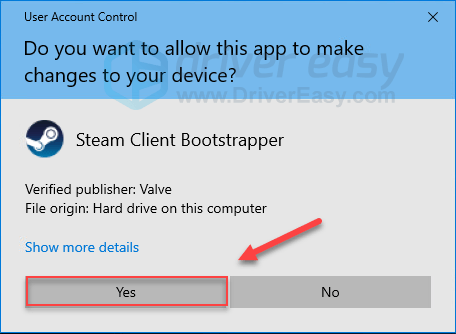
2) Right-click the Steam icon and select Run as administrator.
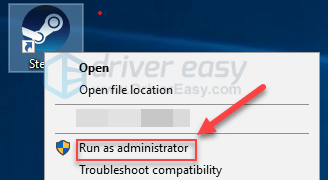
3) Click Yes.
Restart your game to check if this helped. If not, read on and check the fix, below.
Fix 4: Verify the integrity of your game files
You may receive the error code 4128 when a certain game file is damaged or missing. To fix it, try verifying the integrity of your game files on the Steam client. Here is how:
1) Run Steam client.
2) Click LIBRARY.

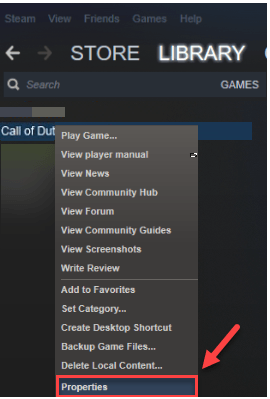
3) Right-click Call of Duty WW2 and select Properties.
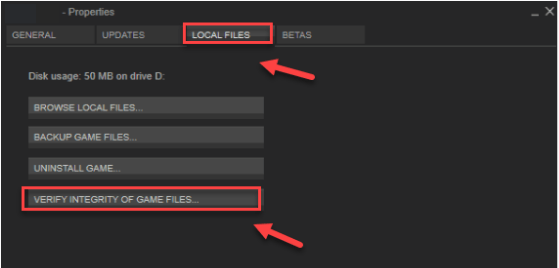
4) Click the LOCAL FILES tab, and then click VERIFY INTEGRITY OF GAME FILES.
5) Wait for Steam to fix any damaged or missing files automatically.
Relaunch your game after the scans. If you still get the error code, don’t fret. There are still 3 more fixes to try.
Fix 5: Clear Steam cache and cookies
Cache files and cookies stored by Steam may also result in the error code 4128. To see if that’s the problem for you, try clearing Steam cache and cookies. Here is how to do it:
1) If your Steam is running now, right-click the Steam icon on the taskbar and select Exit.
2) Right-click the Steam icon, and then select Run as administrator.
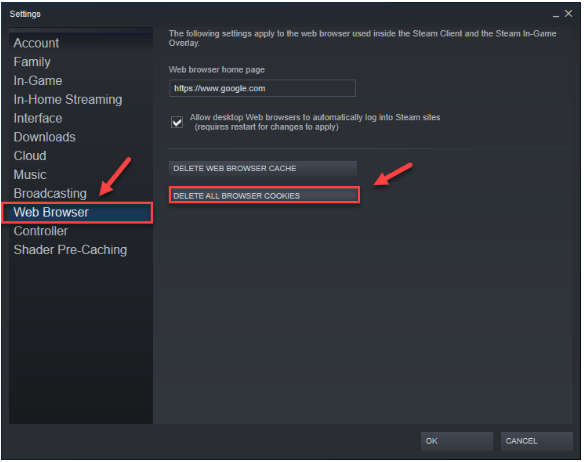
3) Click Steam, and then select Settings.
4) Select Web Browser and click DELETE WEB BROWSER CACHE.

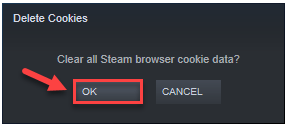
5) Click OK.

6) Click DELETE ALL BROWSER COOKIES.
7) Click OK.
8) Restart your game to test your issue.
Hope it runs smoothly now. If your problem persists, try the fix 5, below.
Fix 6: Update your graphics driver
One of the most common causes of game error code issues is an outdated or faulty graphics card driver. It’s essential that you have the latest correct driver at all times. There are two ways you can update your graphics driver:
Option 1 – Manually – You’ll need some computer skills and patience to update your drivers this way, because you need to find exactly the right the driver online, download it and install it step by step.
OR
Option 2 – Automatically (Recommended) – This is the quickest and easiest option. It’s all done with just a couple of mouse clicks – easy even if you’re a computer newbie.
Option 1 – Download and install the driver manually
The manufacturer of your graphics product keeps updating the driver for your device. To get the latest correct one, you need to go to the manufacturer website, find the drivers corresponding with your specific flavor of Windows version (for example, Windows 32 bit) and download the driver manually.
Once you’ve downloaded the correct drivers for your system, double-click on the downloaded file and follow the on-screen instructions to install the driver.
Option 2 – Automatically update your graphics drivers
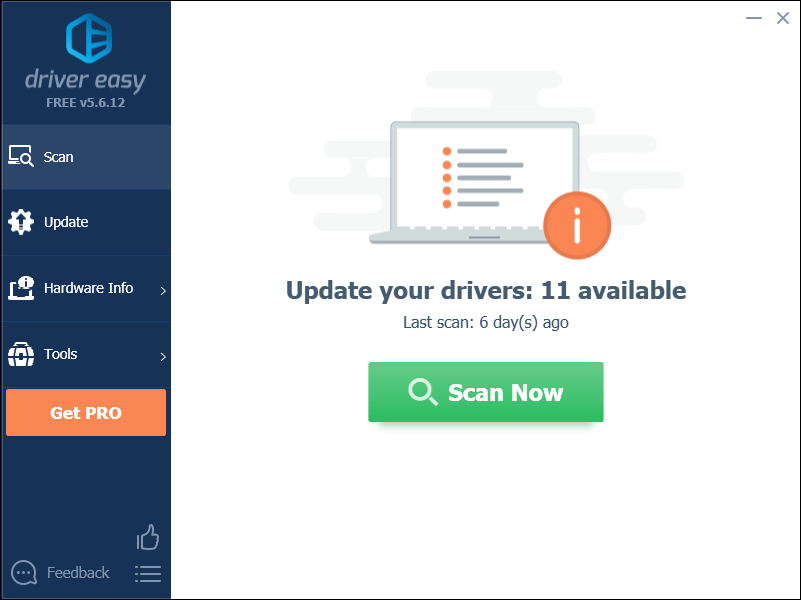
If you don’t have the time, patience or computer skills to update the graphics driver manually, you can do it automatically with Driver Easy.
Driver Easy will automatically recognize your system and find the correct drivers for it. You don’t need to know exactly what system your computer is running, you don’t need to risk downloading and installing the wrong driver, and you don’t need to worry about making a mistake when installing.
You can update your drivers automatically with either the FREE or the Pro version of Driver Easy. But with the Pro version it takes just 2 clicks:
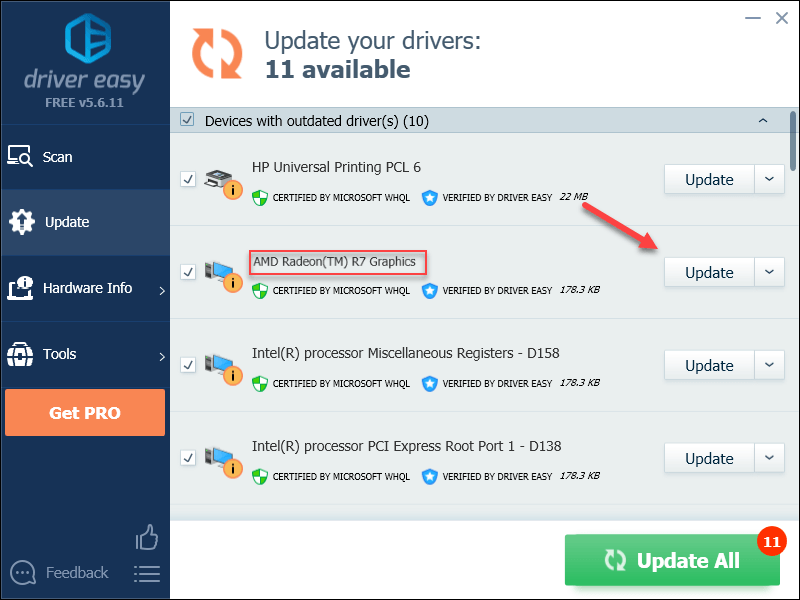
1) Download and install Driver Easy.
2) Run Driver Easy and click the Scan Now button. Driver Easy will then scan your computer and detect any problem drivers.
3) Click Update All to automatically download and install the correct version of all the drivers that are missing or out of date on your system (this requires the Pro version – you’ll be prompted to upgrade when you click Update All).
Fix 7: Reinstall your Steam client
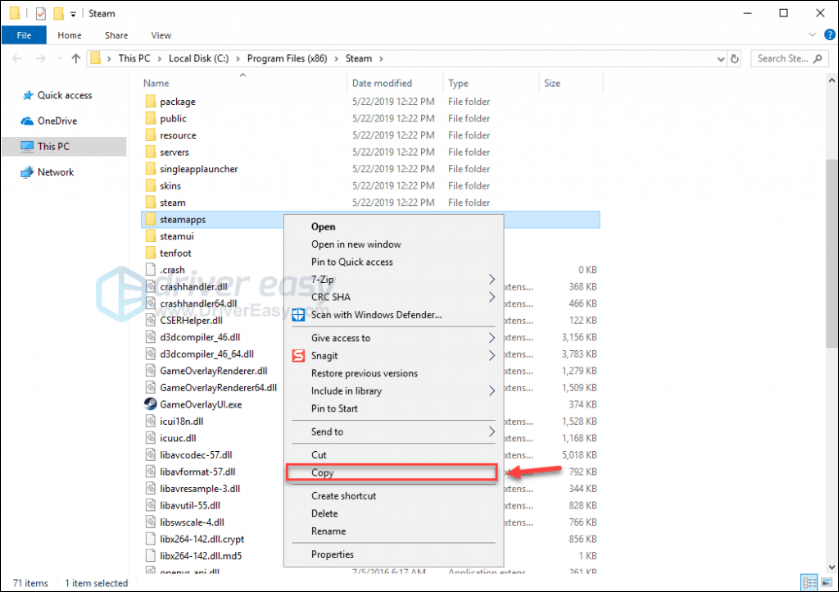
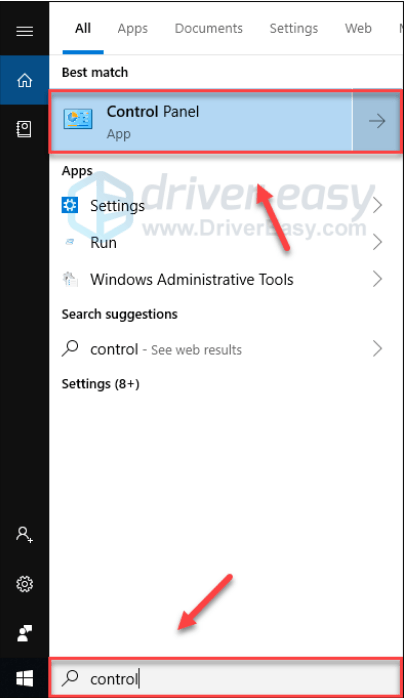
The error code 4128 might appear when certain Steam files are corrupt or missing. In this case, a reinstall is very likely the solution to your problem. Follow the instructions below:
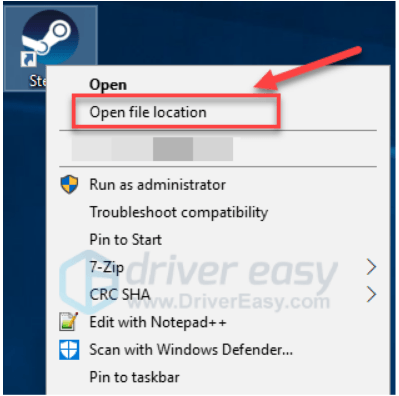
1) Right-click your Steam icon and select Open file location.
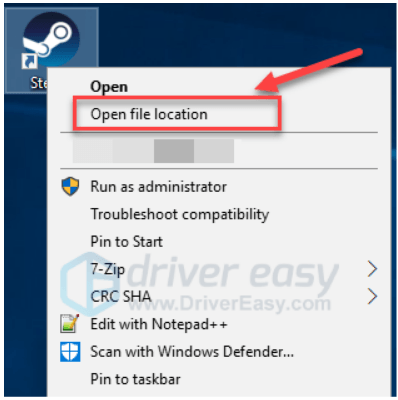
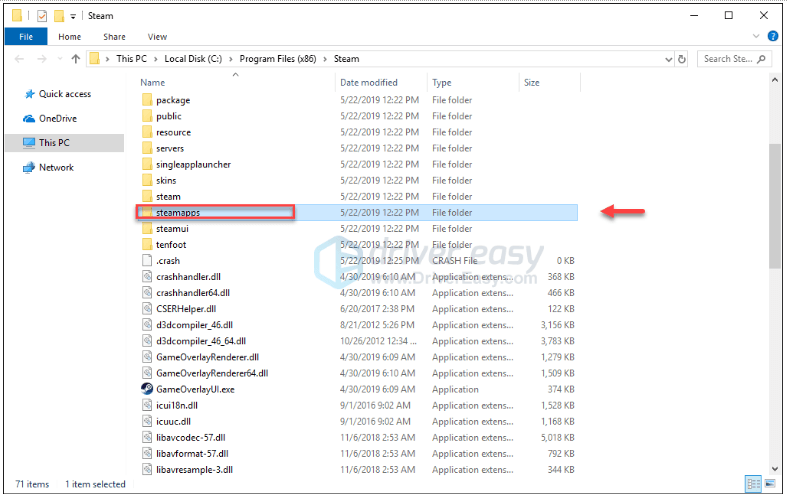
2) Right-click the steamapps folder and select Copy. Then, place the copy in another location to back it up.
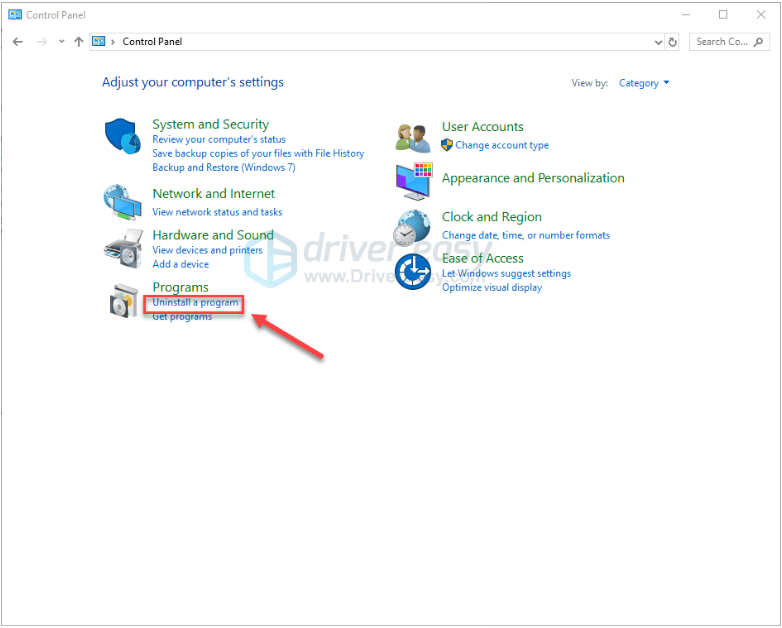
3) On your keyboard, press the Windows logo key and type control. Then, click Control Panel.
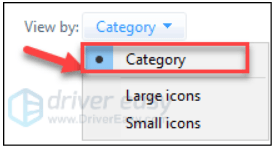
4) Under View by, select Category.
5) Select Uninstall a program.
6) Right-click Steam, and then click Uninstall.
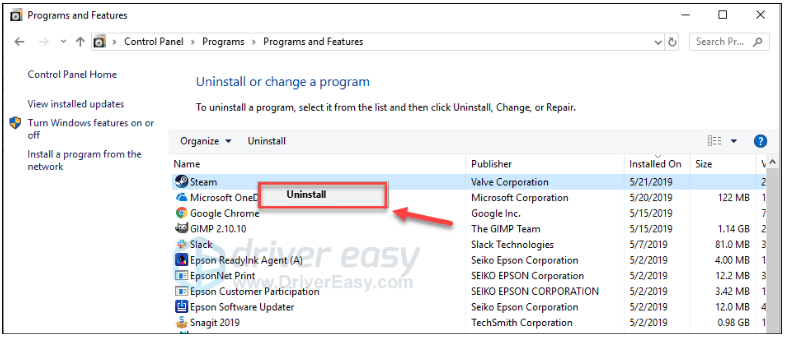
7) Follow the on-screen instructions to uninstall your Steam.
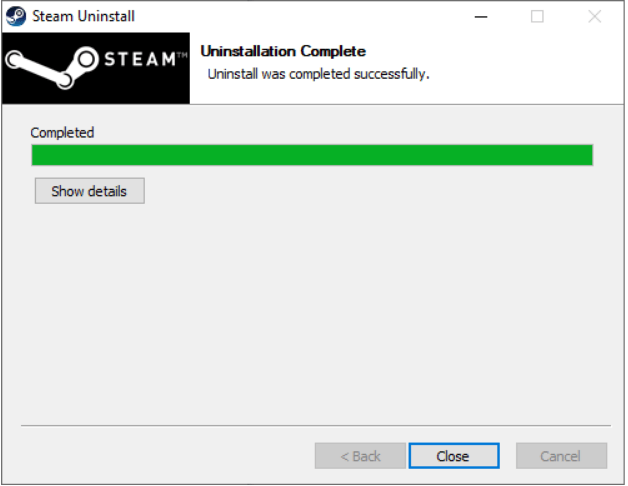
8) Download and install Steam.
9) Right-click your Steam icon and select Open file location.
10) Move the backup steamapps folder you create before to your current directory location.
11) Restart your game to see if this fixed the error code issue.
Hopefully, your game works correctly now. Enjoy!
Fixes for Xbox One Players
If you’re gaming with your Xbox One and the error code 4128 appears while you’re gaming, check the fixes below.
You may not have to try them all. Just work your way down the list until you find the one that works for you.
Fix 1: Sign out and back in
One quick fix to the error code 4128 issue is signing out of your Xbox One, and then signing back in. After logging into your account again, try launching your game to test your issue. If you still get the error message, try the fix, below.
Fix 2: Restart your console
If the solution above didn’t fix the error code 4128, you should try restarting your console. Here is how to do it:
1) Press and hold the power button on the front of the console for 10 seconds to turn off your Xbox One.
2) Wait for 1 minute, then turn your console back on.
Relaunch your game to see if this fixed your issue. If you still get the error code 4128, move on to the fix, below.
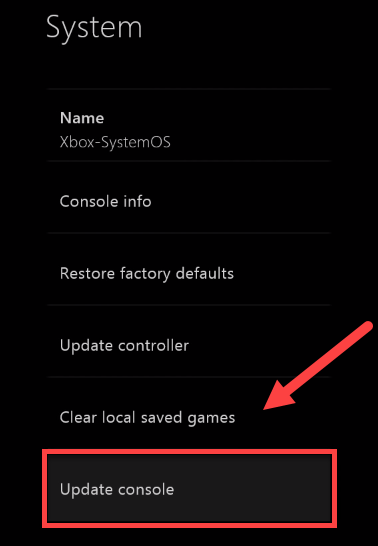
Fix 3: Update your console
An outdated Xbox One system might also cause this problem for you. So, you should update your Xbox One to see if the error code 4128 issue can be fixed. Here is how to do it:
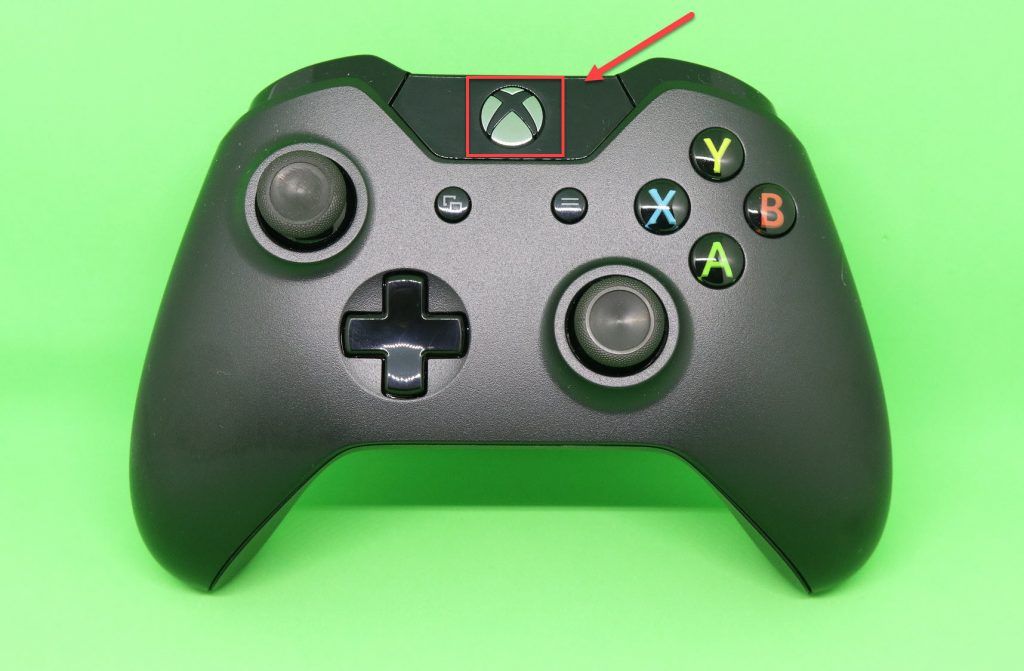
1) On the home screen, press the Xbox button to open the guide.
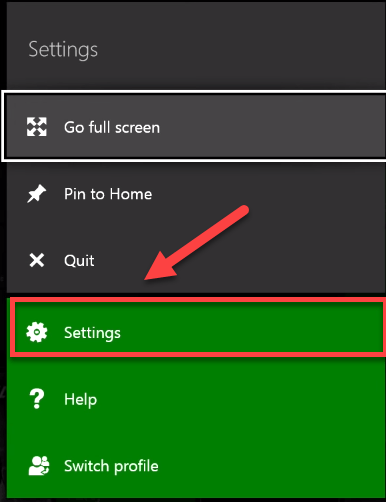
2) Select Settings.
3) Select System.

4) Select Update console.
After the update is complete, restart your game to see if it runs correctly now. If your problem still exists, move to the fix below.
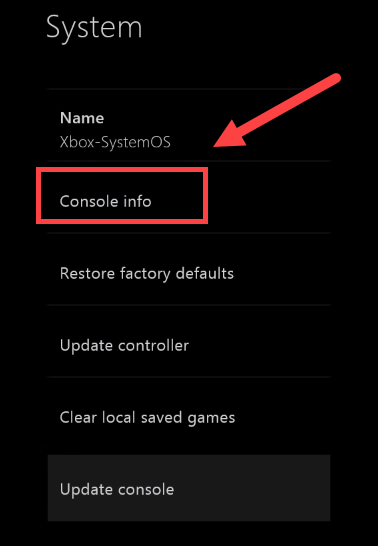
Fix 4: Reset your console
Improper console settings can also cause game errors for you. In this case, try resetting your Xbox to default factory settings. Here is how to do it:
1) On the home screen, press the Xbox button to open the guide.
2) Select Settings.
3) Select System.
4) Select Console info.
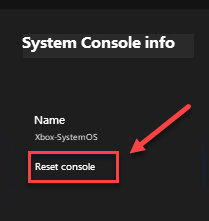
5) Select Reset console.
6) Select Reset and keep my games & apps.
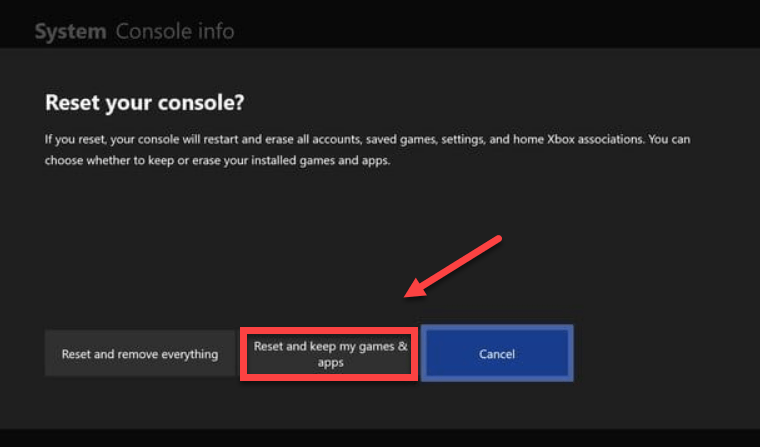
After resetting your console, restart your game to test your issue. If your problem persists, check the fix below.
Fix 5: Reinstall your game
You’re likely to run into the error code 4128 when your game file is corrupted or damaged. To fix it, you’ll need to reinstall your game. Here is how to do it:
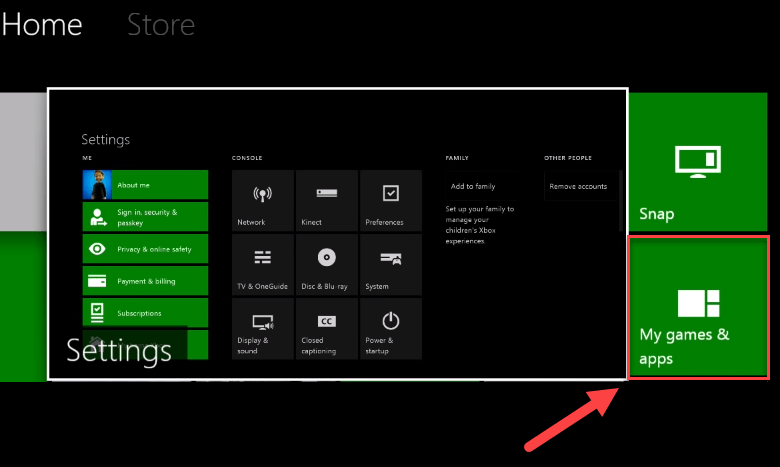
1) On the home screen, press the Xbox button to open the guide.
2) Select My games & apps.
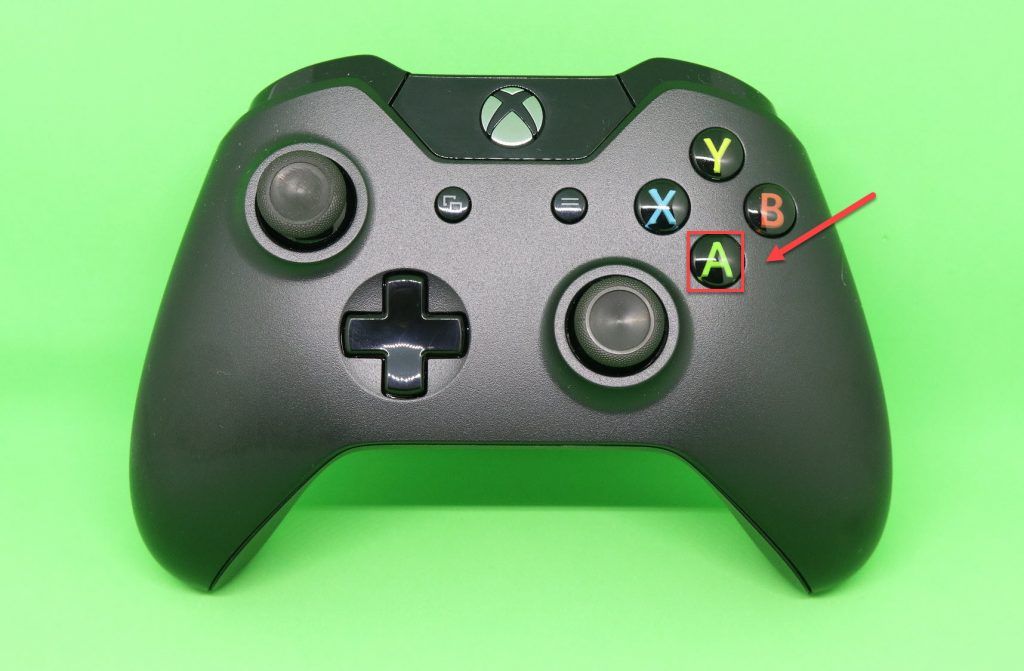
3) Press the A button on your controller.
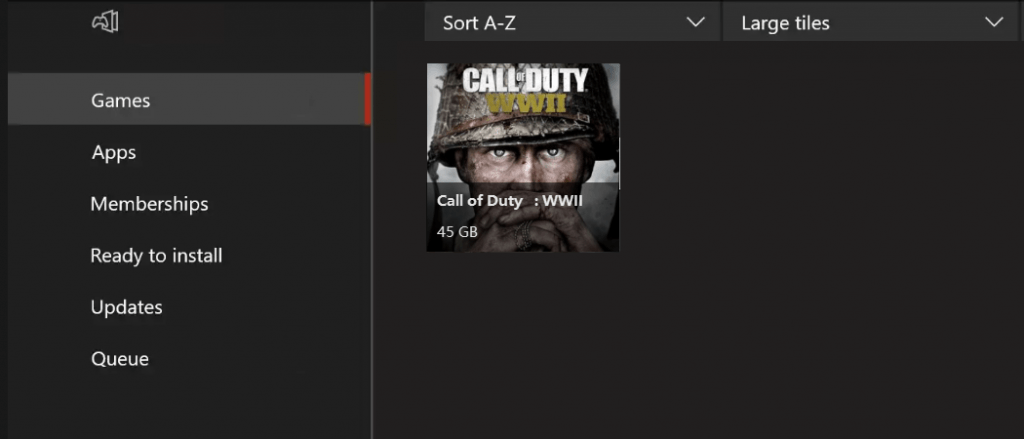
4) Highlight your game, press the ☰ button.
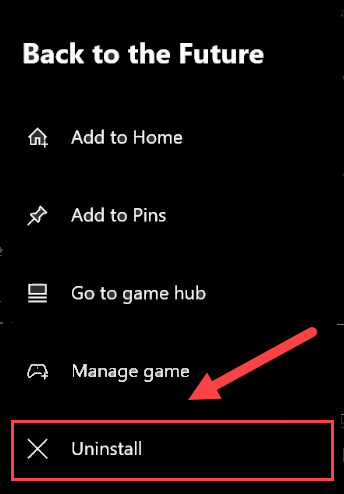
5) Select Uninstall.
6) After the game is uninstalled, insert the game disc into the drive to download and install Call of Duty: WW2.
Hope one of the fixes above worked for you.
Fixes for PlayStation 4 Players
If you get the error code 4128 on your display while you’re gaming on your PlayStation 4, here are some fixes that might help.
You may not have to try them all. Just work your way down the list until you find the one that works for you.
- Log out of your PS4 and log back in
- Restart your PS4
- Update your PS4 system software
- Restore your PS4 settings to default
Fix 1: Log out of your PS4 and log back in
This is the quickest and easiest fix to try when you get the error code 4128 on PlayStation 4. Just sign out of your account, then sign back in.
Now run the game again and test to see whether your game can run properly. If it’s not, move on to Fix 2, below.
Fix 2: Restart your PS4
One quick fix to game issues on PS4 is restarting your device. Here is how:
1) On the front panel of your PS4, press the power button to turn it off.
2) After your PS4 is turned off completely, unplug the power cord from the back of the console.
3) Wait for 3 minutes, and then plug the power cord back into your PS4.
4) Press and hold the power button again to restart your PS4.
5) Restart your game to see if this helped.
If your problem still exists, don’t worry. There are still 2 more fixes to try.
Fix 3: Update your PS4 system software
Outdated system software may also lead to game issues on your PS4. In this case, updating your PS4 system software is very likely the solution to your problem. Here is how to make it:
1) On the home screen of your PS4 system, press the up button on your controller to go to the function area.

2) Select Settings.
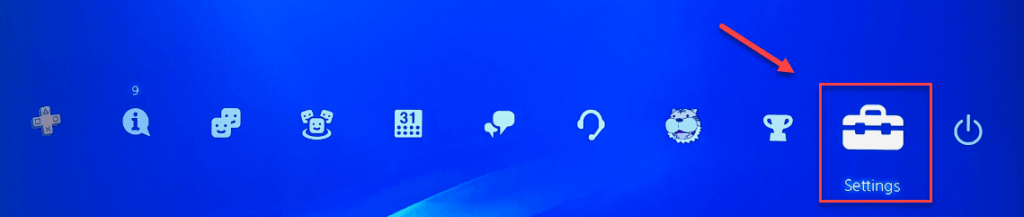
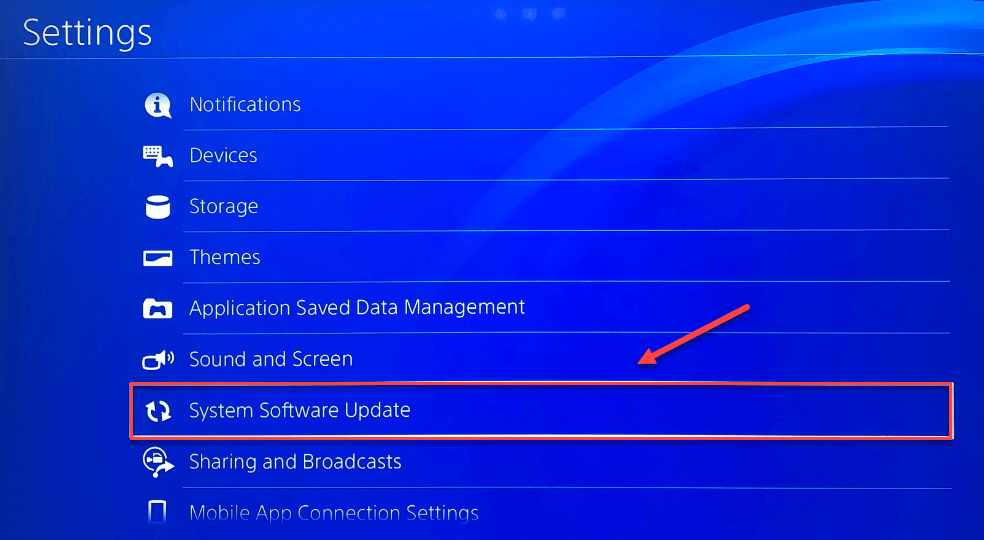
3) Select System Software Update, and then follow the on-screen instructions to update the system software for your PS4.
4) Restart your game to see if this resolved your issues.
If your problem persists after the latest version of the system software is installed on your PS4, try the fix below.
Fix 4: Restore your PS4 settings to default
Another method to fix the Call of Duty WW2 error code 4128 is restoring your PS4 to the default factory settings. Here is how:
1) On the front panel of your PS4, press the power button to turn it off.
2) After your PS4 is turned off completely, press and hold the power button.
3) After you hear two beeps from your PS4, release the button.
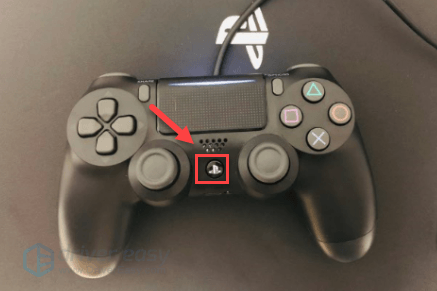
4) Connect your controller to your PS4 with a USB cable.
5) Press the PS button on your controller.
6) Select Restore to Default Settings.
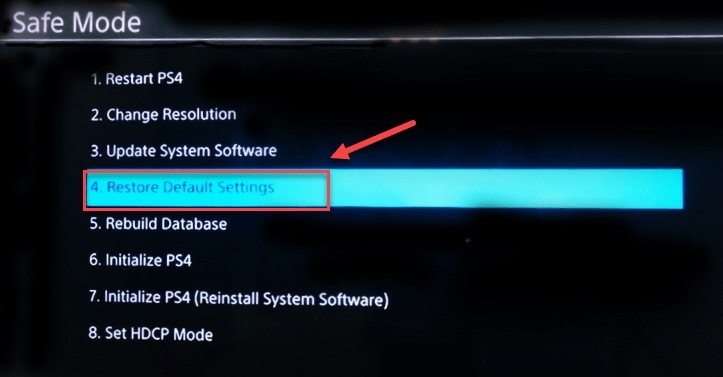
7) Select Yes and wait for the process to be complete.
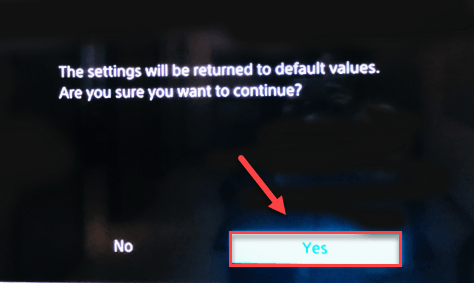
8) Restart your game to see if this fix worked.
Hopefully, this article helped in resolving your problem! If you have any questions or suggestions, please feel free to leave a comment below.