


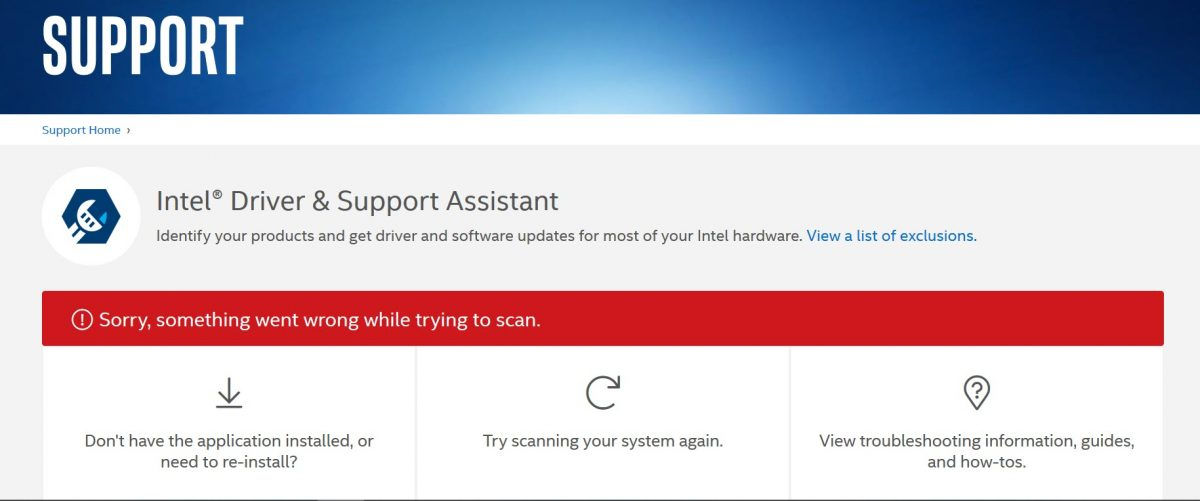
Intel Driver and Support Assistant can help you get the latest drivers automatically, but first you need to make sure it’s working properly. Recently many users reported the program is showing issues like not updating and not detecting hardware. If you happen to be on the same boat, don’t worry. This might not be so hard to fix at all.
Try these fixes:
You might not need to try all of them. Simply work your way down until you find the one that does the trick.
- Some quick checkups
- Perform a clean boot
- Reinstall Intel Driver and Support Assistant
- Use Driver Easy to update drivers automatically
- Scan and repair corrupted files
Some quick checkups
Before you move further, here are some quick steps that you can check if the Intel DSA scan isn’t working properly:
- Clear the browser cache and restart the browser, then try the Intel Driver and Support Assistant scan again.
- Try to use Firefox, Chrome, or Edge for the scan instead of other browsers.
- Try disabling your ad Blocking extensions and privacy-related extensions (if you have any installed) on the Intel Driver & Support Assistant webpage.
If Intel DSA scan still isn’t working, please move on.
Fix 1: Perform a clean boot
Though Driver and Support Assistant is a free official updater, it has its limits and can’t always be reliable. And given that we all have different setups, it’s possible that the utility ran into compatibility issues. To find out, you can do a clean boot. This will start your PC with the minimum services.
here’s how:
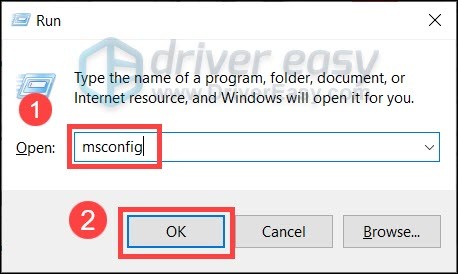
- On your keyboard, press Win+R (the Windows logo key and the r key) at the same time to invoke the Run box. Type or paste msconfig and click OK.
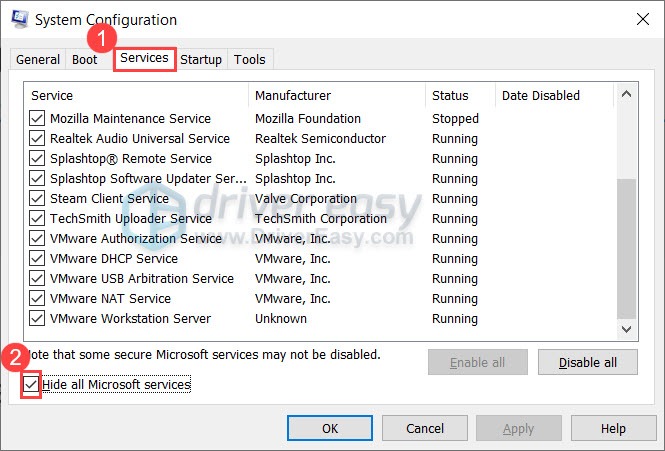
- In the pop-up window, navigate to the Services tab and check the box next to Hide all Microsoft services.
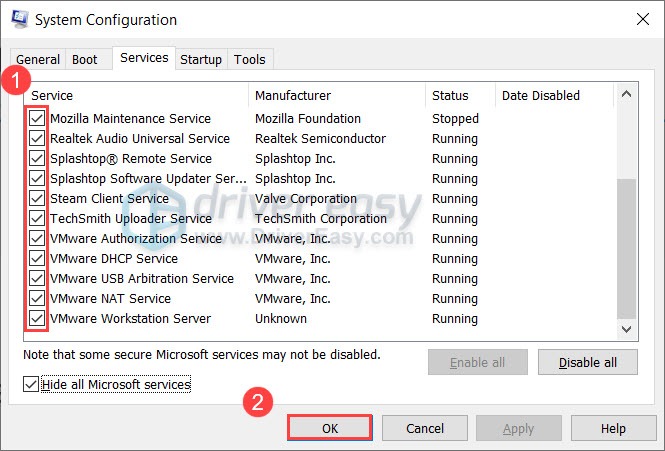
- Uncheck all the services EXCEPT those belong to your hardware manufacturers, such as Realtek, AMD, NVIDIA, Logitech and Intel. Then click OK to apply the changes.
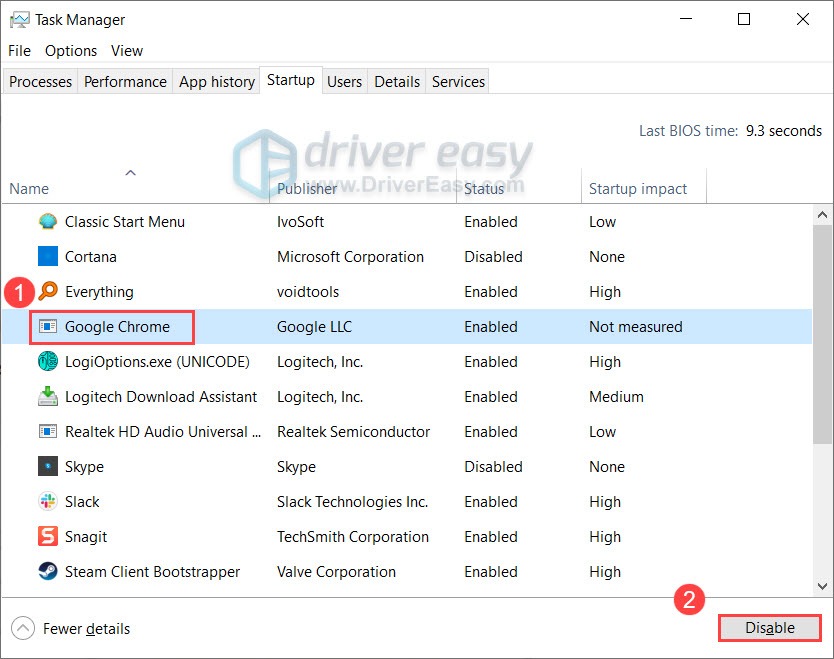
- On your keyboard, press Ctrl, Shift and Esc at the same time to open Task Manager, then navigate to the Startup tab.
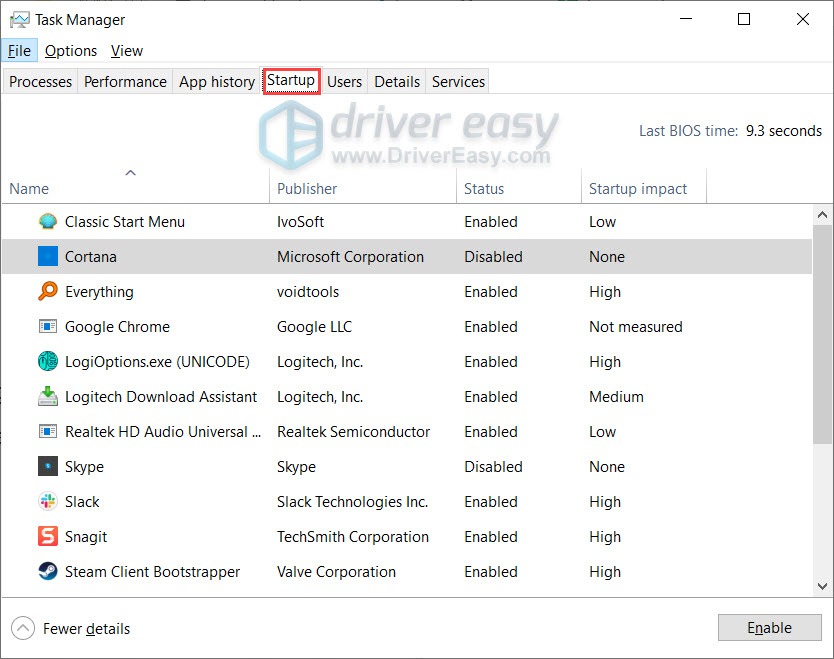
- One at a time, select any programs you suspect might be interfering, and click Disable.
- Restart your PC.
Once done, restart Driver and Support Assistant and check if it’s working properly. If it is, repeat the steps and only disable half of the services and programs to root out the offenders.
If this method doesn’t work for you, take a look at the next fix.
Fix 2: Reinstall Intel Driver and Support Assistant
If you’re using an old version of Driver and Support Assistant or something went wrong during the installation, you can do a reinstallation and see how it goes.
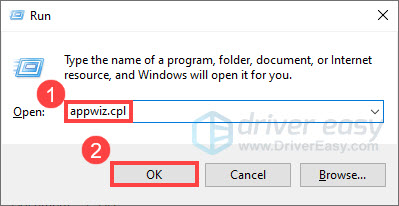
- First you need to remove Driver and Support Assistant completely. On your keyboard, press Win+R and type appwiz.cpl. Click OK.
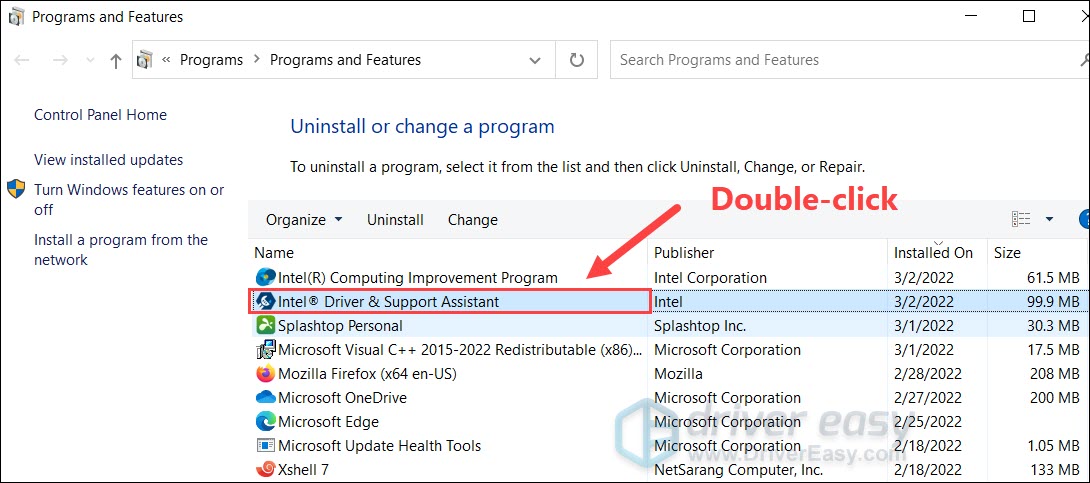
- Double click Intel Driver and Support Assistant and follow the on-screen instructions to uninstall.
- Once done, restart your PC and repeat the steps to make sure you removed everything related.
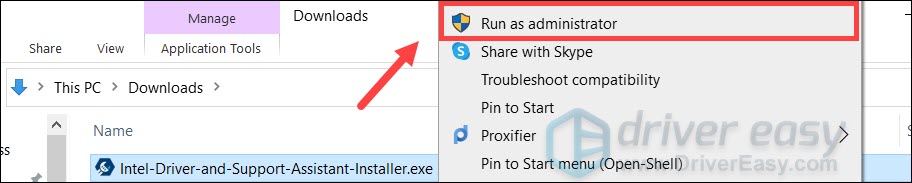
- Then you can go to the official download page to get the latest installer. Once downloaded, right click the installer and choose Run as administrator.
- After installing the program, restart your PC.
- On your keyboard, press Ctrl+Shift+Esc to open Task Manager. Navigate to the Services tab and check if DSAservice and DSAUpdateService is Running. If not, right click to start them.

- Now you can test the new program and see how it works.
If this trick doesn’t work for you, check out the next one below.
Fix 3: Use Driver Easy to Update Drivers Automatically
New drivers usually mean bug fixes and performance boost. Normally you don’t need to worry about device drivers as long as they’re still working. But it’s a different story if your PC is not working properly, or you’re an avid gamer who needs to make the most of the hardware.
If you’re a power user, you can update drivers by visiting the motherboard/GPU manufacturer’s websites, finding the latest correct drivers and installing one by one. But if you’re not comfortable playing with device drivers, you can update them automatically with Driver Easy. It’s a tool that detects, downloads and installs any driver updates your computer needs.
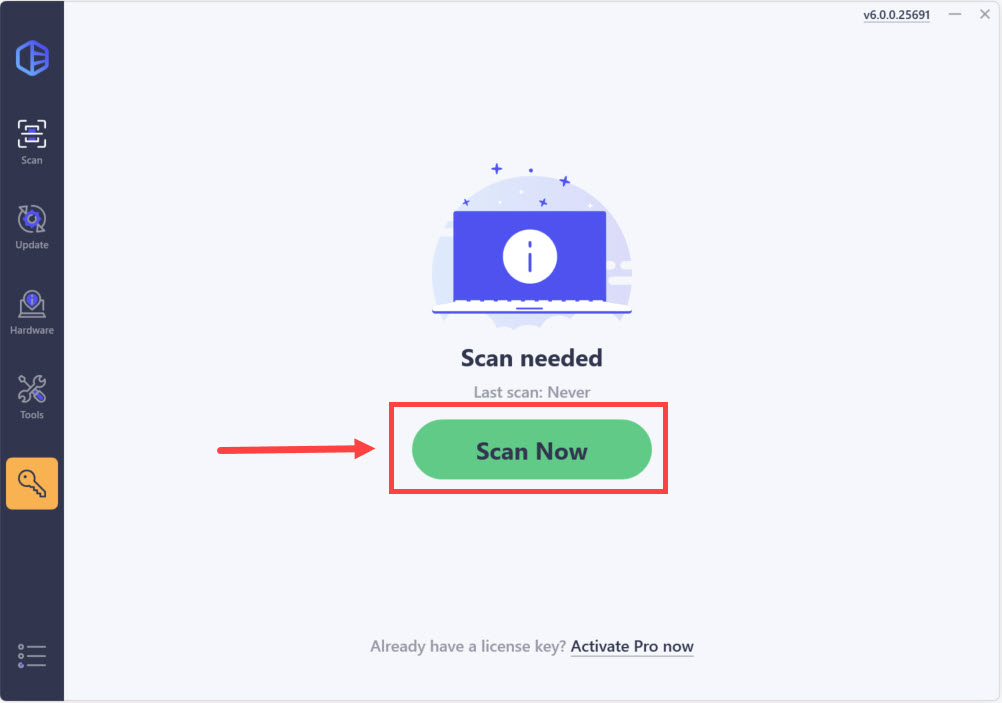
- Download and install Driver Easy.
- Run Driver Easy and click the Scan Now button. Driver Easy will then scan your computer and detect any problem drivers.
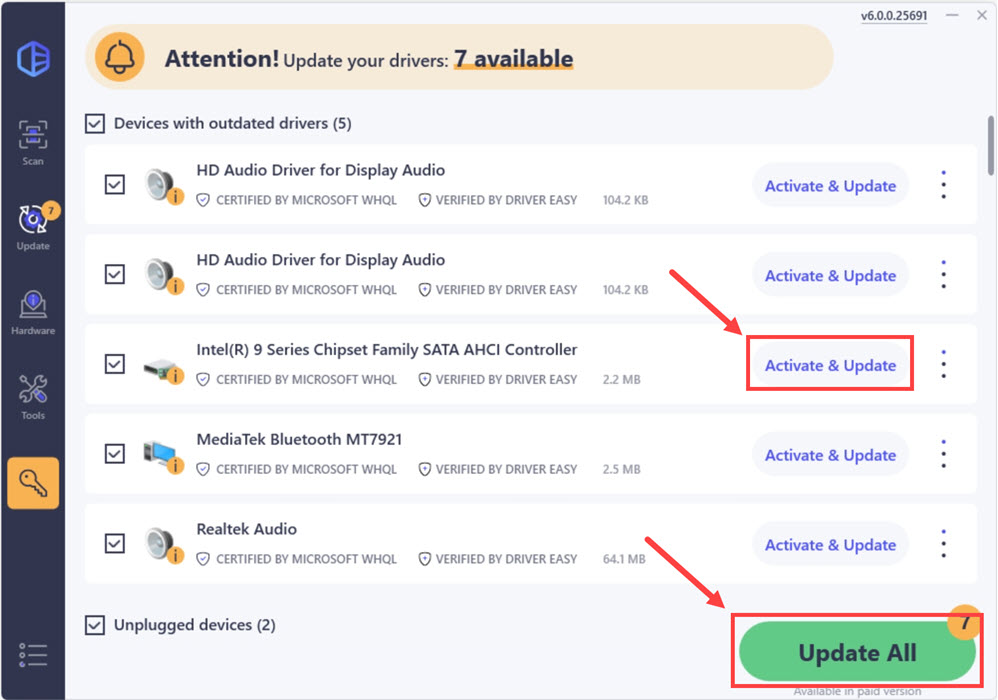
- Click Update All to automatically download and install the correct version of all the drivers that are missing or out of date on your system. (This requires the Pro version which comes with full support and a 30-day money-back guarantee. You’ll be prompted to upgrade when you click Update All. If you’re not ready to buy the Pro version, Driver Easy offers a 7-day free trial which includes access to all the Pro features such as high-speed download and one-click install. You won’t be charged anything until your 7-day trial has ended.)
- Restart your computer for the changes to take effect.
Fix 4: Scan and repair corrupted files
If none of the fixes work for you, chances are you may be looking at a system issue. But before you take the nuclear approach to reinstall Windows, you can run a full scan to detect broken system files a Windows built-in utility.
Step 1. Scan corrupt files with System File Checker
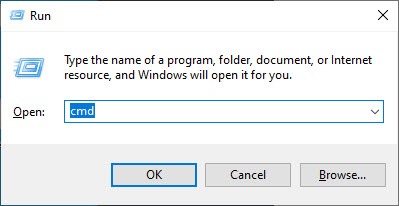
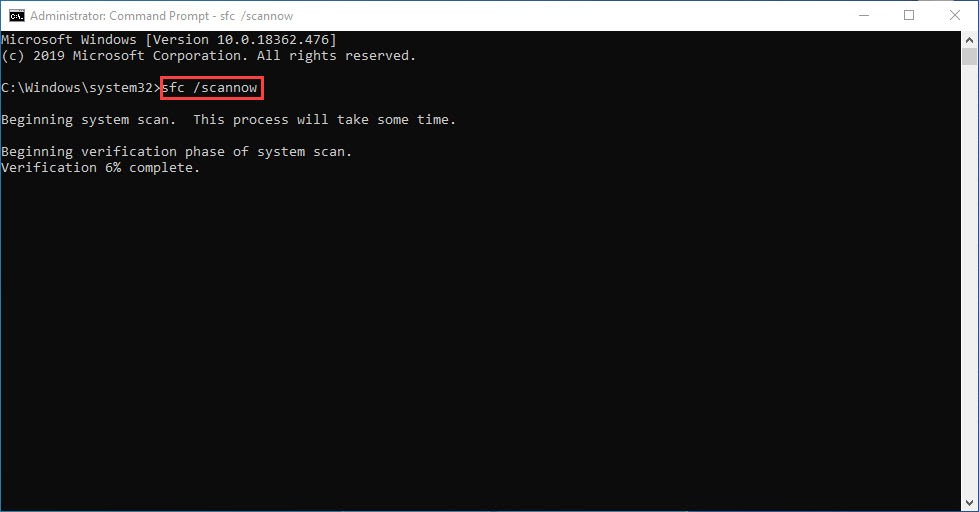
1) On your keyboard, press the Windows logo key and R at the same time to open the Run box. Type cmd and press Ctrl+Shift+Enter to run Command Prompt as administrator.
Click Yes when prompted for permission to make changes to your device.
2) In the Command Prompt, type the following command and hit Enter.
sfc /scannow
3) System File Check will begin to scan all system files and repair any corrupted or missing ones it detected. This may take 3-5 minutes.
4) You may receive something like the following messages after the verification.
- no errors
- it fixed some errors
- could not fix all errors
- could not fix errors at all
- ……
No matter what message you receive, you can try running dism.exe (Deployment Image Servicing and Management) to further scan the health of your PC.
Step 2. Run dism.exe
1) Run Command Prompt as admin and enter the following commands.
- This command line will scan the health of your PC:
dism.exe /online /cleanup-image /scanhealth
- This command line will restore the health of your PC:
dism.exe /online /cleanup-image /restorehealth
2) After the restore health process finishes, you may get some error messages.
- If restore heath gave you errors, you can always try this command line. This will take up to 2 hours.
dism /online /cleanup-image /startcomponentcleanup
- If you get Error: 0x800F081F with the restore health scan, reboot your PC and run this command line.
Dism.exe /Online /Cleanup-Image /AnalyzeComponentStore
If the System File Check finds any files corrupted, follow the on-screen instructions to repair them, and then restart your computer for the changes to take full effect.
Hopefully this helps you fix the Intel DSA not working issue. If you have any questions or ideas, leave a comment down below and we’ll get back asap.