


VALORANT is a character-based tactical shooter video game from Riot Games launching worldwide. Though enjoying its fame, the game has some unchecked small corners including the Error Code VAN 6. Players have been looking for a fix. If you happened to be one of them, you’ve come to the right place. In this article, we’ll walk you through how to get rid of this error.
Try these fixes
You may not need to try them all; simply work your way down the list until you find the one that works for you.
- Allow VALORANT through Windows Firewall
- Update your network adapter driver
- Change your DNS server to Google
- Change VALORANT priority to normal
- Enable Vanguard service and change its startup type
- Reinstall Vanguard
Fix 1: Allow VALORANT through Windows Firewall
These error codes are mainly associated with a network or internet connection issue. So in order to fix it, you need to first make sure that your firewall is not blocking your game. To do this, take the steps as follow.
1) In the Search box, type windows firewall and click Windows Defender Firewall from the results.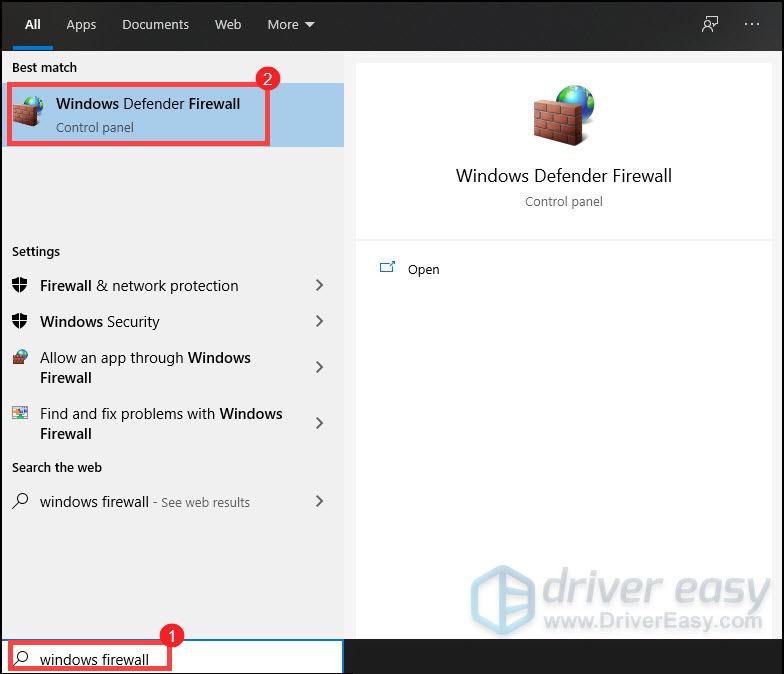
2) From the left panel, click Allow an app or feature through Windows Defender Firewall.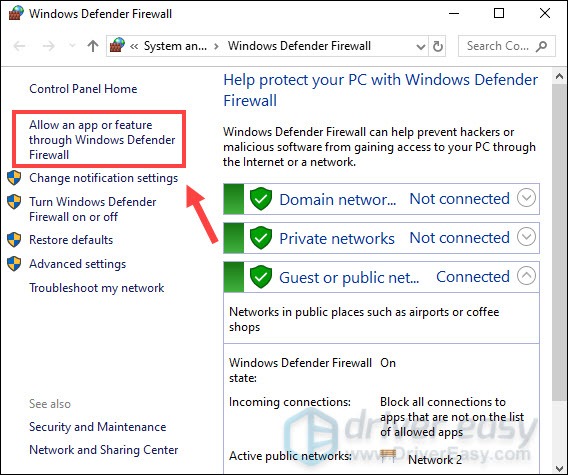
3) Click Change settings if it’s enabled on your end. Then click Allow another app.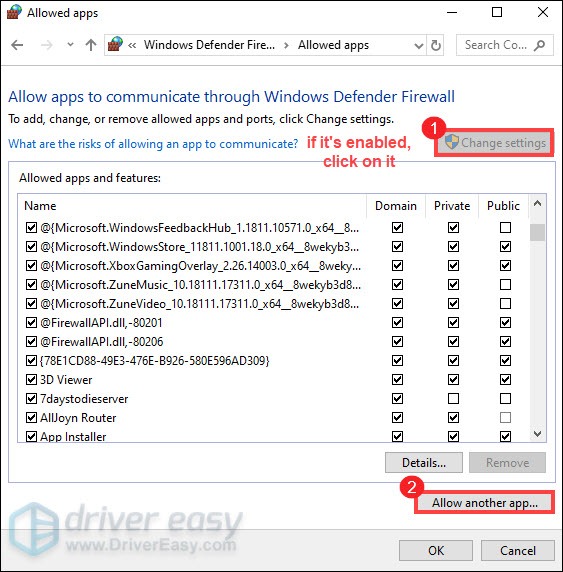
4) Before you add Valorant through Windows Defender Firewall, you need to know where your game is installed. To do this, follow the steps below:
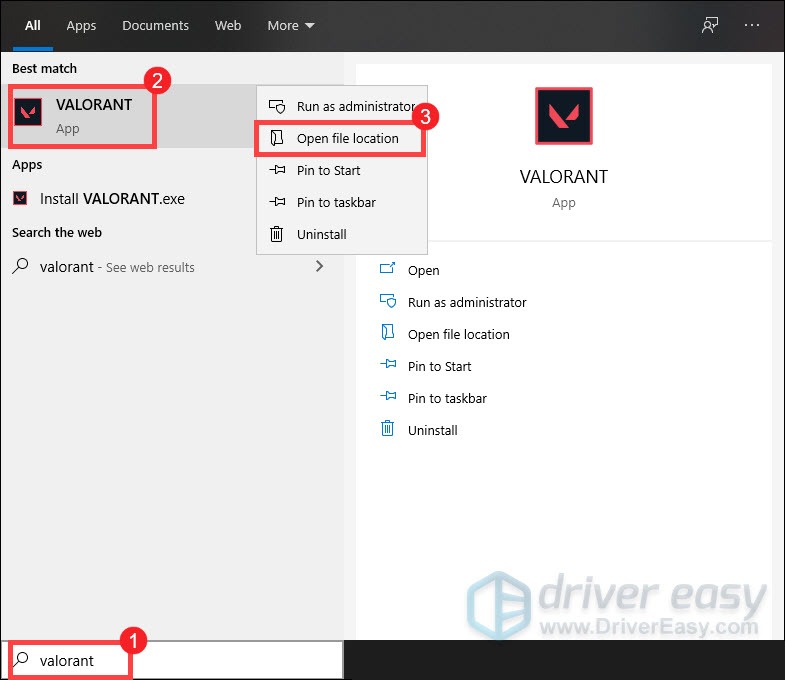
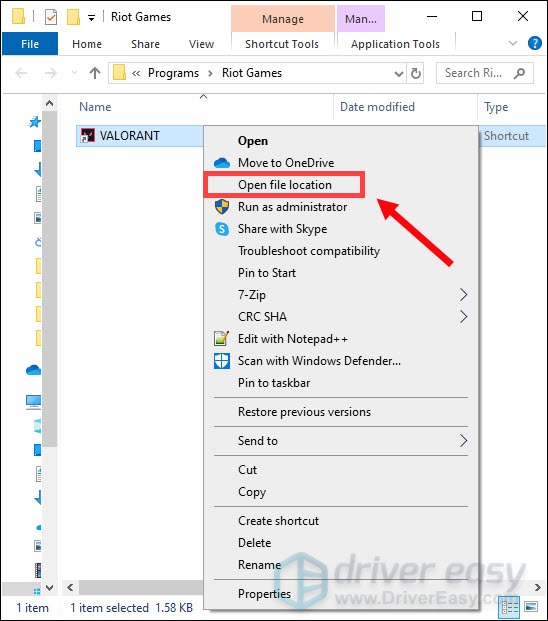
- In the Search box, type valorant. Right-click VALORANT and select Open file location.
- When the window opens, right-click on VALORANT Shortcut and select Open file location.
- In the address bar, copy the directory path.
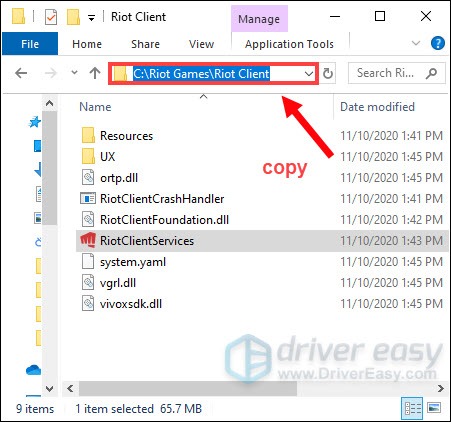
Now you can close the window.
5) Go back to Add an app window. Click on the Browse button.
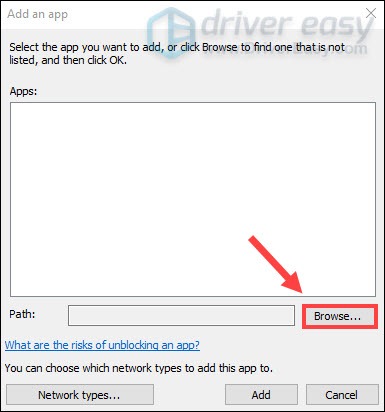
6) When the window opens, click on the address bar. Right-click and select Paste to paste the address that you have just copied in the address bar. Then hit Enter on your keyboard.
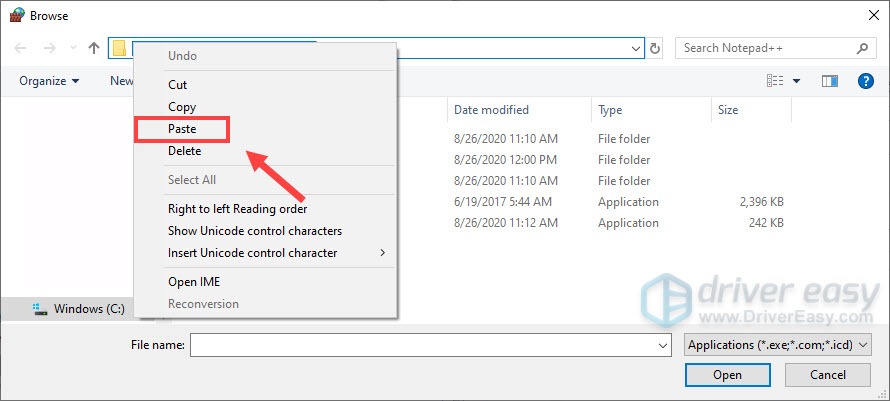
7) Click RiotClientServices.exe and click Open.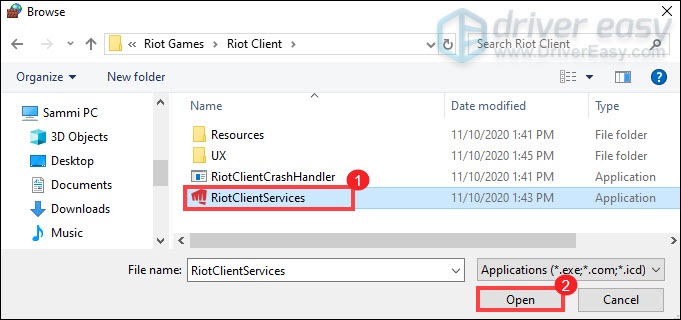
8) Click Add.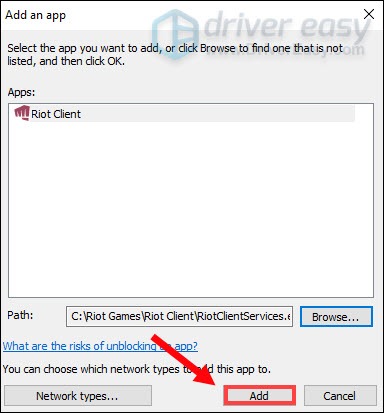
9) Locate Riot Client and make sure that it’s enabled on Domain, Private, and Public networks. 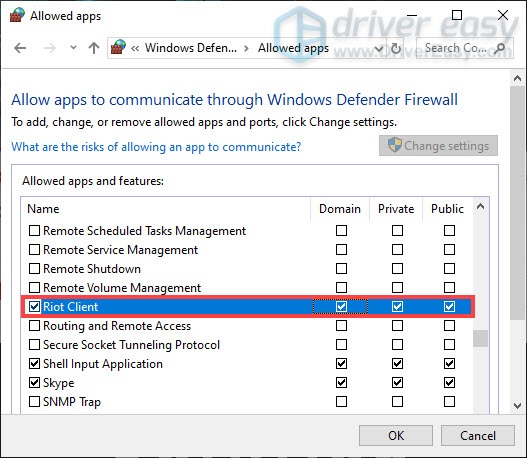
After you’ve done these, follow similar steps to add two more executables, VALORANT.exe and VALORANT-Win64-Shipping.exe, separately.
VALORANT.exe: open the folder Riot Games > VALORANT > live
VALORANT-Win64-Shipping.exe: open the folder Riot Games > VALORANT > live > ShooterGame > Binaries > Win64
After you’ve added the essential in-game ports through your Windows Defender Firewall, close the window and also the VALORANT Launcher. Then reopen the launcher and check if the error persists.
Fix 2: Update your network adapter driver
These error messages are related to network or server connectivity issues. So your outdated network adapter driver can be the culprit and make your game unplayable. To fix it, you’re supposed to update your network adapter driver, especially if you can’t remember when was the last time you updated it.
You can manually update your network adapter driver by going to the manufacturer’s official website to download and install the correct network driver for your system.
OR
You can do it automatically with Driver Easy. It will automatically recognize your system and find the correct driver for it. You don’t need to know exactly what system your computer is running or risk downloading and installing the wrong driver.
Here’s how to update your drivers with Driver Easy:
1) Download and install Driver Easy.
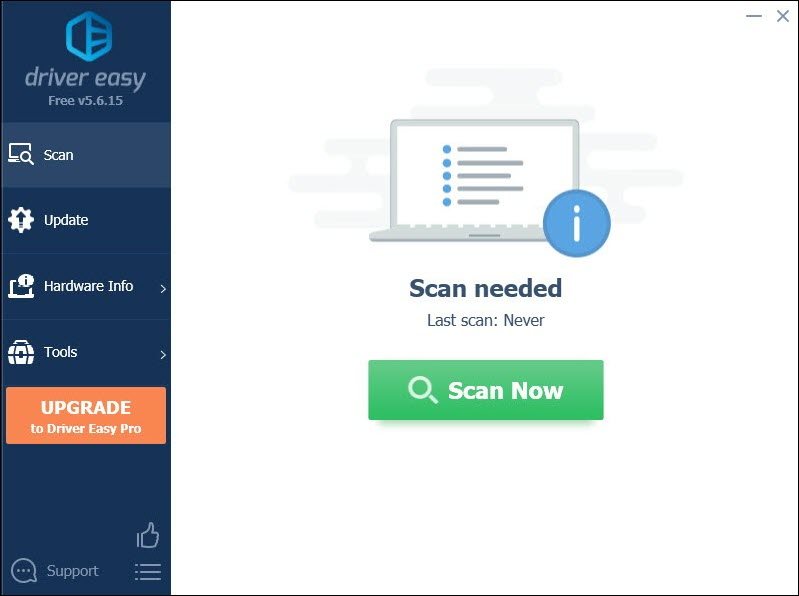
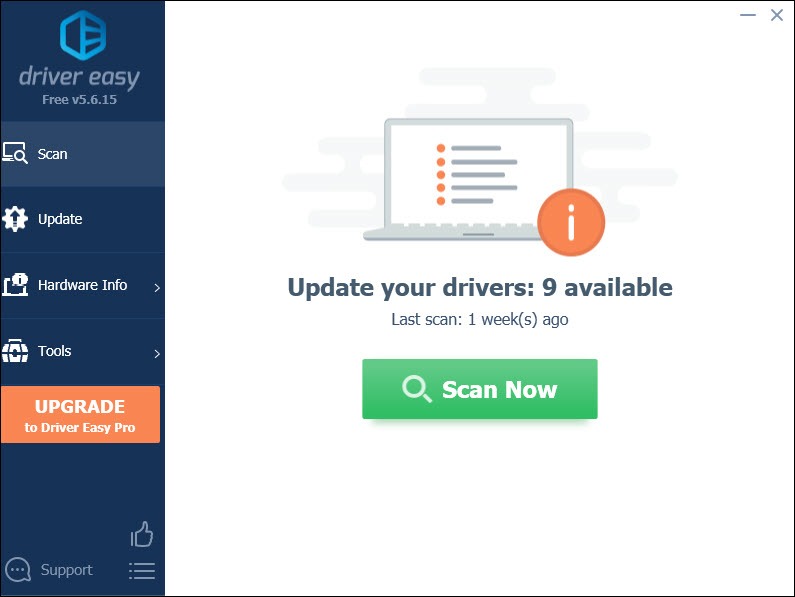
2) Run Driver Easy and click the Scan Now button. Driver Easy will then scan your computer and detect any problem drivers.
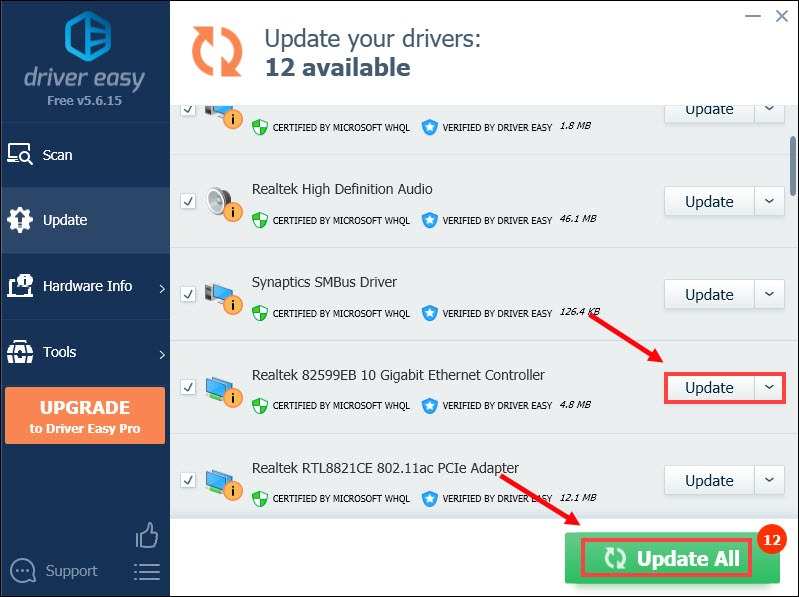
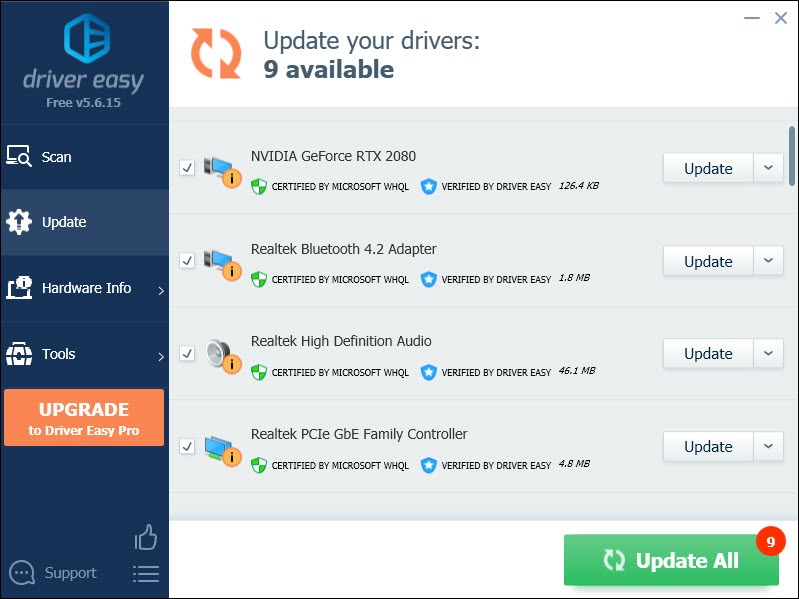
3) Click Update All to automatically download and install the correct version of all the drivers that are missing or out of date on your system.
(This requires the Pro version which comes with full support and a 30-day money-back guarantee. You’ll be prompted to upgrade when you click Update All. If you don’t want to upgrade to the Pro version, you can also update your drivers with the FREE version. All you need to do is to download them one at a time and manually install them.)
After updating your drivers, restart your computer. If you still get this error code, you can try updating your graphics driver, which has proved to be working for some players.
There are mainly two ways you can update your graphics driver: manually and automatically.
Option 1: Manually update your graphics driver
To update your graphics driver manually, you can go to the official website:
Then find the drivers corresponding with your Windows version and download the drivers manually. Once you’ve downloaded the correct drivers for your system, double-click on the downloaded file and follow the on-screen instructions to install the drivers.
Option 2: Automatically update your graphics card driver (recommended)
If you don’t have the time, patience, or computer skills to update drivers manually, you can do it automatically with Driver Easy.
Driver Easy will automatically recognize your system and find the correct drivers for it. You don’t need to know exactly what system your computer is running or risk downloading and installing the wrong driver.
1) Download and install Driver Easy.
2) Run Driver Easy and click the Scan Now button. Driver Easy will then scan your computer and detect any problem drivers.
3) Click Update All to automatically download and install the correct version of all the drivers that are missing or out of date on your system. (This requires the Pro version which comes with full support and a 30-day money-back guarantee. You’ll be prompted to upgrade when you click Update All. If you don’t want to upgrade to the Pro version, you can also update your drivers with the FREE version. All you need to do is to download them one at a time and manually install them.)
After updating your drivers, restart your computer for them to take effect.
Fix 3: Change your DNS server to Google
Sometimes your ISP-supplied DNS server might be slow or not properly configured for caching, which can effectively slow your connection. So it could be the reason why you’re getting the error codes. To fix it, you need to change your DNS server. And Google DNS is recommended.
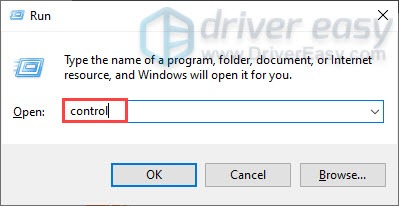
1) On your keyboard, press the Windows logo key and R at the same time to open the Run dialog box.
2) Type control and then press Enter on your keyboard to open the Control Panel.
3) Click Network and Internet. (Note: make sure you view the Control Panel by Category.)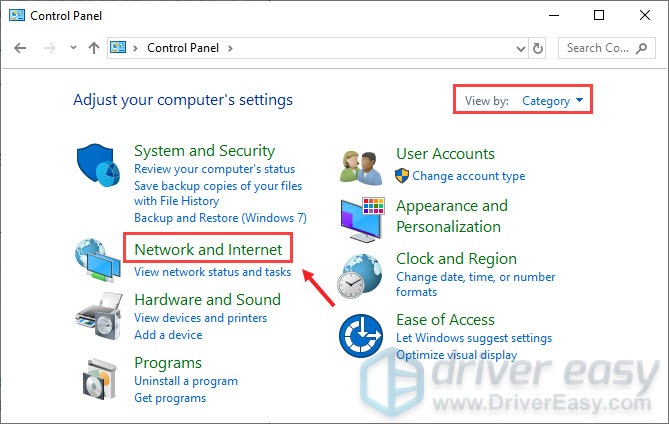
3) Click Network and Sharing Center.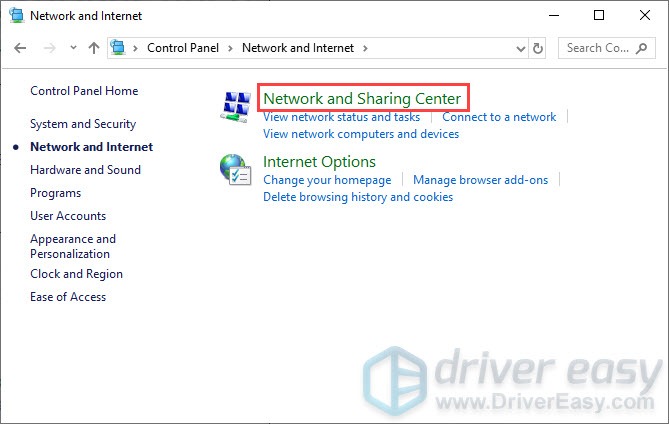
4) Click on your Connections, whether it’s Ethernet, Wifi, or others.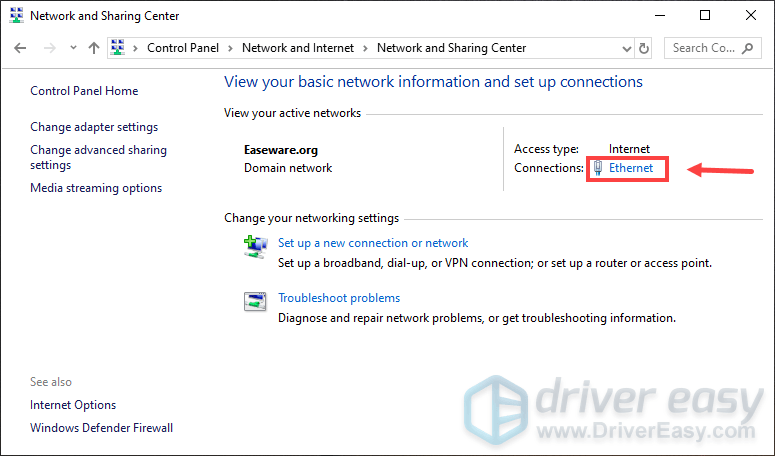
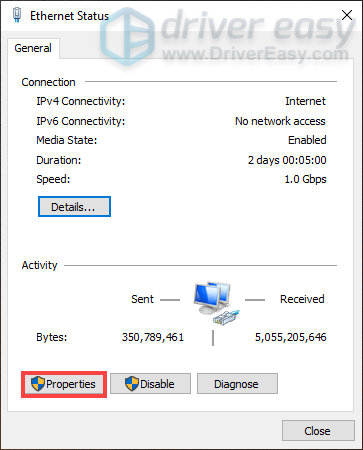
5) Click Properties.
6) Click Internet Protocol Version 4 (TCP /IPv4) > Properties.

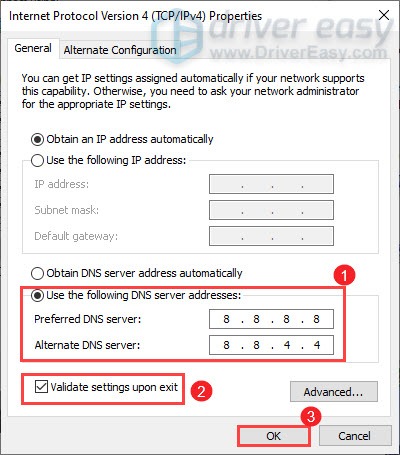
7) Click Use the following DNS server addresses:
Preferred DNS server: 8.8.8.8
Alternate DNS server: 8.8.4.4
Check the box next to Validate settings upon exit and then click OK.
After applying the changes, try playing your game to check if it solves your issue. If not, try the next fix.
Fix 4: Change VALORANT priority to normal
To boost FPS and get the best possible gaming performance, you might set the game’s priority to High. But running your game at a high priority may lead to your game unplayable and you can get some error codes. To fix it, you should change the priority to normal. Here’s how you can do this:
1) Run VALORANT.
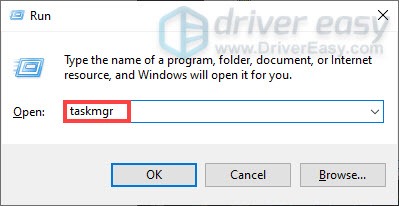
2) On your keyboard, press the Windows logo key and R at the same time to open the Run dialog box.
3) Type taskmgr and then press Enter to open the Task Manager.
4) In the Processes tab, locate VALORANT. Right-click it and select Go to details.
5) In the Details tab, right-click VALORANT.exe and select Set priority > Normal.
After applying the changes, launch your game to check if it works.
Fix 5: Enable Vanguard service and change its startup type
Riot Vanguard is Riot’s all-new anti-cheat system and is required to play VALORANT. So you need to make sure that it’s enabled. To check it, follow the instructions below:
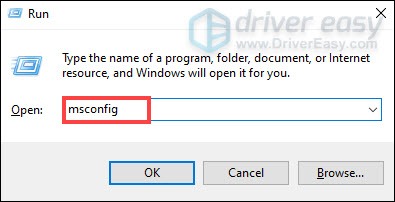
1) On your keyboard, press the Windows logo key and R at the same time to open the Run dialog box.
2) Type msconfig and press Enter.
3) Click on the Services tab. Locate the vgc service. Tick the box next to it to enable the service. Then press Apply > OK.
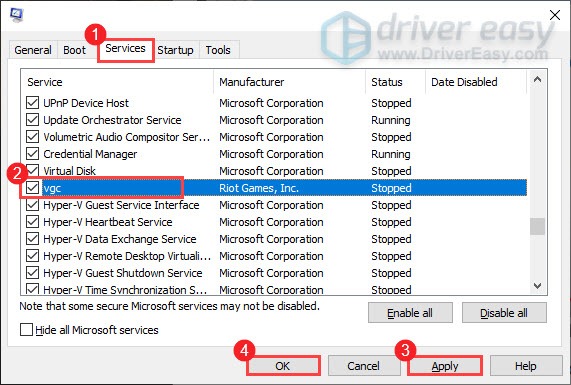
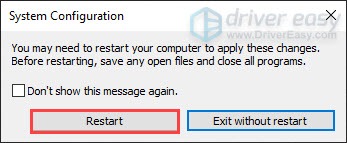
4) Click Restart.
After rebooting your computer, play your game to check if your problem is resolved. If that didn’t work, you need to change vgc startup type.
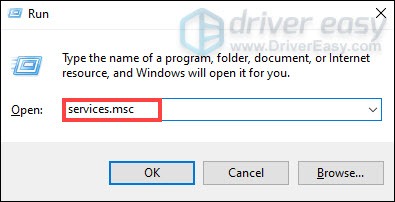
1) On your keyboard, press the Windows logo key and R at the same time to open the Run dialog box.
2) Type services.msc and press Enter.
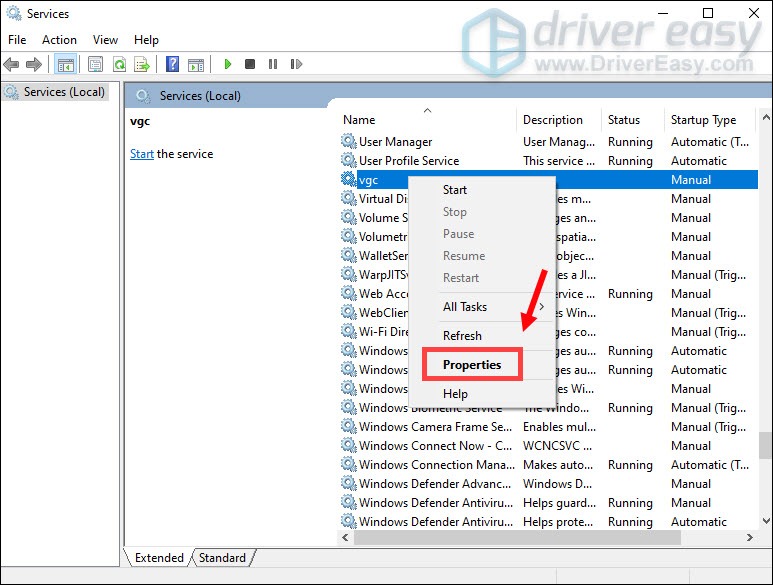
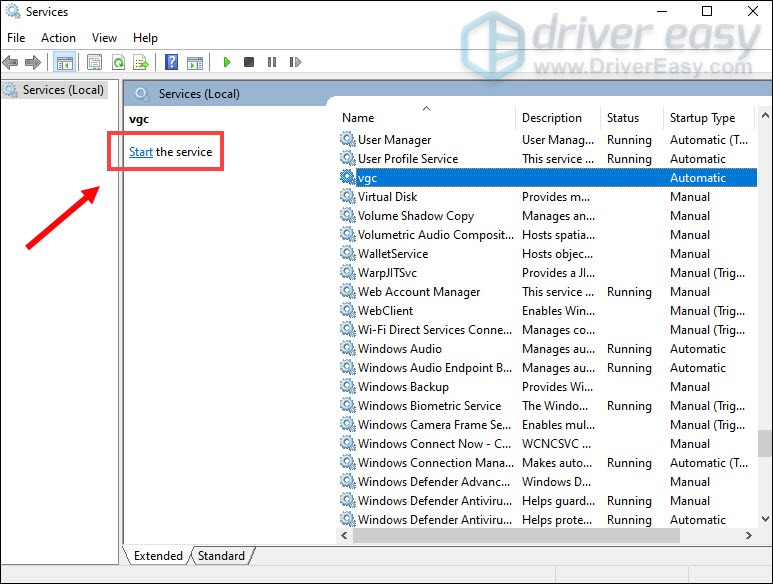
3) Locate vgc service. (The list is in alphabetical order.) Right-click it and select Properties.
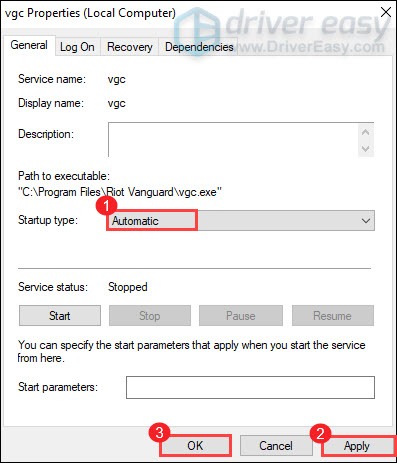
4) In Startup type, click on the down arrow and select Automatic. Then click Apply > OK.
5) Click Start to start the service.
Now launch your game and your problem should be resolved.
Fix 6: Reinstall Vanguard
If none of the fixes listed above worked for you, you should consider reinstalling Vanguard in case a corrupted file inside Vanguard turns out to be the culprit.
1) In the Search box, type cmd. Right-click Command Prompt from the results and select Run as administrator.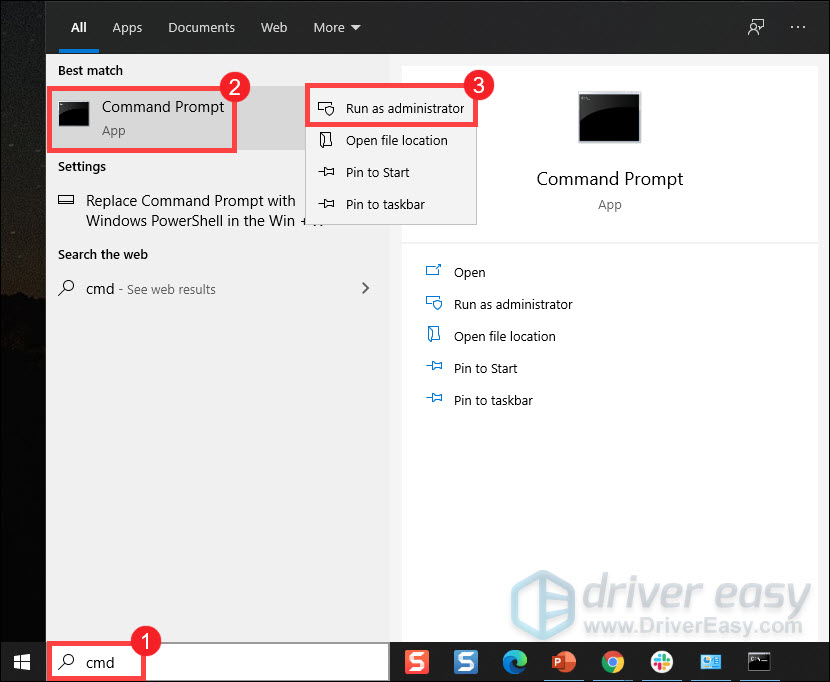
2) Type and press Enter for both of these commands, in succession:
sc delete vgc
sc delete vgk
3) Restart your computer.
4) Once your computer is rebooted, press the Windows logo key and E at the same time to open File Explorer.
5) Click C Drive > Program Files. Right-click on the Riot Vanguard folder and select Delete.
6) From your desktop, right-click Recycle Bin, and select Empty Recycle Bin to completely delete the Riot Vanguard folder. (Note: if you have any important documents in the Recycle Bin, make sure you’ve restored them before you confirm to permanently delete all the stuff in it.)
7) Right-click on the VALORANT shortcut and select Run as administrator.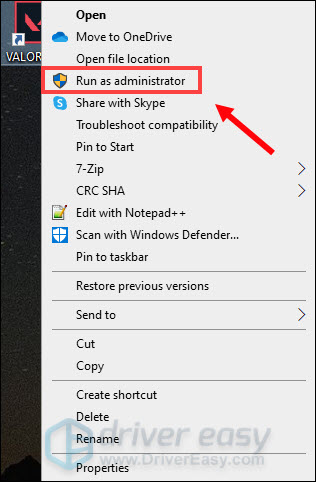
8) Wait for Vanguard to be installed.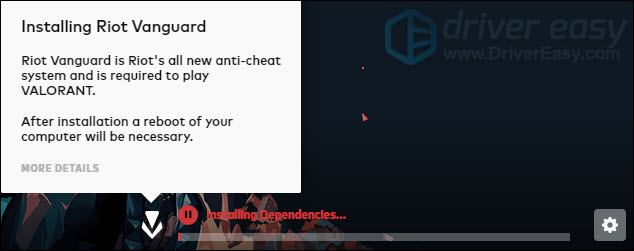
This will take several minutes to complete. After it’s finished, click the PLAY button.
9) When you receive the error VANGUARD NOT INITIALIZED, simply click QUIT.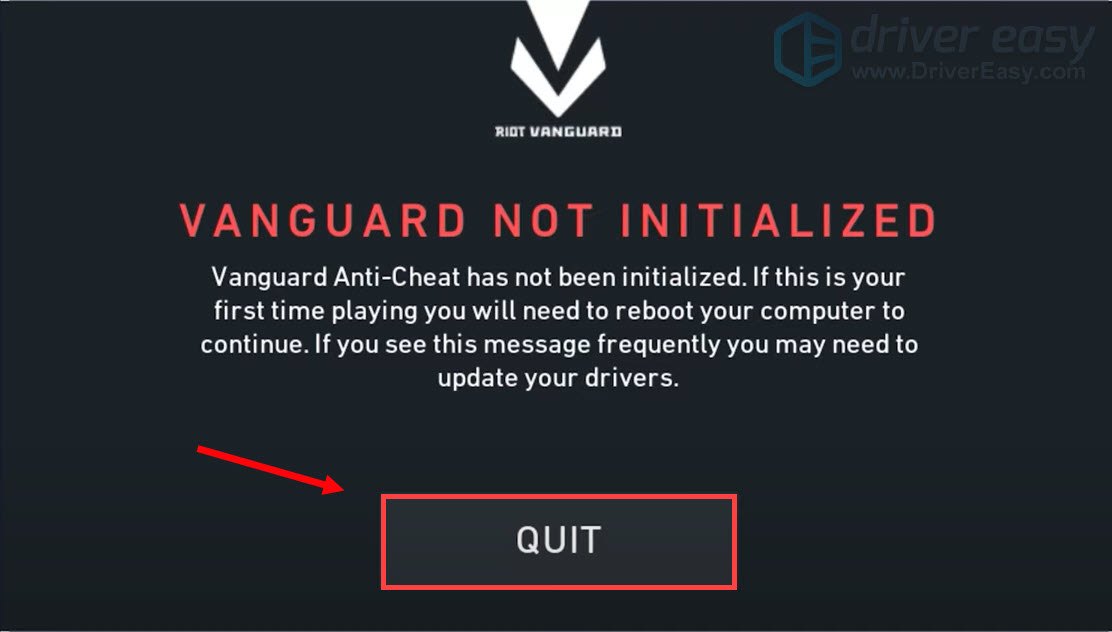
Now restart your computer to finish the installation process.
Once your computer is rebooted, right-click on the VALORANT shortcut and select Run as administrator and you should be able to play your game without the error popping up.
So these are the fixes for VALORANT Error Codes. Hopefully, they work for you. If you have any ideas or questions, please do not hesitate to leave us a comment below. We’ll get back to you as soon as possible.