


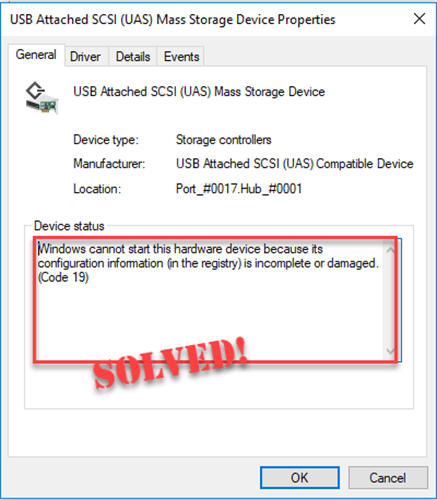
If you’re seeing the Code 19 error that says,
“Windows cannot start this hardware device because its configuration information (in the registry) is incomplete or damaged.”
it means your hardware (like a DVD drive, keyboard, USB device, or external display) can’t start properly due to corrupted or missing registry settings. Frustrating, right?
Don’t worry, though. It can be fixed. In this article, we’ll show you the 5 most effective fixes to get your device back up and running. Just work your way through the list until you find the one that works for you:
Fix 1: Update the problem driver
The Code 19 error is probably caused by a faulty driver. When a driver is outdated, conflicting, or installed incorrectly, it could cause Windows to register multiple services for the same device, fail to open the correct service key, or be unable to retrieve the driver name from the registry. For example, if you recently installed or updated software like iTunes, it might add filter drivers that interfere with your DVD or CD drive, causing this error. Other devices like USB peripherals, keyboards, or external display adapters can also experience similar driver or registry conflicts. Updating your device drivers is often the best way to fix the issue.
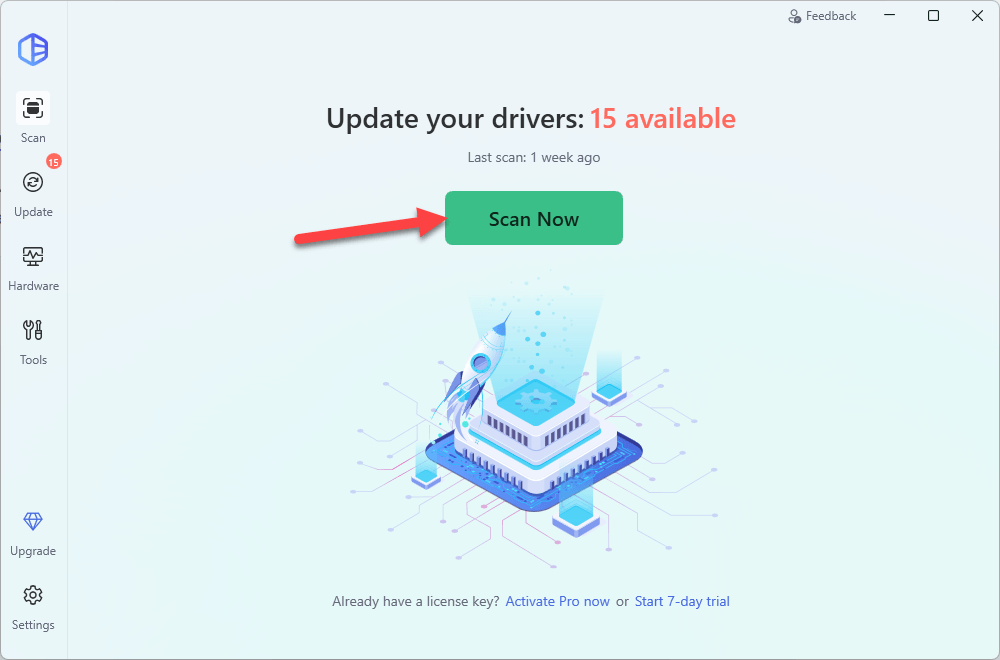
You can update your drivers manually. To do this, go to the hardware vendor’s website for your specific device, select the correct model, and carefully download and install the latest compatible driver for your version of Windows. If you’d rather avoid the manual hassle – or the risk that comes with it – you can do it automatically with Driver Easy. Driver Easy is a trusted driver updater that automatically scans your system, detects any outdated or incorrect drivers, and installs the correct ones for your hardware and version of Windows.
All it takes is just a few clicks:
- Download and install Driver Easy.
- Run Driver Easy and click the Scan Now button. Driver Easy will then scan your computer and detect any problem drivers.
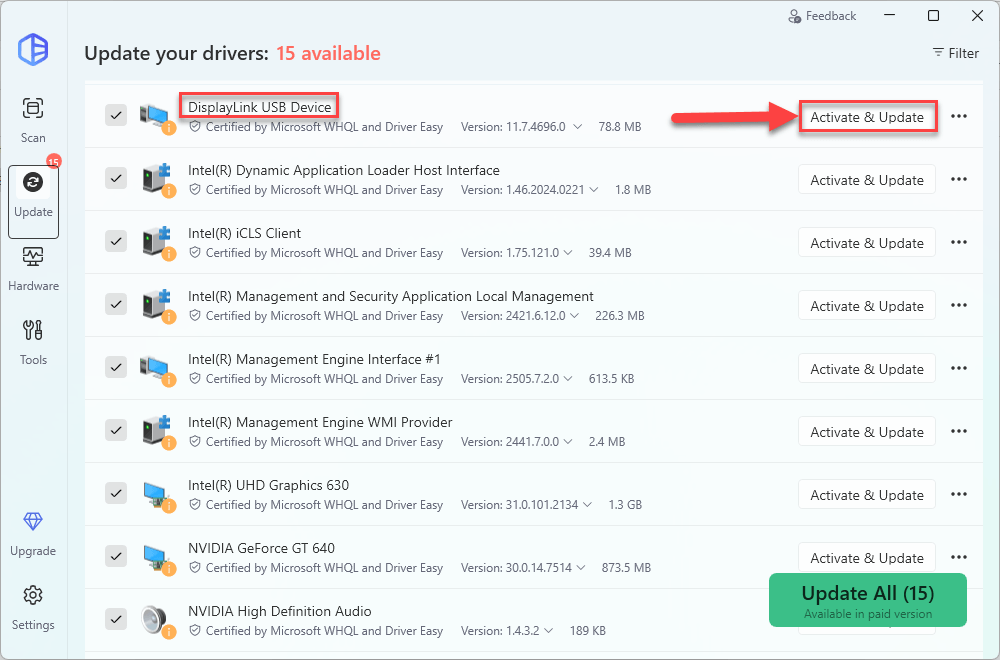
- In the list of scan results, check if the device showing the Code 19 error is flagged. If yes, simply click Update All to start a 7-day trial or upgrade to the Pro version. Either option will automatically download and install the correct drivers for you.
- Restart your computer for the changes to take effect.
- Check to see if the Code 19 “Windows cannot start this hardware device because its configuration information (in the registry) is incomplete or damaged. ” error is resolved. If yes, then great! If it persists, please move on to Fix 2, below.
Fix 2: See if iTunes is causing the problem
Another common culprit for the error code is iTunes. This popular software installs driver filters that interact with your hardware, and occasionally, these filters can corrupt registry settings, leading to device conflicts. Many users have successfully resolved Code 19 errors by reinstalling iTunes.
How to repair iTunes:
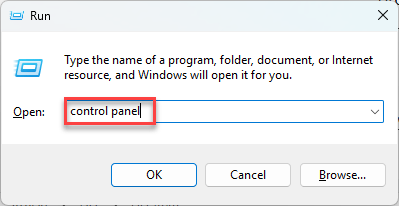
- On your keyboard, press the Windows logo key, type control panel, and then press Enter.
- Change the view to Large icons and click on Programs and Features.

- Locate iTunes in the list, then right-click on it and click Uninstall.
- Restart your PC.
- Reinstall iTunes and see if the devices work properly as they should. If the error still shows up, please move on to Fix 3, below.
Fix 3: Remove UpperFilters and LowerFilters from the registry
Another possible reason for the Code 19 error is corrupted or conflicting registry entries called UpperFilters and LowerFilters. These entries act as filters that assist Windows in communicating with device drivers. When they become damaged or duplicated, they can prevent the device from functioning properly. Removing these problematic registry values often helps restore the device and fix the Code 19 error.
To fix this, you first identify the correct device class GUID in the registry, then back up the registry to avoid any accidental issues, and finally delete the problematic UpperFilters and LowerFilters entries.
Here are the steps:
Step 1: Identify the class GUID
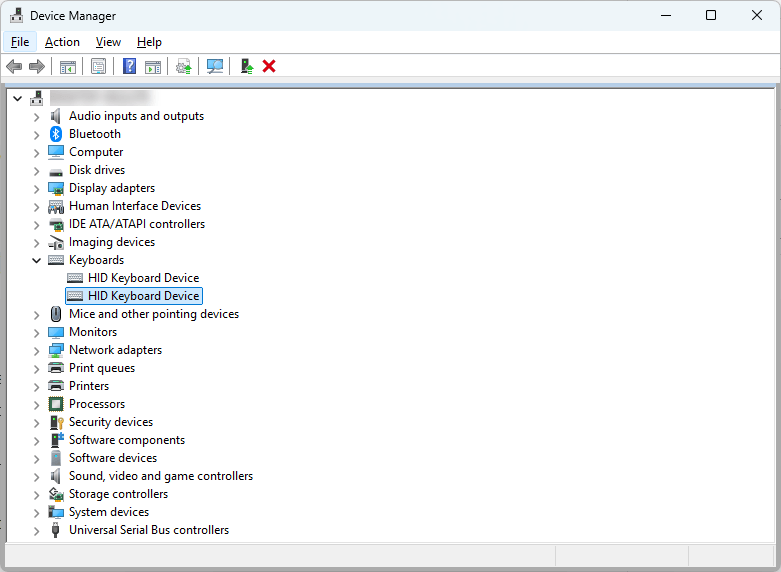
- On your keyboard, press the Windows logo key and X at the same time to open Device Manager.
- Locate the device showing the Code 19 error, then double-click on it.
- Go to the Details tab, then in the Property dropdown, select Class GUID, right-click on the GUID value and choose Copy(e.g.,
{4d36e96b-e325-11ce-bfc1-08002be10318}for keyboards).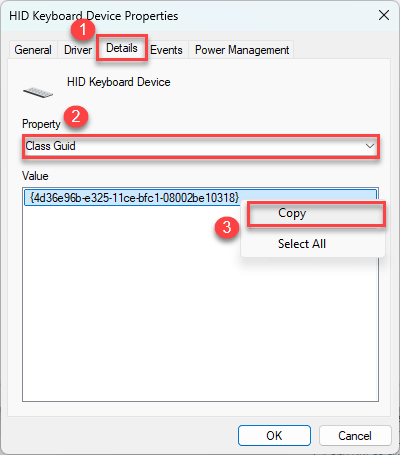
Step 2: Back up the registry
- On your keyboard, press the Windows logo key and R, type
Regedit, and press Enter.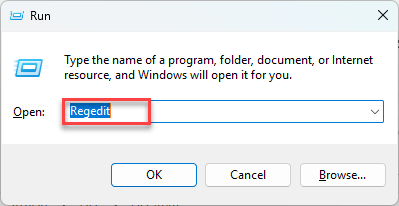
- Click Yes if prompted by User Account Control.
- In Registry Editor, click File > Export.

- Set Export Range to All, name your backup file, and save it somewhere safe (e.g. Desktop).
Step 3: Delete UpperFilters and LowerFilters
- In Registry Editor, copy and paste the following path into the address bar, replacing {your class GUID} with the value you copied from Step 1:
HKEY_LOCAL_MACHINE\SYSTEM\CurrentControlSet\Control\Class{your class GUID}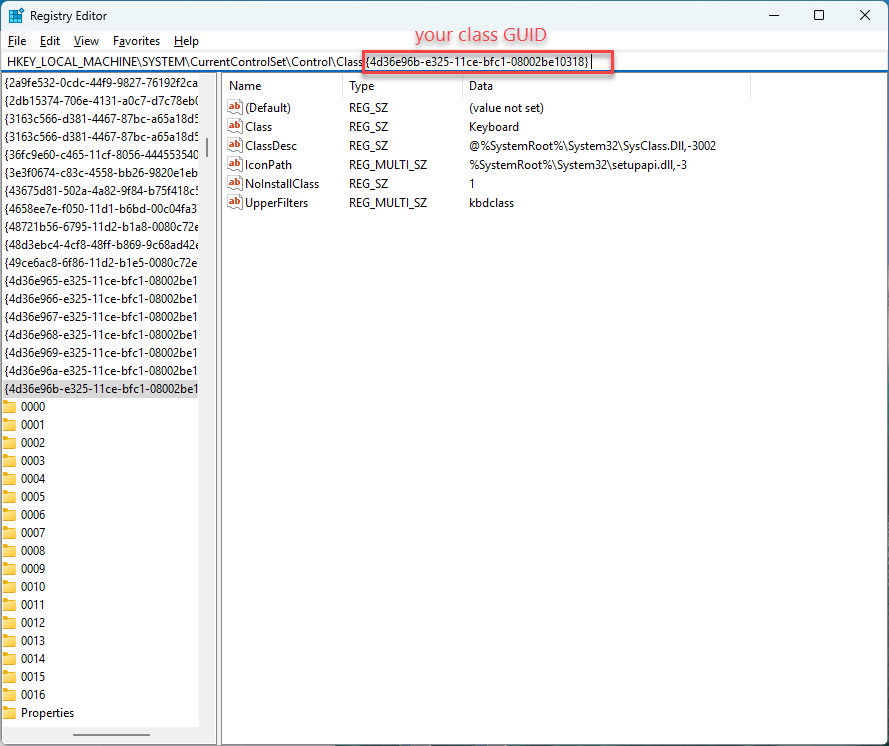
Then press Enter to navigate to that registry key. - With the correct registry key selected, look in the right-hand pane. If you find UpperFilters or LowerFilters values, right-click each one and select Delete. If only one is present, delete that one. Confirm the action when prompted.
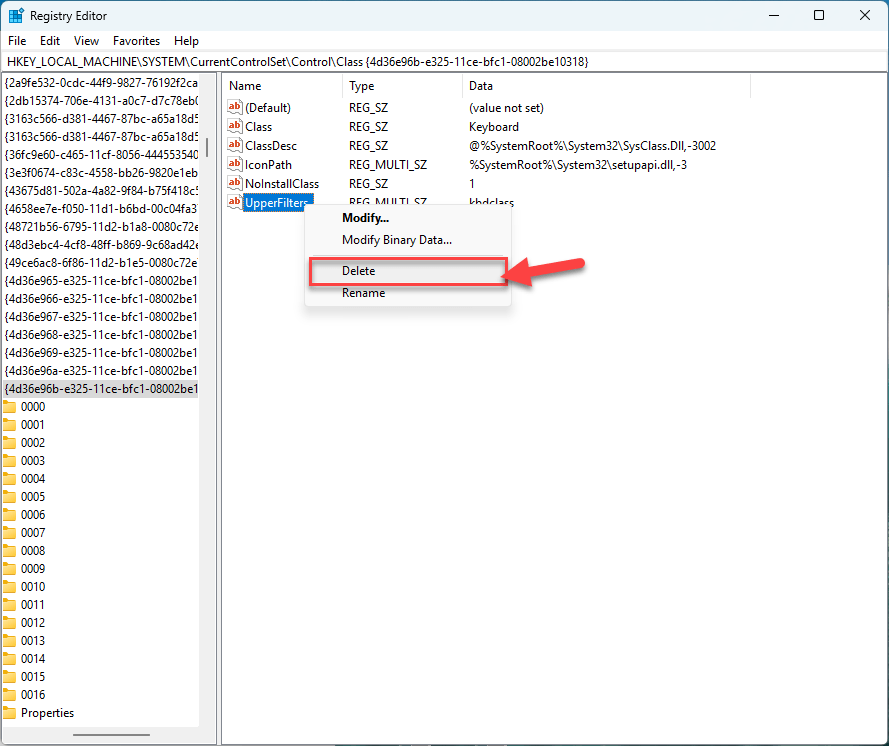
- Close Registry Editor.
Once finished, reboot your PC. Then, go to Device Manager to see if the Code 19 error is resolved.
Fix 4: Reinstall DVD/CD Drive and IDE Controllers (for DVD/CD Code 19 Errors)
If your DVD/CD drive is showing a Code 19 error in Device Manager, the problem may be caused by corrupted drivers or registry conflicts. One of the most effective solutions is to uninstall the drive and its related storage controllers so that Windows can automatically reinstall them on reboot.
This method is safe for most users, especially on modern systems. However, if you’re using an older computer with an IDE system drive, be cautious when uninstalling entries under IDE ATA/ATAPI controllers, as removing the wrong one could affect system startup. If you’re not sure, try uninstalling just the DVD/CD drive first.
Here are the steps:
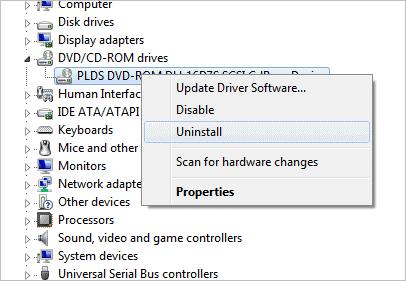
- In Device Manager, double-click on DVD/CD-ROM drives to expand the category. Right-click on the DVD/CD-ROM, and click uninstall, and then restart your PC.
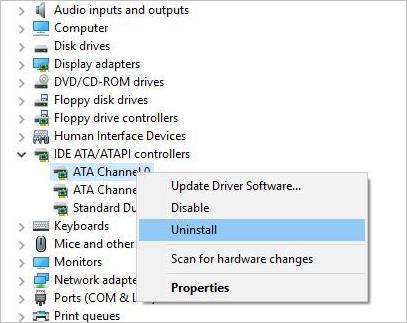
- In the same vein, expand the category IDE ATA/ATAPI controllers, then uninstall all devices under this category.
- Restart your computer and check to see if the problem is fixed.
Fix 5: Run a System Restore (for recent changes)
Important:
- Backup your files before running a System Restore, just to be safe.
- System Restore doesn’t affect personal files, but it may uninstall programs and drivers installed after the chosen restore point.
If the Code 19 error started after a recent change to your system, such as installing new drivers, updates, or software, performing a System Restore could be an effective way to resolve the issue.
System Restore rolls back your system to a previous state when everything was working properly, undoing any changes that might have caused the error.
Here is how to do it:
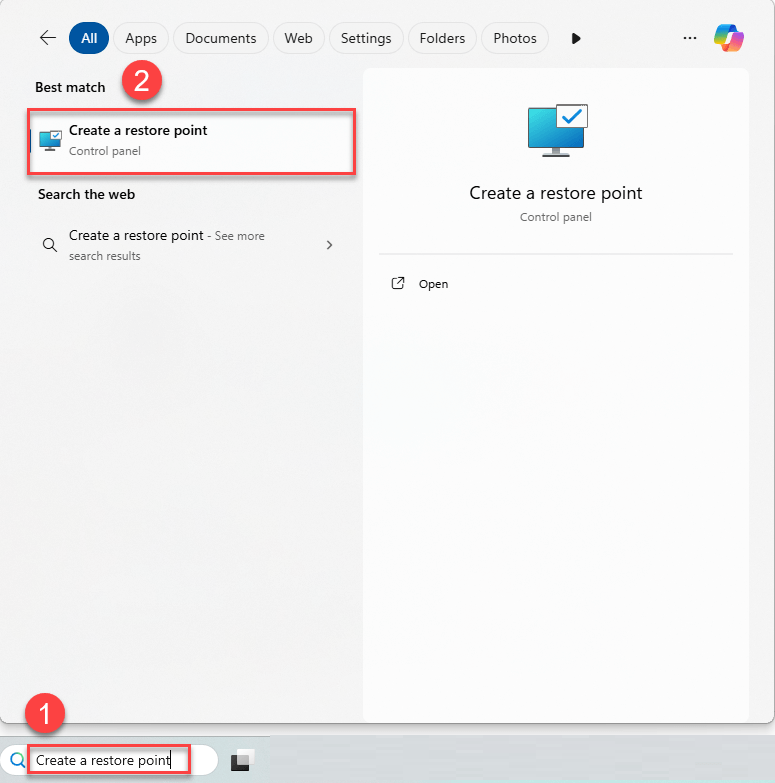
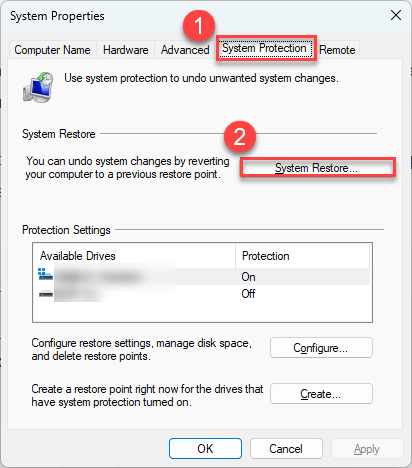
- On your keyboard, press the Windows logo key and type Create a restore point. Then, when it pops up as a matching result, click on it.
- Under the System Protection tab, click System Restore.
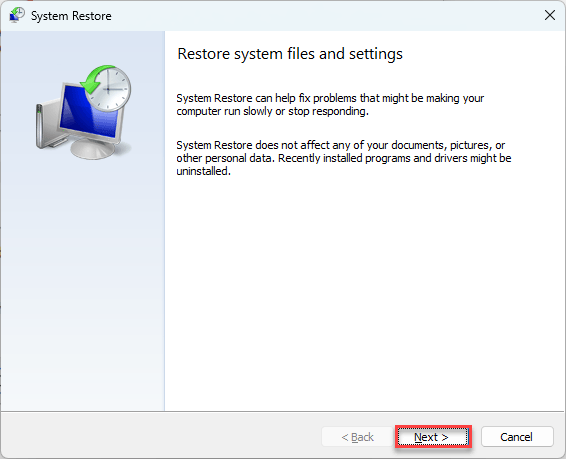
- Click Next to see a list of available restore points.
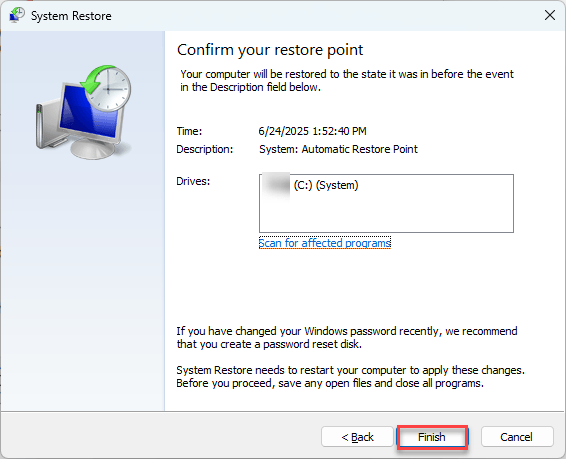
- Choose one that was created before you started experiencing the Code 19 error and click Next to proceed. If you’re unsure, select the Show more restore points checkbox to see all available options.

- Click Finish.
- Your computer will restart, and the system restore process will begin. This can take a few minutes to an hour, depending on your system.
- Once the restore process is complete and your computer restarts, check if the Code 19 error has been solved.
Hopefully, one of the solutions above will help you fix the Code 19 error and get your DVD/CD-ROM device working again. If you have any questions or need further assistance, feel free to leave a comment below!

