


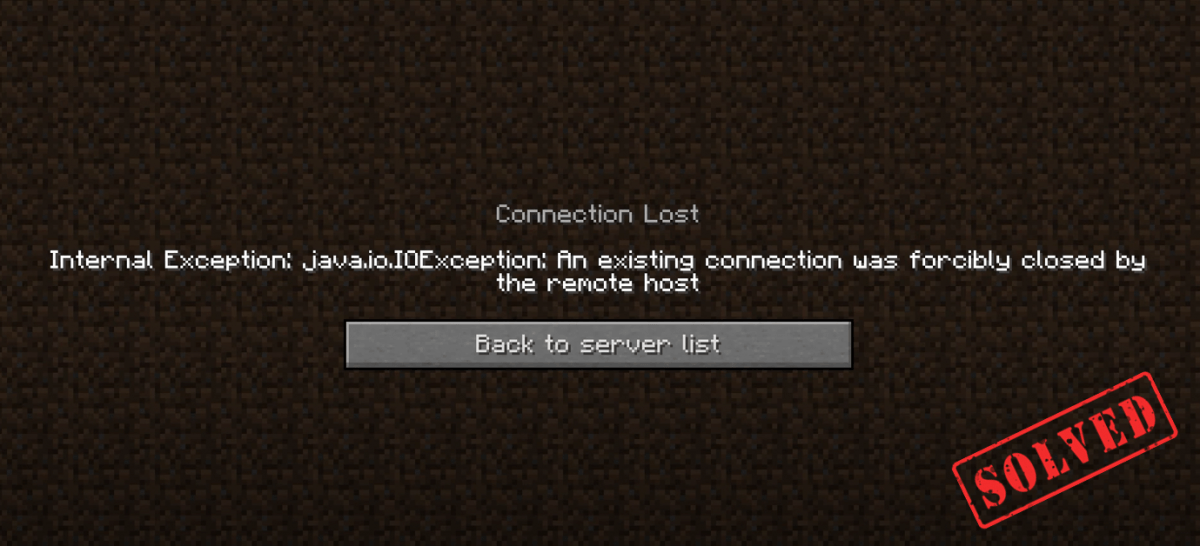
The way Minecraft inspires players and its unique aesthetic make it stand out. So in 2020, Minecraft is still incredibly popular. But while mining the landscape, players report encountering an error saying “An existing connection was forcibly closed by the remote host”. If you happened to be one of them, don’t worry. In this article, you’ll definitely pinpoint the cause.
Try these fixes
You may not need to try them all; just work from the top down until you find the one that works.
- Turn off Windows Firewall
- Create a new registry value
- Reset your last session on Hypixel
- Flush your DNS cache
- Change your DNS server
- Update your drivers
- Configure Java settings with the Control Panel
- Restart your network
Fix 1: Turn off Windows Firewall
It’s important to have Microsoft Defender Firewall on because it helps protect you from unauthorized access. But there is a possibility that it fails to allow Minecraft to run. So to fix it, you should turn off Windows Firewall. Here’s how you can do this:
1) On your keyboard, press the Windows logo key  and I at the same time to open the Settings app.
2) Click Update & Security.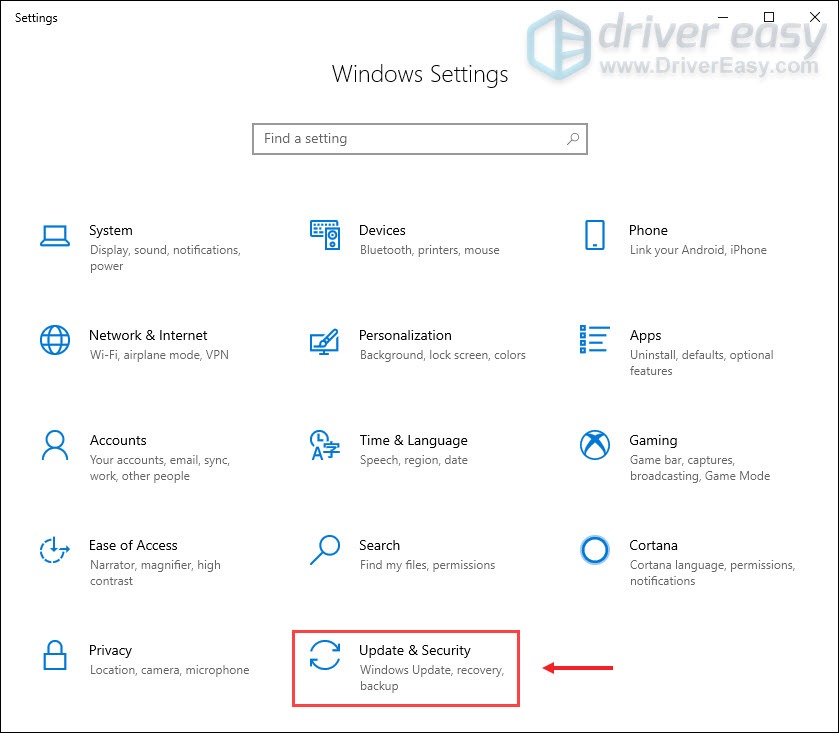
3) Click Windows Security > Firewall & network protection.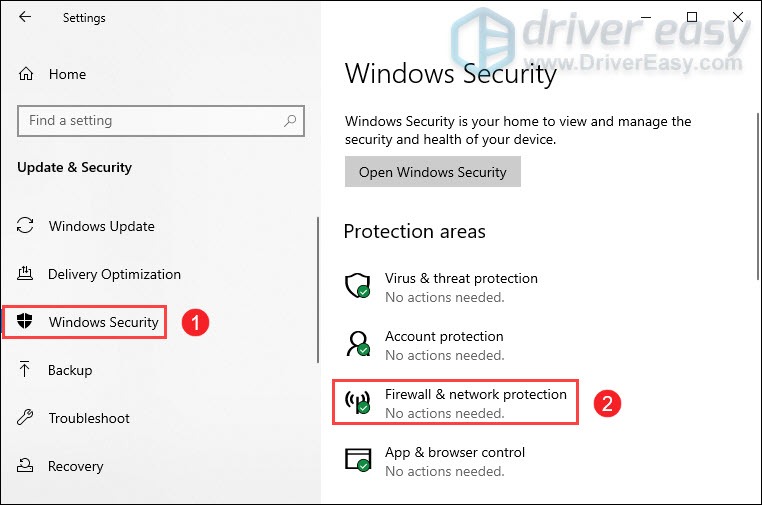
4) Click the network which is active currently.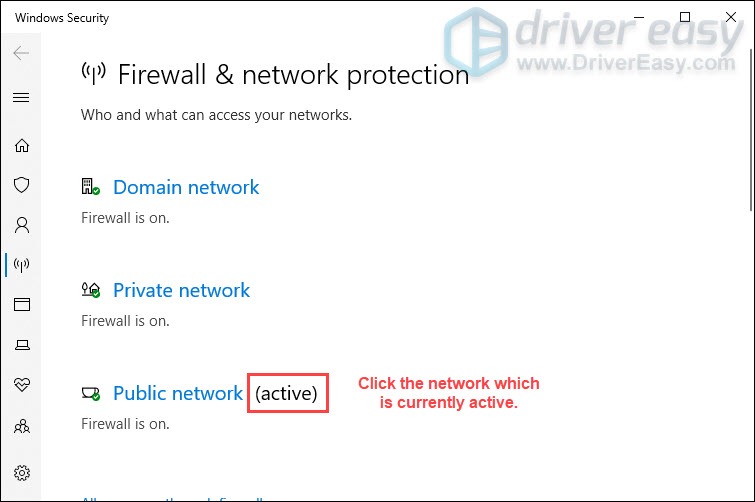
5) Scroll down and under the Windows Defender Firewall section, toggle off the button to disable it. 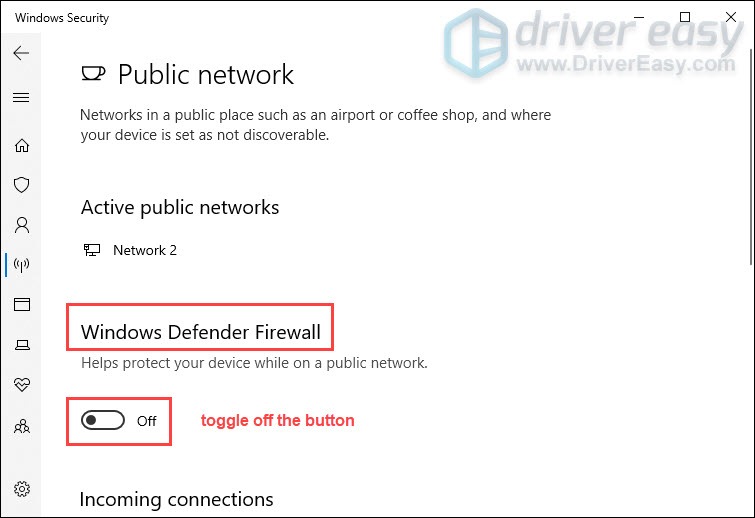
After you’ve done these and still can’t connect to the Minecraft server, move on to the next fix.
Fix 2: Create a new registry value
Creating a new registry value with Windows Registry is part of a troubleshooting step to fix some kind of bug with how Windows handles something. So to fix the connection lost error from Minecraft, you should create a new registry value:
1) In the Search box, type regedit. Right-click on Registry Editor from the results and select Run as administrator.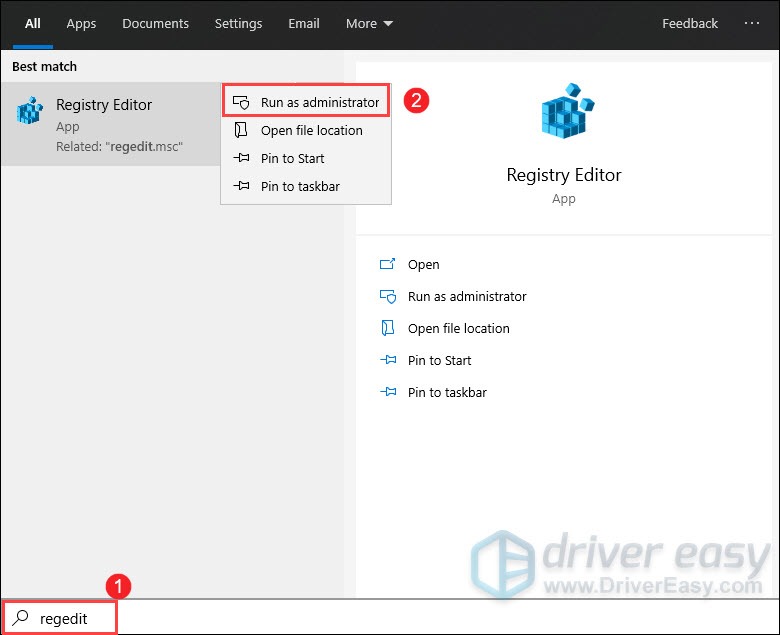
2) When you receive a User Account Control prompt, select Yes.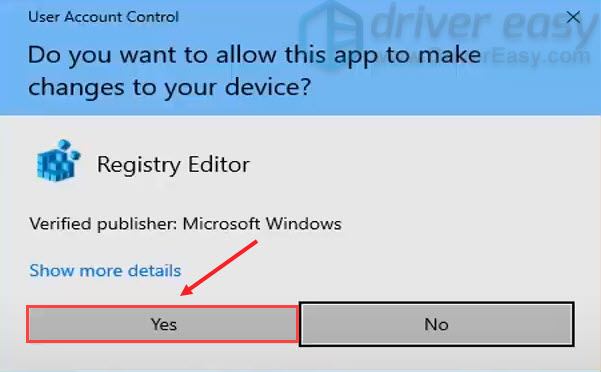
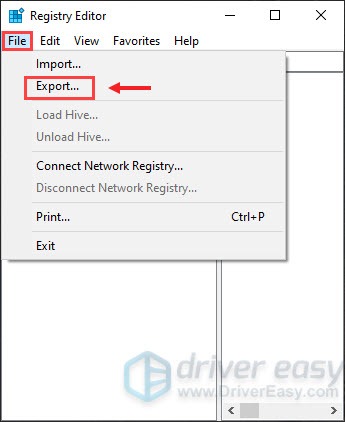
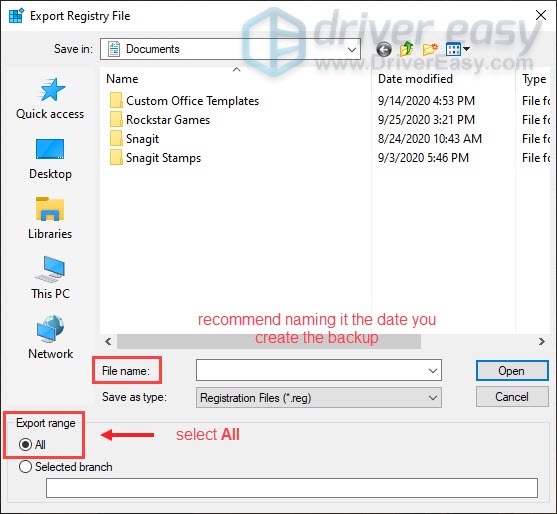
3) Before you proceed in the registry, you’re supposed to create a backup of it so that if anything were to go wrong, you can easily restore it back.
- Click on the File tab and select Export.
- For the File name, we recommend naming it the date you create the backup. The Export range should be selected for All. Then Save it to a convenient location on your computer.
- If you need to import it back in, you just need to click on the File tab and select Import.
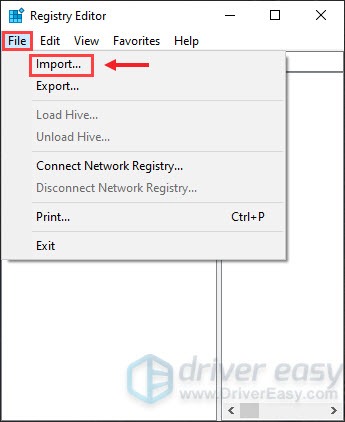
- Navigate to the file location.
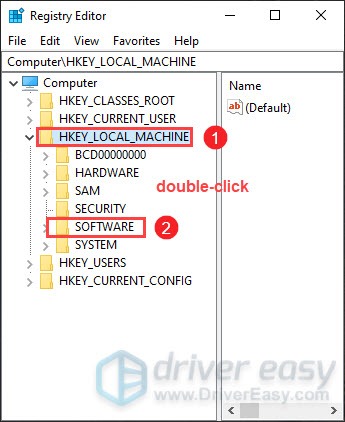
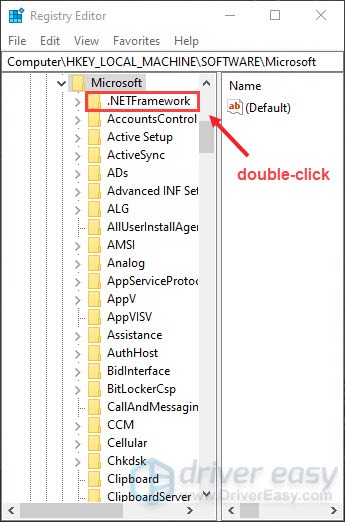
4) Once you’ve created a backup, double-click on the folder HKEY_LOCAL_MACHINE > SOFTWARE.
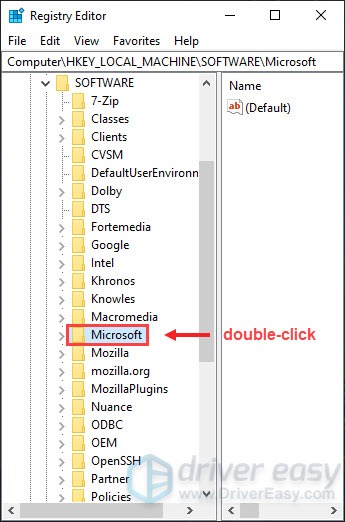
5) From the list of folders, double-click on Microsoft.
6) Locate .NETFramework and double-click on this folder. It should be near the top of the list because it starts with a dot.
7) Click on the folder v4.0.30319. It might be a newer version. But just remember to select the highest number version.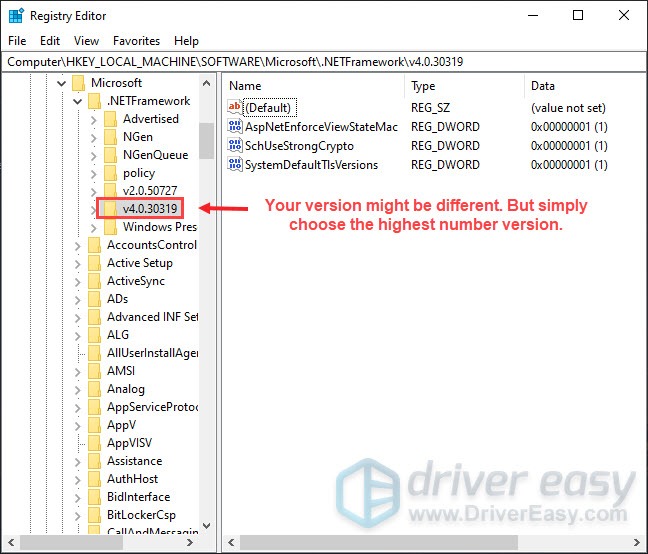
8) Now on the right side, locate something that says SchUseStrongCrypto. If you don’t see a value in here, you can go ahead and create one. 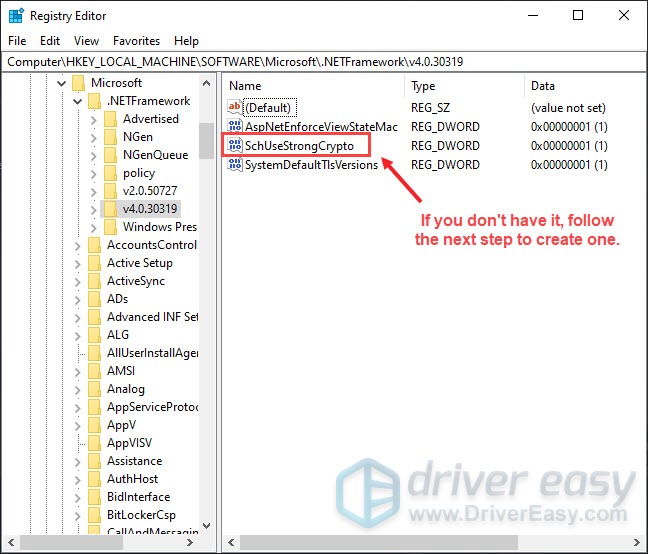
9) On the right panel, right-click on the blank area. Select New > DWORD (32-bit) Value.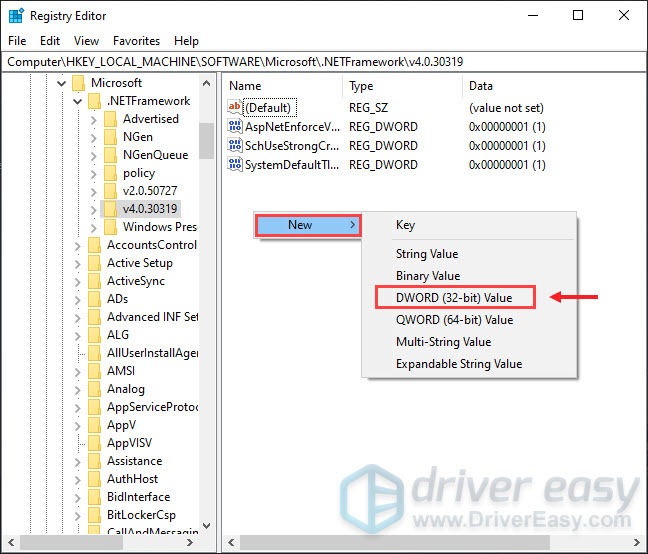
10) Type in SchUseStrongCrypto. Make sure the first letter of each word is capitalized. Then hit Enter to save that. 
11) Double-click on SchUseStrongCrypto. Set the Value data to 1 and click OK.
12) Now close the Registry Editor.
13) Restart your computer for the change to take effect. Then attempt to connect to the remote host once again and your issue should hopefully be resolved.
Fix 3: Reset your last session on Hypixel server
The Hypixel server was created to play and further showcase Minecraft adventure maps. Resetting your last session on the Hypixel server would probably fix the issue. Here’s how you can do this:
1) Open Minecraft. Click Multiplayer.
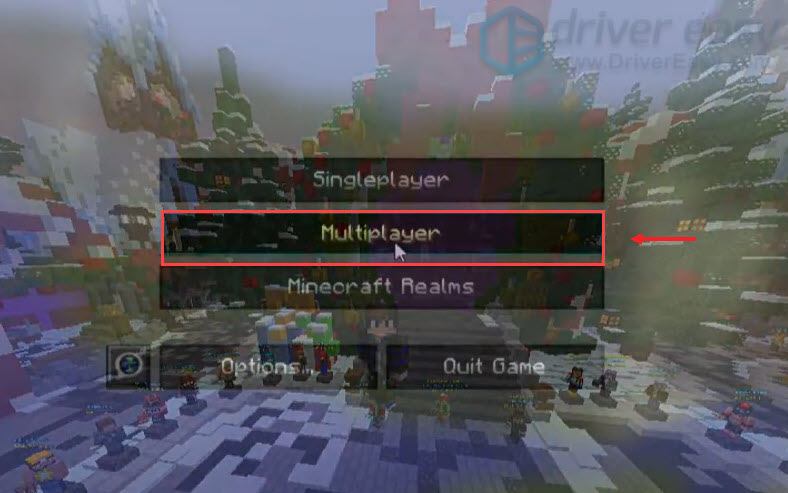
2) At the bottom, click Direct Connect.

3) In the Server Address, type Stuck.hypixel.net_. Then click Join Server.![]()
This should reset your last session on Hypixel. See if that works. If not, then you should restart your router and flush your DNS cache.
Fix 4: Flush your DNS cache
Clearing the DNS cache on a regular basis can remove all the entries and deletes any invalid records. When you get the error from Minecraft, it’s mostly caused by internet connectivity problems. So flushing the DNS cache will help you solve the problem. To do this, follow the steps below:
1) On your keyboard, press the Windows logo key and R at the same time to invoke the Run box.
2) Type cmd and then press Enter on your keyboard to open the Command Prompt.
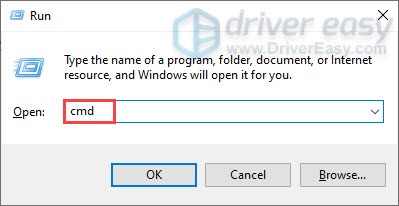
3) Type ipconfig /flushdns and press Enter.
ipconfig /flushdns
Once you’ve successfully flushed the DNS cache, restart your computer and play your game to check if it works.
Fix 5: Change your DNS server
Sometimes your ISP-supplied DNS server might be slow or not properly configured for caching, which can effectively slow your connection. So it could be the reason why you’re getting the error from Minecraft. To fix it, you need to change your DNS server.
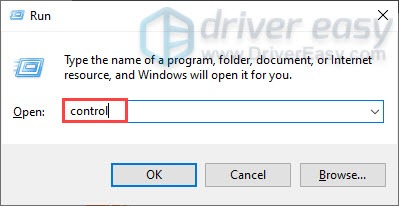
1) On your keyboard, press the Windows logo key and R at the same time to invoke the Run box.
2) Type control and then press Enter on your keyboard to open the Control Panel.
3) Click Network and Internet. (Note: make sure you view the Control Panel by Category.)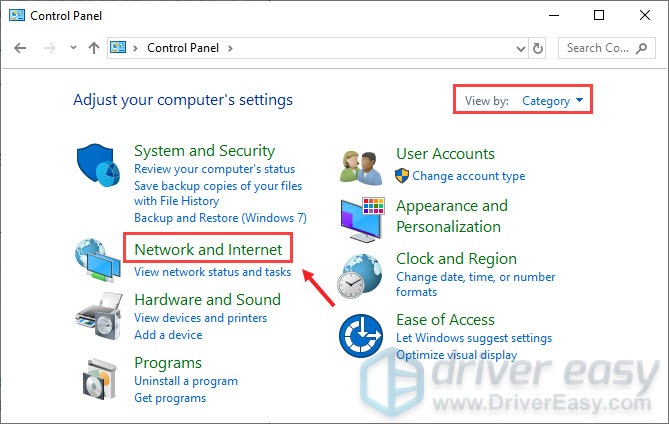
3) Click Network and Sharing Center.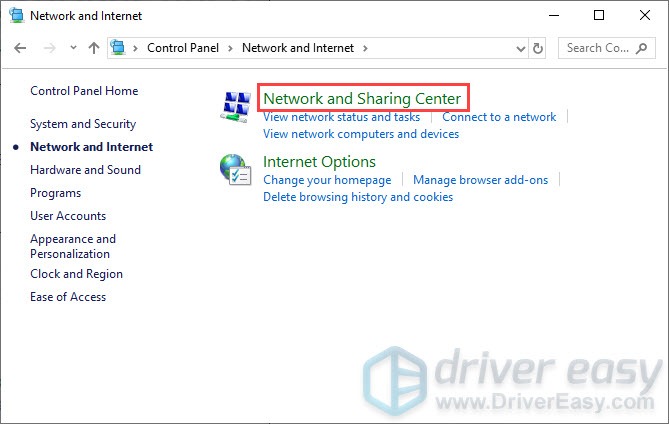
4) Click on your Connections, whether it’s Ethernet, Wifi, or others.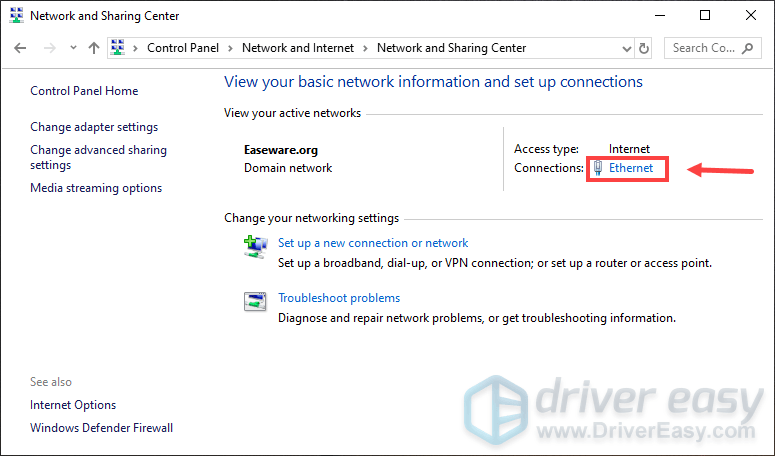
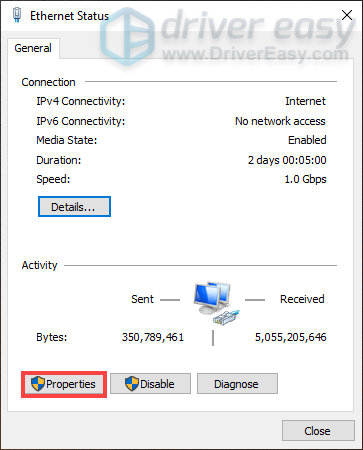
5) Click Properties.
6) Click Internet Protocol Version 4 (TCP /IPv4) > Properties.

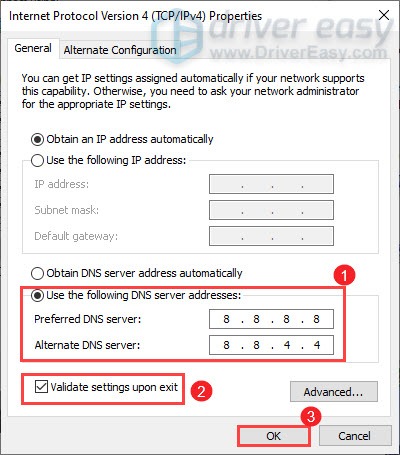
7) Click Use the following DNS server addresses:.
In Preferred DNS server: section, type 8888.
In Alternate DNS server: section, type 8844.
Check the box next to Validate settings upon exit and then click OK.
After applying the changes, try playing your game and the connection issue should be resolved.
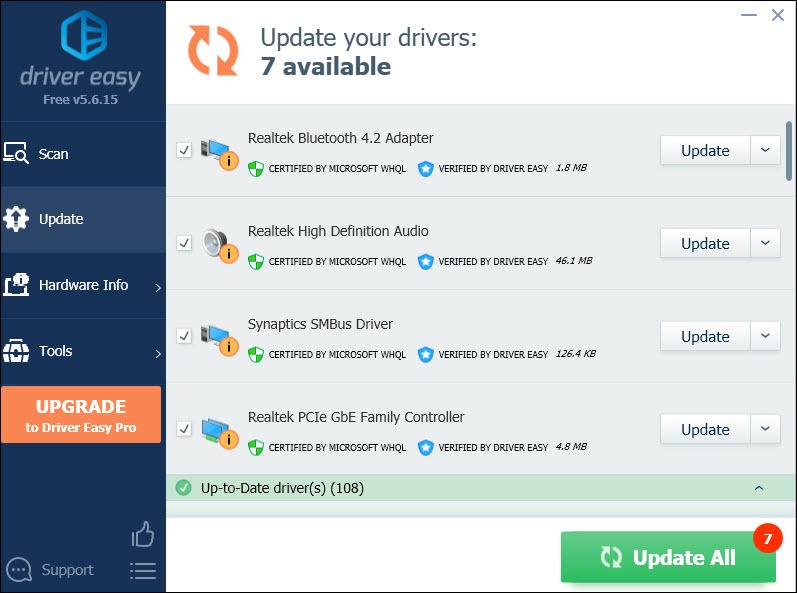
Fix 6: Update your drivers
When you encounter various issues and errors while playing a game like Minecraft, one of the troubleshooting steps you need to take is to check for driver updates. If your drivers are outdated or not optimized, you may encounter poor performance or even can’t connect to the server. So if you receive the error “An existing connection was forcibly closed by the remote host”, you should update your drivers, especially network adapter drivers and graphics drivers (Updating graphics drivers even worked for some players.)
There are two ways you can update your drivers: manually and automatically.
Option 1: Manually update your drivers
Manufacturers keep releasing driver updates. To get them, you need to go to the official websites, find the correct drivers, and download them manually. But you might risk downloading and installing the wrong drivers which are not compatible with your Windows version.
Option 2: Automatically update your drivers (recommended)
If you don’t have the time, patience, or computer skills to update drivers manually, you can do it automatically with Driver Easy.
Driver Easy will automatically recognize your system and find the correct drivers for it. You don’t need to know exactly what system your computer is running or risk downloading and installing the wrong driver.
1) Download and install Driver Easy.
2) Run Driver Easy and click the Scan Now button. Driver Easy will then scan your computer and detect any problem drivers.

3) Click the Update button next to the flagged driver to automatically download the correct version of that driver, then you can manually install it (you can do this with the FREE version).
Or click Update All to automatically download and install the correct version of all the drivers that are missing or out of date on your system. (This requires the Pro version which comes with full support and a 30-day money-back guarantee. You’ll be prompted to upgrade when you click Update All.)
After updating your drivers, restart your computer to check if you still get the same error.
Fix 7: Configure Java settings with the Control Panel
The Java settings set by default might not give you the best gaming experience. So configuring them might offer you greater performance and even fix the error you’re receiving.
To do this, you should:
1) On your keyboard, press the Windows logo key and R at the same time to invoke the Run box.
2) Type control and then press Enter on your keyboard to open the Control Panel.
3) Click System and Security. (Note: make sure you view the Control Panel by Category.)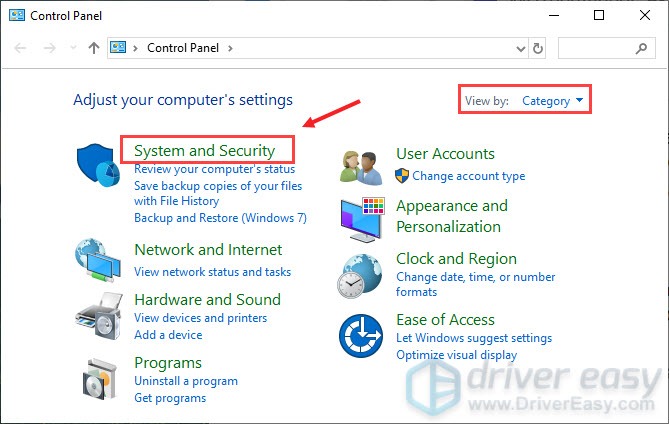
4) On the left pane, click Programs.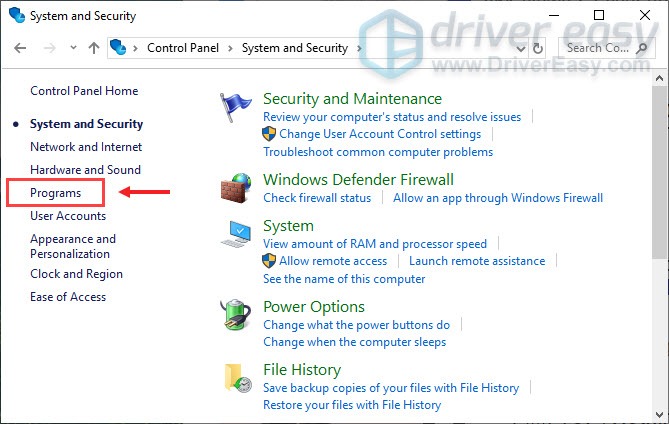
5) Click on Java.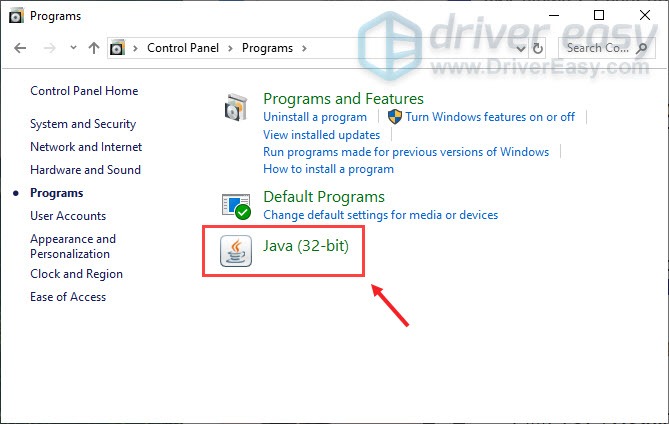
5) If there’s an Update tab, select it and click Update to update your Java.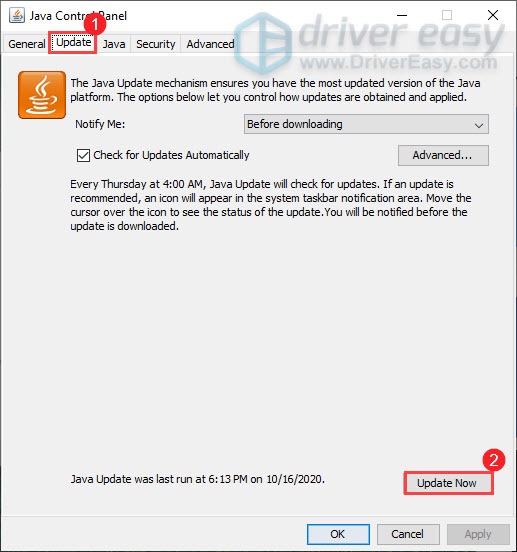
6) Select the tab Advanced. Check the box next to Enable the operating system’s restricted environment (native sandbox). Then click Apply > OK.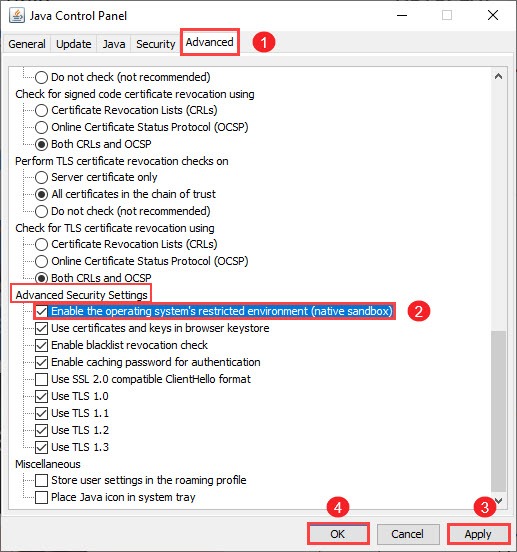
7) Now restart your computer and launch your game to check if it works. If not, move on to the next fix.
Fix 8: Restart your network
If you encounter the error “An existing connection was forcibly closed by the remote host” in Minecraft, perhaps there are some problems with your network. In this case, you should restart your network.
You can unplug both your router and modem and disconnect the ethernet cable for a few minutes. Then reconnect the cable and plug in the modem back. Once the indicator lights are back to their normal state, check if the error has been resolved.
Hopefully, these fixes work for you. If you have any ideas or questions, please do not hesitate to leave us a comment.