


Have you ever found your computer running so slowly that it’s almost impossible to use? If the answer is yes, then you should check out whether a file named WUDFHost.exe has taken up a major chunk of your CPU usage. As many have reported, WUDFHost.exe is one of the culprits responsible for CPU hogging. But don’t worry, it’s usually not a difficult problem to solve.
What is WUDFHost.exe?
WUDFHost.exe stands for Windows User-mode Driver Framework Host, a trustworthy system process from Microsoft Windows. As an important part of your operating system, WUDFHost.exe proves to be necessary for the stability of your computer, so killing the process is not recommended. However, this process may cause certain errors such as high CPU usage that restrict your PC from running properly. If you’re having trouble with WUDFHost.exe, then you should follow the instructions below and see if any of them can help you fix the problem.
7 fixes for high CPU usage by WUDFHost.exe in Windows 10
Here’re 7 fixes that have helped other users to solve the high CPU usage problem caused by WUDFHost.exe. You don’t have to try them all; just work your way down the list until you find the one that works for you.
Fix 1 – Run a full scan for viruses and malware
Fix 2 – Update your device drivers
Fix 3 – Disable Intel Wireless Gigabit 17265 User mode driver
Fix 5 – Disable portable devices
Fix 6 – Run the system file checker
Fix 7 – Check for software conflicts
Fix 1: Run a full scan for viruses and malware
The original WUDFHost.exe file is safe for your computer, but some dangerous viruses or malware may disguise themselves as WUDFHost.exe by using the same file name to escape detection. If your WUDFHost.exe file isn’t located in the C:\Windows\System32 folder, it is very likely to be a trojan.
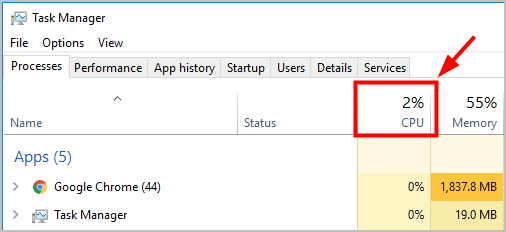
In this case, you should run your antivirus software to scan for viruses and malware. After removing all the possible threats to your computer, press Ctrl + Shift + Esc on your keyboard to open Windows Task Manager. Pay attention to your CPU usage (it should return to a normal rate by now) and see if the WUDFHost.exe process has been removed.
In case your problem still persists, you should move on to Fix 2.
Fix 2: Update your device drivers
If the WUDFHost.exe file proves to be safe in the last method, your CPU hogging issue may be caused by a corrupt or out-dated driver. Many people have reported that updating their device drivers helps them fix the problem, so you may also give it a try.
If you don’t have the time, patience or skills to update the driver manually, you can do it automatically with Driver Easy.
Driver Easy will automatically recognize your system and find the correct drivers for it. You don’t need to know exactly what system your computer is running, you don’t need to be troubled by the wrong driver you would be downloading, and you don’t need to worry about making a mistake when installing. Driver Easy takes care of everything.
You can update your drivers automatically with either the FREE or the Pro version of Driver Easy. But with the Pro version it takes just 2 steps (and you get full support and a 30-day money back guarantee):
1) Download and install Driver Easy.
2) Run Driver Easy and click the Scan Now button. Driver Easy will then scan your computer and detect any problem drivers.

3) Click Update All to automatically download and install the correct version of all the drivers that are missing or out of date on your system (this requires the Pro version – you’ll be prompted to upgrade when you click Update All).
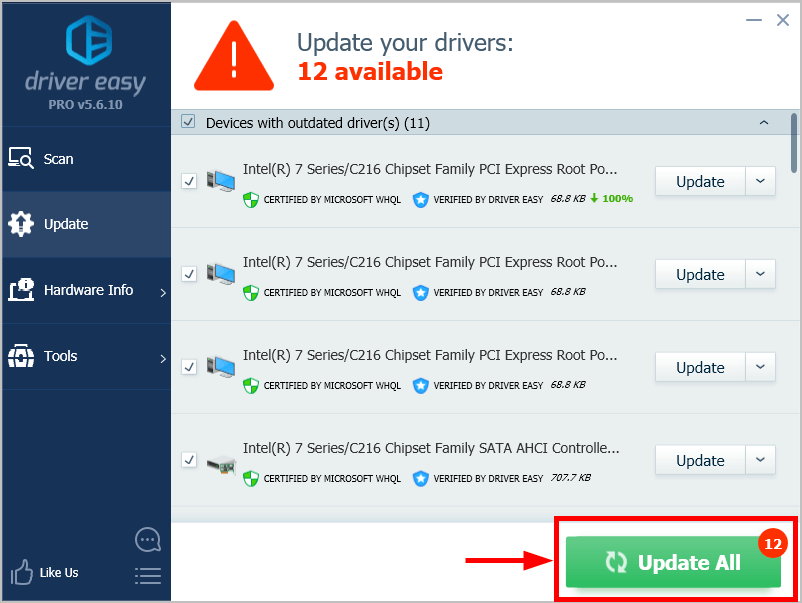
Note: You can do it for free if you like, but it’s partly manual.
4) Check your CPU usage: press Ctrl + Shift + Esc on your keyboard to open Windows Task Manager and look at the % at the top of the CPU column.
If it returns to a normal rate, then congrats – you’ve solved your problem! If not, please read on and try Fix 3.
Fix 3: Disable Intel Wireless Gigabit 17265 User mode driver
Unfortunately, the Intel Wireless Gigabit User mode driver has also been reported by many users as a culprit for the WUDFHost.exe hogging issue. If you happen to be using this driver, you may fix the issue by disabling it from Device Manager.
1) On your keyboard, press the Windows Logo Key and R at the same time to invoke the Run dialog box. Type devmgmt.msc and click OK.

2) Double-click on the Intel Wireless Gigabit Drivers category to expand its list.
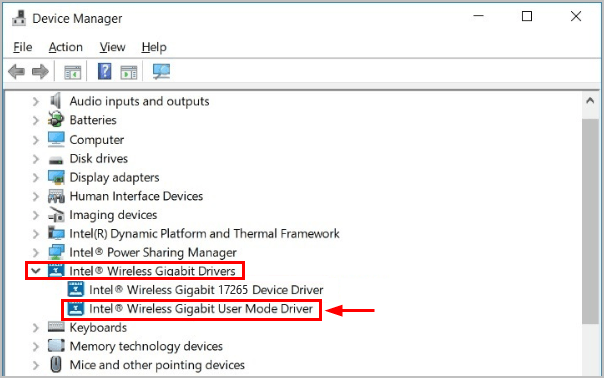
Right-click on the Intel Wireless Gigabit User Mode Driver item, and then select Disable device.
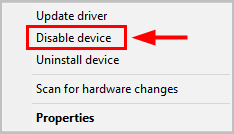
3) Click Yes to confirm.
4) After disabling your Intel Wireless Gigabit User Mode Driver, the CPU usage taken up by WUDFHost.exe should drop down to a normal rate. Check it out in Task Manager by pressing Ctrl + Shift + Esc on your keyboard.
If your CPU usage successfully goes down, then you’ve solved your hogging problem!
But if you don’t want to leave the driver disabled or you happen to be using a wireless docking device, you may download and install the latest driver to see whether it fixes your WUDFHost.exe hogging issue. Choose either of the following methods to download and install the driver:
- Go to Intel dock manager and download your corresponding driver (usually with the EXE extension). Then follow the on-screen instructions to install the driver manually.
- Download Driver Easy and use it to automatically update your driver to the latest version.
Reboot your computer for the changes to take effect even if you’re not asked to.
In case you find your problem reoccurring after the latest driver has been installed, you may disable the Intel Wireless Gigabit User Mode Driver again. If the issue still persists, try to contact Intel Support for further assistance.
Fix 4: Disable NFC
NFC may also be the cause of your WUDFHost.exe hogging issue. So if your computer has NFC, turn it off and see whether that fixes the problem.
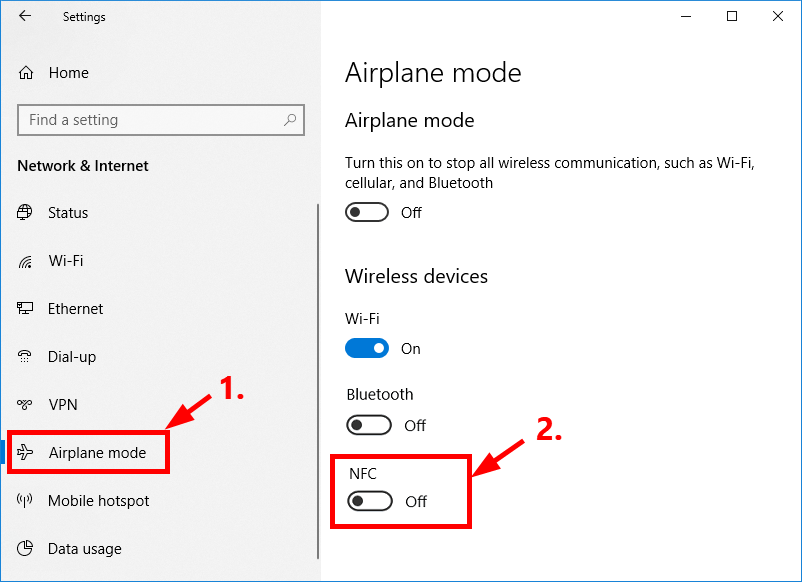
1) On your keyboard, press the Windows Logo Key and I at the same time to open the Settings window. Then click Network & Internet.

2) Select Airplane mode in the left pane. Then turn off the toggle button of NFC below Wireless devices.
3) Check your CPU usage: press Ctrl + Shift + Esc on your keyboard to open Windows Task Manager and look at the % at the top of the CPU column.
If it returns to a normal rate, you’ve fixed the problem! Otherwise, please move on to the next method.
Fix 5: Disable portable devices
Sometimes when you connect your portable devices to the computer, it may also trigger the WUDFHost.exe hogging problem. To figure out if it’s your portable devices to blame, you can either disable them in Device Manager or simply disable the Device Install Service.
Disable your portable devices
1) When a portable device is connected to your PC, press the Windows Logo Key and R at the same time to invoke the Run dialog box. Then type devmgmt.msc and click OK.
2) Double-click on the Portable Devices category to expand its list.
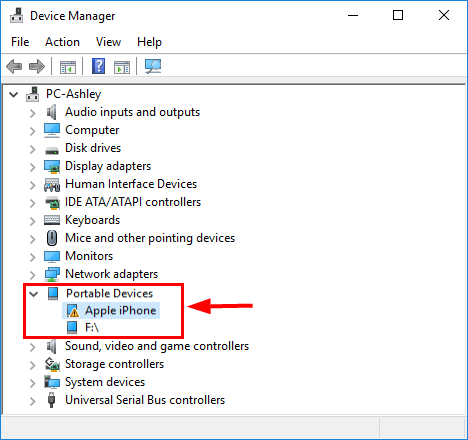
3) Select your device from the list and right-click on it to open the context menu. Then click Disable device.
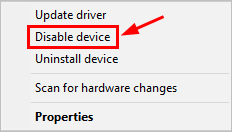
Don’t worry about your portable device – you can still use it normally.
4) Click Yes to confirm.
5) Check your CPU usage: press Ctrl + Shift + Esc on your keyboard to open Windows Task Manager and look at the % at the top of the CPU column.
If it goes down to a normal rate, then you’ve found out the cause of your WUDFHost.exe hogging issue. Besides, there’s another way for you to deal with the portable devices problem, which is disabling the Device Install Service.
Disable the Device Install Service
Alternatively, if you’d like to disable the Device Install Service, here’s the guidance for you.
1) On your keyboard, press the Windows Logo Key and R at the same time to invoke the Run dialog box. Type services.msc and hit Enter.
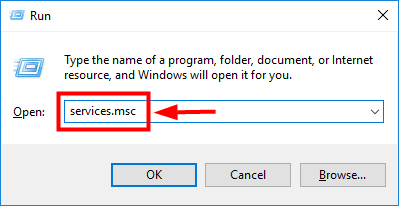
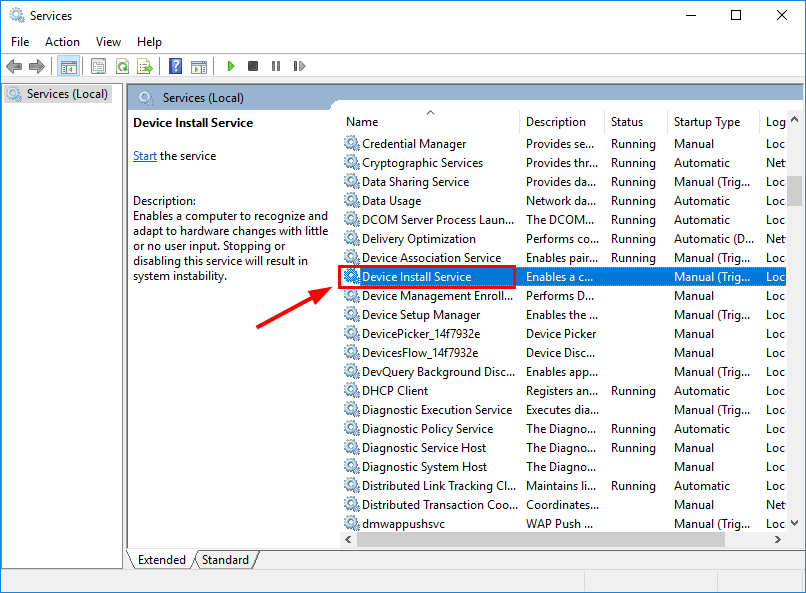
2) Here pops up the Services window. Scroll through the list to locate the Device Install Service item and then double-click on it.
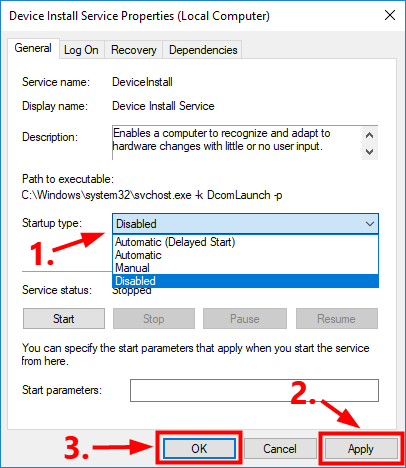
3) In the Device Install Service Properties window, open the drop-down list next to Startup type and select Disabled. Then click Apply > OK to save the changes.
4) Check your CPU usage: press Ctrl + Shift + Esc on your keyboard to open Windows Task Manager and look at the % at the top of the CPU column.
If it returns to a normal rate, you’ve fixed the problem! Otherwise, please move on to Fix 6.
Fix 6: Run the system file checker
System file checker (sfc) is a Windows utility that checks for system file corruption. You may use the command sfc /scannow to scan all protected system files and repair the missing or corrupted ones.
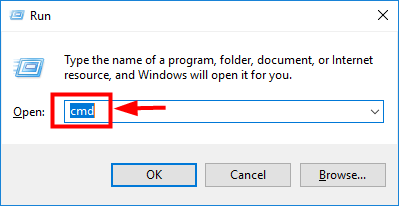
1) On your keyboard, press the Windows Logo Key and R at the same time to open the Run dialog box. Type cmd and press Ctrl+Shift+Enter to run Command Prompt as administrator.
2) When prompted with permission to make changes to your device, click Yes.
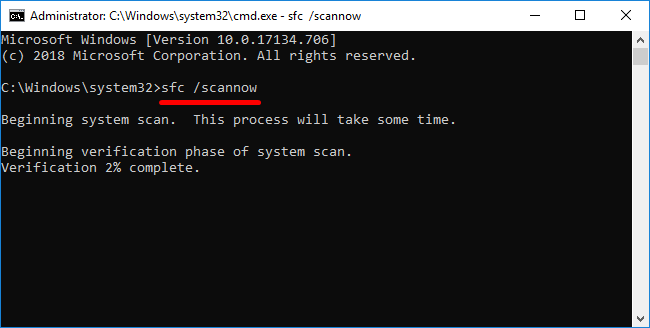
3) In the pop-up window of Command Prompt, type the following command (note that there’s a space between sfc and /):
sfc /scannow
After you finish entering the command, hit Enter on your keyboard. Then the sfc tool will begin to scan all system files and repair the corrupted or missing ones.
4) Wait until the verification process completes.
5) Now you can open Windows Task Manager by pressing Ctrl + Shift + Esc on your keyboard. Take a look at the % at the top of the CPU column.
If it returns to a normal rate, which means WUDFHost.exe no longer drains high CPU resources, then congrats – you’ve fixed your problem!
Fix 7 – Check for software conflicts
If all the fixes above don’t work for you, then you should perform a clean boot to check for possible software conflicts that may cause the WUDFHost.exe hogging issue. Here’s how to do it:
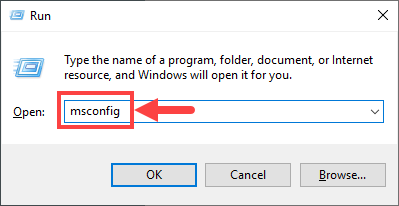
1) On your keyboard, press the Windows Logo key and R at the same time to invoke the Run dialog box. Type in msconfig and hit Enter.
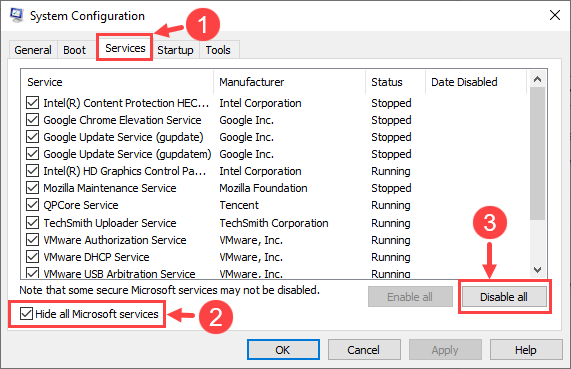
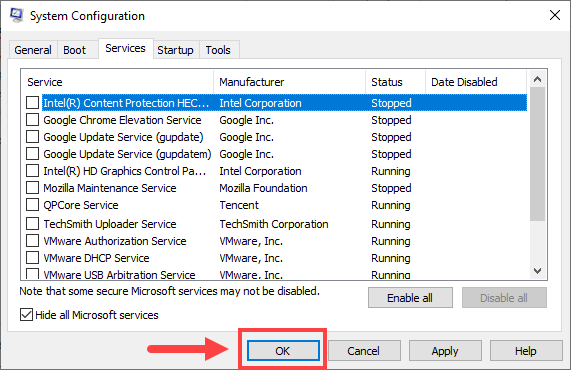
2) Select the Services tab, and then check the Hide all Microsoft services box. Next, click Disable all.
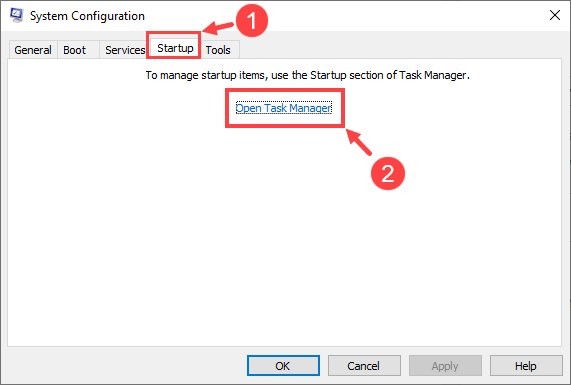
3) Select the Startup tab. Then click Open Task Manager.
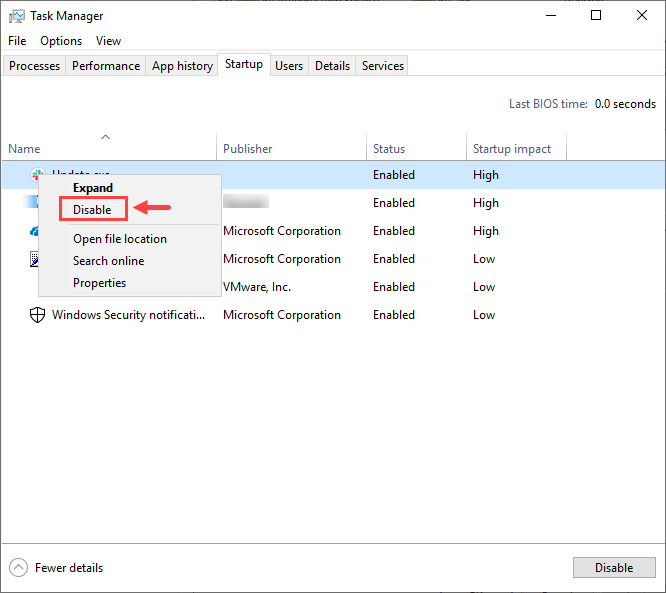
4) On the Startup tab, right-click on each program and click Disable until you’ve disabled all of them.
5) Close the Task Manager window. Then, go back to System Configuration and click OK.
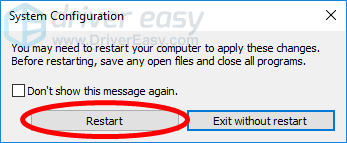
6) Make sure you’ve already saved your work on the computer. Then click Restart to reboot your PC.
7) After restarting your computer, now you have a clean boot environment. Check to see if your CPU is still hogged by WUDFHost.exe. If so, proceed to the next step to determine which application or service has caused the software conflicts. Otherwise skip all the steps below and seek other solutions.
8) Again, press the Windows Logo key and R simultaneously to open the Run dialog box. Type in msconfig and hit Enter.
9) Select the Services tab and then check the Hide all Microsoft services box. Click to select the upper half of the check boxes in the Service list. After that, click OK.
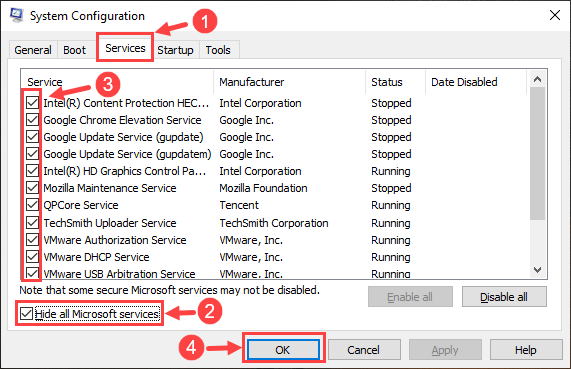
10) Click Restart.
11) After restarting your PC, it’s time to check whether your problem still remains. Depending on different situations, you should take different actions accordingly:
- If your problem remains, then repeat Step 8 to 10. But in Step 9, clear the lower half of the check boxes you’ve selected in your last test.
- If your problem disappears, then the services you’ve selected in your last test are not the causes of your issue. Repeat Step 8 to 10, but in Step 9 this time, clear all the checked boxes and select those that haven’t been checked yet.
- Repeat these steps until you finally determine which service is problematic, or until you figure out none of these services have caused your WUDFHost.exe hogging issue. In the former situation, you can simply go to Step 17; in the latter, you should move on to the next step.
12) On your keyboard, press the Windows Logo key and R at the same time to invoke the Run dialog box. Type in msconfig and hit Enter.
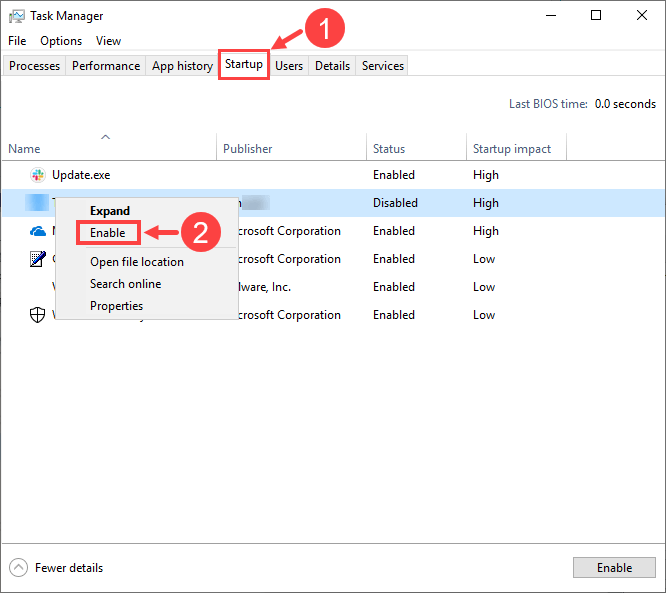
13) Select the Startup tab. Then click Open Task Manager.
14) On the Startup tab, right-click on one of the items to open its context menu. Then click Enable.
15) With only one startup item enabled, close Task Manager. Next, go back to the System Configuration window. Click OK and then Restart.
16) Check to see if WUDFHost.exe is still taking up a large part of your CPU. If not, just repeat Step 12 through 15 to test the startup items one by one until you isolate the problem to a single item, or until you figure out none of these items have caused your issue.
17) Now you’ve tested all the services and startup items that will probably be the cause of your problem. If you can determine which one of them is the culprit, then you should contact the program manufacturer and ask for technical support. Or you may just disable it if possible.
For more details about clean boot, please refer to this site:
https://support.microsoft.com/en-us/help/929135/how-to-perform-a-clean-boot-in-windows
Hopefully you’ll find this post useful. If you have other effective ways to fix the WUDFHost.exe hogging issue, please feel free to leave a comment below to share your ideas with everyone else!