


After a 10-year long service, support for Windows 7 is coming to an end on January 14, 2020. However, you may prefer sticking to using Windows 7. Although Windows 7 runs stable, it can also bump into various problems, and the most annoying one is a system crash!
What should you do when a Windows 7 crash occurs? Don’t worry. Here we offer you a full guide to troubleshoot and fix your Windows 7 crashing issue.
Try these fixes:
You don’t need to try them all; just work your way down until you find the one that works.
- Clear the temp files
- Run a Disk Check
- Run System File Checker
- Run a memory check
- Update your drivers
- Check the crash dump
- Perform a System Restore
- Scan for malware and virus
- Reinstall your system
Why does my Windows 7 crash?
You may keep wondering why your Windows keeps crashing just for no apparent reason. The most likely causes are:
- Bad Memory Or Motherboard
- Incorrect Or Corrupt Drivers
- Hard Drive Problems
- Corrupt Files
- Virus
This post will help you find out the exact cause, then you can get your system crashing issue resolved easily with these fixes.
Press the power button to turn on your computer, and press the F8 key before you see the Windows logo. Then the Advanced Boot Options menu will appear. Use the arrow keys to select Safe Mode with Networking (you may need internet access in the following steps). Then press Enter key to enter the model you selected.
If you can’t boot your system even into Safe Mode, you can skip to Fix 7 and Fix 9 to solve your problem.
Fix 1:Clear the temp files
Your system keeps storing temporary files on your hard drive. Over time, these files can start to take up a lot of space, thus leading to a system crashing issue. To avoid it, you can clear temporary files regularly to reclaim additional storage space and see if the crashing issue is solved.
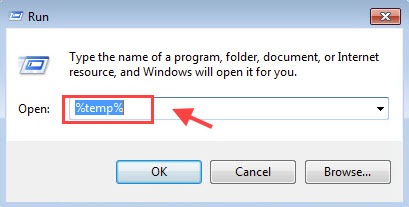
1) On your keyboard, press the Windows logo key and R at the same time to open the Run box.
2) Type %temp% and press Enter.
2) Press Ctrl + A to select all.
3) Right click the selected files and click Delete.
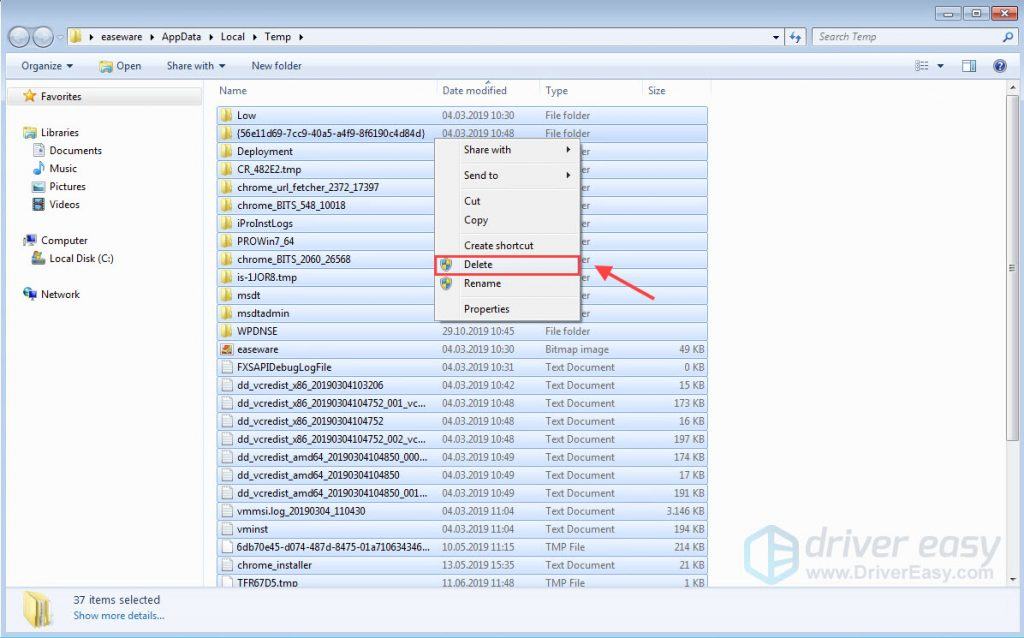
4) All temporary files should now be deleted.
Hopefully, this easy fix can solve your Windows 7 crashing issue. If your PC still keeps crashing randomly, you can try the next fix to resolve it.
Fix 2: Run a Disk Check
The system crash can be caused by your hard drive errors. To rule out this as your problem, you can run the disk checking tool with Command Prompt.
1) Click Start, then type cmd. Right-click Command Prompt and choose Run as administrator. Click Yes if you’re prompted for permission.
2) Type chkdsk c: /f and hit Enter. Windows will run a disk check on your C drive.
chkdsk c: /f
3) If the system asks you whether you want to schedule this check to next time the system restarts, type Y and hit Enter.
4) Restart your computer to complete the check.
If you see any errors, it’s possible they’re causing Windows to crash, and you should consider upgrading your disk. If No errors were found, you can try the next fix.
Fix 3: Run System File Checker
Corrupted or missing system files can cause Windows 7 to crash. But don’t worry, System File Checker is a magic tool for you to get your original system files back. To restore your system files here is how to do it:
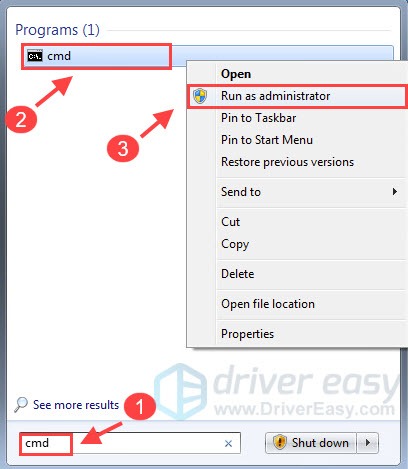
1) Click Start, then type cmd. Right-click cmd and choose Run as administrator. Click Yes if you’re prompted for permission.
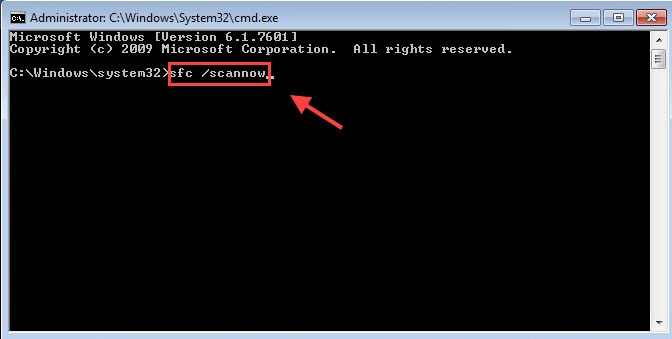
2) In the Command Prompt Window, type the following command (Note that there is a space between sfc and /).
sfc /scannow
Then press Enter.
3) Windows will scan your system for corrupted files, and attempt to fix them if there are any during the process.
4) When the scan finishes, you may receive the following messages:
- Windows Resource Protection did not find any integrity violations.
It means you don’t have any missing or corrupted system files. You can go ahead with the next fix to solve your problem. - Windows Resource Protection found corrupt files and successfully repaired them
You can perform a restart to see if the crash issue still persists.
If you receive neither of these messages, you can click Microsoft Support Page to further fix your problem with File Checker Tool.
Fix 4: Run a Memory Check
A faulty memory card is a common cause of a system crash. To check if this is your problem, you can perform a memory check with Windows Memory Diagnostic tool. Here is how to do it:
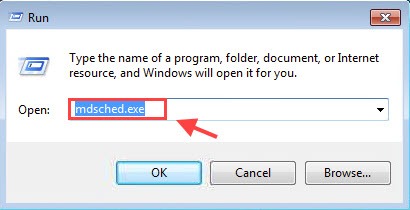
1) ) On your keyboard, press the Windows logo key and R at the same time to invoke the Run box. Type mdsched.exe in the run box and hit Enter.
2) Click Restart now and check for problems (Recommended).
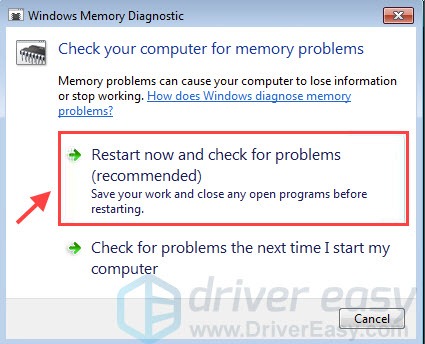
3) Windows will then restart and show you the progress of the check. Wait until the test is complete.
If you don’t see any errors here, your memory isn’t the one to blame in this case. You can try the next fix to solve your problem.
Fix 5: Update your drivers
If there’s no problem with your hard drive, memory card, or system files, the crashing issue is probably caused by your drivers. Device drivers are essential parts of your computer. Corrupt or missing drivers can usually bump your computer into various problems, including a system crash.
There are 2 ways for you to update your drivers:
Option 1 – Manually – You’ll need some computer skills and patience to update your drivers this way because you need to find exactly the right driver online, download it and install it step by step.
OR
Option 2 – Automatically (Recommended) – This is the quickest and easiest option. It’s all done with just a couple of mouse clicks – easy even if you’re a computer newbie.
Option 1: Update your drivers manually
To update your drivers manually, you can visit the manufacturer’s official website to download the correct and latest drivers and install them on your computer.
Once you’ve downloaded the correct drivers for your system, double click the downloaded file and follow the on-screen instructions to install the driver.
Option 2: Update your drivers automatically (Recommended)
If you don’t have the time, patience or computer skills to update the drivers manually, you can do it automatically with Driver Easy.
Driver Easy will automatically recognize your system and find the correct drivers for it. You don’t need to know exactly what system your computer is running, you don’t need to risk downloading and installing the wrong driver, and you don’t need to worry about making a mistake when installing.
You can update your drivers automatically with either the FREE or the Pro version of Driver Easy. But with the Pro version, it takes just 2 clicks.
1) Download and install Driver Easy.
2) Run Driver Easy and click Scan Now. Driver Easy will then scan your computer and detect any problem drivers.

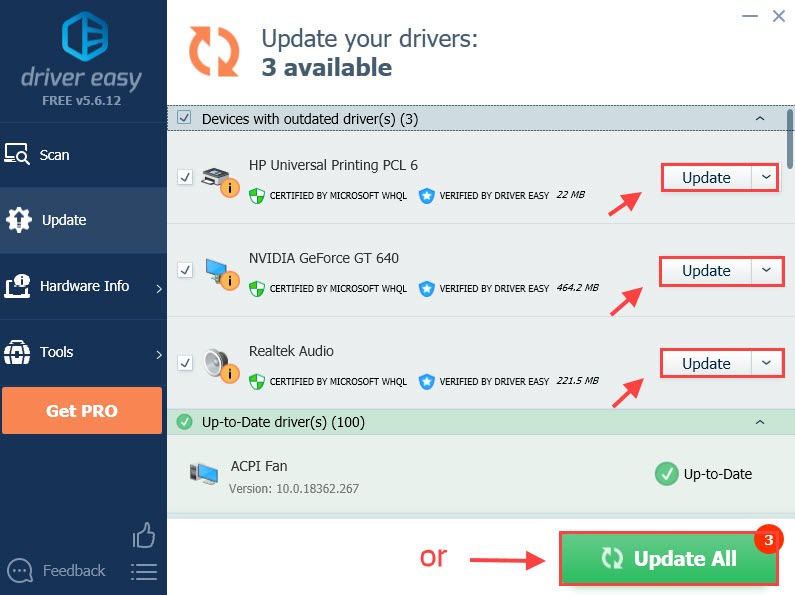
3) Click the Update button next to your driver to download the correct version of its driver, then you can manually install it.
OR
Click the Update All button at the bottom right to automatically update all the drivers. (This requires the Pro version — you will be prompted to upgrade when you click Update All. You get full support and a 30-day money back guarantee.)
4) Restart your computer after installing the drivers.
See if your Windows 7 crashing issue still persists. If so, don’t give up here, you still have a few fixes to try.
Fix 6: Check the crash dump
The crash dump files are created to provide you with information about the cause of the system crash. Though it’s mainly for developers, it can be useful for you too.
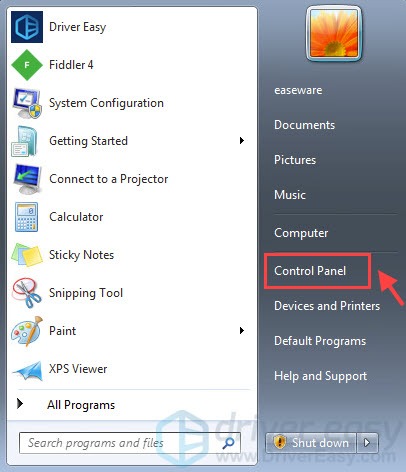
1) Click Start and select Control Panel.
2) Click System and Security, and then select System.
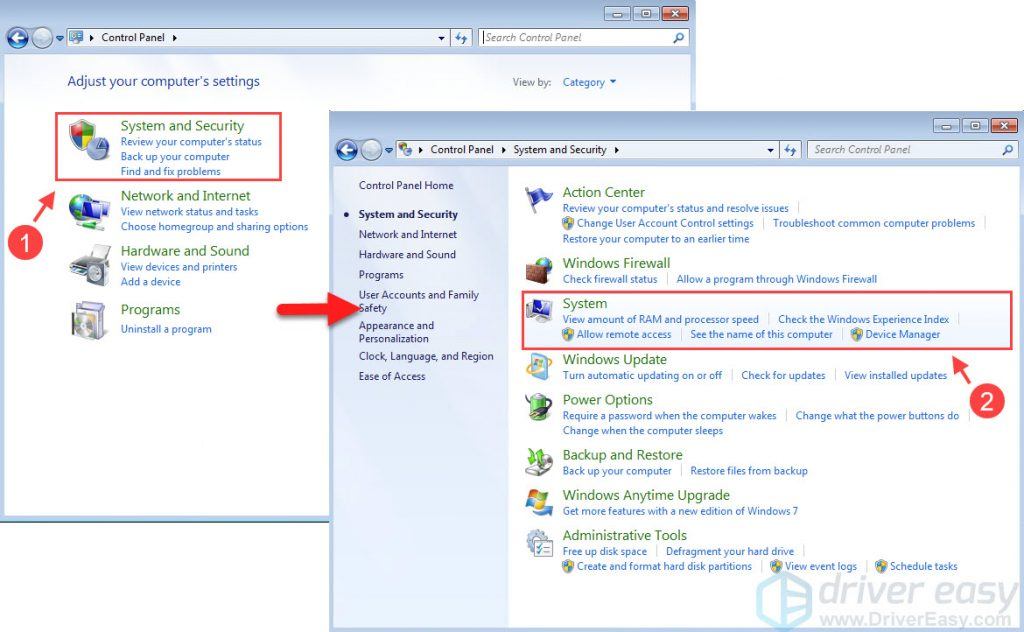
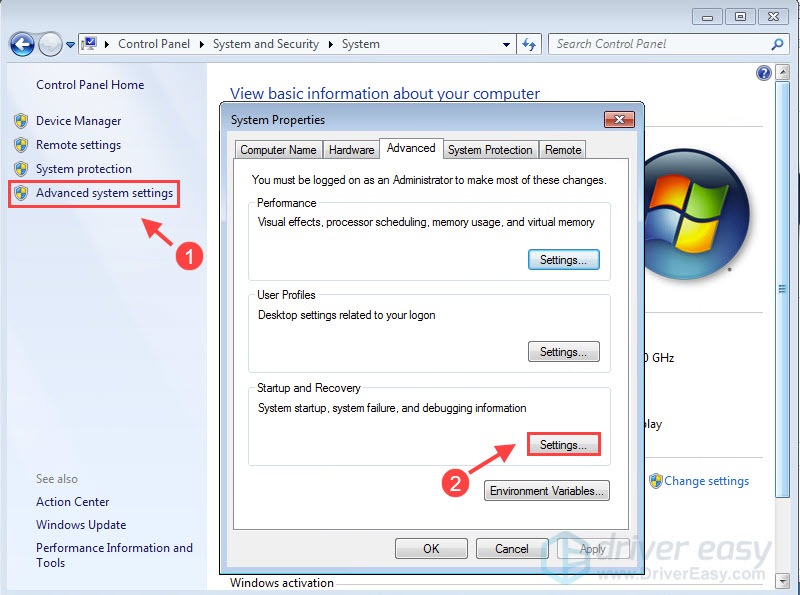
3) Click Advanced system settings. Under the Advanced tab, select Settings under Startup and Recovery.
4) In the Write debugging information list, select Small memory dump (256 KB). Then click OK.
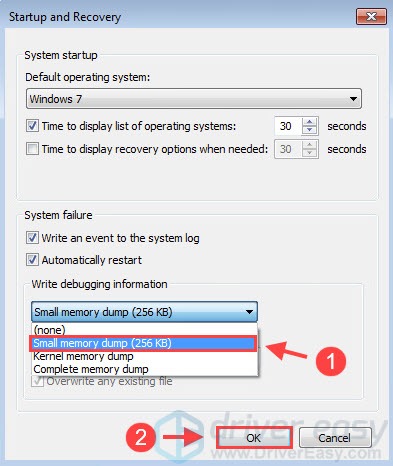
5) Restart your computer.
6) After turning on your device, you can go to Instant Online Crash and upload your crash dump file in %SystemRoot%\Minidump or send the file to Microsoft Support for further analysis. Then you will get more details about the cause of your system crashing issue and solve it according to the exact cause.
This may take time, and you can try the following methods to solve your problem while you’re waiting.
Fix 7: Perform a System Restore
If you’ve recently installed a new application or program, or if you’ve upgraded your system, it’s likely to cause the Windows 7 crashing issue. To bring it back to its last working state, you can perform a System Restore.
1) Remove all external devices and then press the power button to start your computer
2) Press and hold the F8 key before the Windows logo appears.
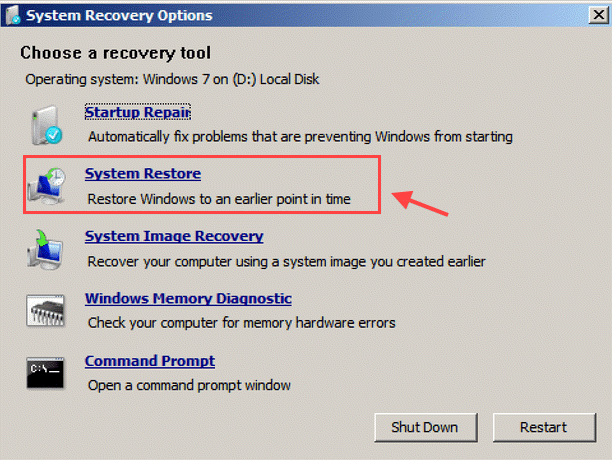
3) On the Advanced Boot Options screen, use the down arrow key to highlight Repair your computer, and then press Enter.
4) On the System Recovery Options menu, click System Restore, and then follow the on-screen instructions.
After finishing the System Restore, see if your computer can work properly again. If not, you can try the next fix.
Fix 8: Scan for malware and virus
The virus may crash your computer so it’s necessary to scan your system for any malware and virus. In this case, you may need a third-party antivirus program, like McAfee or Norton.
If any problem has been detected, follow the instructions provided by the antivirus program to fix the problem. Then restart your computer to test the issue.
Fix 9: Reinstall your system
If none of the fixes above works for you, you can perform a clean reinstall of your Windows 7 system. To do it, you need a Windows 7 installation media such as a bootable USB flash drive or a Windows installation DVD/CD.
1) Press the power button to turn on your computer.
2) When the first screen pops up, you may see a message saying something like Press F12 to Choose Boot Device. Press F12 to enter Boot Menu.
4) Use the down arrow key to choose the Boot Device to USB, CD, or DVD.
5) After selecting the language and region, select Install Now and follow the on-screen instructions to reinstall Windows 7 on your computer.
After reinstalling, your computer should be working now.
Feel free to leave us a comment if you have further questions or suggestions.