


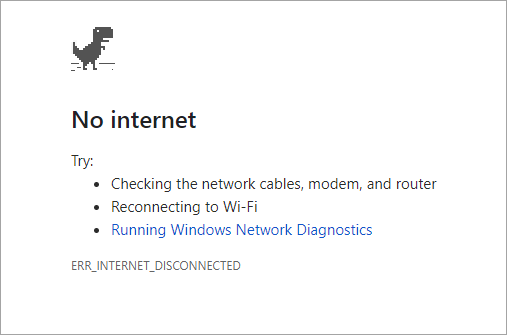
The moment when your laptop doesn’t connect to the Internet can really drive you crazy. All the online activities come to a screeching halt: no online gaming, no video watching, and no news reading. Therefore, it allows of no delay to fix the issue – whatever causes your faulty network connection, you may troubleshoot the problem with this tutorial step by step.
Do some checking on your computer
First of all, we need to determine what kind of network problems you’re confronted by. To figure it out, complete the following procedure:
- If you have more than one computer (or mobile phone) to hand, you should check whether the network connection is in normal state on other equipment. If so, then the problem should be based in the laptop which won’t connect to the Internet; if not, there may be something wrong with your wireless router or modem – say, the devices overheat due to long hours of working. Other than that, you should check your net wires and cables in case they’ve gone loose or perished.
- Supposing it is your hardware to blame, you can try to tinker with it first. No matter what sort of connection you’re using – wired or wireless – restart any related devices such as modems and wireless routers. Remember to turn off the problematic laptop before you shut them down. After they’ve been restarted, you should reboot your notebook and see whether it can connect to the Internet properly this time.
- Once you find out that you don’t have quite the skills to resolve these hardware problems, you should contact a local technician or your ISP (Internet Service Provider) for assistance.
- If there’s nothing wrong with your hardware, then maybe you should turn your eyes upon the software malfunctions such as inappropriate PC settings or out-dated drivers. Also, when you find out there’s only one laptop suffering from the network issue, you don’t need to worry about your modem, router or anything like that. Just stick to that faulty computer and find possible causes for the trouble.
- Try to open more than one webpages. Sometimes the server of a particular website may go offline temporarily, which is quite common and won’t affect other sites. Once you find out that you don’t have access to every site you open, it’s quite possible that you do have a problem in network connection.
Don’t get upset so soon as you notice a network malfunction. In the following section, we’ll provide you with 9 fixes on how to solve this issue.
9 fixes for “laptop won’t connect to the Internet”
Here are 9 fixes that have helped many users resolve their problem. You may not need to try them all; just work your way down the list until you find the one that works for you.
Fix 1: Disable & Enable your network adapter
Fix 2: Update your device drivers
Fix 3: Run Network troubleshooter
Fix 5: Modify your TCP/IPv4 settings
Fix 6: Adjust Power Management settings
Fix 7: Clean up temporary files
Fix 8: Disable Antivirus Software temporarily
Fix 1: Disable & Enable your network adapter
Always remember to try this quick-fix when you lose your network connection on PC. It may seem dumb, but it’s worth taking a shot especially when you have no other solutions in sight.
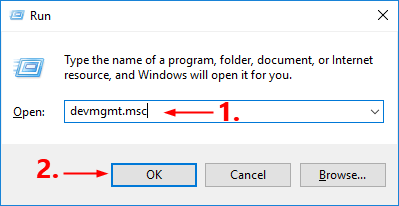
1) Press the Windows Logo Key and R at the same time to invoke the Run box. Then type devmgmt.msc into the box and click OK.
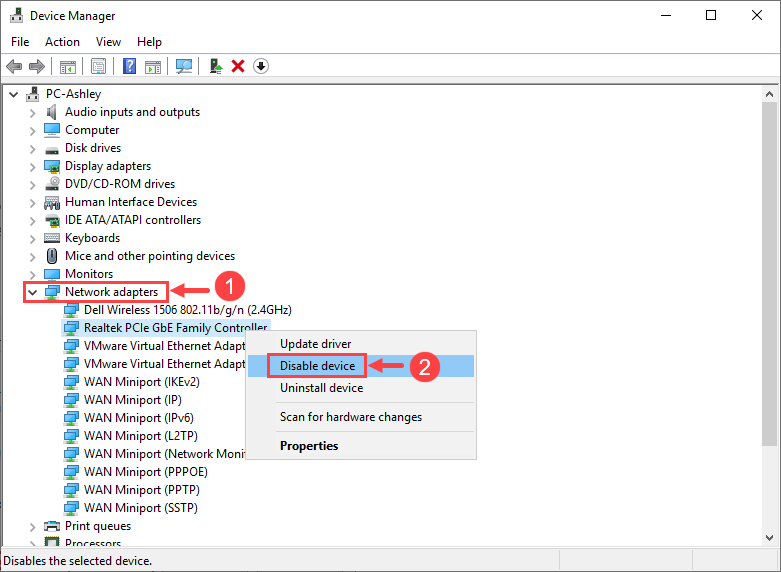
2) In Device Manager, double-click on the Network adapters category to expand its list. Then right-click on the faulty adapter and select Disable device from the context menu. If prompted for confirmation, click Yes.
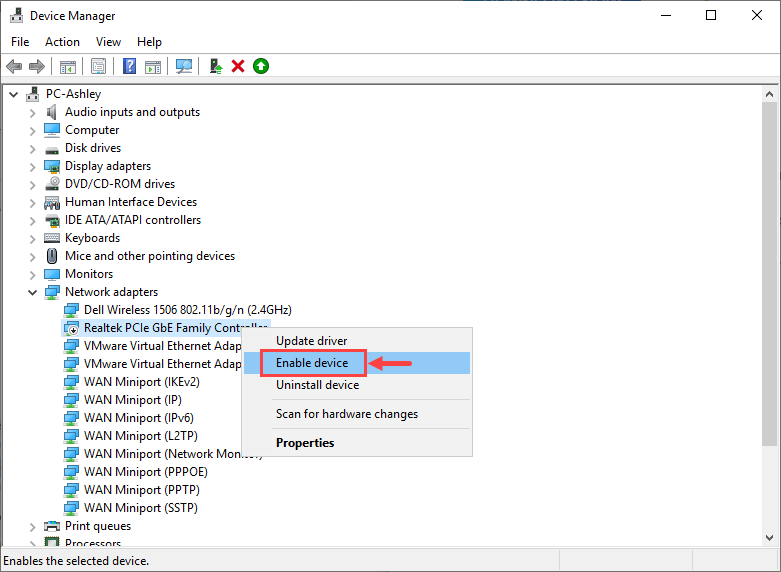
3) Wait a few seconds. Then, right-click on the faulty adapter again and select Enable device.
Now your network adapter is available for use again. Open your web browser to see whether the Internet is connected properly. Hopefully it is; but if not, please read on and try out the next fix.
Fix 2: Update your device drivers
Out-dated or corrupt drivers can lead to your network issue as well. You may look on this fix as one that is simply related to the network card driver, but actually there’s a lot more to it. In this case, you should first update your network card drivers and see whether that helps solve your problem. If not, try to update all the device drivers on PC.
Here we recommend updating all your device drivers to the latest correct version with Driver Easy.
Driver Easy will automatically recognize your system and find the correct drivers for it. You don’t need to know exactly what system your computer is running, you don’t need to risk downloading and installing the wrong driver, and you don’t need to worry about making a mistake when installing.
You can update your drivers automatically with either the FREE or the Pro version of Driver Easy. But with the Pro version it takes just 2 clicks (and you get full support and a 30-day money back guarantee):
1) Download and install Driver Easy.
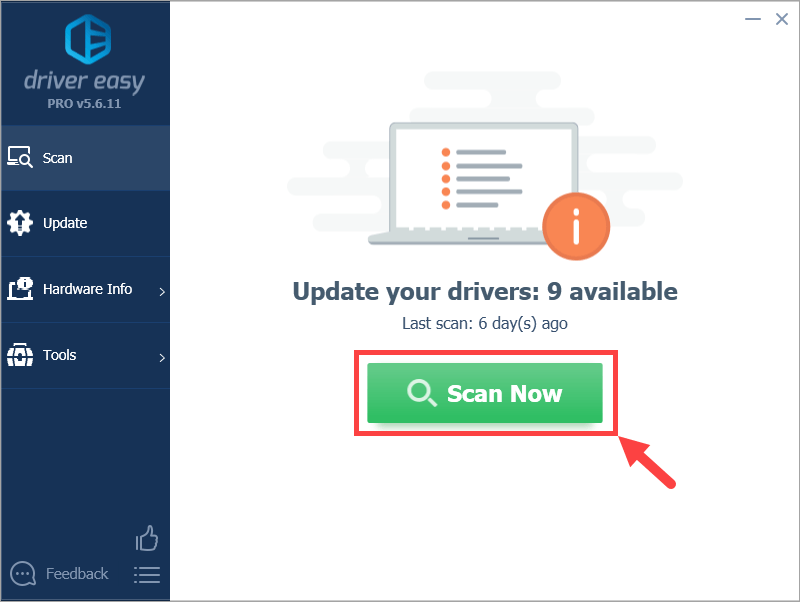
2) Run Driver Easy and click Scan Now button. Driver Easy will then scan your computer and detect any problem drivers.
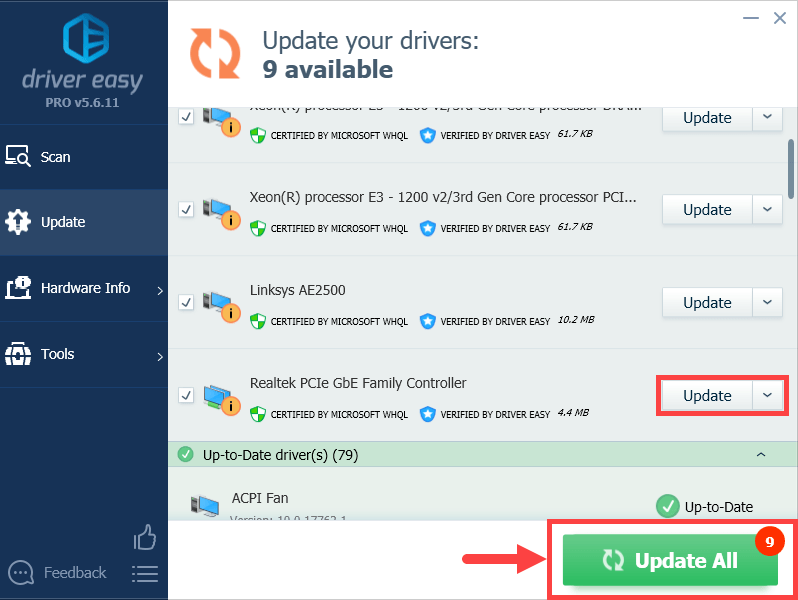
3) Click the Update button next to any flagged device such as your network adapter to automatically download and install the correct version of that driver (you can do this with the FREE version).
Or click Update All to automatically download and install the correct version of all the drivers that are missing or out of date on your system (this requires the Pro version – you’ll be prompted to upgrade when you click Update All).
https://www.drivereasy.com/help55/offline-scan/
Hopefully updating device drivers can resolve your problem. Open your web browser and check if the network connection has gone back to normal. If not, please proceed to the next fix.
Fix 3: Run Network troubleshooter
Network troubleshooter is a built-in utility of Windows 10. Some users may consider it ineffective, but it can save you much time and effort when it really does the trick.
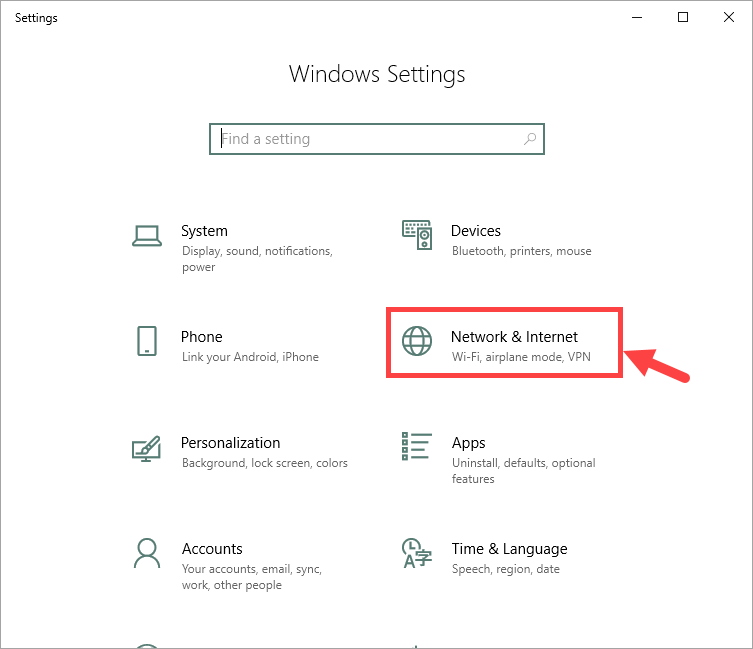
1) On your keyboard, press the Windows Logo key and I at the same time to invoke the Settings window. Locate Network & Internet and click on it.
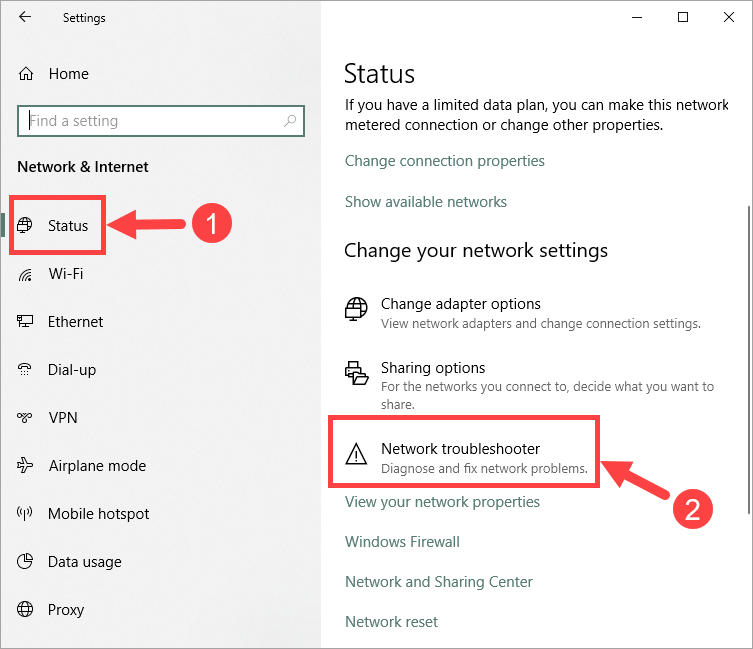
2) In the left pane, select Status. Then click Network troubleshooter on the right panel.
3) Follow the onscreen instructions and troubleshoot your network issue step by step.
So far, have you solved your network issue? If not, go on to check out the next fix below.
Fix 4: Renew your IP address
To renew your IP address, please follow the steps below:
1) On your taskbar, type command into the search box. Then right-click on the Command Prompt result and select Run as administrator.
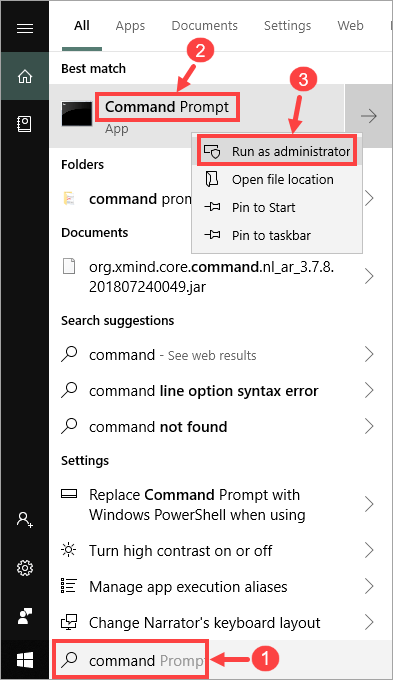
Click Yes if you’re prompted about permission.
2) Here pops up the command prompt window.
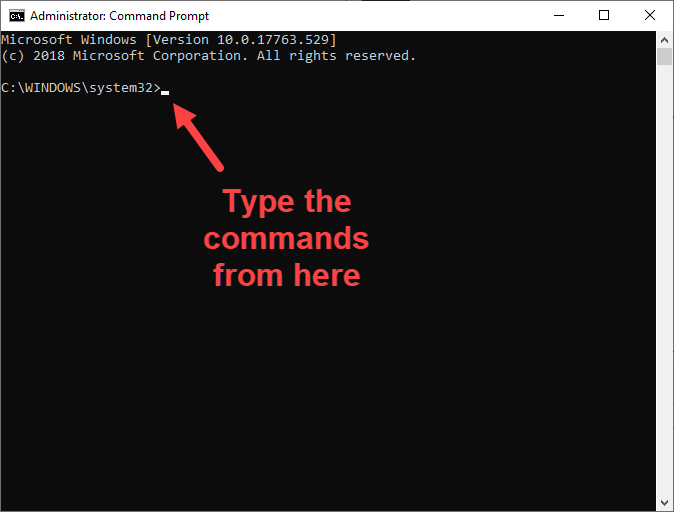
In your command prompt window, enter the following command:
netsh winsock reset
Then, press the Enter key on your keyboard and wait till the reset is complete.
3) Likewise, enter the following command:
netsh int ip reset
Then, press Enter and wait till the reset is complete.
4) Type the following command this time:
ipconfig /release
Note that there’s a space between “ipconfig” and “/”.
Then, press Enter and wait till the release is complete.
5) Type the following command:
ipconfig /renew
Note that there’s a space between “ipconfig” and “/”.
Then, press Enter and wait till the renewal is complete.
6) For the last time, enter the command below:
ipconfig /flushdns
Note that there’s a space between “ipconfig” and “/”.
Then, press Enter and wait till the flush is complete.
Now close the command prompt window. Open your web browser and check if the network issue still remains. If not, then congrats – you’ve solved your problem! If so, please move on to the next fix.
Fix 5: Modify your TCP/IPv4 settings
Try to reset your IP and DNS server addresses when Windows suspects that you don’t have a valid IP configuration. Here’s how to do it:
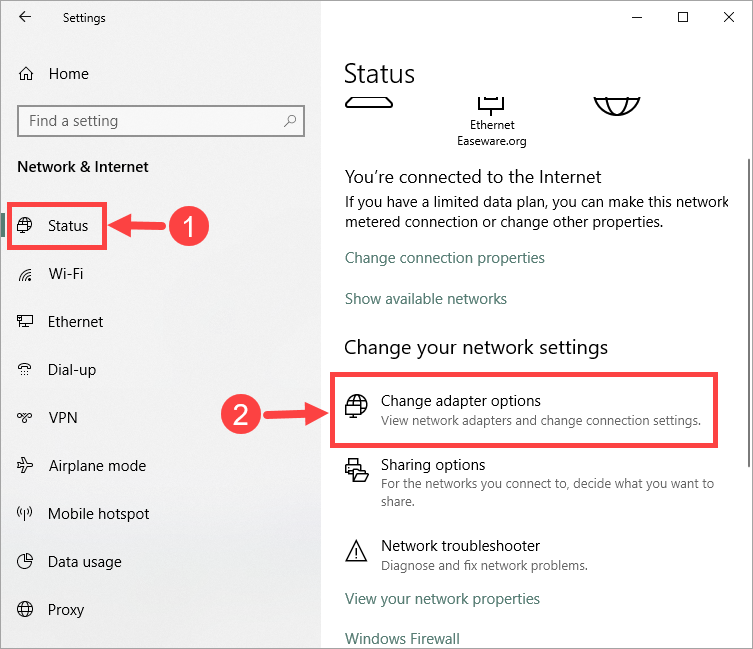
1) On your keyboard, press the Windows Logo key and I at the same time to invoke the Settings window. Locate Network & Internet and click on it.
2) In the left pane, select Status. Then click Change adapter options on the right panel.
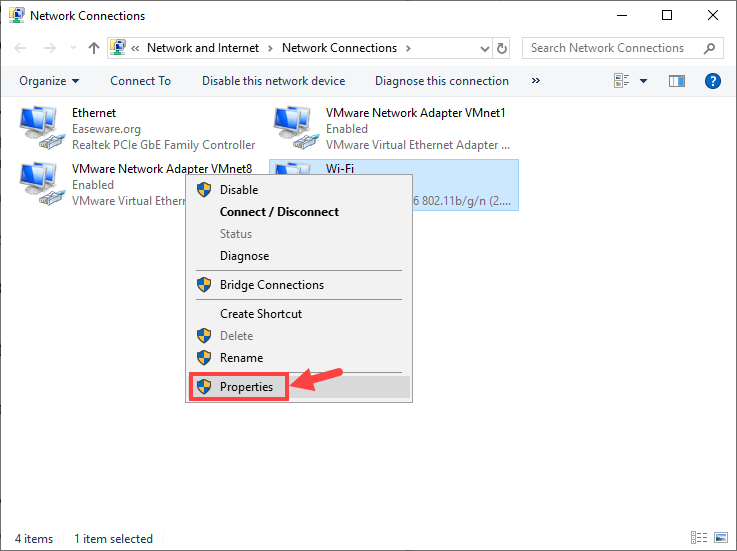
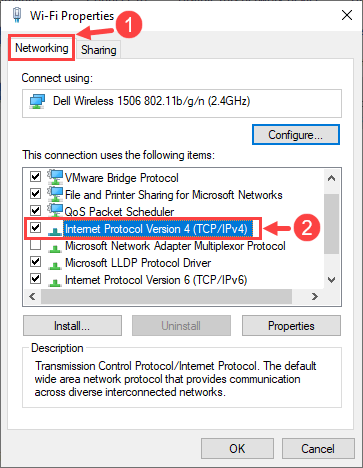
3) Right-click on the problematic network adapter and select Properties.
4) On the Networking tab, double-click on Internet Protocol Version 4 (TCP/IPv4).
5) In the pop-up window, make sure you select these two radio buttons: Obtain an IP address automatically and Obtain DNS server address automatically. Then click OK to save the changes.
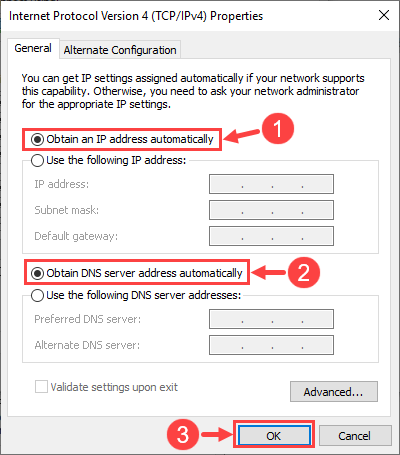
6) Now open your web browser to test if the Internet can be connected properly. If so, then you may skip the content below; if not, move on to the next step.
7) Given that the settings in Step 5 haven’t fixed your network problem, this time you should manually reset your IP and DNS server addresses.
Repeat Step 1 through Step 4. Then in the window of Step 5, make the following tweaks:
- Select Use the following IP address, and then set IP address to 192.168.1.X (you can replace X with any digit numbers from 0 to 255; if you are not sure about it, simply use 192.168.1.14).
- After that, set Subnet mask to 255.255.255.0 and Default gateway to 192.168.1.1.
- Under Use the following DNS server addresses, set Preferred DNS server to 208.67.222.222 and Alternate DNS server to 208.67.220.220.
- Click OK to save the changes.
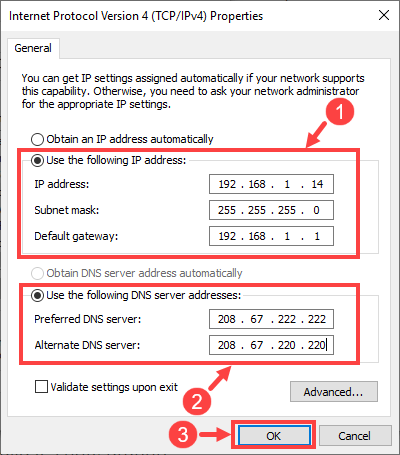
It’s optional for you to set Preferred DNS server to 8.8.8.8 and Alternate DNS server to 8.8.4.4, as shown below.

Now it’s time to open your web browser and see whether this method works for you. In case the network problem persists, check out the next fix.
Fix 6: Adjust Power Management settings
When your laptop is running out of power, one of the settings in Power Management may force your network adapter to stop working with the purpose of saving energy. In this situation, you should try to turn off this setting.
1) On your keyboard, press the Windows Logo key and I at the same time to invoke the Settings window. Locate Network & Internet and click on it.
2) In the left pane, select Status. Then click Change adapter options on the right panel.
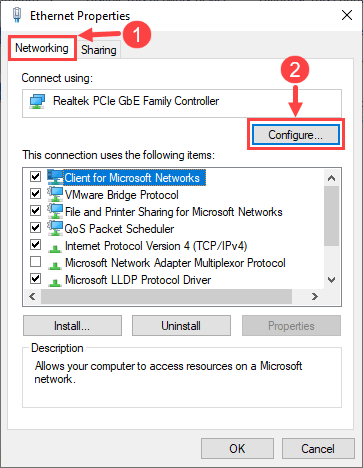
3) Right-click on the problematic network adapter and select Properties.
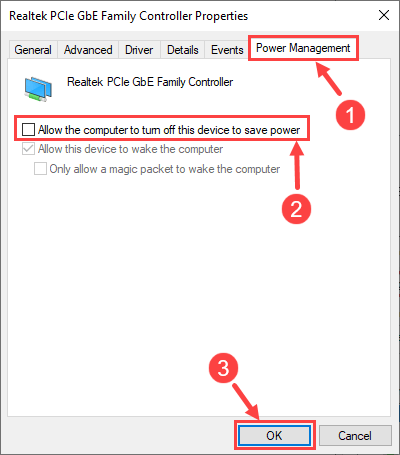
4) On the Networking tab, click Configure….
5) Go to the Power Management tab. Make sure you uncheck Allow the computer to turn off this device to save power. Then, click OK to save the change.
Now visit a website and see if your problem has been solved. If not, please move on to the next fix.
Fix 7: Clean up temporary files
Have you ever cleaned up your temporary files in the laptop? Temporary file, just as its name suggests, is a kind of files that used to exist for a good reason but not anymore. Now they are just eating up your network space and making it increasingly difficult for your system to operate in an efficient way. Therefore, you should delete all the temporary files at regular times.
1) On your keyboard, press the Windows Logo key and R at the same time to invoke the Run dialog box. Type in temp and hit Enter.
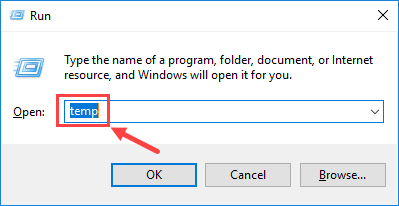
If prompted, click Continue to open the folder.
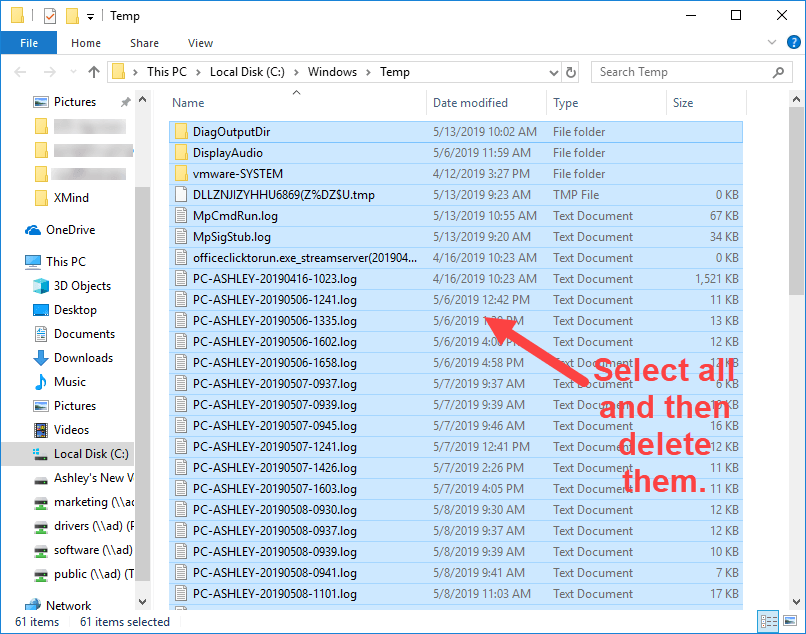
2) Select all the files and delete them to clear up the folder. This won’t affect your personal files.
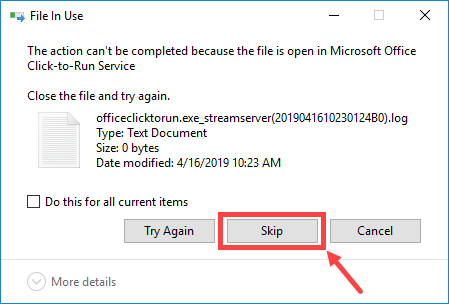
3) Click Skip if you’re presented with a warning that says “the folder or a file in it is open in another program.”
4) On your keyboard, press the Windows Logo key and R at the same time to invoke the Run dialog box again. Type in %temp% and hit Enter.
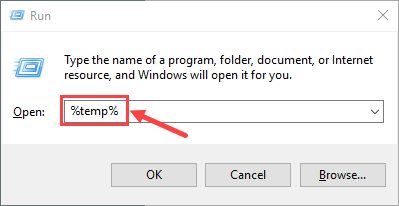
If prompted, click Continue to open the folder.
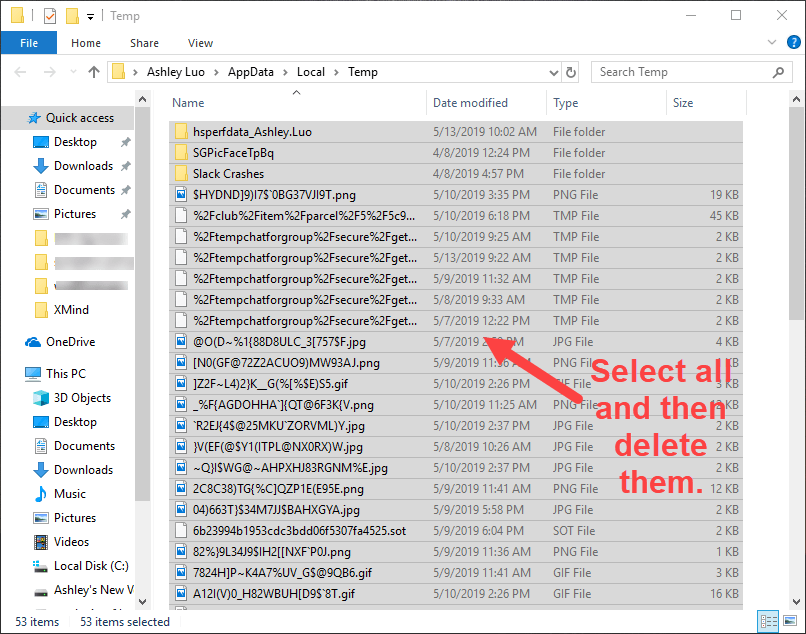
5) Press Ctrl + A to select all the files. Then hit the Delete button on your keyboard to clear them up. This won’t affect your personal files.
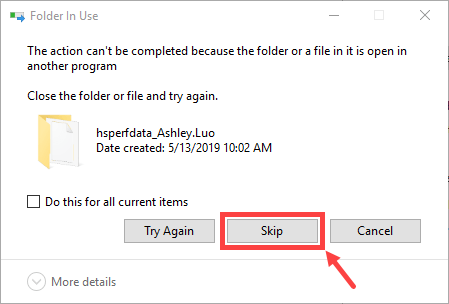
6) Click Skip if you’re presented with a warning that reads “the folder or a file in it is open in another program.”
7) Don’t forget to empty your Recycle Bin after everything’s done.
Open your web browser to check if you can surf the Internet as normal. In case your network issue hasn’t been solved yet, please read on and try the next fix below.
Fix 8: Disable Antivirus Software temporarily
Chances are that your laptop is prevented by antivirus software from connecting to the Internet. If that’s the case, then you should try to disable your antiviruses temporarily and see if they’re causing you the trouble.
Please refer to your antivirus software’s documentation to learn how to disable it. You might also find these links useful:
- How to temporarily turn off Norton Antivirus program?
- How to stop AVG temporarily?
- How to disable Avast temporarily?
Note that Microsoft has its own default anti-malware, Windows Defender. It’s automatically enabled even if you also have other antivirus applications installed. Even if you disable the third-party antivirus program, Windows Defender is always there for you during that certain time range. So, no need to worry too much about temporarily turning antivirus off. That said, you should still turn it on as soon as possible because your PC will be more vulnerable to malware or viruses without the protection of an antivirus program.
Once you find out it’s your antivirus to blame, you may reach out to the software manufacturer or visit their official websites to see if there’s an updated version available for download.
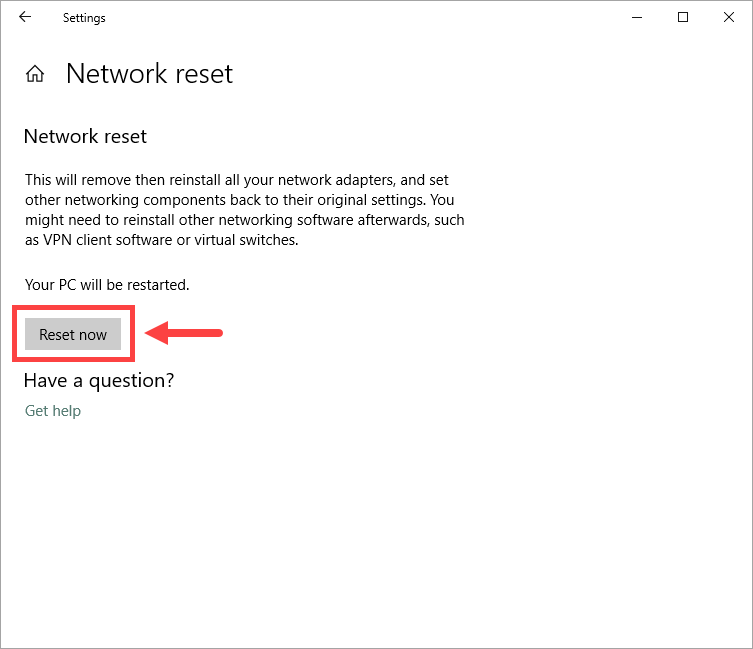
Fix 9: Run Network reset
If none of the fixes above are able to solve your network problem, then you need to consider running Network reset, a feature of your Windows system. This method proves to be useful especially when you have a network problem soon after the Windows system has been updated to a new version. However, running Network reset removes any installed network adapters in your laptop along with their settings. After you reboot your PC, these adapters will be reinstalled automatically with their settings set to the defaults. Besides, some networking software such as VPN will also be uninstalled during the process, so you have to install them manually afterwards.
Here are the steps for you to run Network reset:
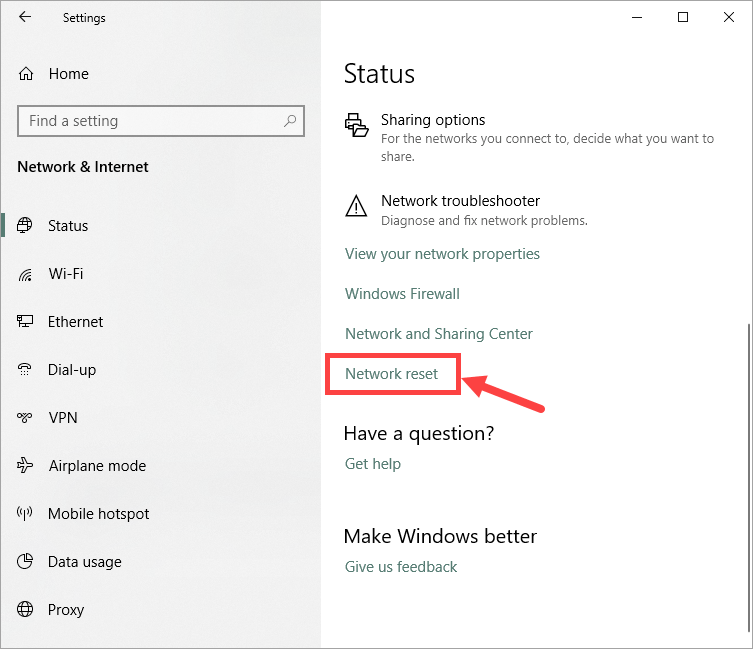
1) On your keyboard, press the Windows Logo key and I at the same time to invoke the Settings window. Locate Network & Internet and click on it.
2) In the left pane, select Status. Then click Network reset on the right panel.
3) In the next window, click Reset now. If prompted about confirmation, click Yes.
4) Wait till your laptop gets restarted. After that, open your web browser to check if the network connection has gone back to normal.
So far, have you succeeded in resolving your network issue? If you have any follow-up questions or ideas, please feel free to leave a comment below. Thanks for reading, and good luck to all of you!