Many users have updated to Windows 11, but some of them encounter Bluetooth not working issues. If you’re looking for a cure for the Bluetooth not working issue, you’re in the right place. In this tutorial, we’ll walk you through all the working fixes and get your Bluetooth device working in a jiff.
Try these fixes:
You might not need to try them all; just work your way down until you find the one that suits you.
- Check your device
- Run the Windows 11 Bluetooth troubleshooter
- Update your Bluetooth driver
- Restart the Bluetooth Support Service
- Change the Bluetooth device discovery setting
- Repair your system files
Fix 1: Check your device
Before starting any complicated fixes, make sure you’ve checked these things:
- Make sure your device supports Bluetooth;
- Make sure your device has turned on Bluetooth; and
- Make sure your PC has turned on Bluetooth.
Here’s how to check on Windows 11 PC:
- Press the Windows logo key + A to open Quick Settings.
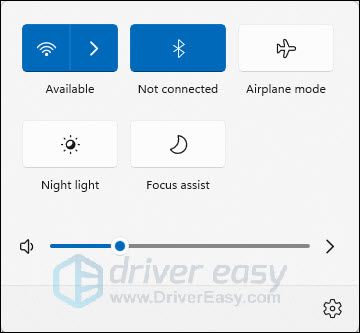
- Make sure the Bluetooth option is enabled.
- You can re-enable Bluetooth on your PC by turning off Bluetooth and then enabling it later. Then check if your device can work on your PC. It may work for some users. If you need help doing this, please skip to here: how to pair your Bluetooth device on Windows 11
If you’re sure your device supports Bluetooth and was already paired with your PC, move to the next method to get it working.
Fix 2: Run the Windows 11 Bluetooth troubleshooter
Windows has built-in troubleshooters to fix some common errors. You can run the Bluetooth troubleshooter to fix the Windows 11 Bluetooth not working issue. This is the most common and easy way to fix the problem.
Here’s how:
- Press the Windows logo key + I (i) key together to open Settings.
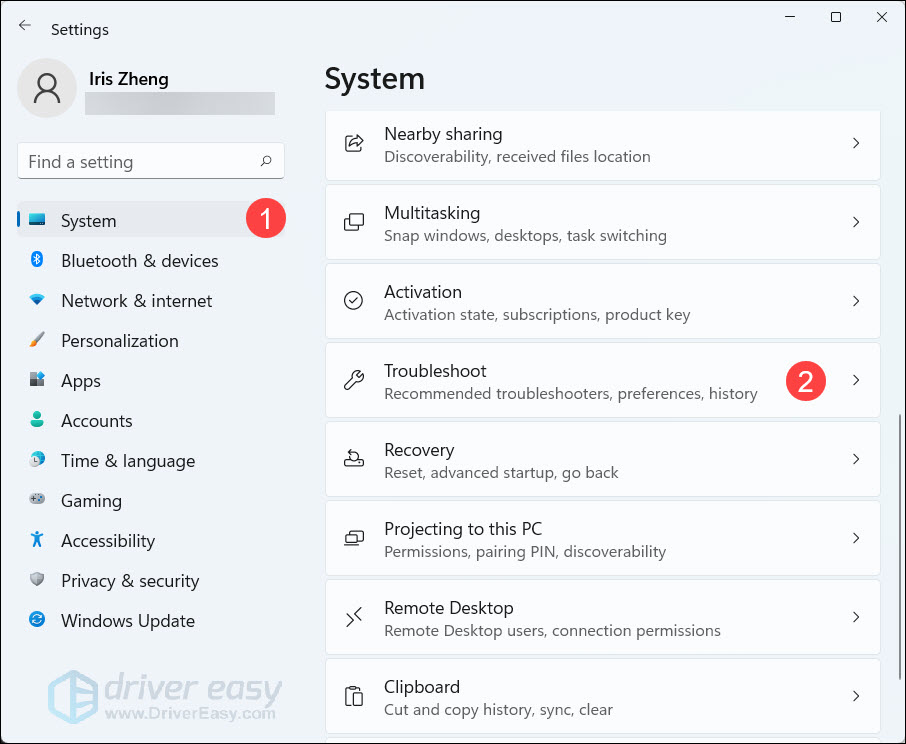
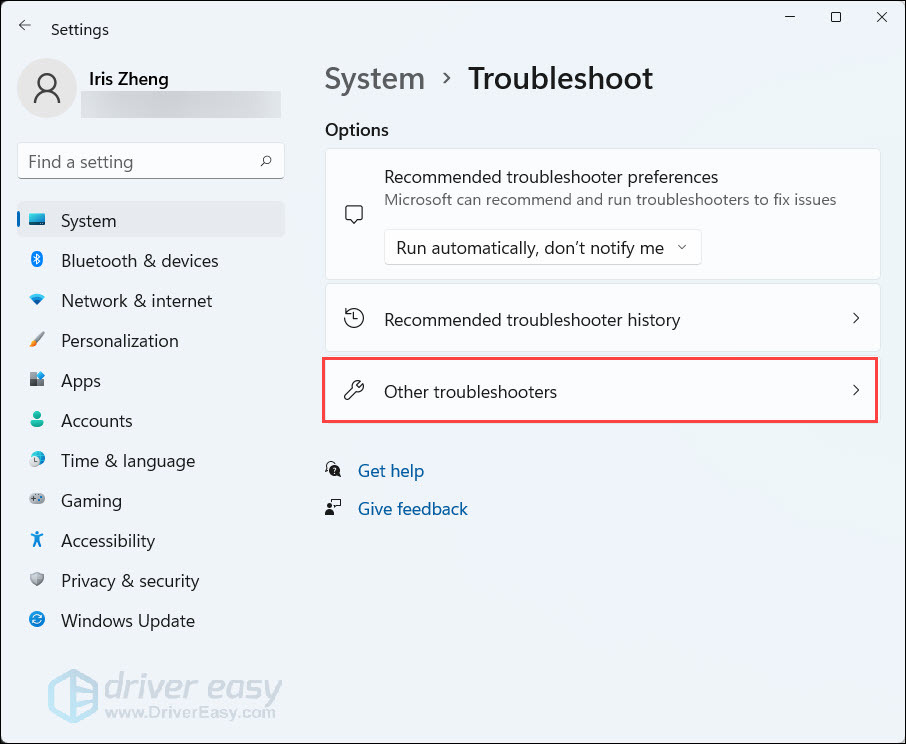
- Click System in the left panel. Then scroll down on the right panel and click Troubleshoot.
- Click Other troubleshooters.
- Find Bluetooth and click Run.
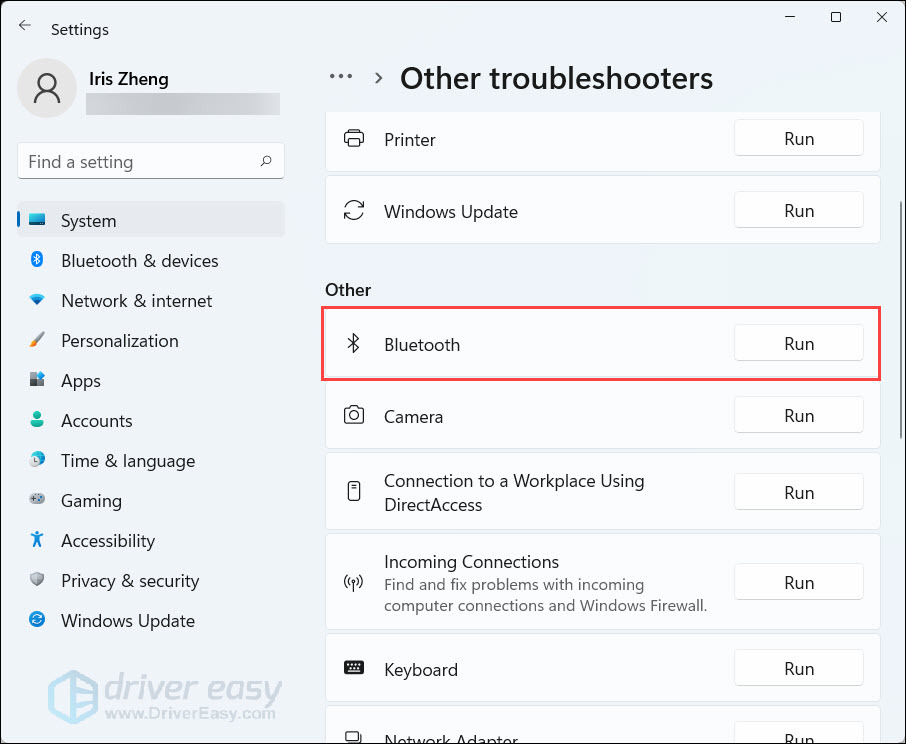
- The system will automatically run the troubleshooter to fix the problem. When the process is completed, Windows will let you know whether the problem is solved or not.
If the Bluetooth troubleshooter doesn’t work, move to the next fix.
Fix 3: Update your Bluetooth driver
One of the most common causes of Bluetooth not working problem is an outdated or faulty Bluetooth driver. If you never bother to or don’t remember when was the last time you updated your Bluetooth driver, definitely do it now. It might just fix your problem right away.
There’re mainly 2 ways you can update your Bluetooth driver: manually or automatically.
Option 1: Update your Bluetooth driver manually
If you’re familiar with computer hardware, you can try to update the Bluetooth driver manually.
To do so, first, visit the website of your device manufacturer, then search for your device model. Be sure to download only the latest driver that’s compatible with your operating system. Once downloaded, open the installer and follow the on-screen instructions to proceed.
Option 2:Update your Bluetooth driver automatically (Recommended)
If you don’t have the time, patience, or computer skills to update your Bluetooth driver manually, you can, instead, do it automatically with Driver Easy. Driver Easy will automatically recognize your system and find the correct drivers for your exact device, and your Windows version, and it will download and install them correctly.
You can update your drivers automatically with either the 7 days free trial or the Pro version of Driver Easy. It takes just 2 clicks, and you get full support and a 30-day money-back guarantee with the Pro version:
- Download and install Driver Easy.
- Run Driver Easy and click the Scan Now button. Driver Easy will then scan your computer and detect any problem drivers.

- Click the Activate & Update button next to the flagged device to automatically download and install the correct version of this driver.
Or click Update All to automatically download and install the correct version of all the drivers that are missing or out of date on your system (You’ll need the Pro version for this – when you select Update All, you’ll get a prompt to upgrade. If you’re not prepared to purchase the Pro version yet, Driver Easy provides a 7-day trial at no cost, granting access to all Pro features like fast downloads and easy installation. No charges will occur until after your 7-day trial period ends.)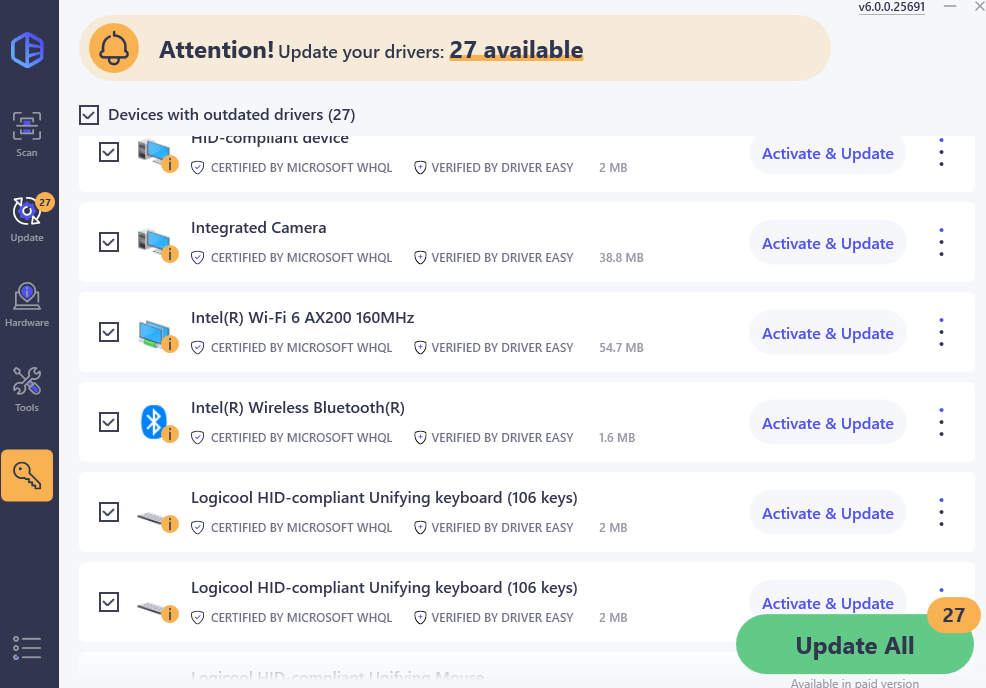
- After updating, restart your computer to take effect.
Fix 4: Restart Bluetooth Support Service
If the Bluetooth Support Service is not working or is set to manual, you might encounter Bluetooth not working issue. You can check if that’s the case for your PC by following the steps below.
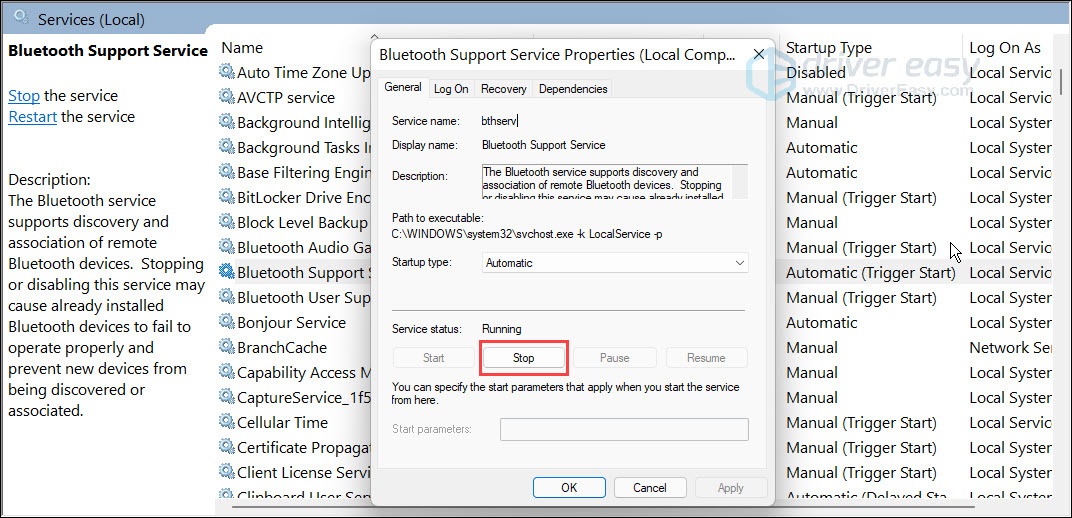
- Press the Windows logo key + S together. Type services in the search bar, then click Services app.

- Scroll down to find Bluetooth Support Service, then double-click it.
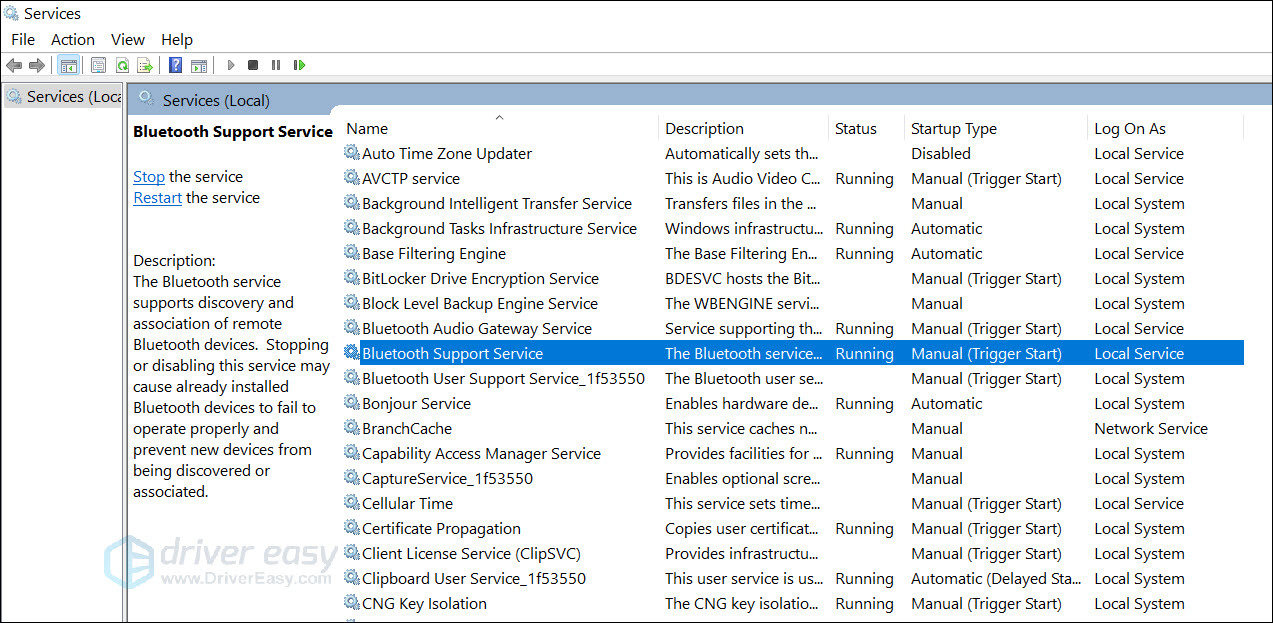
- In the pop-up window, go to the General tab. Click Stop under Service status. Then click Start next to it.
- Select Automatic in the Startup type drop-down menu. Then click Apply > OK.
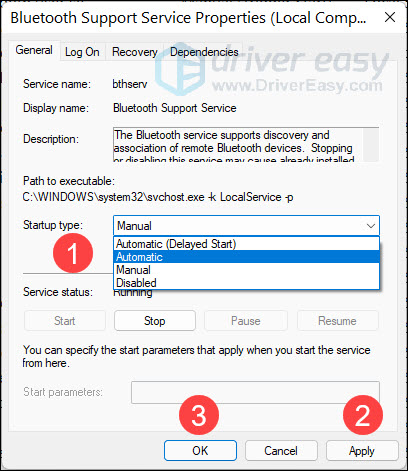
The Bluetooth Support Service is running in normal terms and you should be able to pair your device and use it normally.
Fix 5: Change the Bluetooth devices discovery setting
As per quite some Reddit readers, setting the Bluetooth devices discovery setting to Advanced helps to fix the Bluetooth not working problem on their Windows 11 computers. To see if this does the trick for you as well:
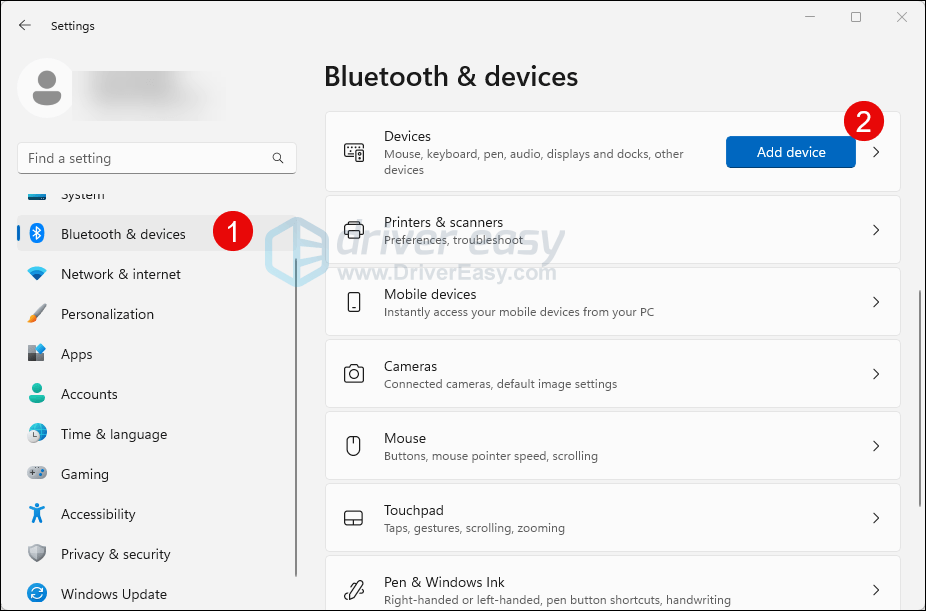
- On your keyboard, press the Windows key and the I key together. Select Bluetooth & devices, then Devices.
- Scroll down and change the Bluetooth devices discovery option to Advanced.
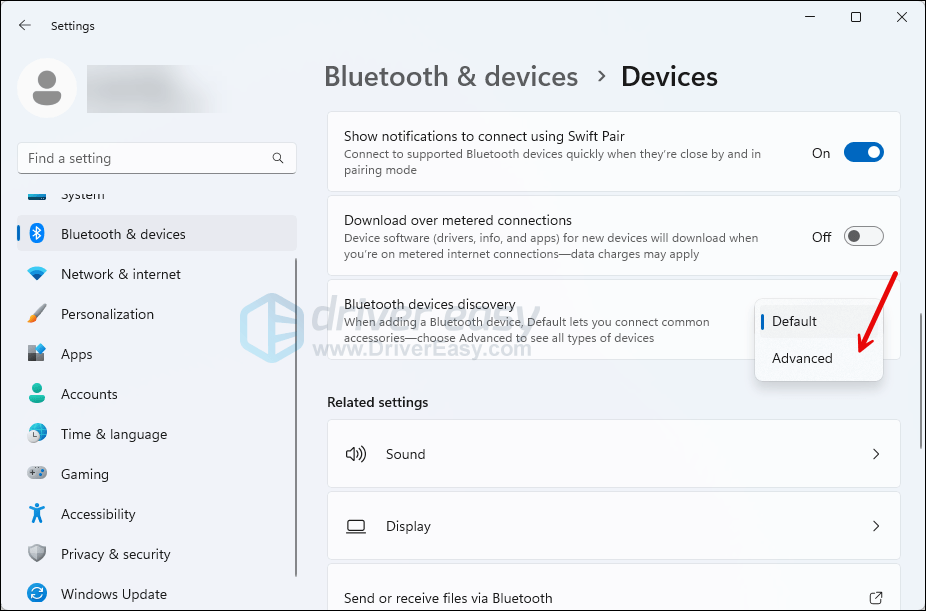
Try to see if your Bluetooth starts working properly. If the problem remains, please move on.
Fix 6: Repair your system files
It’s possible that Bluetooth not working issue is caused by a Windows system error. Corrupt, damaged, or missing system files can cause Windows issues. To check if this is the exact cause, you can either use the Windows built-in tool to run a basic check.
Microsoft’s inbuilt program – System File Checker (SFC) makes it easy for you to get your original system files back. It will restore any broken or missing system files that could be causing your PC issues.
1) Press the Windows logo key + S together to open the Search panel.
2) Type cmd and then right-click on Command Prompt. Click Run as administrator. Click Yes to provide administrator permission.

3) In the black Command Prompt window, type:
sfc /scannow
Then press Enter on your keyboard.
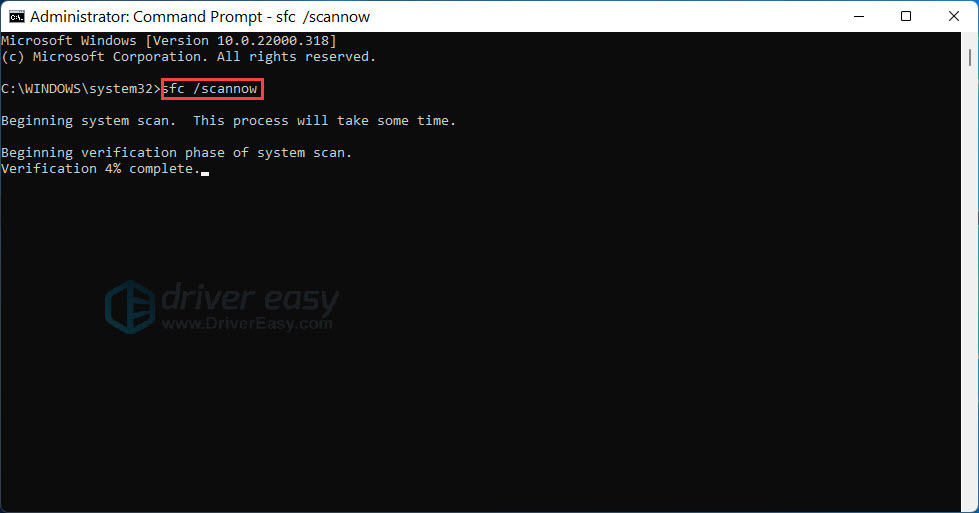
Windows will scan your system for corrupted files, and attempt to fix any it finds. The results will display in this window, so please leave it open until the operation is complete.
How to pair your Bluetooth device on Windows 11
- Press the Windows logo key + I (i) key together to open Settings.
- Click Bluetooth & devices. In the right panel, click Add device.
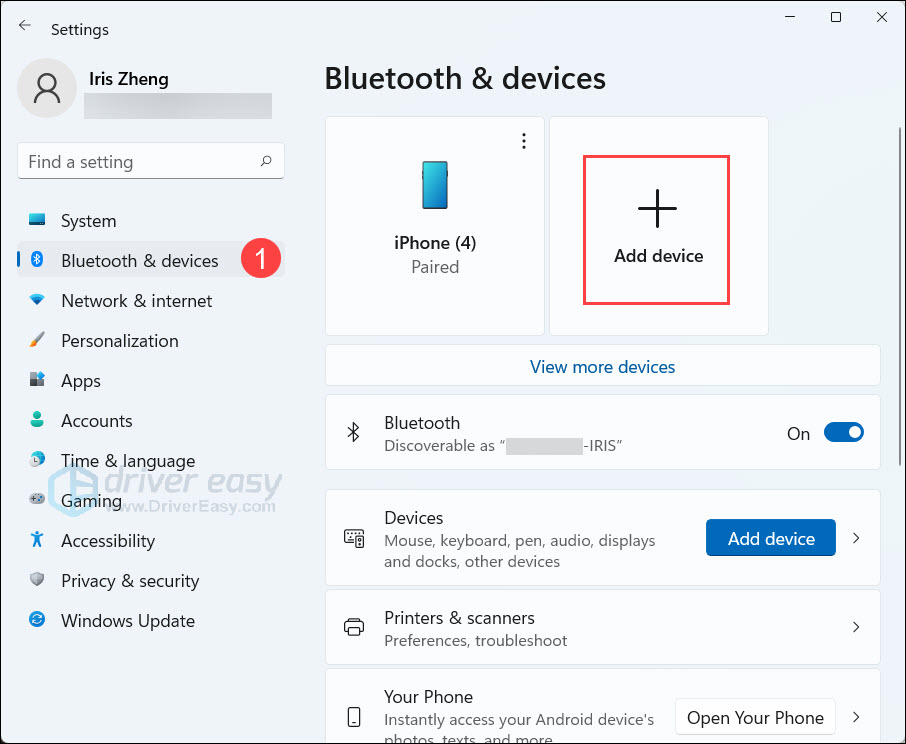
- Click Bluetooth. Make sure your Bluetooth device is turned on and discoverable. Then wait the device the show up in the list.
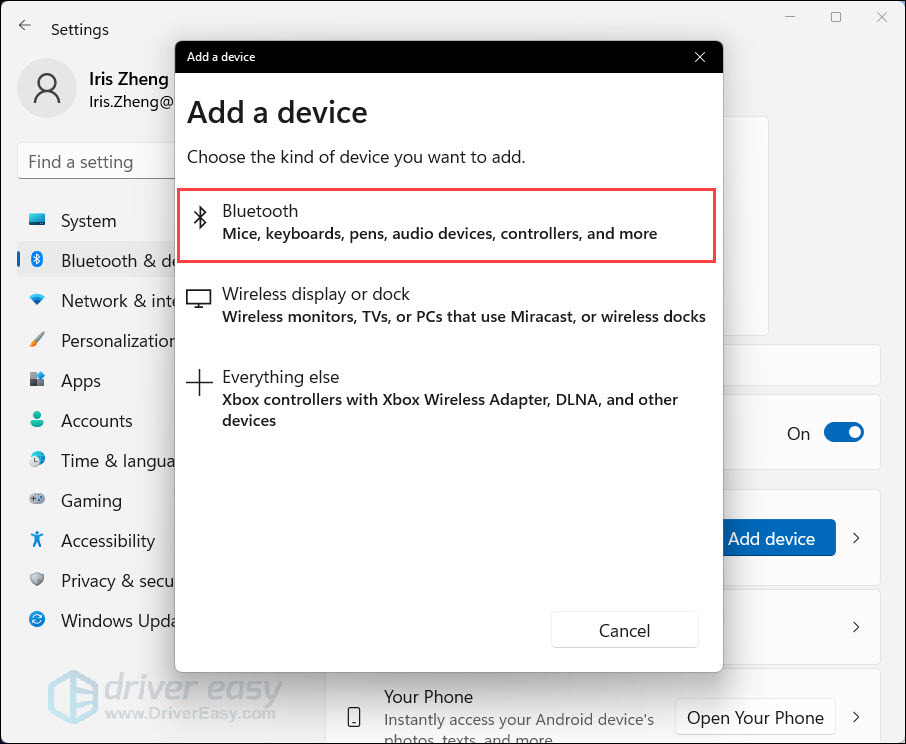
- Click the device you want to pair and wait for a while. It should appear as Connected or Paired.
