


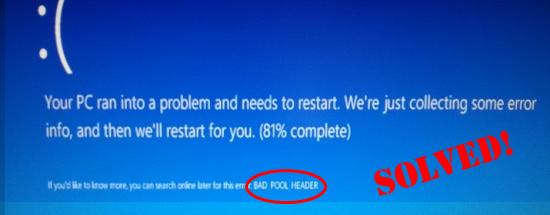
If you keep getting random blue screens with Bad_Pool_Header error on your Windows 7 computer, don’t worry. It’s often not hard to fix at all…
Fixes for Bad Pool Header Windows 7
Here are 5 fixes that have helped other users resolve the Bad Pool Header in Window 7 issue. You may not have to try them all; just work your way down the list until you find the one that works for you.
- Update your device drivers
- Run Windows Memory Diagnostic
- Disable Windows search
- Check for hardware issues
- Check disk errors
Fix 1: Update your device drivers
This problem may occur if you are using the wrong or outdated device drivers. So you should update your device drivers to see if it fixes your problem. If you don’t have the time, patience or skills to update the driver manually, you can do it automatically with Driver Easy.
Driver Easy will automatically recognize your system and find the correct drivers for it. You don’t need to know exactly what system your computer is running, you don’t need to be troubled by the wrong driver you would be downloading, and you don’t need to worry about making a mistake when installing. Driver Easy handles it all.
You can update your drivers automatically with either the FREE or the Pro version of Driver Easy. But with the Pro version it takes just 2 steps (and you get full support and a 30-day money back guarantee):
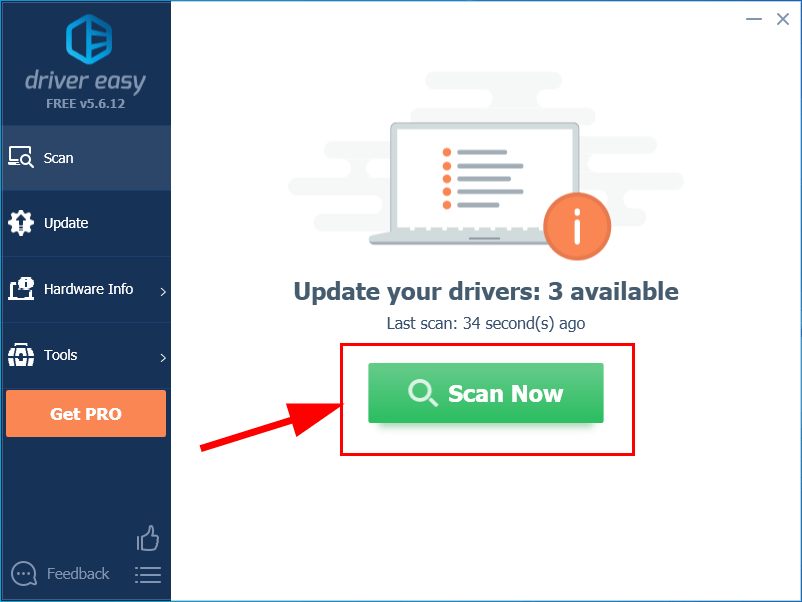
1) Download and install Driver Easy.
2) Run Driver Easy and click the Scan Now button. Driver Easy will then scan your computer and detect any problem drivers.
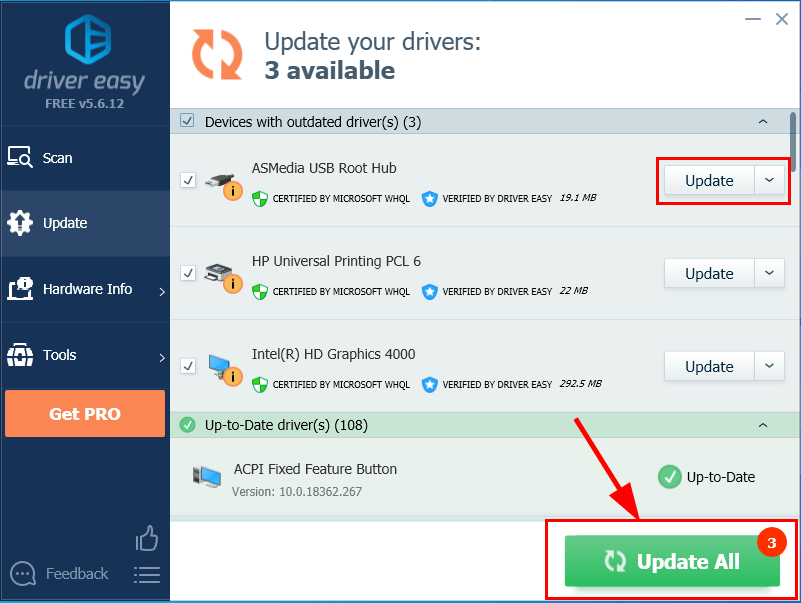
3) Click Update All to automatically download and install the correct version of all the drivers that are missing or out of date on your system (this requires the Pro version – you’ll be prompted to upgrade when you click Update All).
4) Restart your computer for the changes to take effect.
5) Check to see if the bad pool header blue screen problem has been resolved. If yes, then great! If the issue remains, please move on to Fix 2, below.
Fix 2: Run Windows Memory Diagnostic
If you’ve recently made any changes to your computer, say upgrading memory etc., then we might have to run the built-in Windows tool called Windows Memory Diagnostic to help check our system for memory problems and see if it fixes this Bad Pool Header blue screen problem.
To do so:
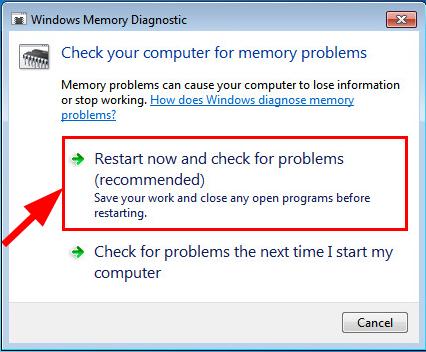
- On your keyboard, press the Windows logo key and type memory. Then click on Windows Memory Diagnostic.

- Be sure to save your work & close all apps on your PC before clicking Restart now and check for problems (Recommended).
- Wait until Windows restarts again(that’s when the memory test finishes), and then:
- If you get a report of memory errors, then follow the on-screen instructions to further troubleshoot.
- If you get a No memory errors were detected from Windows Memory Diagnostic, then you don’t have failed memory on your RAM, please move on to Fix 3 below to further troubleshoot.
Fix 3: Disable Windows search
Windows search is a service in our system that keeps an index of files on your computer to improve searching speed. But it can also be corrupted and responsible for this blue screen issue. So we might have to disable it to see if it works. Here’s how:
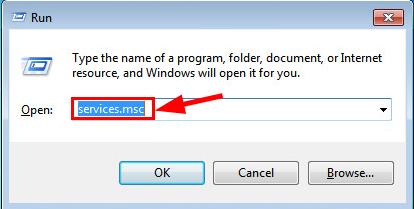
- FOn your keyboard, press the Windows logo key and R at the same time. Then copy & paste services.msc into the box and press Enter.
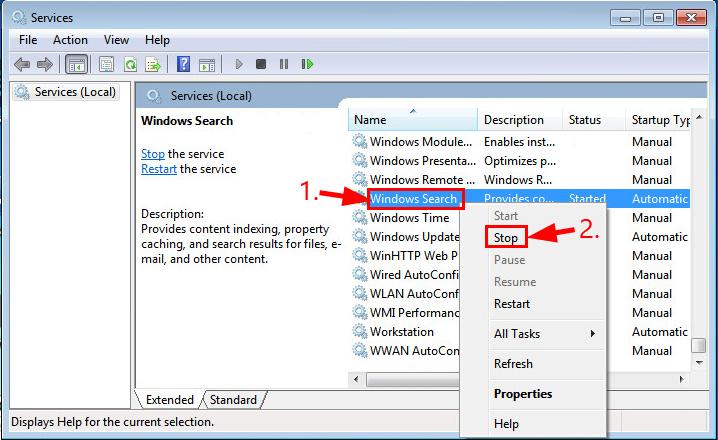
- Scroll down to the bottom, then right click on Windows Search and click Stop.
- Double-click on Windows Search. Then in Startup type:, choose Disabled.
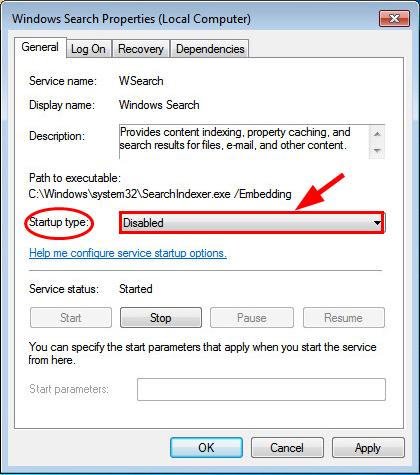
- Click Apply > OK.
- Restart your computer and check if the Bad_Pool_Header issue is fixed. If yes, then great! If it still persists, please move on to Fix 4, below.
Fix 4: Check for hardware issues
Turn off and unplug your PC, then remove all of your RAM sticks. Try to power your computer back on with the sticks, ONE BY ONE. If your computer fails to boot with one specific RAM, you know which one is to blame.
Fix 5: Check disk errors
Disk check is a useful in-built Windows tool that scans our hard disk and external drives for errors and fix them.
To do so:
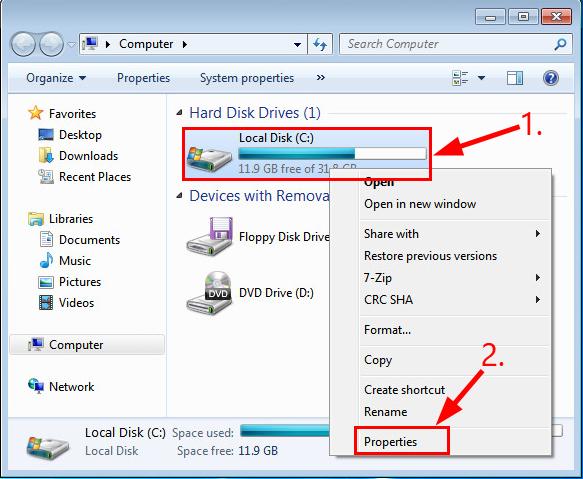
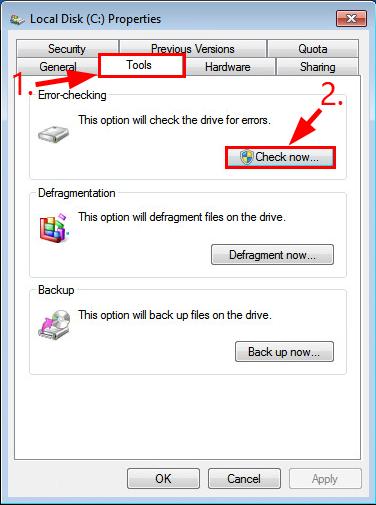
- On your keyboard, press the Windows logo key and E at the same time. Then right-click on Local Disk (C:) and click Properties.
- Click the Tools tab > Check.
- Make sure to check BOTH boxes in the pop-up window and click Start.
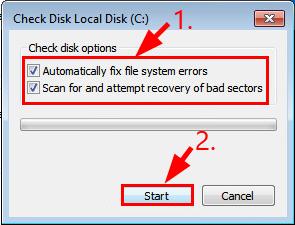
- Follow the on-screen instructions for Windows to detect and fix the errors found.
- Restart your computer and see if it fixes the Bad Pool Header blue screen error.
Hopefully you have successfully resolved the Bad Pool Header in Windows 7 issue by now. If you have any questions, ideas or suggestions, please let me know in the comments. Thanks for reading!