


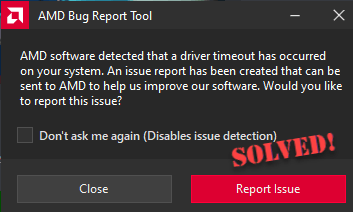
If your screen suddenly flickers, freezes, or you see the message “AMD software detected that a driver timeout has occurred on your system” — right in the middle of your favorite game — it’s incredibly frustrating. Even users with powerful systems like the RX 9070 XT encounter the same issue.
The good news? Most of the time, you don’t need to be a tech wizard to fix it. In this guide, we will show you 9 effective fixes to get your AMD drivers back on track. Read on…
- What causes the AMD driver timeout error?
- Fix 1: Disable Hardware Acceleration
- Fix 2: Update your AMD graphics driver
- Fix 3: Disable AMD Crash Defender service
- Fix 4: Disable MPO (Multiplane Overlay)
- Fix 5: Increase TDR delay
- Fix 6: Disable hardware-accelerated GPU Scheduling
- Fix 7: Perform a clean boot
- Fix 8: Disable EXPO/XMP profile
- Fix 9: Check your hardware (PSU, cables, undervolt/underclock)
What causes the AMD driver timeout error?
The AMD driver timeout error occurs when Windows detects that the graphics driver has stopped responding and forcibly resets it through the Timeout Detection and Recovery (TDR) system. When this happens, you may see an AMD Software detected that a driver timeout has occurred notification, along with symptoms such as application/game crashes or freezes, black screens, or system stuttering or temporary screen flickering.
This issue can happen for a bunch of reasons, from software conflicts to hardware quirks. Below, we’ve put together 9 quick fixes for AMD driver timeout errors based on our real-world troubleshooting experience and community-validated solutions.
Fix 1: Disable Hardware Acceleration
Hardware acceleration offloads rendering tasks to the GPU. While this usually improves performance, it can sometimes trigger timeout events on AMD systems. If you’re using this feature in your background apps, such as Discord, Steam, or Chrome, try disabling it to see if your system remains stable.
Fix 2: Update your AMD graphics driver
In many cases, AMD driver timeouts are simply the result of corrupted or outdated drivers, especially your graphics driver. A broken driver can trigger crashes, freezes, or that dreaded timeout error when your system struggles to communicate with the GPU properly. To fix this, you should remove your graphics driver completely and install the latest compatible version.
You can do this manually by uninstalling your current driver completely and then downloading and installing the latest driver from AMD’s official website. Instead of using AMD Adrenalin Software, which is reported by many users to cause instability, simply download the driver-only package.
If you want to avoid the manual hassle — and the potential risks that come with it, you can do it automatically with Driver Easy. Driver Easy is a reliable driver update tool that performs a thorough removal of outdated drivers and automatically installs the correct, latest versions. You don’t need to worry about compatibility issues or missing steps. Driver Easy handles it all.
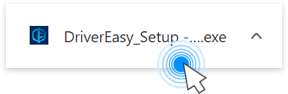
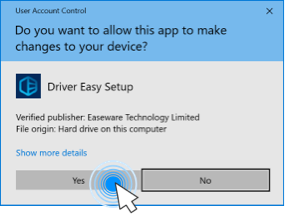
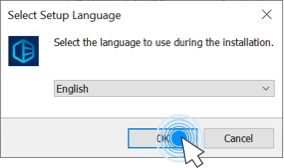
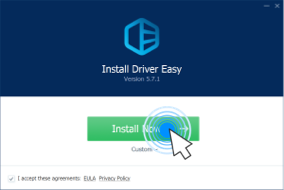
- Download and install Driver Easy.
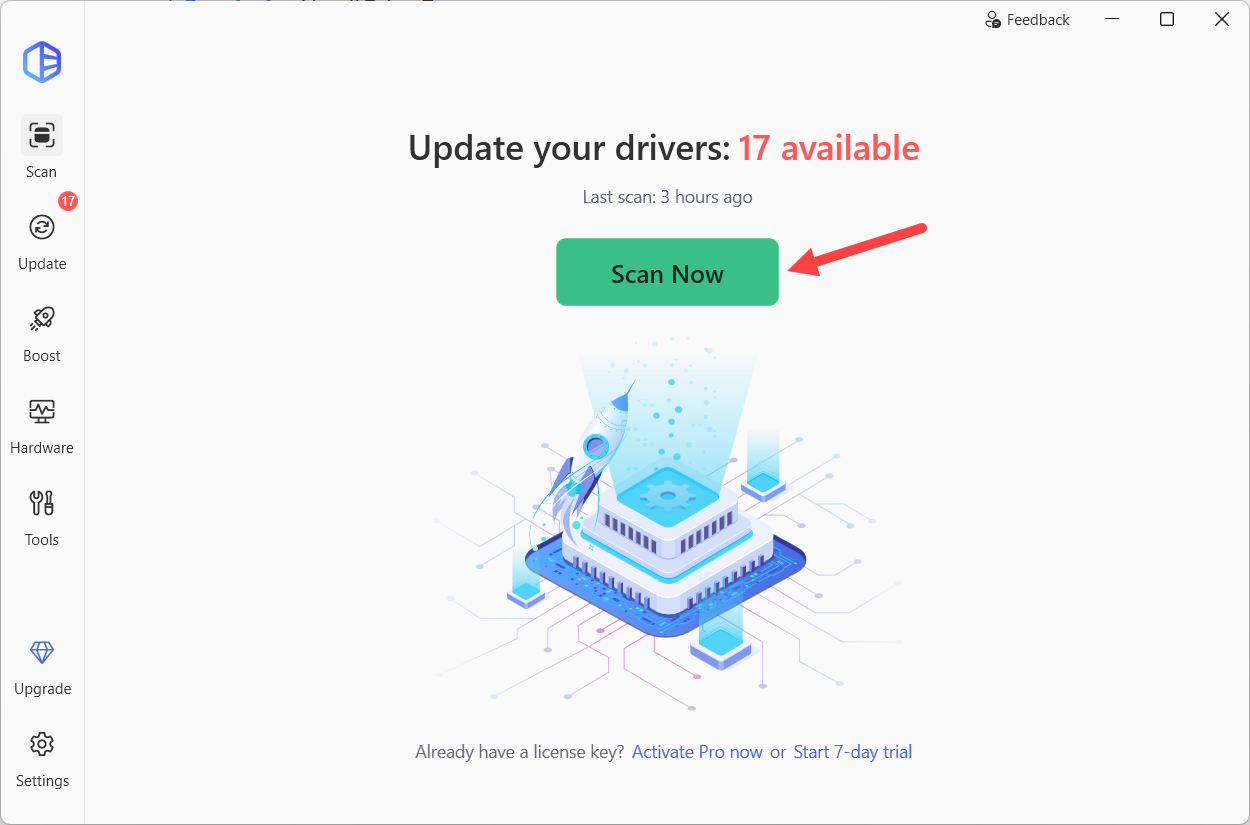
- Run Driver Easy and click the Scan Now button. Driver Easy will then scan your computer and detect any problem drivers.
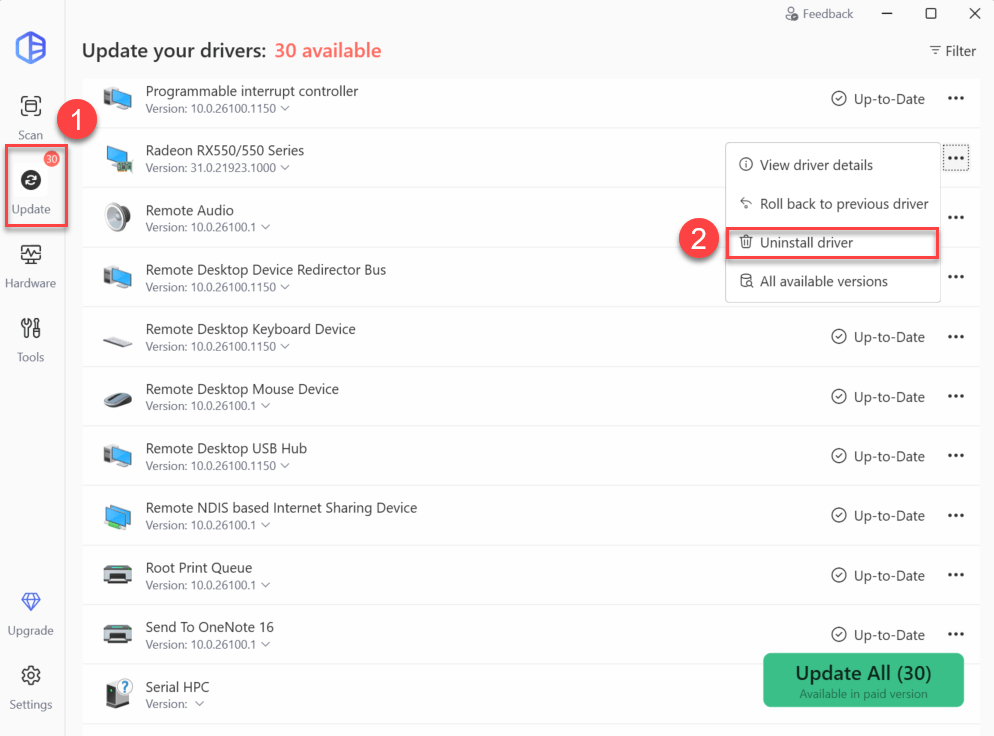
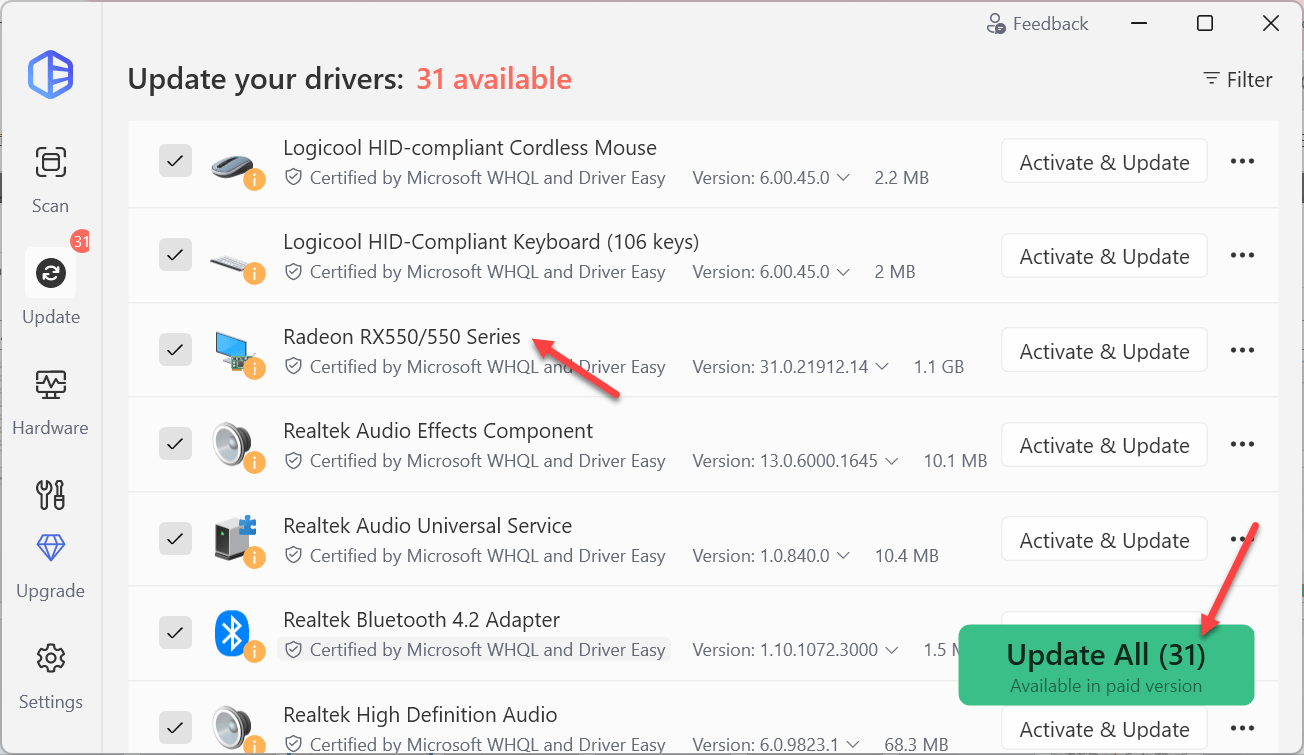
- Click Update, then locate your AMD graphics card in the device list. Click the three-dot menu next to it, and select Uninstall driver.
- This will prompt you to upgrade to the Driver Easy Pro version. It provides hassle-free driver updates and full technical support for you to keep your PC running smoothly. If you’re not ready to purchase now, you can try all the Pro features with the 7-day free trial.
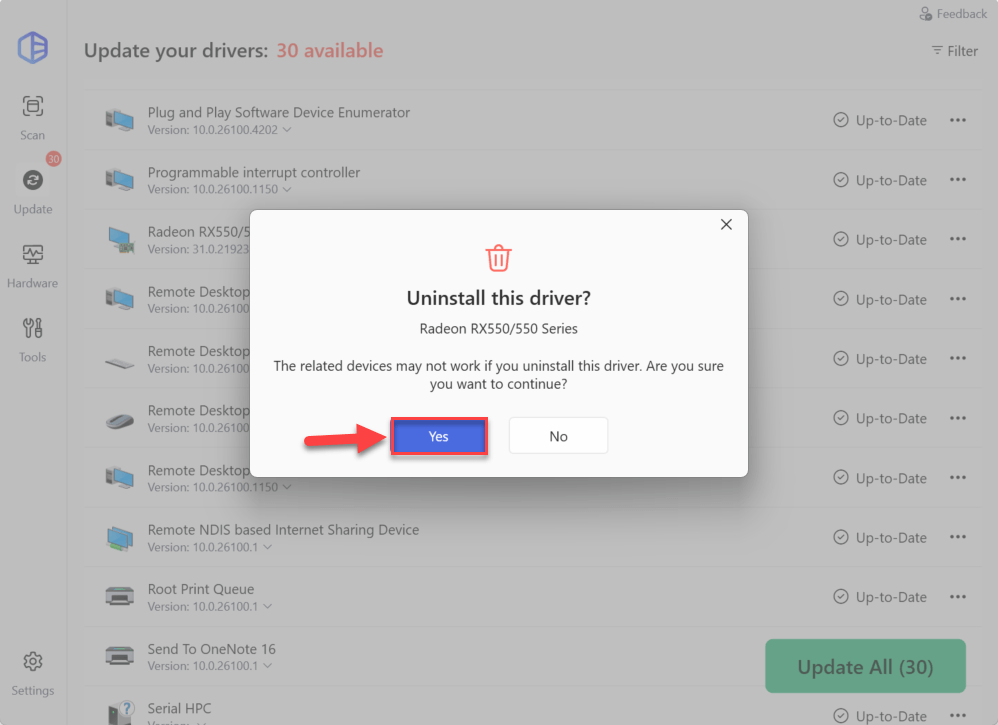
- Once you‘ve activated, you can proceed with the uninstall. When prompted to confirm the removal of the driver, click Yes to continue. This will remove the current AMD graphics driver along with its associated files.
- Run Driver Easy and click the Scan Now button. Driver Easy will then scan your computer and detect any problem drivers.
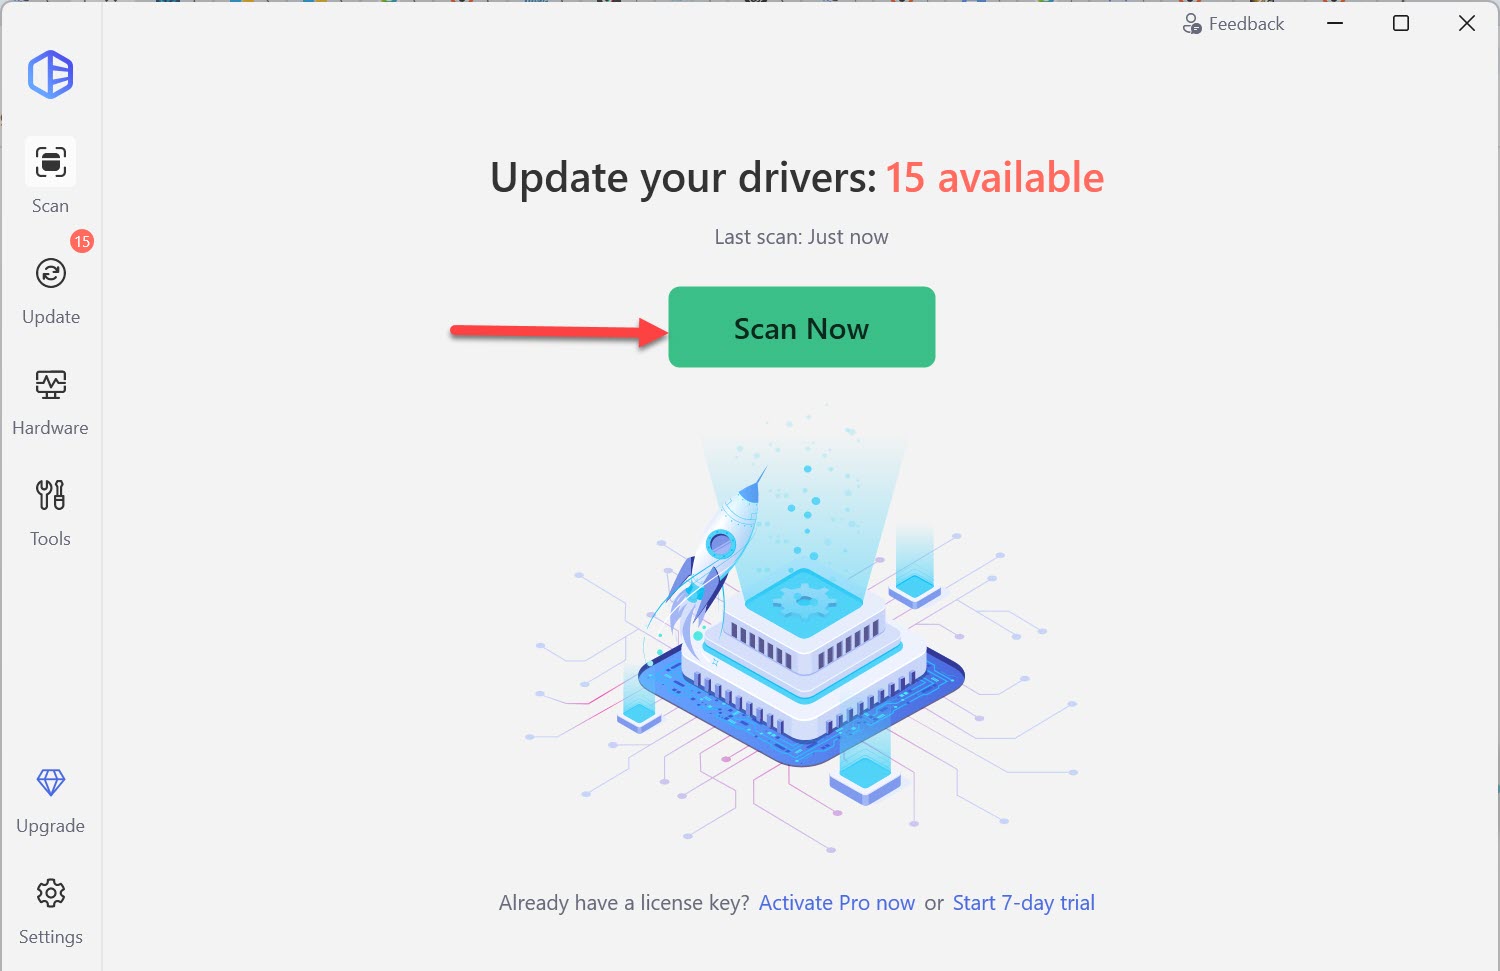
- In the list of scan results, click Update All so that Driver Easy will automatically download and install the latest AMD driver for your computer.
- Restart your computer for the changes to take effect.
- Run your usual games or apps that were causing the AMD driver timeout error. If the timeout messages no longer occur, then great! If the issue persists, don’t worry. Please proceed to Fix 3, below.
Fix 3: Disable AMD Crash Defender service
AMD Crash Defender is designed to help protect your system by restarting your graphics driver when it detects a problem. However, sometimes it can cause conflicts that lead to driver timeout errors. Many have found that disabling the service helps reduce or even eliminate these timeouts without affecting system stability.
- On your keyboard, press the Windows logo key and R, then type services.msc and press Enter.
- Locate AMD Crash Defender Service, right-click it, and select Properties.
- Set Startup type to Disabled, then click Apply > OK
- Restart your computer for the changes to take effect.
After restarting, test your games or applications again. If the driver timeout problem is gone, you’ve found your fix! If not, please move on to Fix 5, below.
Fix 4: Disable MPO (Multiplane Overlay)
Multiplane Overlay (MPO) is a Windows graphics feature intended to improve performance and reduce power consumption by rendering content in layers. However, MPO has been known to trigger stuttering, flickering, or driver timeouts on certain AMD setups. To rule out this as a possible cause, you can disable MPO.
Here’s how:
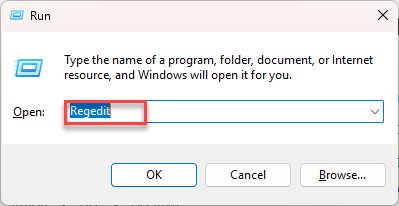
- On your keyboard, press the Windows logo key and R simultaneously, type regedit, and hit Enter to open the Registry Editor.
- Navigate to: HKEY_LOCAL_MACHINE\SOFTWARE\Microsoft\Windows\Dwm. Right-click on the right panel, choose New > DWORD (32-bit) Value.
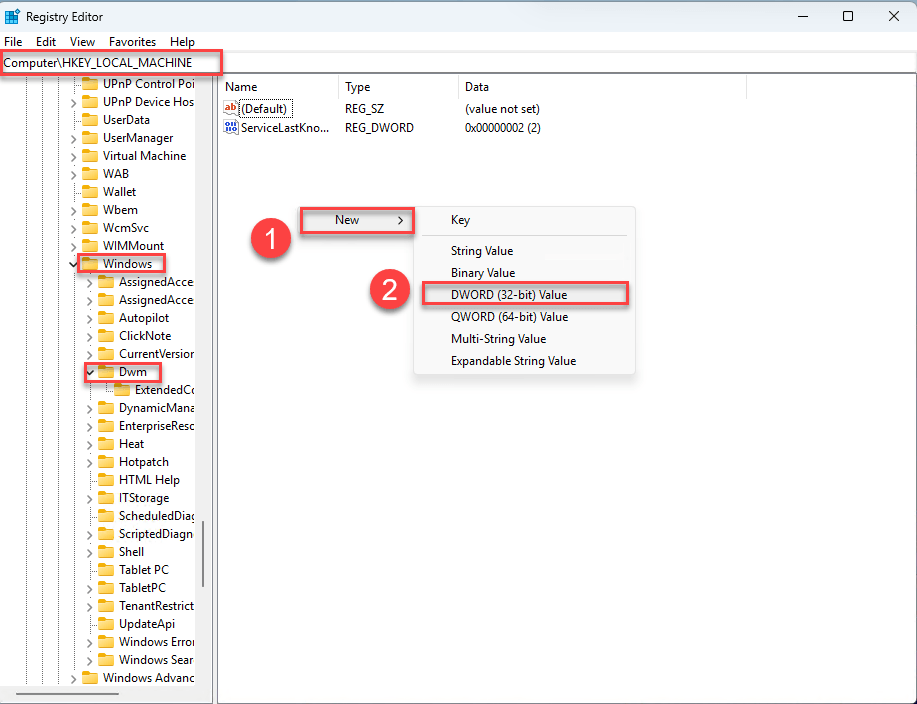
- Name the new key OverlayTestMode and set its value to 5.
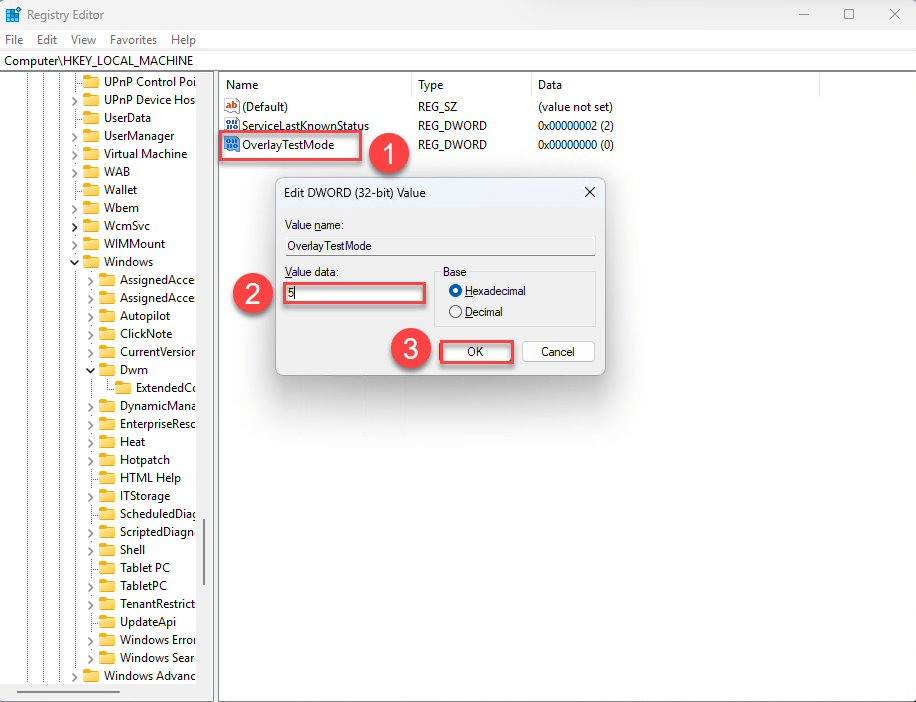
- Close the Registry Editor and restart your computer.
- If you want to re-enable MPO later, simply delete the OverlayTestMode entry from the registry.
- Check for any system freezes, artifacts, or driver crashes. If they no longer appear, then you’ve likely resolved the issue. If they still occur, please try Fix 5, below.
Fix 5: Increase TDR delay
The TDR (Timeout Detection and Recovery) feature in Windows determines how long the system waits before resetting a non-responsive graphics card. By default, this timeout is just 2 seconds, which is too short for some workloads or unstable GPUs. Increasing this value can give your GPU more time to recover, potentially preventing driver timeout errors.
⚠️ Note: This doesn’t fix the underlying cause but can reduce the frequency of timeouts.
Here’s how to increase the TDR delay:
- On your keyboard, press the Windows logo key and R on your keyboard, type regedit, and press Enter to open the Registry Editor.
- Navigate to HKEY_LOCAL_MACHINE\SYSTEM\CurrentControlSet\Control\GraphicsDrivers. Then in the right panel, right-click an empty space, choose New > DWORD (32-bit) Value
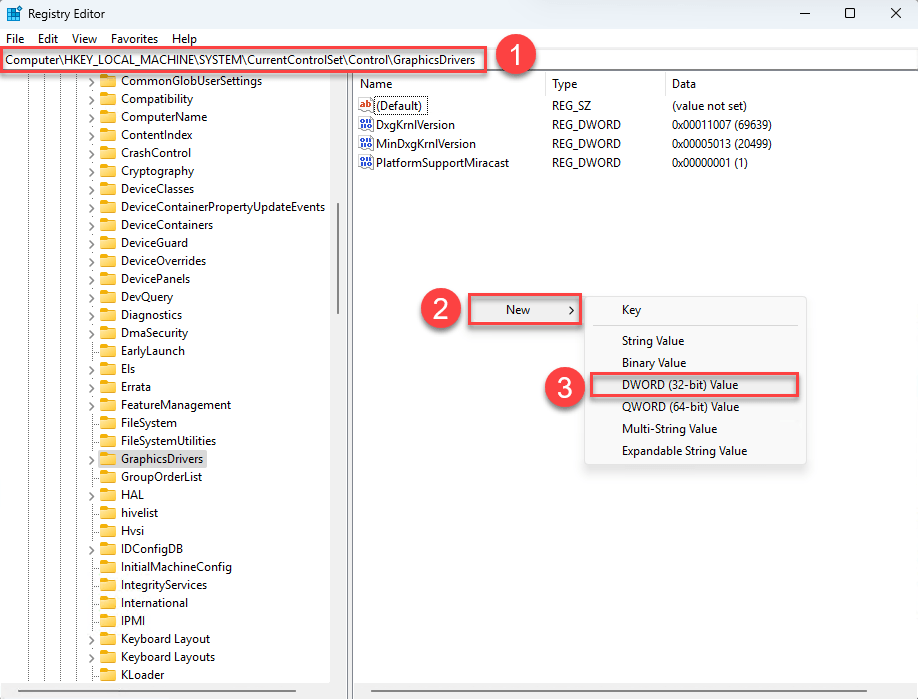
- Name the value TdrDelay and set its Value data to
8(This sets the timeout to 8 seconds). You can adjust the number higher, but 8–10 is usually sufficient. Click OK and close the Registry Editor.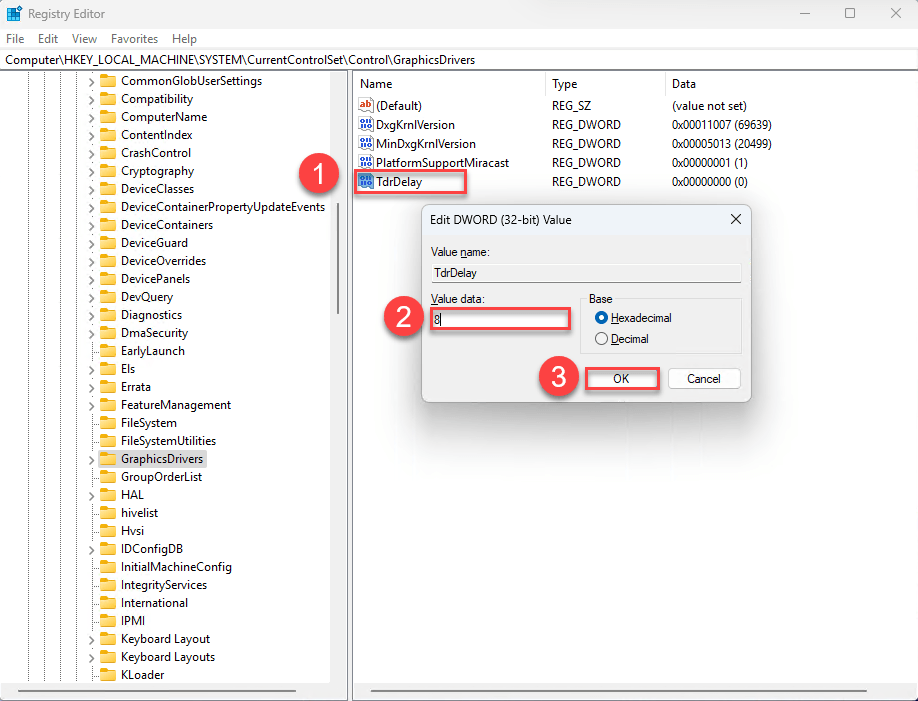
- Restart your computer to apply the changes.
AMD driver timeout issue still not yet fixed? Don’t worry. Here are a few more fixes.
Fix 6: Disable hardware-accelerated GPU Scheduling
Hardware-accelerated GPU scheduling shifts some of the graphics workload from the CPU to the GPU to reduce latency and improve performance in theory. But with certain AMD drivers, especially when paired with specific games or system setups, this offloading can create conflicts or timing issues between the GPU and the driver, hence ‘A driver timeout has occurred’ error.
- On your keyboard, press the Windows logo key + I to open Settings.
- Go to System > Display, and then scroll down and click Graphics settings.
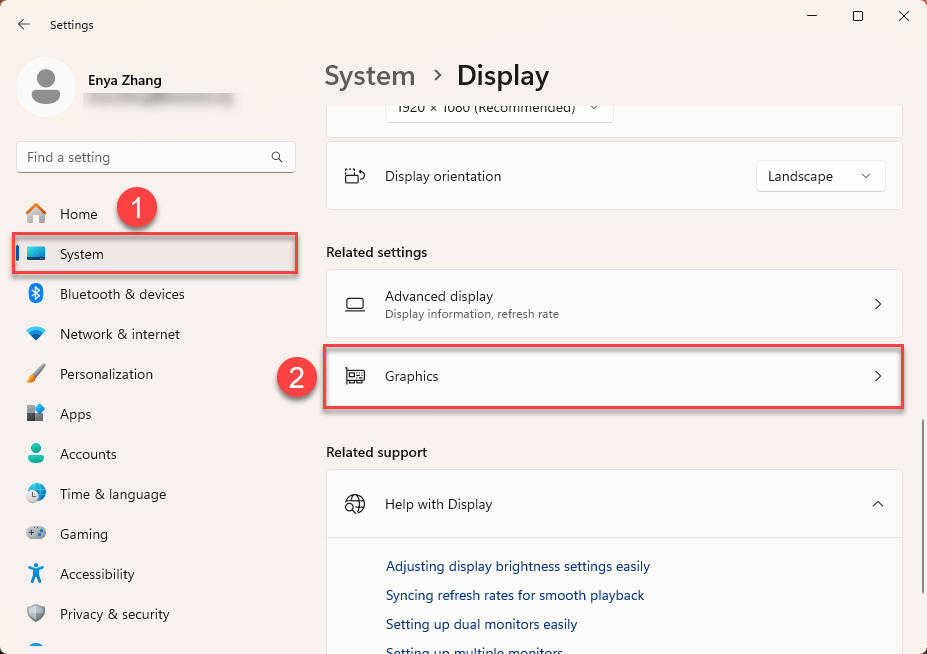
- Under Default graphics settings, toggle Hardware-accelerated GPU scheduling off.
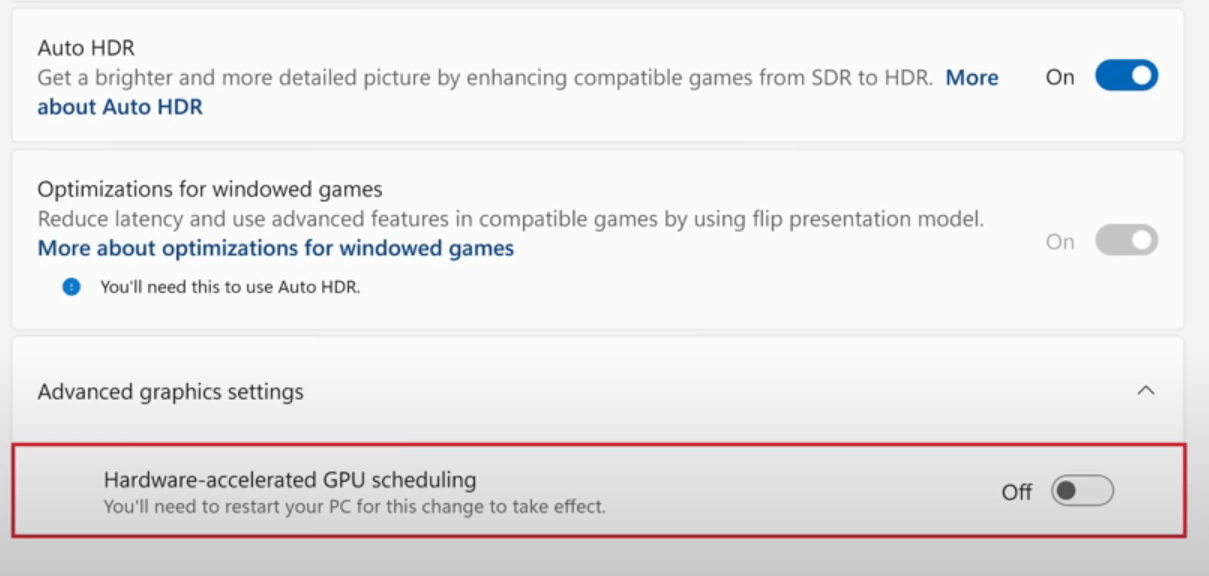
- Restart your PC for the change to take effect.
Launch your game and see if the error persists. If not, then you’ve solved the issue. If it still rears its ugly head, please go on with Fix 8, below.
Fix 7: Perform a clean boot
Sometimes, background programs or services can quietly interfere with your AMD drivers and cause timeouts. These could be unnecessary utilities, startup apps, or even benign-looking services running in the background.
Performing a clean boot starts Windows with only the essential drivers and services, allowing you to test your system in a minimal state and identify if any third-party software is the culprit.
Here’s how to do a clean boot:
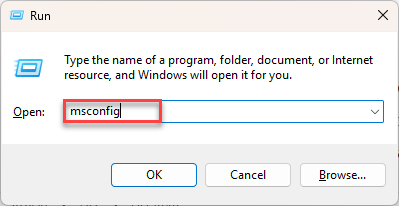
- On your keyboard, press the Windows logo key + R, type msconfig, and hit Enter.
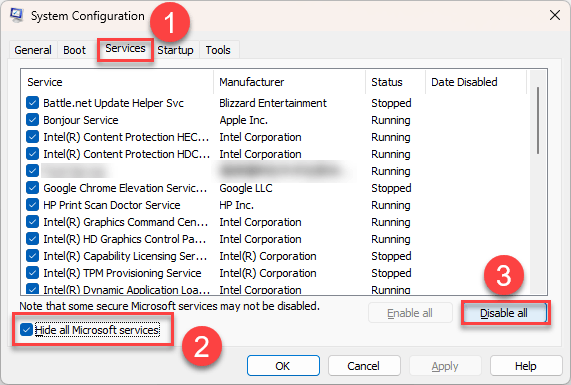
- In the System Configuration window, go to the Services tab, check Hide all Microsoft services (this prevents disabling anything critical), and click Disable all to turn off third-party services.
- Go to the Startup tab and click Open Task Manager.
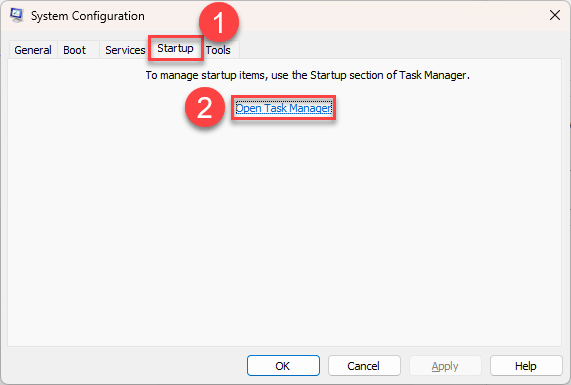
- (Optional) Close unnecessary start-up apps: In Task Manager, navigate to the Startup tab, right-click on any app you don’t need right away (like Spotify, Discord, or game launchers), and select Disable.
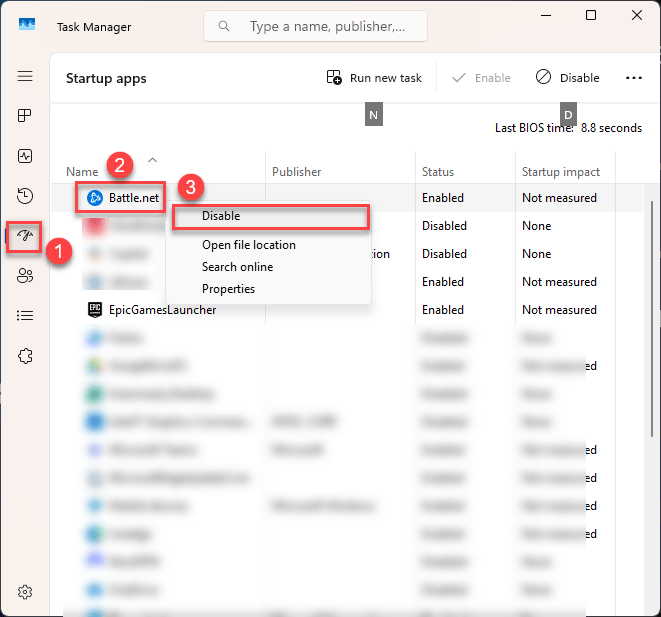
- Close everything and restart your PC.
- Launch your game and check if the driver timeout error has been resolved. If yes, you’ve confirmed something in the background was the cause. To find out what it is, Re-enable half of the services, restart, and test again.
- If the error comes back, then the problematic service is in the group you just re-enabled. If the error doesn’t appear, the problematic service is likely in the other group you left disabled.
- Keep repeating this process. Re-enabling or disabling half of the remaining services each time, until you pinpoint the exact program or service causing the conflict.
msconfig and selecting “Normal startup” under the General tab.Fix 8: Disable EXPO/XMP profile
System RAM instability can also trigger a GPU error. If your DDR5 memory is running on an aggressive EXPO or XMP profile (6000MHz+), your CPU’s memory controller may drop signals under load, forcing your graphics driver into a timeout.
- Shut down your PC completely.
- Restart your PC and enter BIOS by repeatedly pressing the hotkey, which may vary by computer brand:
Asus: F2
Dell: F2
HP: Esc or F10
Lenovo: F1 - If you’re in EZ Mode, press F7 to enter Advanced mode.
- Locate the Overclock/Tweaker menu, which may vary depending on your motherboard’s manufacturer and BIOS/UEFI version.
ASUS: Ai Tweaker tab
MSI: Left sidebar OC (Overclocking) menu
Gigabyte: M.I.T. / Tweaker page
ASRock: Tweaker / OC tab - Disable memory overclock profile:
ASUS: Find Ai Overclock Tuner, set to Disabled (preferred) or Auto.
Intel boards: Locate Extreme Memory Profile (XMP), set to Disabled.
AMD Ryzen boards: Locate EXPO / A-XMP, set to Disabled. - Press F10 to save the changes.
Restart your computer and check for the issue. If your applications or system still crash, try the last solution below.
Fix 9: Check your hardware (PSU, cables, undervolt/underclock)
If you’ve tried all the software fixes and still experience driver timeouts, it’s time to check hardware stability. A weak or unstable power supply (PSU), poor cable connections, or even factory-overclocked GPUs can trigger instability.
Here’s what to check:
- Reseat your power cables: Power off your PC completely, then unplug and securely reconnect all power cables connected to your GPU.
- Avoid split/daisy-chained cables: If your PSU has enough PCIe connectors, use separate cables for each power port on the GPU.
- Inspect cables and connectors: Check for any visible damage, fraying, or looseness.
- Check your PSU capacity: Make sure your PSU wattage is sufficient for your GPU and system.
Undervolt or underclock your GPU: Lowering the voltage or clock speeds can help stabilize GPUs that aren’t fully stable at factory settings, especially if they’re overclocked out-of-the-box. Here’s a general approach:
- Use a tool like AMD Adrenalin Software or MSI Afterburner.
- Undervolting: In the tuning or performance tab, lower the voltage slider gradually (start by reducing ~50mV).
- Underclocking: Lower the maximum frequency/clock speed by small increments (around 5% at a time).
- Test stability: Run stress tests like 3DMark or simply test in your usual games to check for improvements.
Once you’ve secured your hardware setup, restart your system and monitor for driver timeout errors. If the issue persists, it may be worth consulting a hardware specialist or considering a PSU upgrade.
That’s it! Hopefully, one of these fixes has helped you resolve the AMD driver timeout issue.
If you have any questions, feedback, or if a specific fix worked particularly well for you, feel free to leave a comment below. We’d love to hear your experience!