


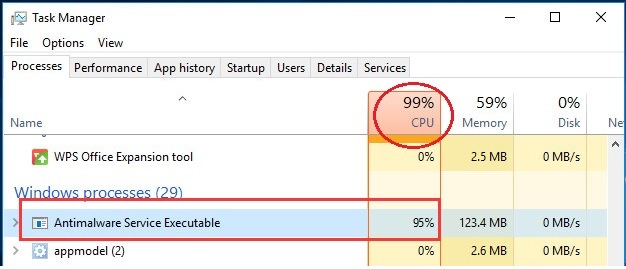
If you noticed that the Antimalware Service Executable process takes up a high CPU on Windows, you’re not alone. This is one of the most commonly reported Windows Defender problems on a Windows computer. The good news is that in most cases, the cause is easy to identify and fix.
In this article, you’ll learn what the Antimalware Service Executable is and how to fix its high CPU usage issue.
What is Antimalware Service Executable?
Antimalware Service Executable, also known as MsMpEng.exe, is the background scanning engine of Microsoft Defender. It continuously scans files, downloads, applications, and running processes for malware.
Normally, this process uses between 1% and 5% CPU. A sustained high CPU usage (longer than 10 minutes) usually indicates the Defender is stuck at a scan, processing corrupted security definitions, conflicting with certain software, or repeatedly scanning the same files.
Can I stop Antimalware Service Executable?
The short answer is no. Windows will not permanently allow you to kill the process because it is critical to core operating system security. If you forcefully end it in Task Manager, you will either receive an “Access Denied” error or Windows will immediately restart the service within seconds.
Instead of stopping Antimalware Service Executable entirely, try the solutions below. Based on our troubleshooting experience, these methods solve the high CPU usage far more effectively than repeatedly killing the process.
6 Fixes for Antimalware Service Executable high CPU:
- Run a full system scan manually
- Change Windows Defender’s schedule
- Exclude Antimalware Service Executable and trusted applications
- Repair corrupted system files
- Update Microsoft Defender Signatures
- Temporarily disable real-time protection while gaming
Fix 1: Run a full system scan manually
A scan may be partially completed or stuck on a specific file. Running a manual Full Scan often forces Defender to complete the process properly.
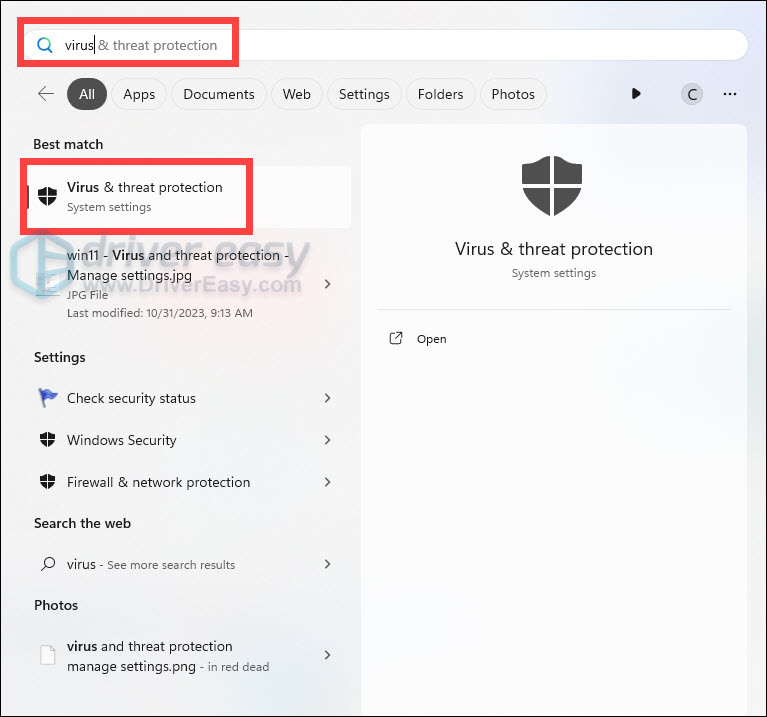
- On your keyboard, press the Windows logo key to open the Start menu. Type virus into the search box, and click Virus & threat protection from the list of results.
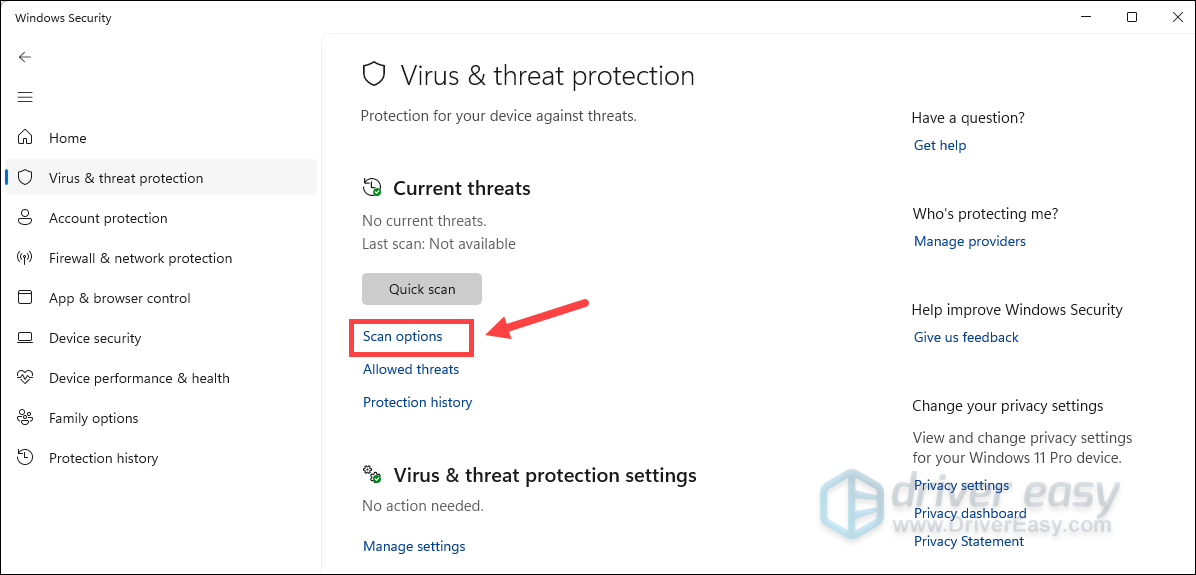
- Click Scan Options.
- Select Full Scan and click Scan Now.
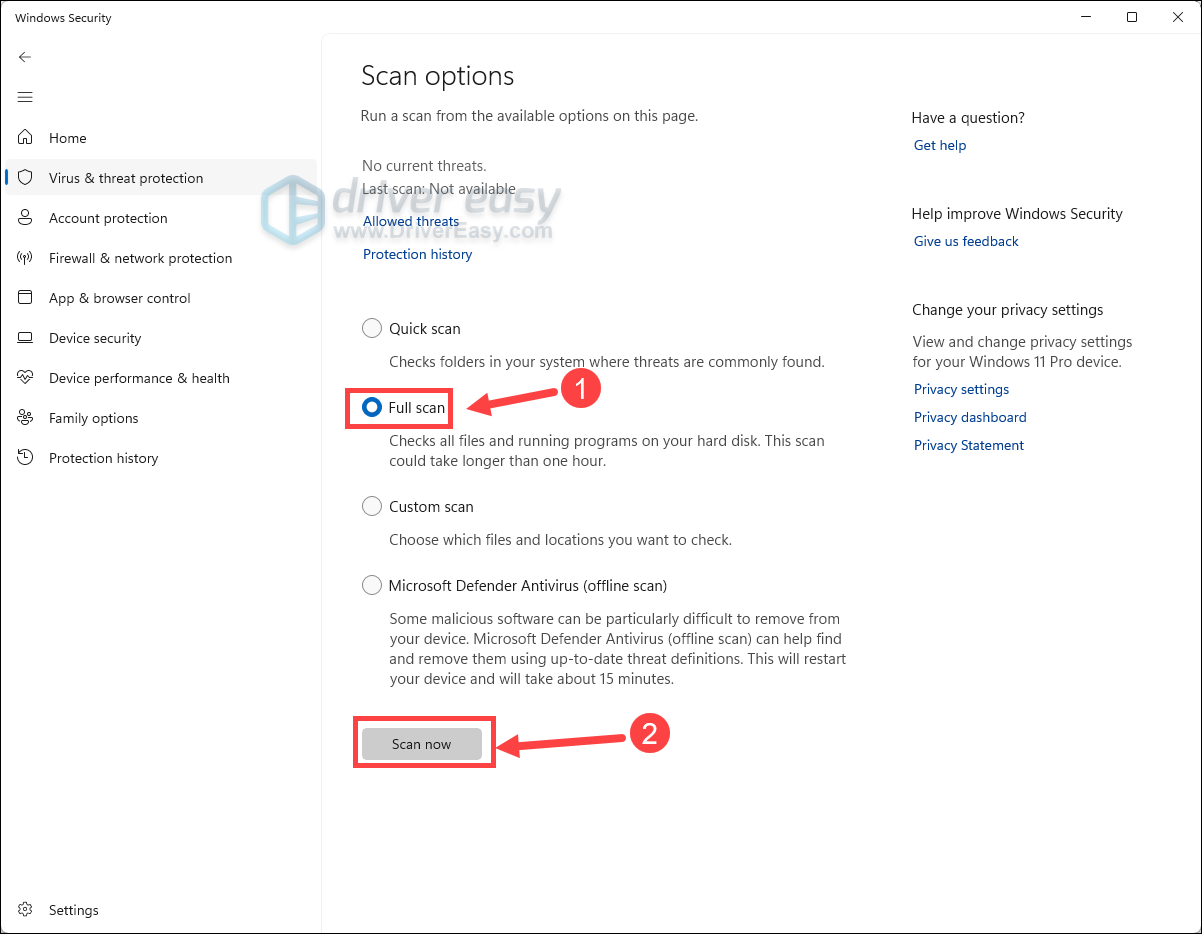
Allow the scan to finish completely. Depending on your drive capacity and speed, this may take anywhere from 45 minutes to over 2 hours. Once completed, open Task Manager to check if the MsMpEng.exe drops below 5% CPU.
Fix 2: Change Windows Defender’s schedule
The error is mainly due to its real-time protection feature. So we can change Windows Defender’s schedule to fix it.
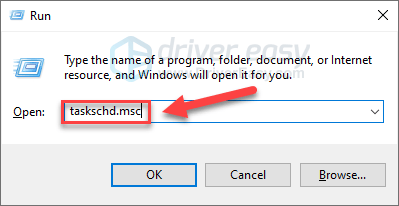
- On your keyboard, press the Windows logo key and R at the same time to invoke the Run box. Type taskschd.msc and press Enter.
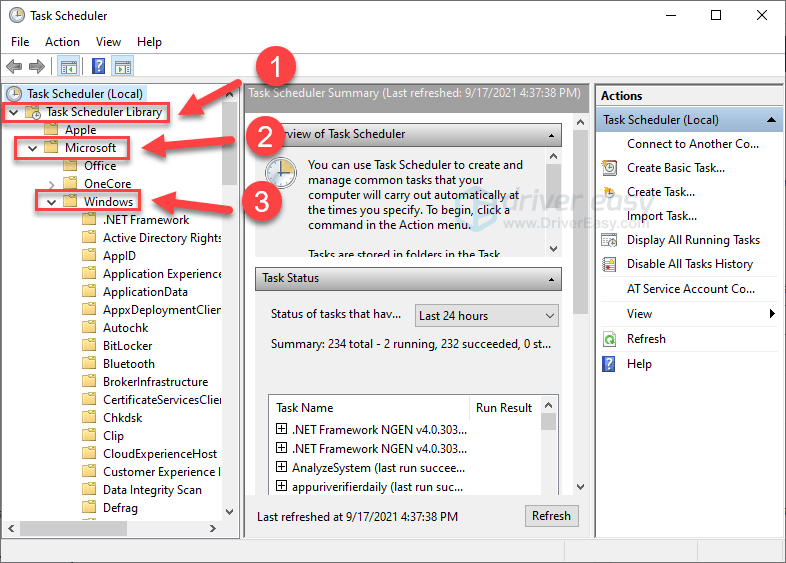
- Double-click on Task Scheduler Library > Microsoft > Windows.
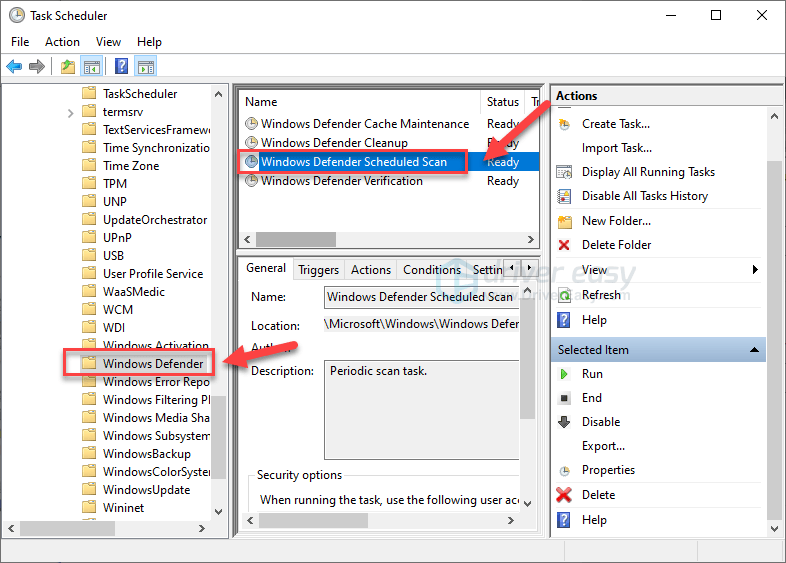
- Double-click Windows Defender in Windows. Then double-click Windows Defender Scheduled Scan.
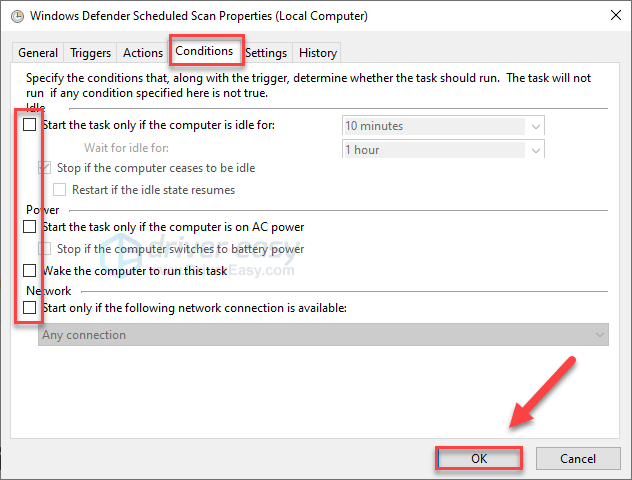
- Uncheck Run with highest privileges.
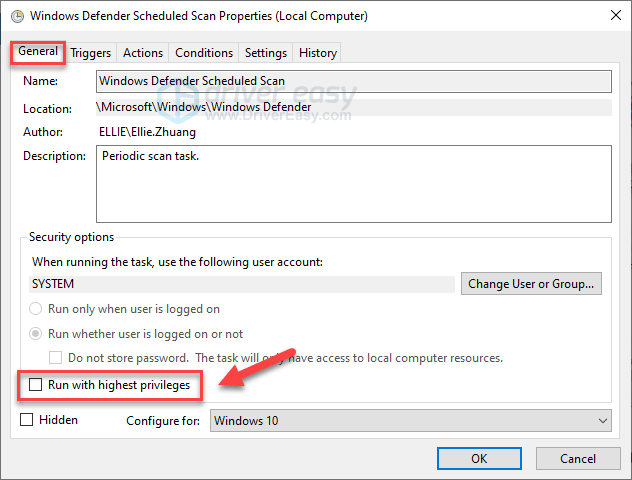
- Uncheck all the items in the Conditions section. Then click OK.
- With the steps above, your error should be fixed now.
If unfortunately, it doesn’t work, please don’t be frustrated, try the following method.
Fix 3: Exclude Antimalware Service Executable and trusted applications
High CPU usage can signal issues with Windows Defender real-time scanning. A troubleshooting step is to add the Antimalware Service Executable to Defender’s exclusion list. This prevents scanning of the file, potentially stopping unnecessary scans that cause high CPU.
- On your keyboard, press the Windows logo key to open the Start menu. Type virus, and click Virus & threat protection from the list of results.

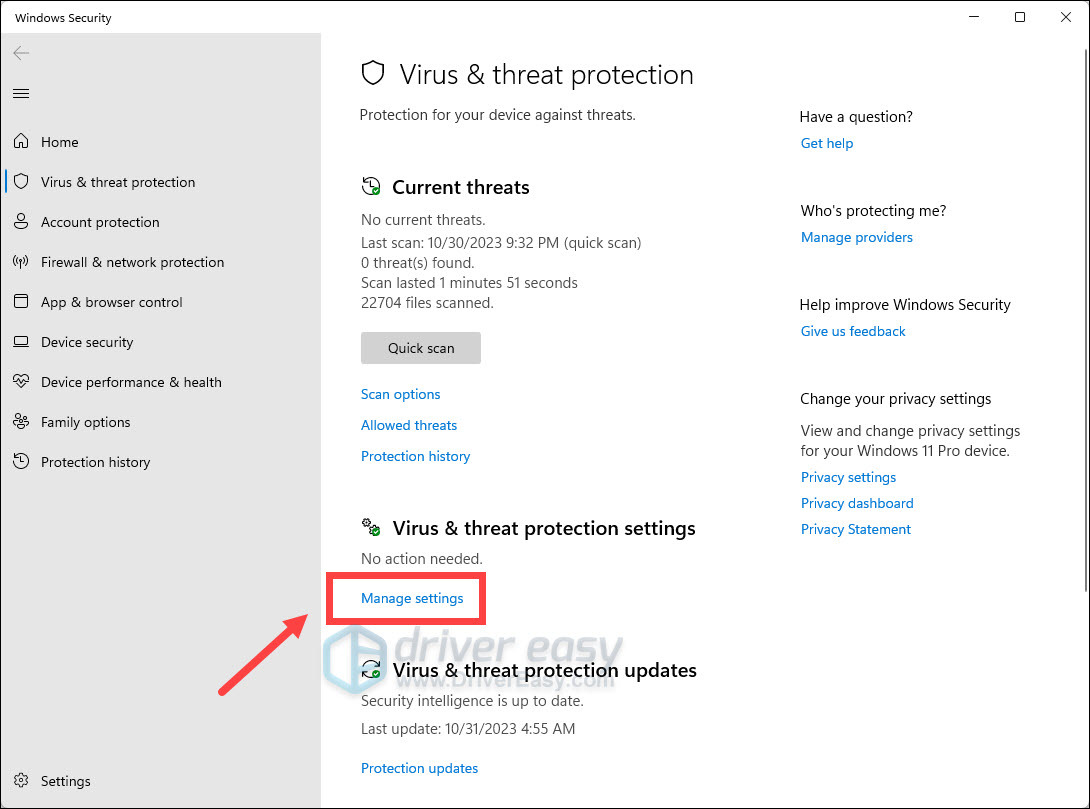
- Find Manage settings under Virus & threat protection settings and click on it.

- Scroll to the bottom and click Add or remove exclusions.
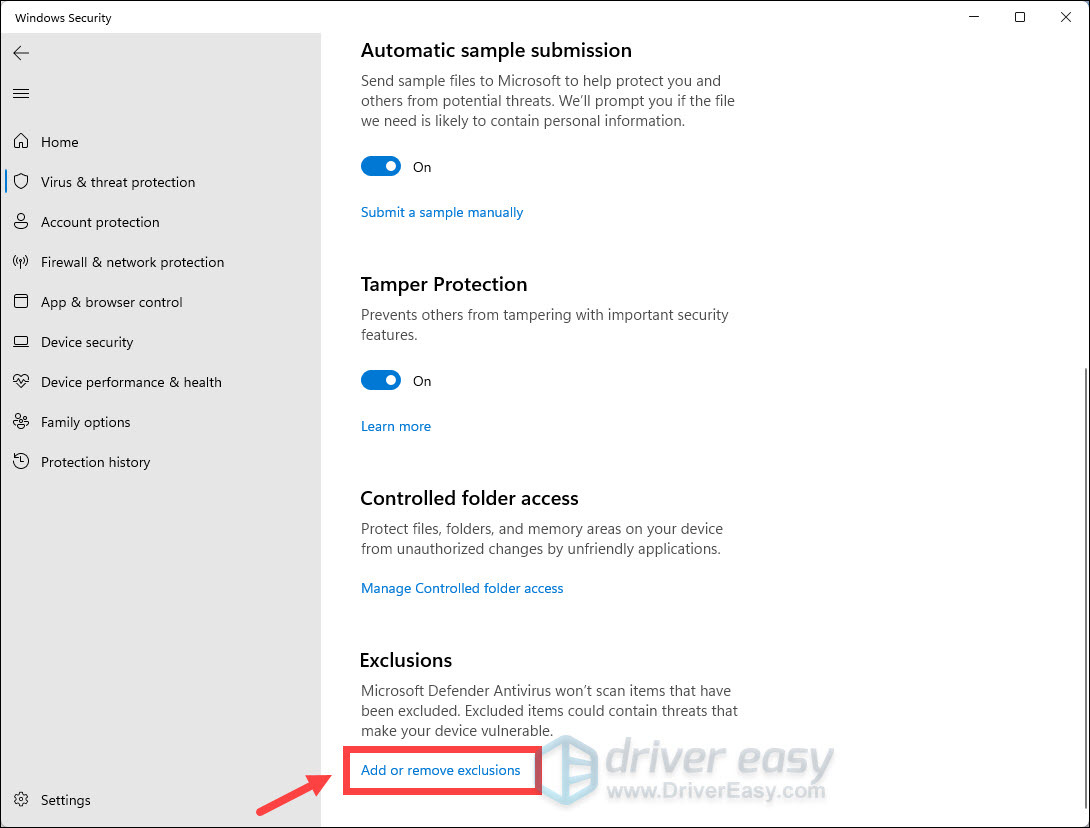
- When you’re asked for permission, click Yes to proceed.
- Click Add an exclusion. From the drop-down menu, select Folder.
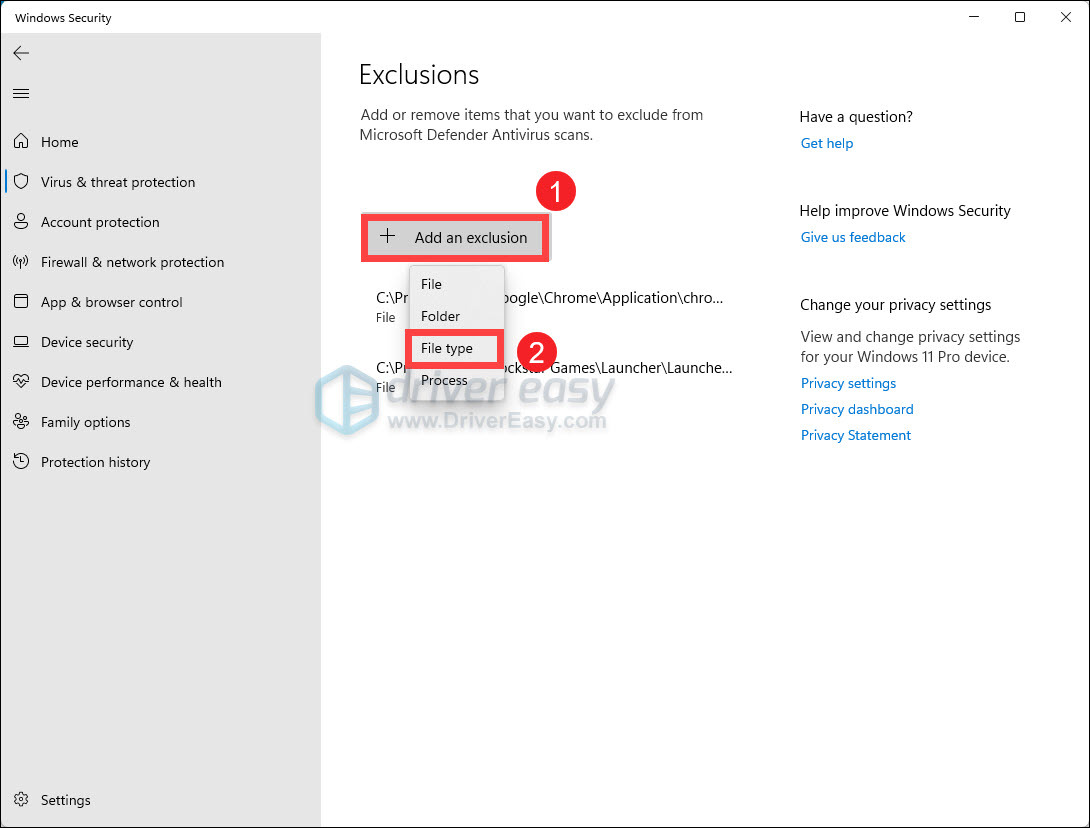
- Then select the following path:
C:\Program files\Windows Defender.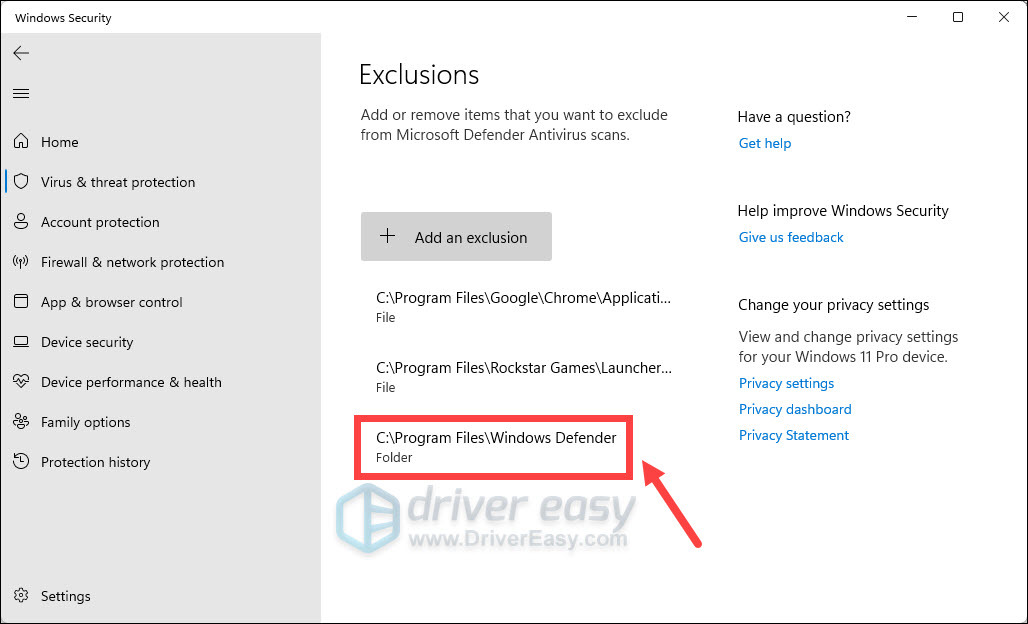
Defender often scans newly created game files, shader caches, updates, and temporary files. If the Antimalware Service Executable shows high CPU usage during your gameplay, exclude your game libraries (such as C:\Program Files (x86)\Steam\steamapps\common\ and C:\XboxGames) and hardware overlays as well.
Fix 4: Repair corrupted system files
Damaged Windows files can interfere with Defender and trigger abnormal scanning behavior. You can use System File Checker, a Windows built-in tool, to fix the Windows OS for faulty files or missing system components.
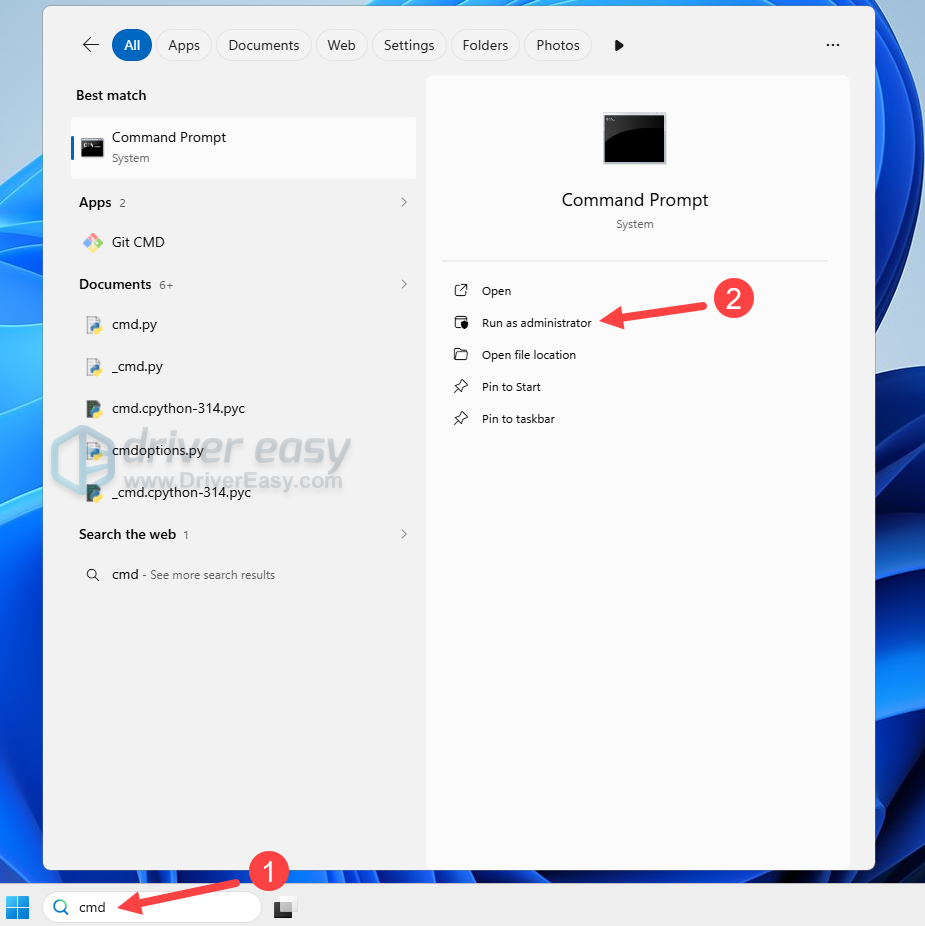
- Press the Windows logo key and R on your keyboard to invoke the Run box.
- On your keyboard, type cmd and press Ctrl, Shift and Enter at the same time to run Command Prompt as administrator.
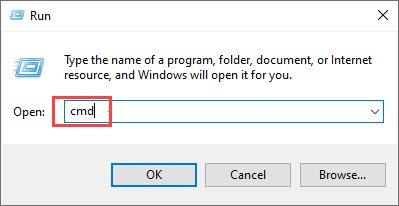
- You’ll be prompted for permission. Click Yes to open Command Prompt.
- Type sfc /scannow, then press Enter.
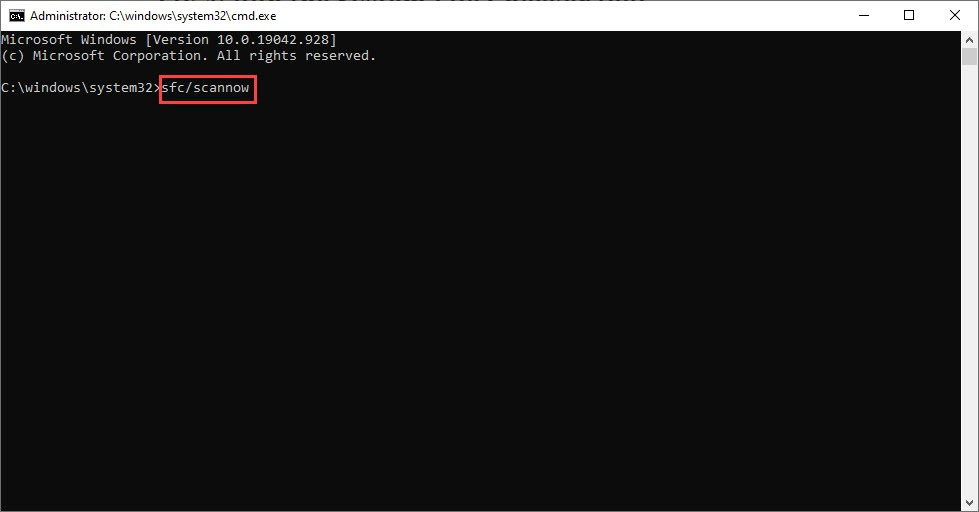
- The System Files Checker tool will automatically scan for corrupt or missing files and fix them, if there are any.

- Restart your PC to see if the problem persists.
Fix 5: Update Microsoft Defender Signatures
Microsoft Defender signatures are databases that Windows Defender uses to identify and block viruses, malware, and cyber threats. If it’s corrupted or outdated, the defender scan may loop endlessly. Resetting this can often clears the cache and forces a fresh download or update.
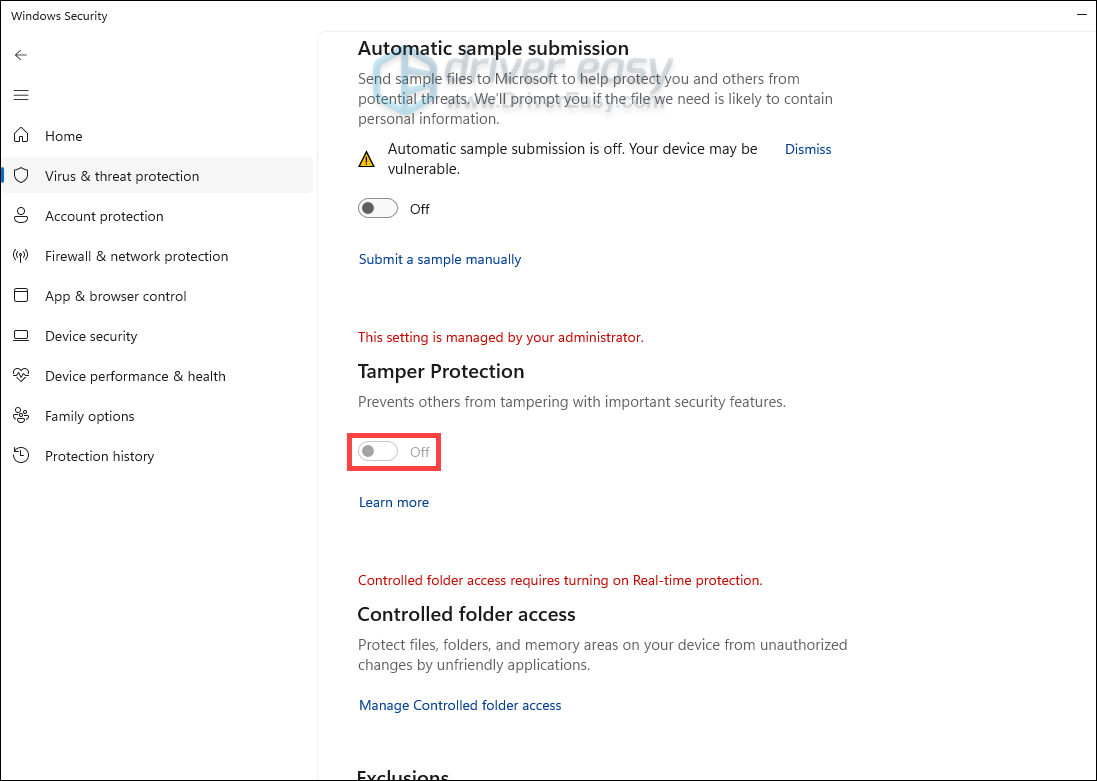
To do this, you’ll need to temporarily disable Windows Tamper Protection first.
- Type virus into the Windows search bar and click Virus & threat protection from the list of results.
- Click Manage Settings.
- Scroll down to find Tamper Protection, and toggle it off.
- Type cmd into the Windows search bar and click Run as administrator.
- In the command prompt, paste the following commands and press Enter after each.
net stop WinDefend
“%ProgramFiles%\Windows Defender\MpCmdRun.exe” -RemoveDefinitions -All
“%ProgramFiles%\Windows Defender\MpCmdRun.exe” -SignatureUpdate
net start WinDefend
Wait a few minutes and check Task Manager to see if the CPU usage drops below 10%.
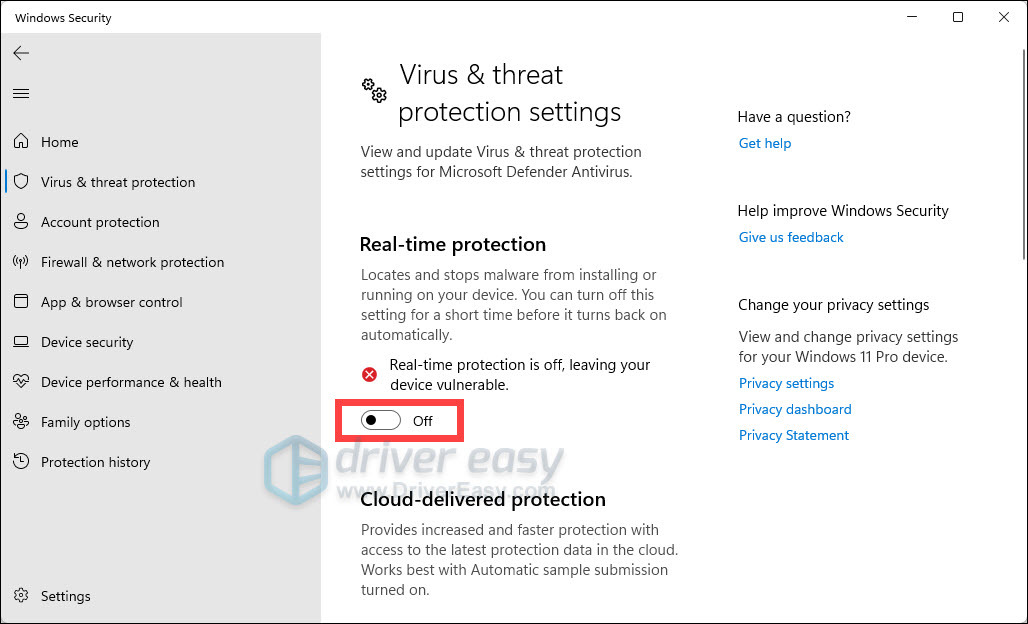
Fix 6: Temporarily disable real-time protection while gaming
If the antimalware service executable shows high CPU usage during gaming sessions, you can temporarily disable Defender’s real-time monitoring to immediately reduce the overload.
- On your keyboard, press the Windows logo key to open the Start menu. Type virus, and click Virus & threat protection from the list of results.
- Find Manage settings under Virus & threat protection settings and click on it.
- Scroll a little bit and click on the switch to turn Off Real-time protection.
Pro Tips: Update device drivers automatically
While driver issues are not a common root cause of MsMpEng.exe high CPU usage, outdated chipset, storage controller, or security-related drivers can occasionally contribute to abnormal system behavior. If you don’t want to manually identify and update every driver, you can use Driver Easy to scan your system automatically.
Driver Easy Pro provides you with hassle-free driver updates and full technical tools and support. Whether you’re trying to improve system stability, fix device errors, or simply keep your PC running smoothly, Driver Easy helps you get it done faster with less effort and fewer risks.
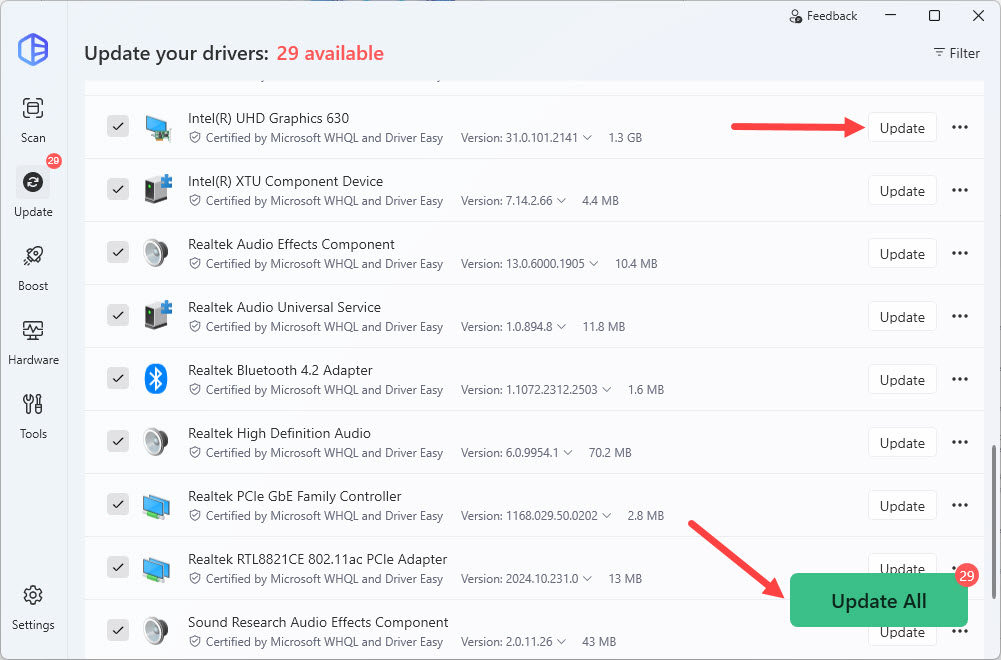
- Download and install Driver Easy.
- Run Driver Easy and click the Scan Now button. Driver Easy will then scan your computer and detect any problem drivers.

- Review the results. You can click the Update button next to the specific driver, or click Update All at the bottom right to automatically download and install all the drivers that are missing or out-of-date on your computer.
Antimalware Service Executable high CPU usage is usually caused by a stuck scan, corrupted Defender signatures, or repeated scanning of large game and application folders. By following the methods above, you can usually fix the underlying cause and bring the CPU to the normal range.