


Your keyboard gets stuck in Caps and everything you type is uppercase, even if you press the Caps lock key to turn it off? This is so inconvenient. But don’t worry. We’ll help you fix the Caps stuck on issue.
Why is my keyboard stuck in Caps? On one hand, it’s likely that your keyboard driver is out of date, so the keyboard is not working properly. On the other hand, the malfunction of the Caps key can cause the Caps lock problem.
Try these fixes
Fix 1: Restart your computer
Since many technical problems can be resolved by restarting, it never hurts to restart your computer and your game. Often this will be enough to fix your problem.
This can fix some issues like the Caps lock stuck on issue.
Fix 2: Check Advanced Key Settings
If your Caps lock is stuck on, and you can’t turn it off by pressing the Caps key, you can change the Advanced Key Settings and turn it off. Here’s how to do it:
If you’re using Windows 11
If you’re using Windows 10
If you’re using Windows 7
If you’re using Windows 11:
- On your keyboard, press the Windows logo + I keys simultaneously to open Settings.
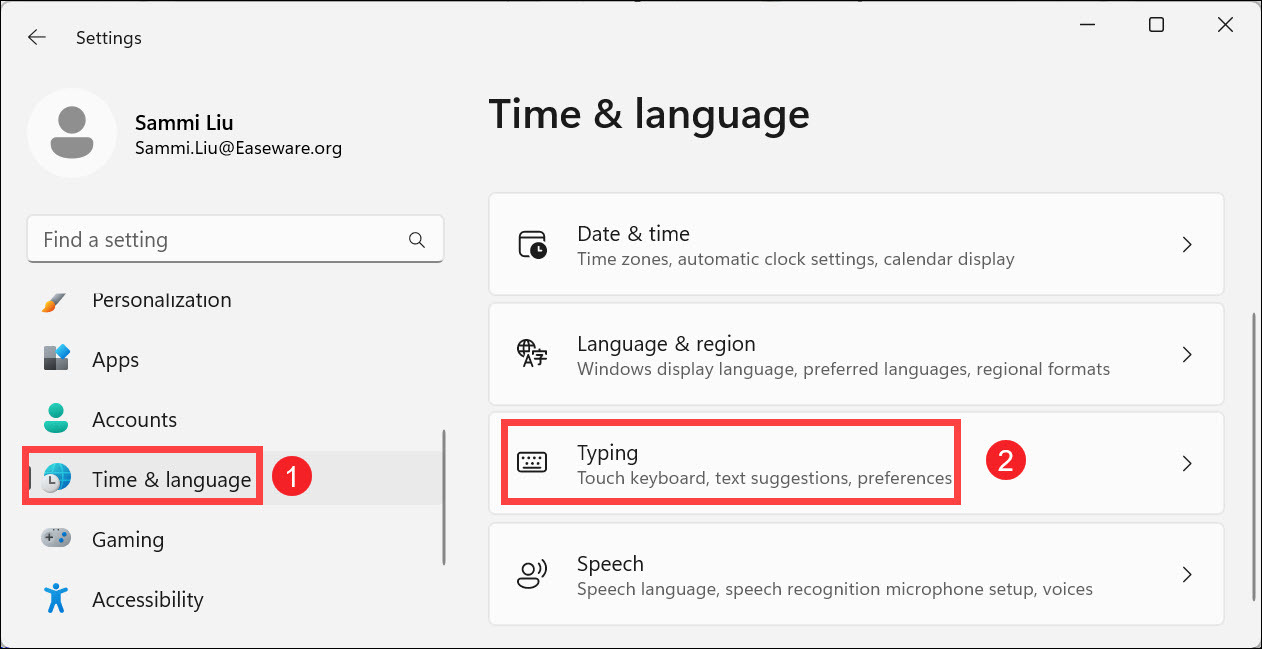
- From the left navigation panel, select Time & language. Then click Typing.
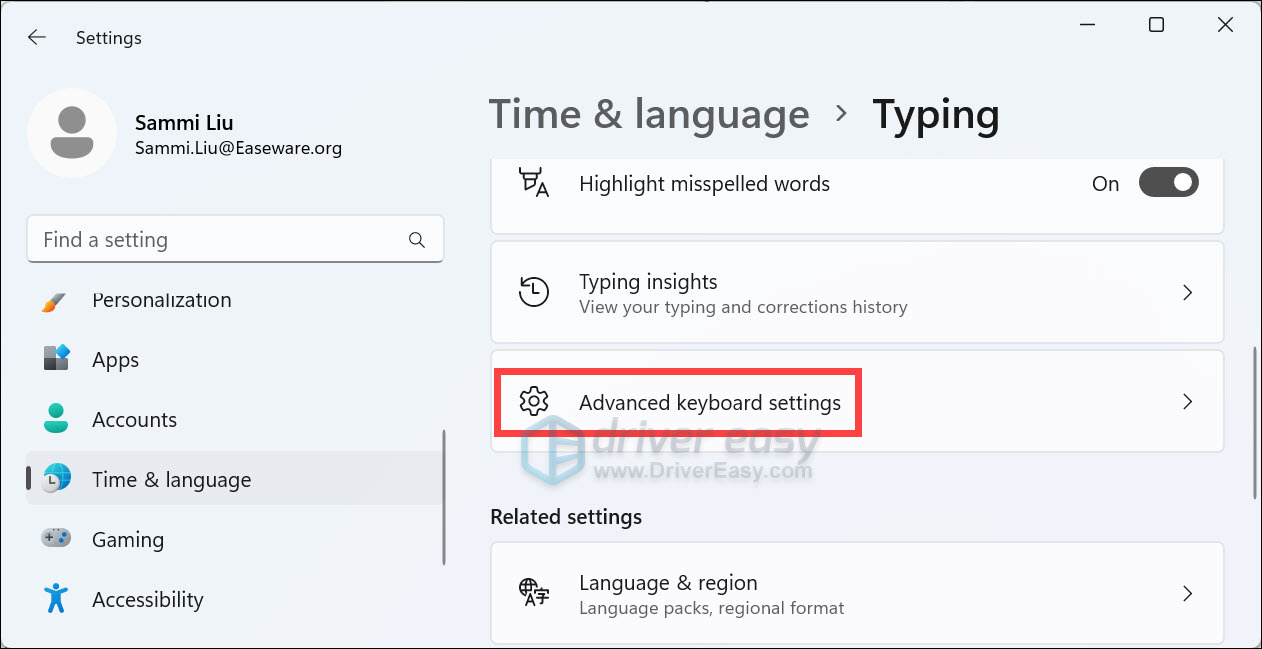
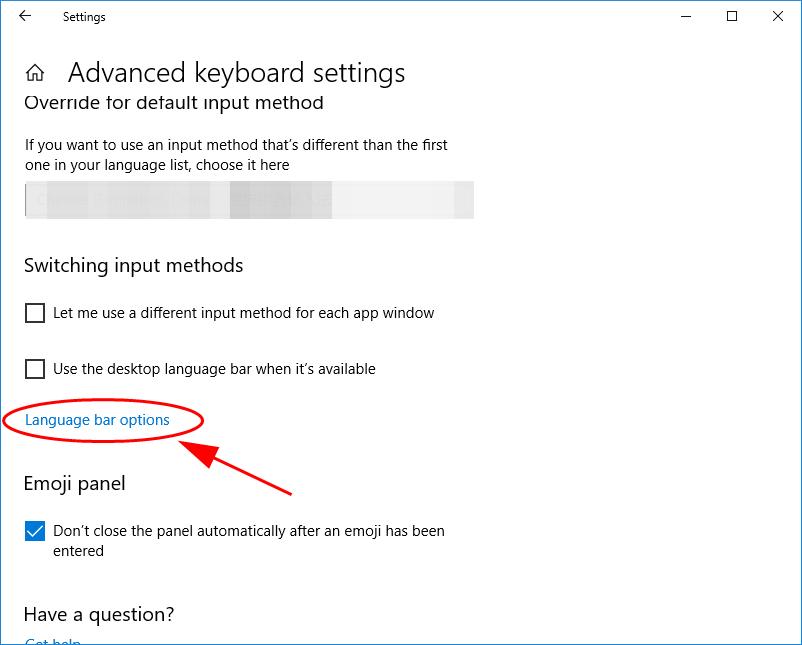
- Click Advanced keyboard settings.
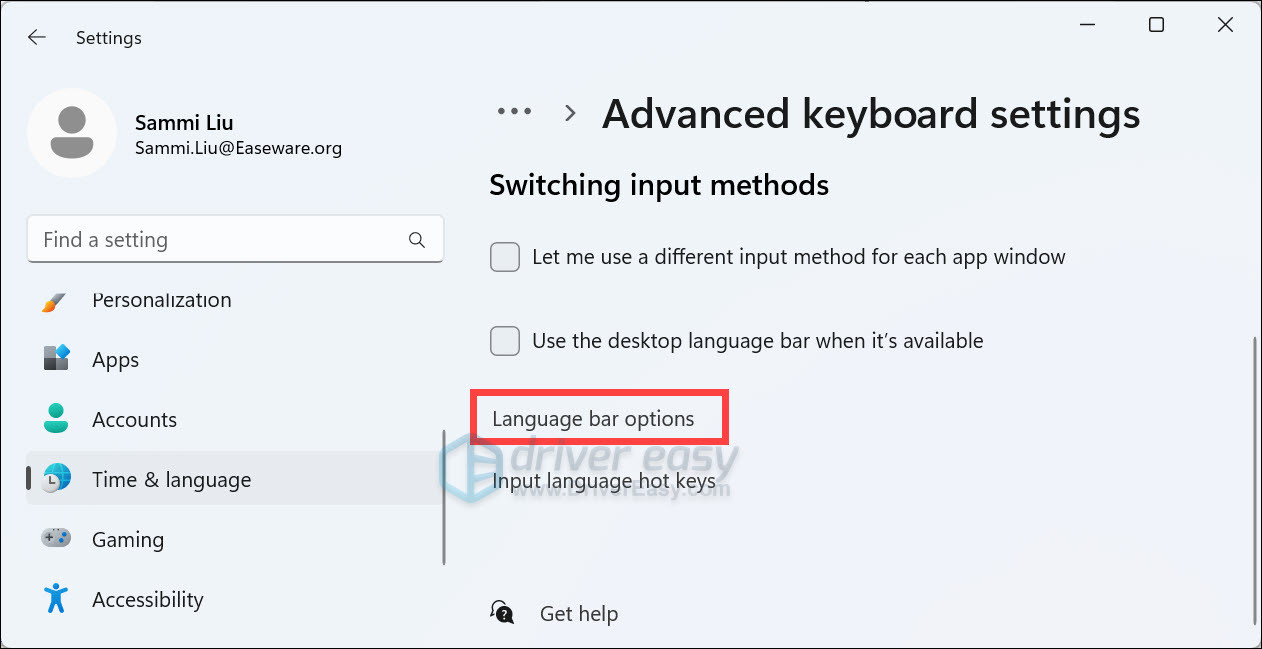
- Click Language bar options.
- Select the tab Advanced Key settings, then select Press the SHIFT key to turn off Caps lock. Click Apply and OK to save the changes.
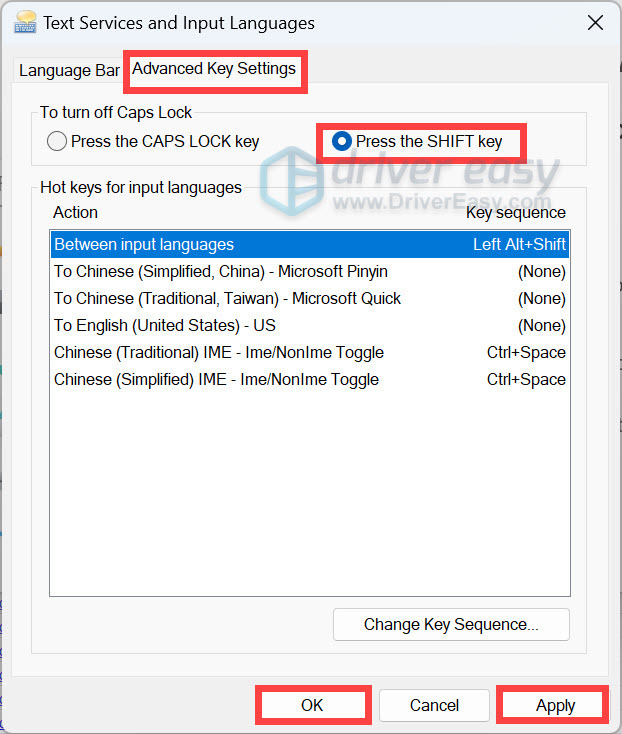
If it was selected to Press the SHIFT key to turn off Caps lock, you can switch it to Press the CAPS Lock key to turn off Caps lock. Then save the changes. - Then restart your computer, and press the SHIFT key (or the CAPS LOCK key) to turn off Caps lock and see if it works.
If you’re using Windows 10:
- Press the Windows logo key

and X at the same time, and click Settings.
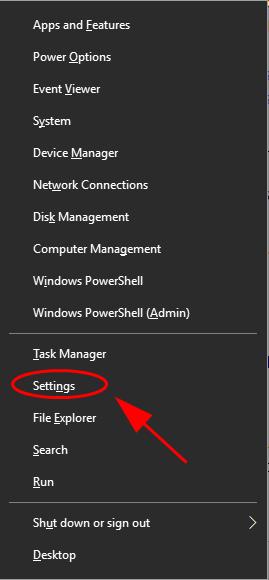
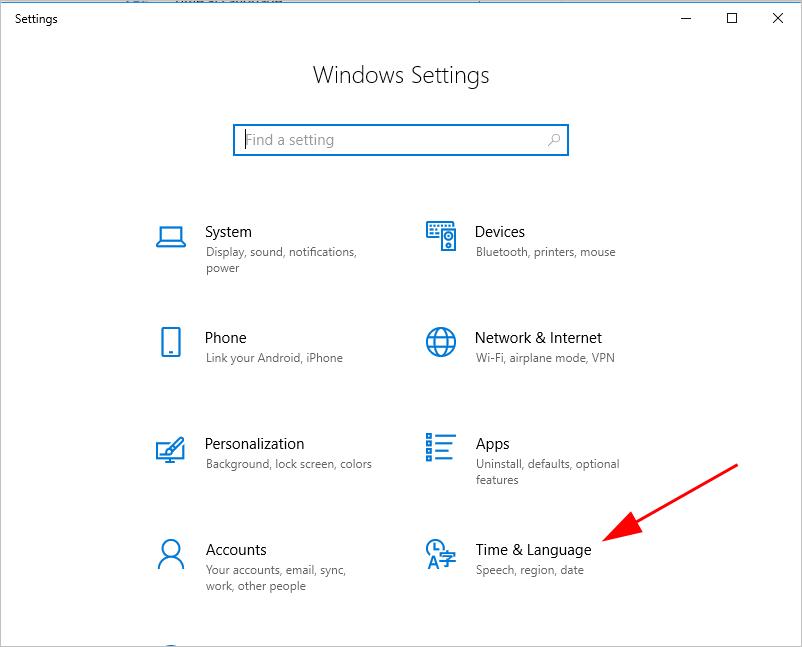
- Click Time & Language.
- Click Region & language on the left pane.
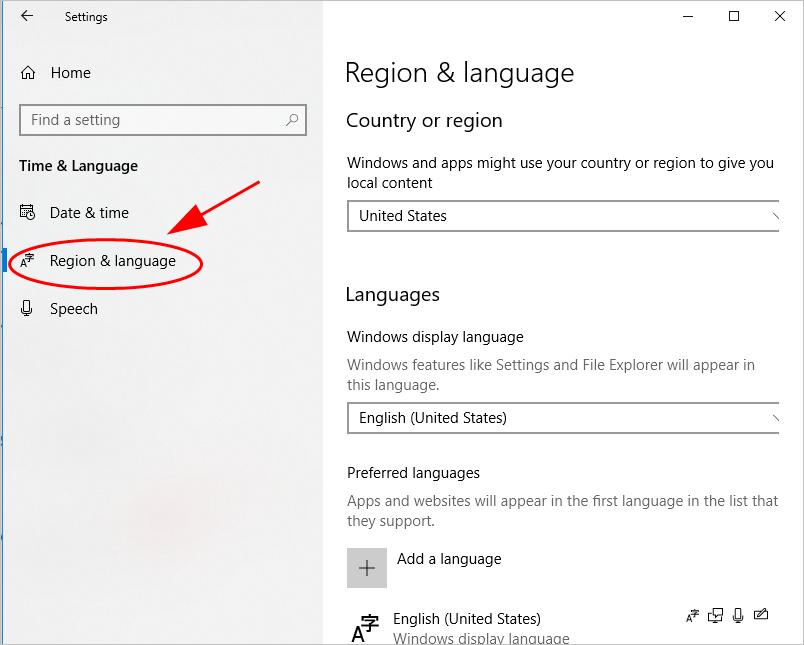
- Scroll down and click Advanced keyboard settings.
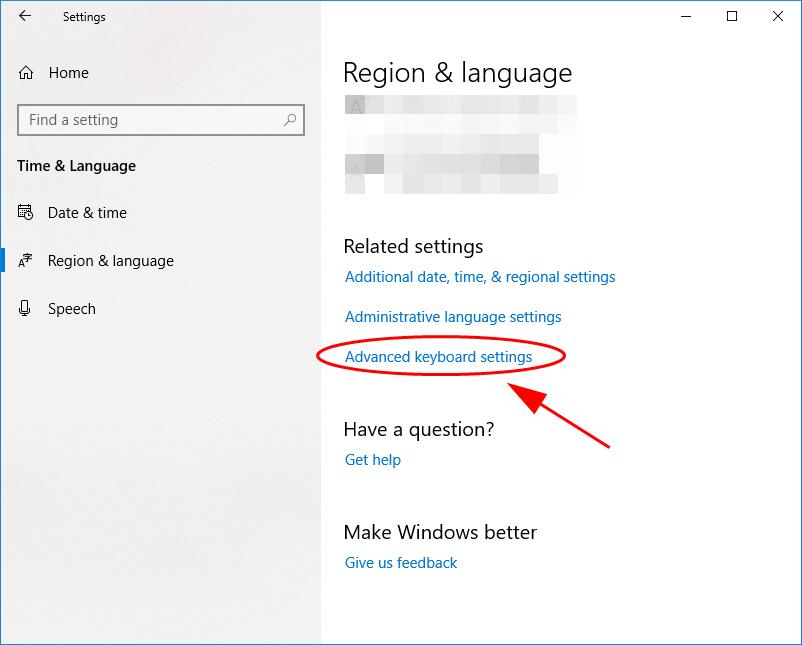
- Click Language bar options.
- Click Advanced Key settings, then select Press the SHIFT key to turn off Caps lock. Click Apply and OK to save the changes.
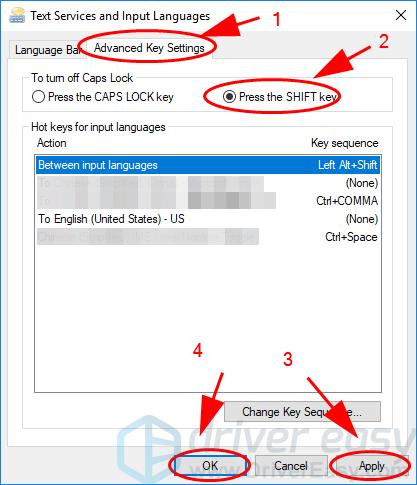
If it was selected to Press the SHIFT key to turn off Caps lock, you can switch it to Press the CAPS Lock key to turn off Caps lock. Then save the changes.
- Then restart your computer, and press the SHIFT key (or the CAPS LOCK key) to turn off Caps lock and see if it works.
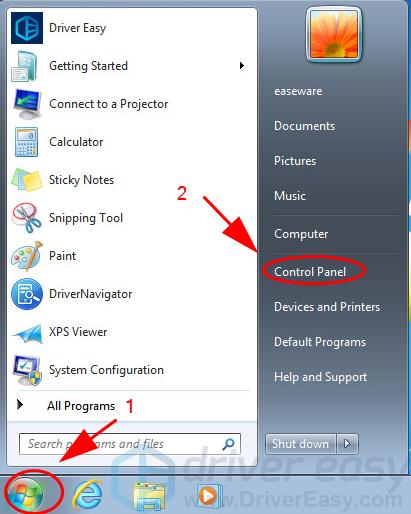
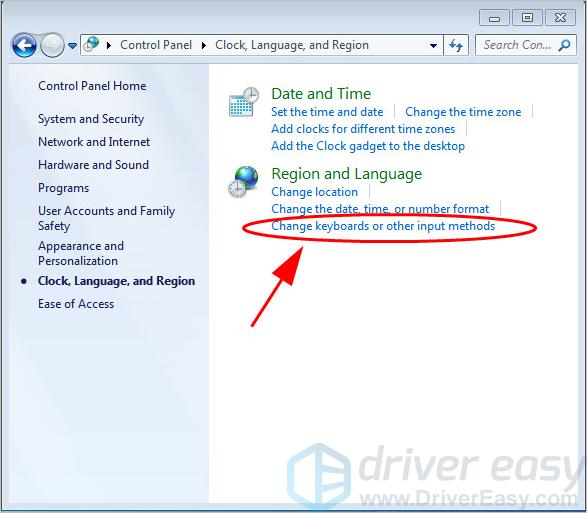
- Click the Start button to open Control Panel.
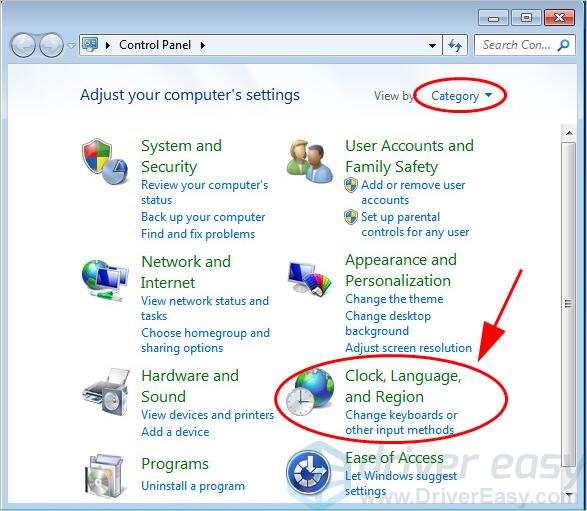
- Ensure to view Control Panel items by Category. Then click Clock, Language and Region.
- Click Change keyboards or other input methods in the Region and Language section.
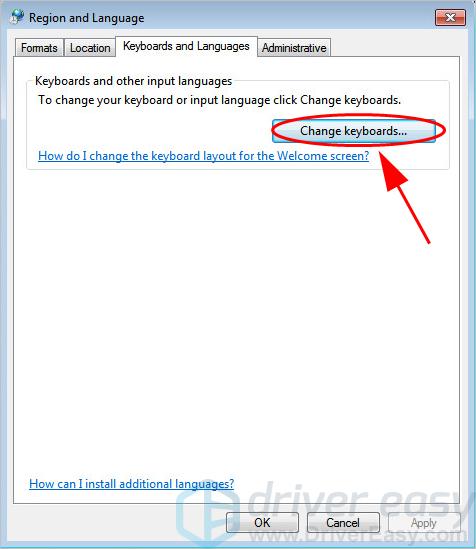
- In the popup pane, click Change keyboards… in the Keyboards and Languages tab.
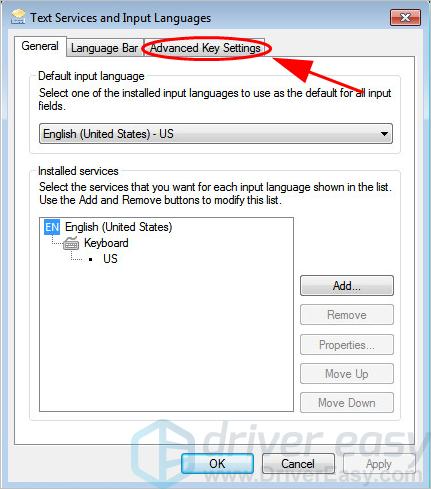
- Click the Advanced Key Settings tab in the new pane.
- Select Press the SHIFT key to turn off Caps lock, then click Apply and OK to save.
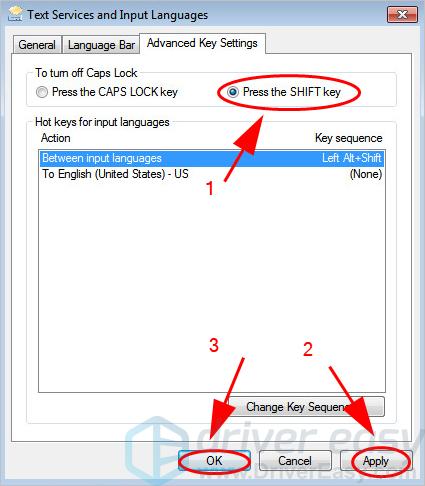
If it was selected to Press the SHIFT key to turn off Caps lock, you can switch it to Press the CAPS LOCK key to turn off Caps lock. Then save the changes.
- Restart your computer and try press the SHIFT key (or the CAPS LOCK key) to see if it works.
If your problem still persists, don’t worry. There are something else to try.
Fix 3: Update keyboard driver
A missing or outdated keyboard driver can cause your keyboard malfunction, and that’s possible the reason why your Caps lock stuck on. So you should keep your keyboard driver up to date.
There are two ways to update the keyboard driver: manually and automatically.
Manually update driver – You can manually download the driver from the manufacturer’s website, and install it in your computer. This requires time and computer skills.
Automatically update driver – If you don’t have time or patience, you can do it automatically with Driver Easy.
Driver Easy will automatically recognize your system and find the correct drivers for it. You don’t need to know exactly what system your computer is running, you don’t need to risk downloading and installing the wrong driver, and you don’t need to worry about making mistakes when installing.
You can update your drivers automatically with either the FREE or the Pro version of Driver Easy. But with the Pro version it takes just 2 clicks (and you get full support and a 30-day money back guarantee):
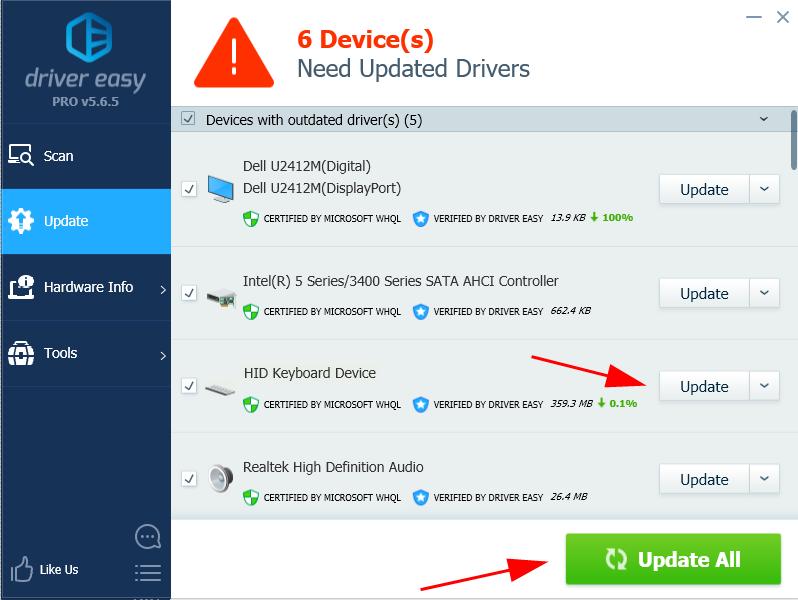
- Download and install Driver Easy.
- Run Driver Easy and click the Scan Now button. Driver Easy will then scan your computer and detect any problem drivers.
- Click the Update button next to the flagged keyboard device to automatically download the correct version of their driver (you can do this with the FREE version). Then install it in your computer.Or click Update All to automatically download and install the correct version of all the drivers that are missing or out of date on your system (this requires the Pro version – you’ll be prompted to upgrade when you click Update All).
- Restart your computer and see if it fixes your problem.
Still no luck? Okay, there is one more thing to try.
Fix 4: Use the On-Screen Keyboard
Windows has the built-in feature to allow you to use the keyboard on your screen. So here’s how to open it:
If you’re using Windows 11
If you’re using Windows 10
If you’re using Windows 7
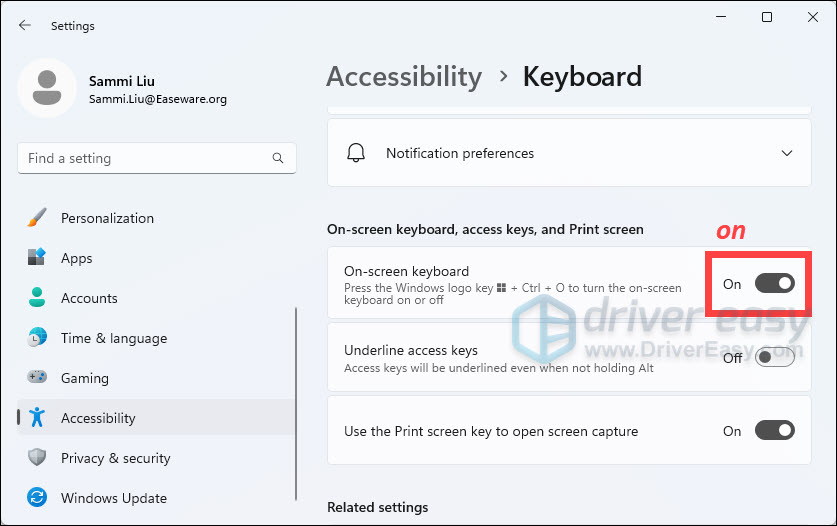
If you’re using Windows 11:
- On your keyboard, press the Windows logo + I keys simultaneously to open Settings.
- Select Accessibility > Keyboard.
- Toggle on On-screen keyboard.
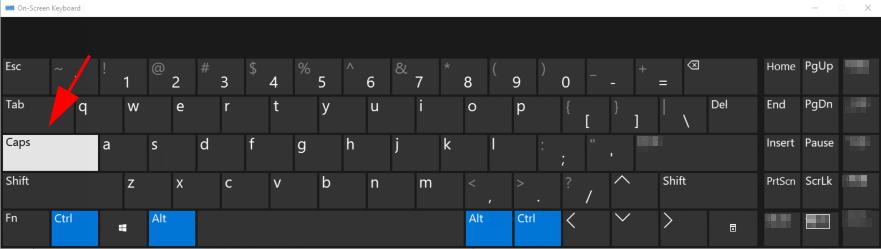
- A keyboard that can be used to move around the screen and enter text will appear on the screen. You can turn off the Caps lock using the on-screen keyboard.
If you’re using Windows 10:
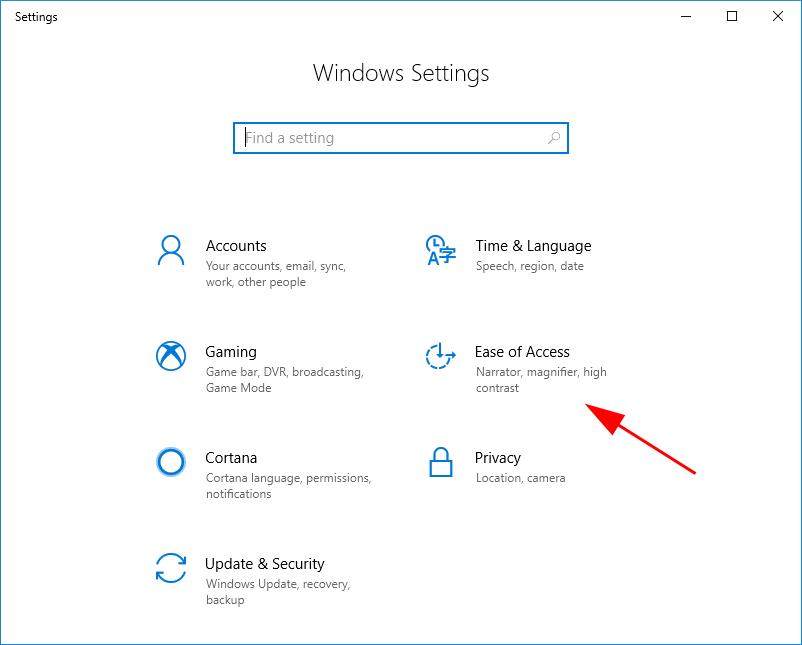
- Press the Windows logo key and X at the same time, and click Settings.
- Click Ease of Access.
- Scroll down and click Keyboard on the left.
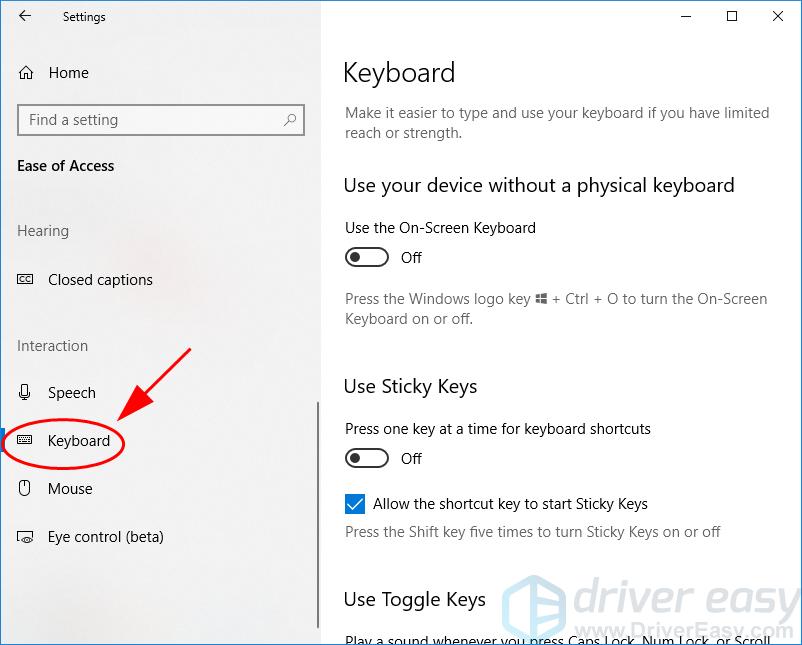
- Under Use the On-Screen Keyboard, toggle the button to turn it ON.
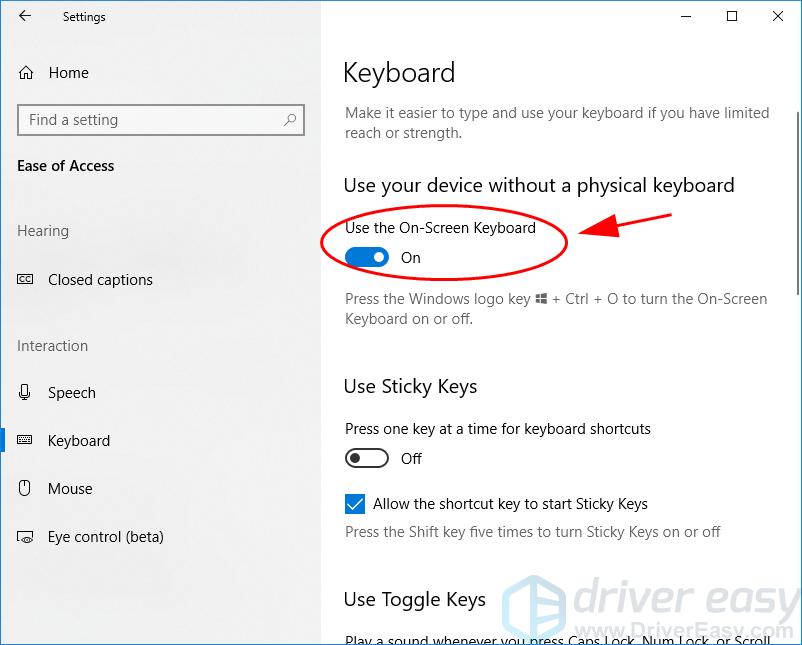
- A keyboard will pop up on your screen, and you can turn off the Caps lock using the on-screen keyboard.
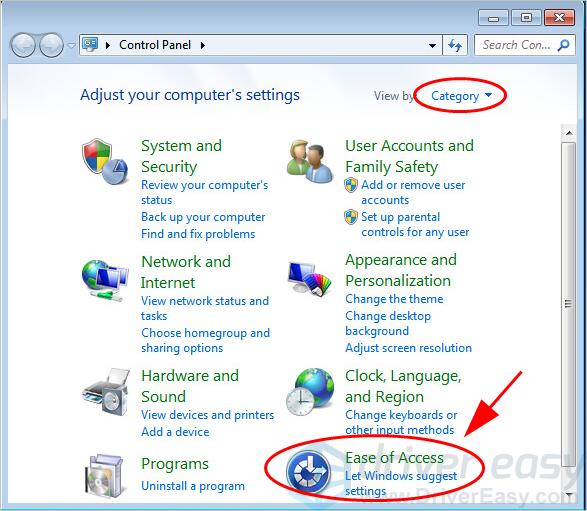
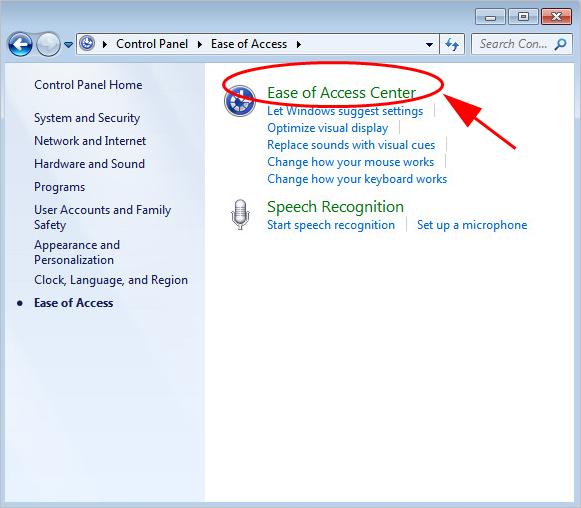
- Click the Start button and click Control Panel to open it.
- View Control Panel by Category, and click Ease of Access.
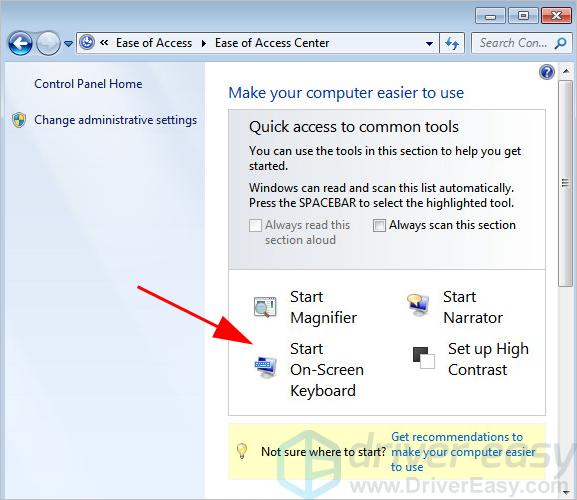
- Click Ease of Access Center.
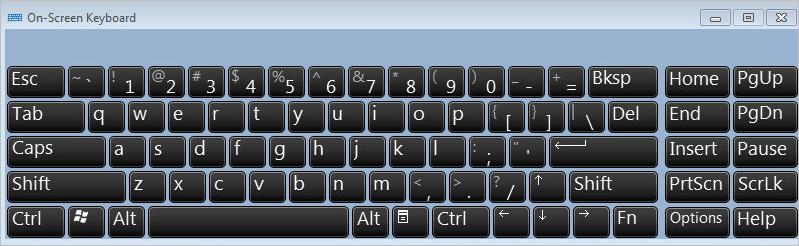
- Click Start On-Screen Keyboard. Then a keyboard will appear on your screen.
- Type the on-screen keyboard using your mouse click, and try turning off the Caps lock.
Note: if you’re not sure which key on your keyboard is the one to turn off Caps lock, you can check Fix 2.
So there you have it – the four effective ways to fix Caps lock stuck on issue. Hope this post comes in handy and helps resolve your problem. You’re welcome to let us know which method helps. If you have any question, feel free to add a comment below and we’ll see what more we can do.