


Want to connect wireless headphones to your computer? Don’t worry. It’s easy. Below you’ll learn how to connect bluetooth headphones to your computer step by step. With these simple steps, you can connect the bluetooth headphones quickly even if you don’t have much computer skills.
First, you need to do the following two things:
1. Turn on the headphones
The first thing you need to do is turn on your headphones. Computer is not able to find the bluetooth device if it’s turned off.
2. Check if the headphones are discovered by computer
After turning on the headphones, go to check if the discovery settings is configured correctly or not. Wrong settings would make unsuccessful connection.
The steps you check the settings depend on the Windows version your computer has installed.
If you’re using Windows 10, 8 & 8.1, follow these steps:
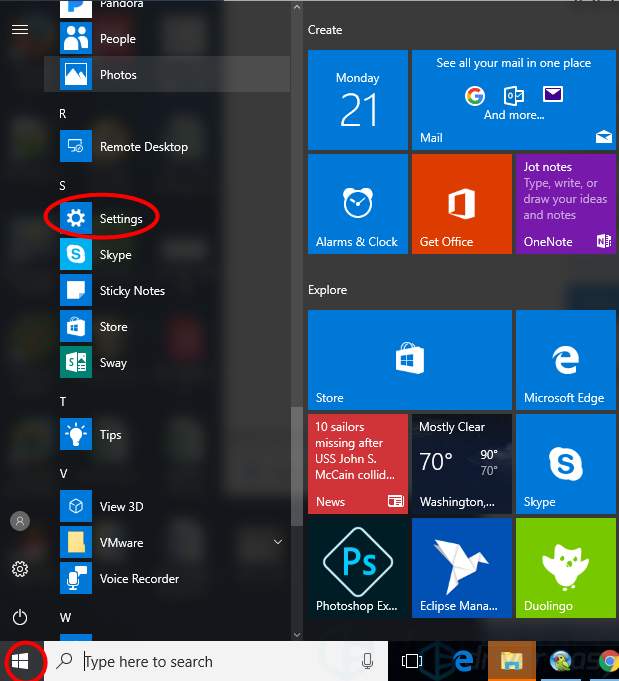
1) Click Start button. Scroll down the menu and select Settings.
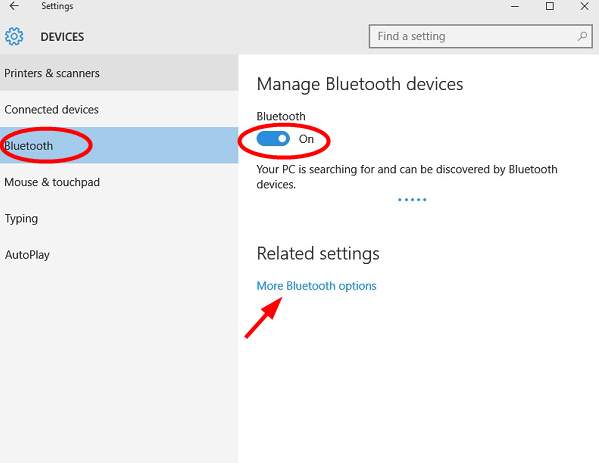
2) Click Bluetooth in the left pane. In the right pane, ensure Bluetooth is on. Under “Related settings”, click More Bluetooth options.
Note: If you don’t see the Bluetooth in the right pane, please follow the instructions in this post to resolve the issue: [Solved] Windows 10 Bluetooth Missing in Settings Error
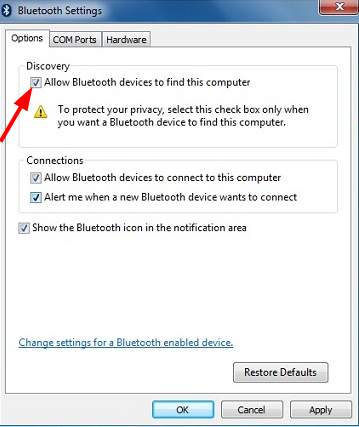
3) Under “Discovery”, see if the check box next to “Allow Bluetooth devices to find this PC” is checked. If it’s not checked, check it and click OK button to save the changes. If it’s checked, close the window and follow steps below to connect your headphones.

If you’re using Windows 7, follow these steps:
1) Click Start menu button at the left corner bottom of desktop.
2) Type “change bluetooth settings” in the search field and press the Enter key on your keyboard. Then the Blutooth Settings windows will pop up.
3) Under “Discovery”, see if the check box next to “Allow Bluetooth devices to find this PC” is checked. If it’s not checked, check it and click OK button to save the changes. If it’s checked, close the window and follow steps below to connect your headphones.
After preparing above two things, follow steps below to connect your headphones to your computer:
1) Open Control Panel:
1a) On your keyboard, press the Win+R (Windows logo key and R key) at the same time to invoke the run box.
2a) Type control panel and and press Enter to open the Control Panel window.
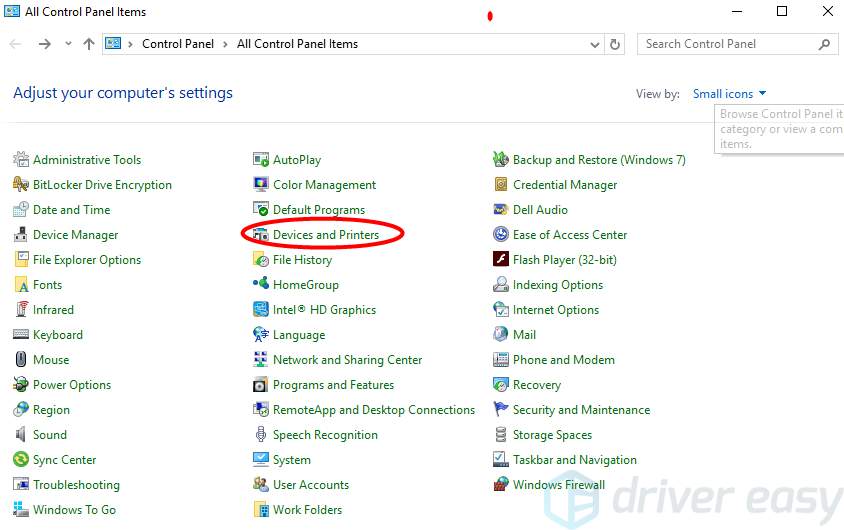
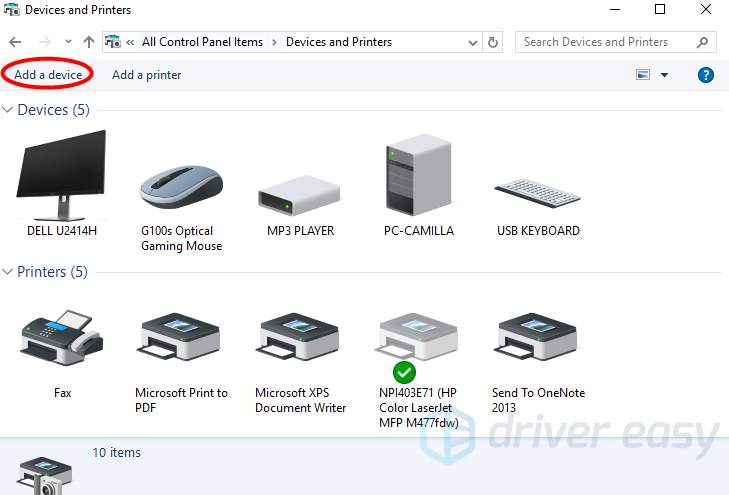
2) View by Small icons and click Devices and Printers.
3) Click Add a device.
4) Select your bluetooth headphones and follow the on-screen instructions until you’re done and connected.
Pro Tip: If you can’t pair your bluetooth headphones with your PC, there might be problems with the bluetooth driver. So try to update drivers for your computer if you think it necessary.
Whether you choose to update the device drivers manually, using Windows Update, or you use a trusted third party product, it’s essential that you have the latest correct device drivers for your operating system at all times.
If you’re not comfortable playing with device drivers, we recommend using Driver Easy. It’s a tool that detects, downloads and (if you go Pro) installs any driver updates your computer needs.
To update your drivers with Driver Easy, just click the Scan Now button, then when it lists the drivers you need to update, click Update. The correct drivers will be downloaded, and you can install them – either manually through Windows or all automatically with Driver Easy Pro.

Hope the instructions above help you connect the bluetooth headphones successfully to your computer. If you have any questions, please feel free to leave your comments. We’d love to hear of any suggestions or ideas.