


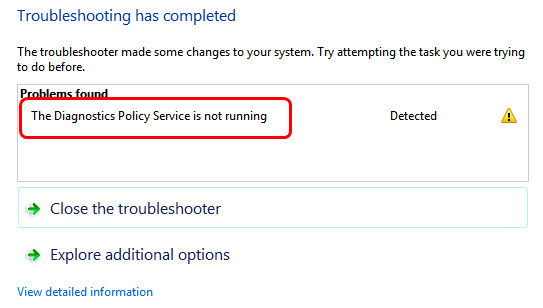
It seems that the network connection is not good on your Windows computer. So probably you to troubleshoot the network through the Windows Network Diagnostics. But unluckily, you are seeing this error saying before it tells you any network problem as before:
The Diagnostics Policy Service is not running
Rest assured. You’re not alone. Many Windows users have this problem as you. More importantly, we’ve found the answer for you.
Read on this small guide and follow to solve the problem on your Windows.
What is Diagnostics Policy Service?
The Diagnostic Policy Service enables problem detection, troubleshooting and resolution for Windows components on your Windows operating system. If this service is not running, diagnostics will no longer function.
How do I fix the Diagnostics Policy Service is not running issue?
Here’re 3 easy and helpful solutions you can try. You may not have to try them all; Just start from the top and work your way down the list until your problem is solved.
- Check the Diagnostics Policy Service in the Services window
- Give the network service and local service administrator privilege on your Windows
- Reinstall your all network adapters
Solution 1: Check the Diagnostics Policy Service in the Services window
Since the error message tells you that the service is not running, the first quick solution is to check the service status in the Services window.
Follow these steps:
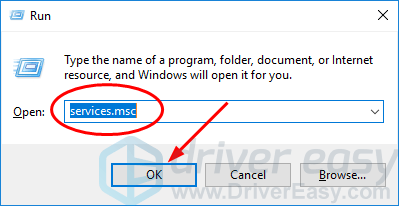
1) On your keyboard, press the Windows logo key and R (at the same time) to invoke the Run command.
2) Type services.msc and click OK.
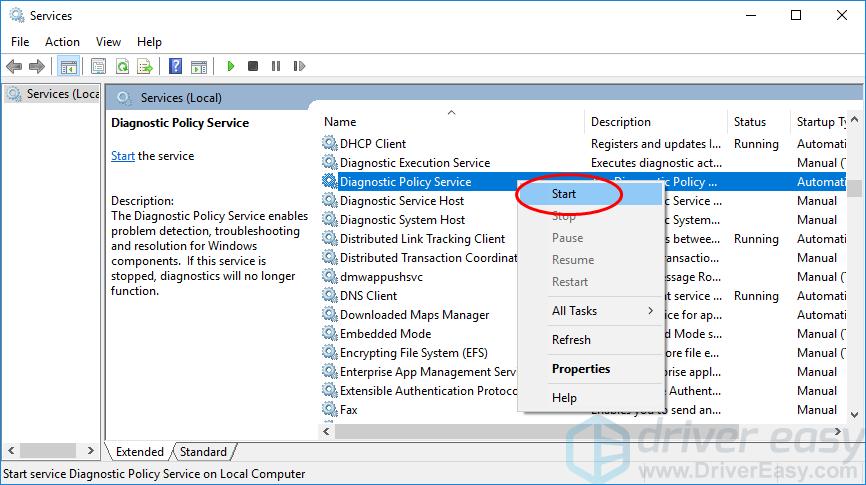
3) Locate Diagnostics Policy Service, right-click on it to select Start, if Start grayed out, click Restart instead.
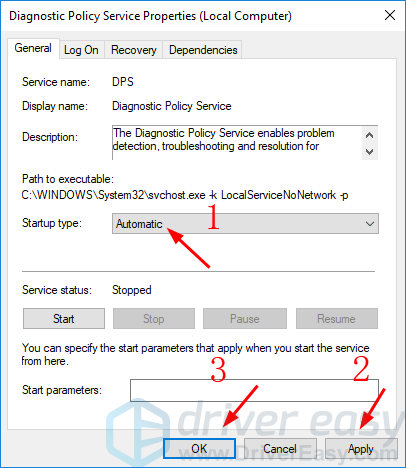
4) Right-click on Diagnostics Policy Service again and this time select Properties.

5) Set its Startup type to Automatic. Then click Apply > OK.
6) Run the Network Diagnostics and see if it goes well.
Solution 2: Give the network service and local service administrator privilege on your Windows
This problem could happen due to the service doesn’t have access to run properly. You can easily fix it by giving the services administrator privilege.
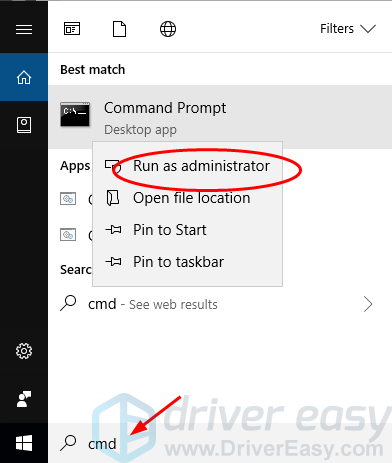
1) Type cmd in the search box from the Start menu. Then right-click on Command Prompt or cmd.exe to select Run as administrator.
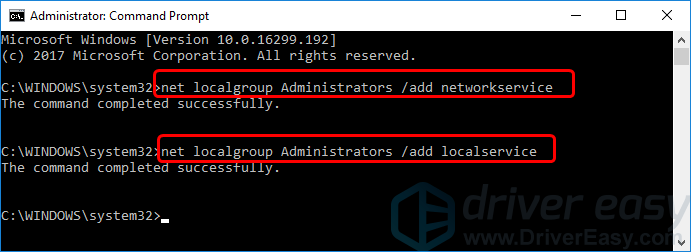
2) Type the following commands and press Enter after each.
net localgroup Administrators /add networkservice

net localgroup Administrators /add localservice
net localgroup Administrators /add network service
net localgroup Administrators /add local service
You should see a message saying The command completed successfully after each.
3) Close the Command Prompt window, and run the Network Diagnostics to see if it goes well.
Solution 3: Reinstall your network adapters
This error could be also caused by your malfunctioned network adapters. You can try to reinstall your network adapters to solve it.
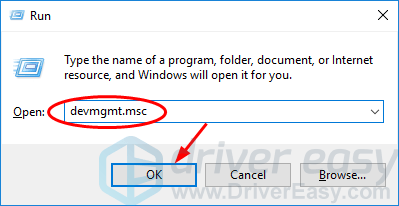
1) On your keyboard, press the Windows logo key and R (at the same time) to invoke the Run command.
2) Type devmgmt.msc and click OK.
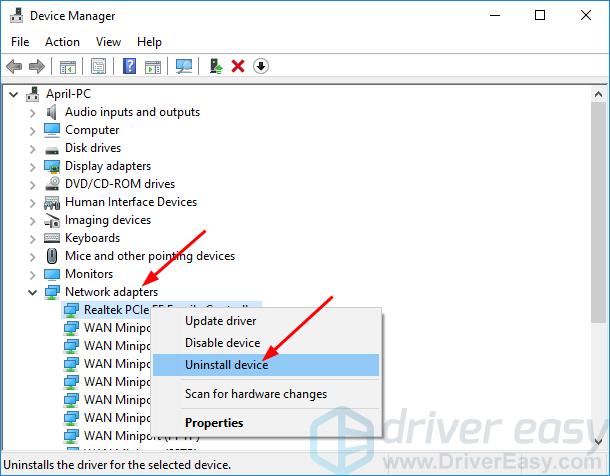
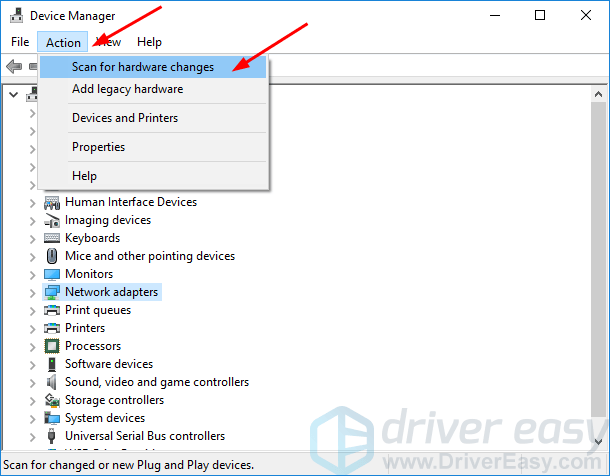
3) Double-click Network adapters and right-click on your network adapters one by one(if there’re more than one) to select Uninstall device.
4) Click Action > Scan for hardware changes. Microsoft should then reload the network adapter driver automatically.
5) Run the Network Diagnostics to see if it goes well. If it keeps giving you the error, install the latest driver for your network adapter then.
You can update your network adapter driver manually by going to your motherboard or computer manufacturer’s website, searching for the most recent correct driver for your network adapter. Be sure to choose only drivers that are compatible with your variant of Windows system.
Note: If you can get access to the Internet on your computer, then download the driver file from another working computer and save it to the USB flash drive. Then you can install the driver on your target computer through the USB drive.
Alternatively, If you don’t have the time, patience or computer skills to update your network adapter driver manually, you can, instead, do it automatically with Driver Easy. Driver Easy will automatically recognize your system and find the correct drivers for your exact network adapter, and your variant of Windows system, and it will download and install them correctly:
1) Download and install Driver Easy.
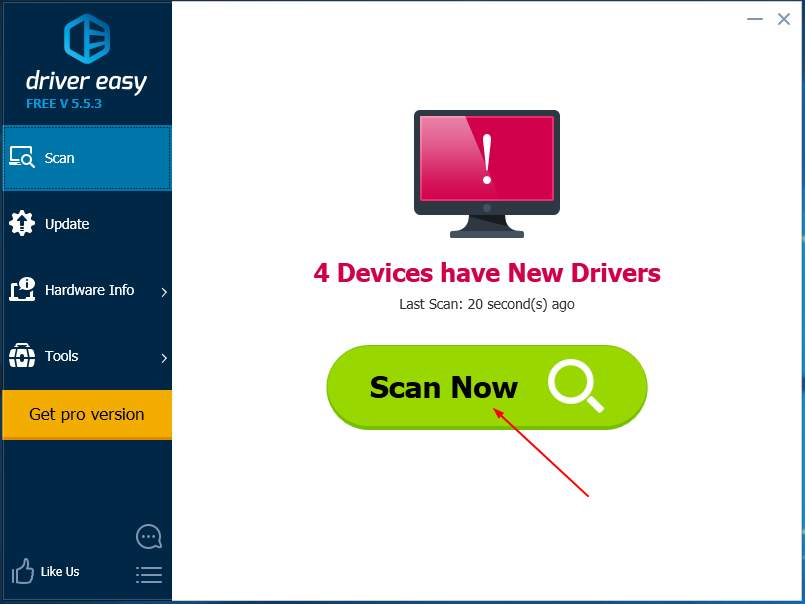
2) Run Driver Easy and click the Scan Now button. Driver Easy will then scan your computer and detect any problem drivers.
3) Click the Update button next to a flagged network adapter driver to automatically download and install the correct version of this driver (you can do this with the FREE version).
Or click Update All to automatically download and install the correct version of all the drivers that are missing or out of date on your system (this requires the Pro version – you’ll be prompted to upgrade when you click Update All).
4) After updating your network adapter driver, please restart your computer.
5) Run the Network Diagnostics to see if it goes well.