


Watching videos on the internet has become part of our daily life. But no matter what app you’re using, which website you’re login, video buffering is an annoying issue for us. Normally, pause the video for a few minutes (wait until the services for the content provider are less busy) is our common fix, but in this post, we will give you the tips that prevent video buffering from happening.
Try these fixes:
- Delete temporary cache and internet files
- Turn off Hardware acceleration in Flash and your browser
- Limit the number of devices on your network
- Reduce the quality of the video
- Increase your bandwidth
- Update your Adobe Flash Player
- Install the latest video card drivers
Fix 1: Delete temporary cache and internet files
To avoid video buffering, you should clean the temporary caches and internet files on your computer. It is because they are weighing your device down. The cache is like a reservoir, the bigger it is, the more stuff can be saved and you’ll get a smooth viewing experience.
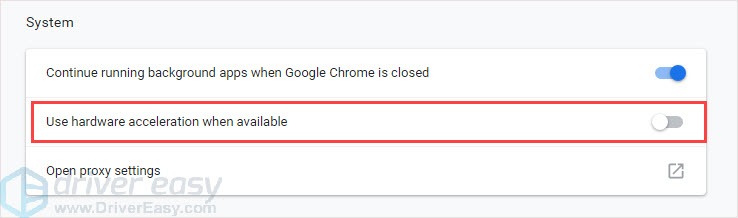
Fix 2: Turn off Hardware acceleration in Flash and your browser
If you have really slow hardware, you can try this method. The software acceleration provides less video stutter and fixes the buffering problem.
- Double click the Google Chrome shortcut.
- Hit the three dots button in the upper right corner, then click Settings.

- Scroll down to the bottom and click Advanced.
- Turn off Use hardware acceleration when available.
Fix 3: Limit the number of devices on your network
It is well known that multiple devices using one network will consume the network’s bandwidth and cause buffering. Especially when you’re under heavy traffic. So control the number of active devices before you watch a video can avoid video buffering.
Fix 4: Reduce the quality of the video
Reducing the quality of video sounds not pleasant, but this method can decrease bandwidth to stop buffering. You can change the video quality in settings.
Fix 5: Increase your bandwidth
The internet speed is the biggest limitation for video buffering. If you’re tired of the low speed, you can change your Internet Service Provider or change your service plan.
But if you don’t want to change ISP, there’s another method you can try–get a VPN.
A good VPN (Virtual Private Network) can lead you passing by the ISP to reduce the speed loss and avoid the restrictions. And help you avoid video buffering issue. It can protect your privacy as well.
You can use the VPN you already have, if you don’t have one, it’s recommended to use NordVPN.
NordVPN can bypass geo-restrictions to get all add-ons desired, keeps you protected from snooping eyes, and secures your data to keep your online activity private. It’s safe and easy to use!
- Download NordVPN in your device. (You can get 75% OFF right now!)
- Run NordVPN and open it.
- Connect to a server in a chosen location.

Fix 6: Update your Adobe Flash Player
Most of the video streaming sites use Adobe Flash which means if you’re running the outdated version may cause video buffering. Therefore, update your Adobe Flash Player to the latest version can help avoid the video buffering problem.
You can go to the Adobe Flash Player official website, download and install the latest version.
Fix 7: Install the latest video card drivers
Drivers are the bridge to communicate device with the operating system. The failure to update the driver in time will affect video playing. So updating the drivers in time can help your device run smoothly.
There are two ways to update drivers:
Option 1 – Manually – You’ll need some computer skills and patience to update your drivers this way, because you need to find exactly the right the driver online, download it and install it step by step.
OR
Option 2 – Automatically (Recommended)– This is the quickest and easiest option. It’s all done with just a couple of mouse clicks – easy even if you’re a computer newbie.
Option 1 – Download and install the driver manually
You can go to your video card manufacturer’s official website, find the driver for your system version and download them manually.
Once you’ve downloaded the correct drivers for your system, double-click on the downloaded file and follow the on-screen instructions to install the driver.
Option 2 – Automatically update drivers
If you don’t have the time, patience or computer skills to update the driver manually, you can do it automatically with Driver Easy.
Driver Easy will automatically recognize your system and find the correct drivers for it. You don’t need to know exactly what system your computer is running, you don’t need to risk downloading and installing the wrong driver, and you don’t need to worry about making a mistake when installing.
You can update your drivers automatically with either the FREE or the Pro version of Driver Easy. But with the Pro version it takes just 2 clicks (and you get full support and a 30-day money back guarantee):
- Download and install Driver Easy.
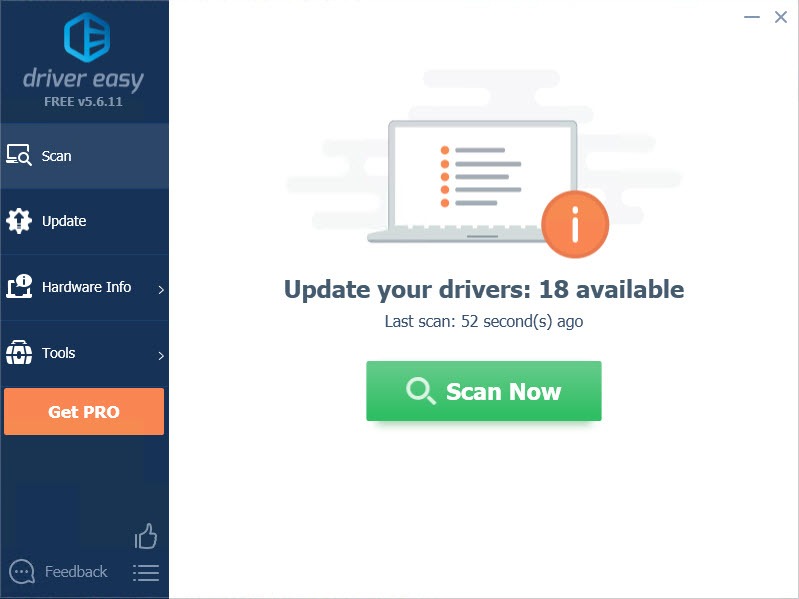
- Run Driver Easy and click Scan Now button. Driver Easy will then scan your computer and detect any problem drivers.
- Click the Update button next to the driver to automatically download and install the correct version of this driver (you can do this with Free version).
Or click Update All to automatically download and install the correct version of all the drivers that are missing or out of date on your system (this requires the Pro version – you’ll be prompted to upgrade when you click Update All).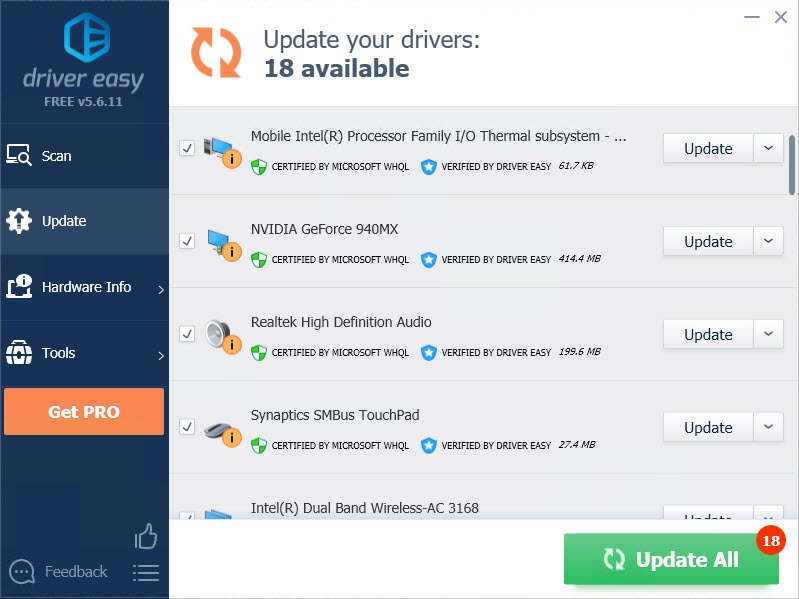
We hope this post can meet your needs. If you have questions or suggestions, please leave a comment below.