


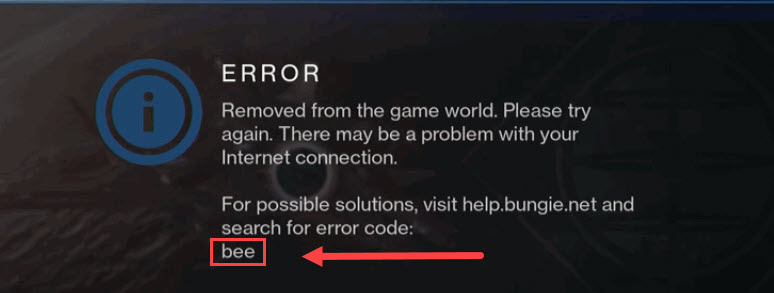
It’s been several years since Destiny 2 was released. But every now and then, there’re still players getting booted in the middle of the game by an error code: Bee. If you’re looking for a way to tackle this issue once and for all, here’re some working fixes you can try.
Try these fixes
You might not need to try them all. Simply work your way down until you find the one that gives you luck.
- Reboot your network
- Close network-hogging programs
- Update your network driver
- Try servers in another region
- Use a VPN
Fix 1: Reboot your network
When troubleshooting network issues, first make sure your network equipment is working properly. Or you can simply do a restart. It’ll purge the cache and get you a new IP address, which might just fix the issue.
- At the back of your modem and router, unplug the power cords.
Modem 
Router - Wait at least 30 seconds, then plug the cords back in. Make sure the indicators are back to their normal state.
- Open your browser and check the connection.
If restarting your network equipment doesn’t help, take a look at the next fix below.
Fix 2: Close bandwidth-hogging programs
You might experience lag or disconnection if you have background programs taking up your traffic. So before entering the game, you need to make sure all the unwanted programs and services are disabled.
You can use these steps to check for bandwidth hogs:
- On your keyboard, press CTRL+Shift+Esc at the same time to open Task Manager.
- Then click Network to check which program is taking up your bandwidth. Select that program and click End task.
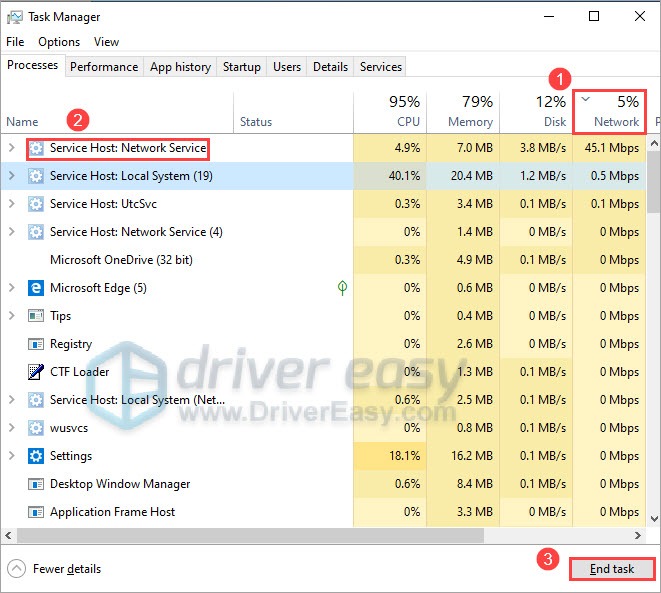
The common offenders include Windows Update, Discord and Chrome. You can reschedule the system update and close all the background apps before launching Destiny 2.
If you’re sure there aren’t any programs stealing your traffic, check out the next fix below.
Fix 3: Update your network driver
If you’re getting disconnected constantly and restarting the router won’t even help, you need to check if you’re using a faulty and outdated network driver. We always recommend gamers to keep their driver up to date so as to avoid performance issues.
You can update your network driver manually, by checking the manufacturer, visiting the official website and finding the latest correct driver installer. But if you’re not comfortable playing with device drivers, you can update automatically with Driver Easy.
- Download and install Driver Easy.
- Run Driver Easy and click the Scan Now button. Driver Easy will then scan your computer and detect any problem drivers.
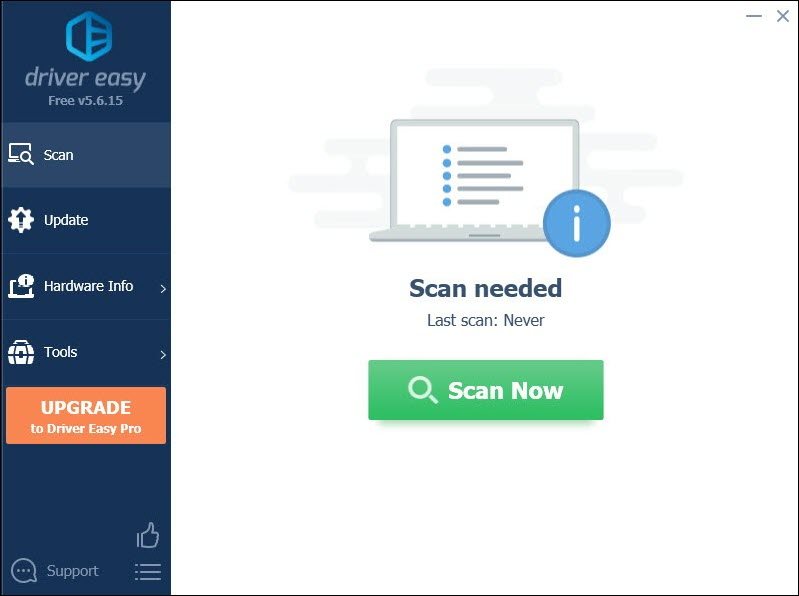
- Click Update All to automatically download and install the correct version of all the drivers that are missing or out of date on your system.
(This requires the Pro version – you’ll be prompted to upgrade when you click Update All. If you don’t want to pay for the Pro version, you can still download and install all the drivers you need with the free version; you just have to download them one at a time, and manually install them, the normal Windows way.)
After updating your network driver, restart your PC and check if Destiny 2 disconnects again.
If the latest network driver doesn’t give you luck, simply continue to the next fix.
Fix 4: Try servers in another region
Some players reported that changing to other servers could stop the disconnection. To check if this is a regional issue, you can try switching to another region and test the gameplay.
Here’s how you can change your server on Battle.net client:
- Open your Battle.net client and sign out.
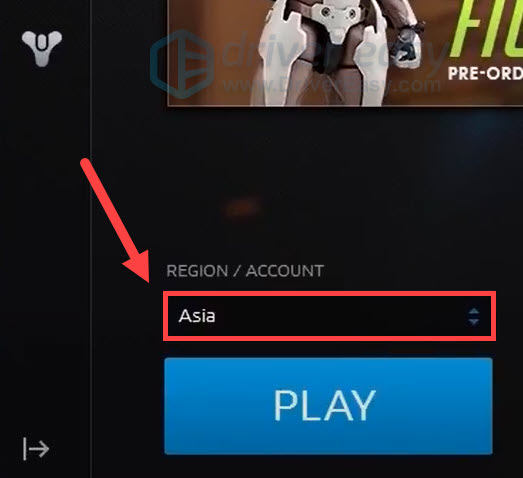
- In the log in window, click the globe icon to change your region. Then log in as you normally do.

- At the bottom left corner, click the box under REGION/ACCOUNT and change your region.
Now you can launch Destiny 2 and check the connection.
If the error code reappears, you can try the next fix.
Fix 5: Use a VPN
If none of the fixes above can help you, give VPNs a try. VPN servers offer a more stable connection to the game servers, and you won’t need to worry about the rigmarole of NAT type, port forwarding and firewall settings. If using a VPN fixes the problem, you can circle back to the troubleshooting when you feel like it.
Be advised that we don’t like free VPNs as they’re always after something. Sometimes even the cheapest VPN plans give you access to premium servers.
And here’re some VPNs we recommend:
Hopefully this post helps you fix the connection issue with Destiny 2. If you have any questions or suggestions, feel free to leave a comment down below.