


If you’re encountering performance issues such as low fps/fps drops or stutters when playing Call of Duty: Black Ops Cold War, you’re definitely not alone. In this post, we’ll walk you through the steps to boost FPS and reduce stuttering during your gameplay.
Try these methods
You may not need to try them all; simply work your way down the list until you find the one that works.
- Close programs running in the background
- Update your graphics driver
- Optimize Windows 10 for gaming
- Disable overlays
- Disable fullscreen optimizations
- Set priority to high
- Optimize NVIDIA Control Panel settings
- Change in-game settings
Method 1: Close programs running in the background
Programs like browsers, game launchers, anti-virus software are CPU intensive. So if you have them running when playing the game, you’re most likely to get lower FPS. To fix that, you should end programs that you don’t need to be running when in-game. Here’s how you can do this:
1) Right-click on the taskbar. Then select Task Manager from the list of options.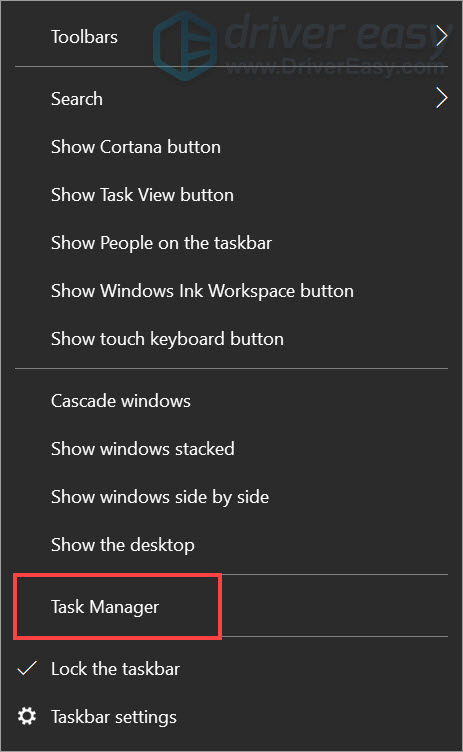
2) In the Processes tab, check the programs that are using more CPU from the list. Then right-click on those programs and select End task.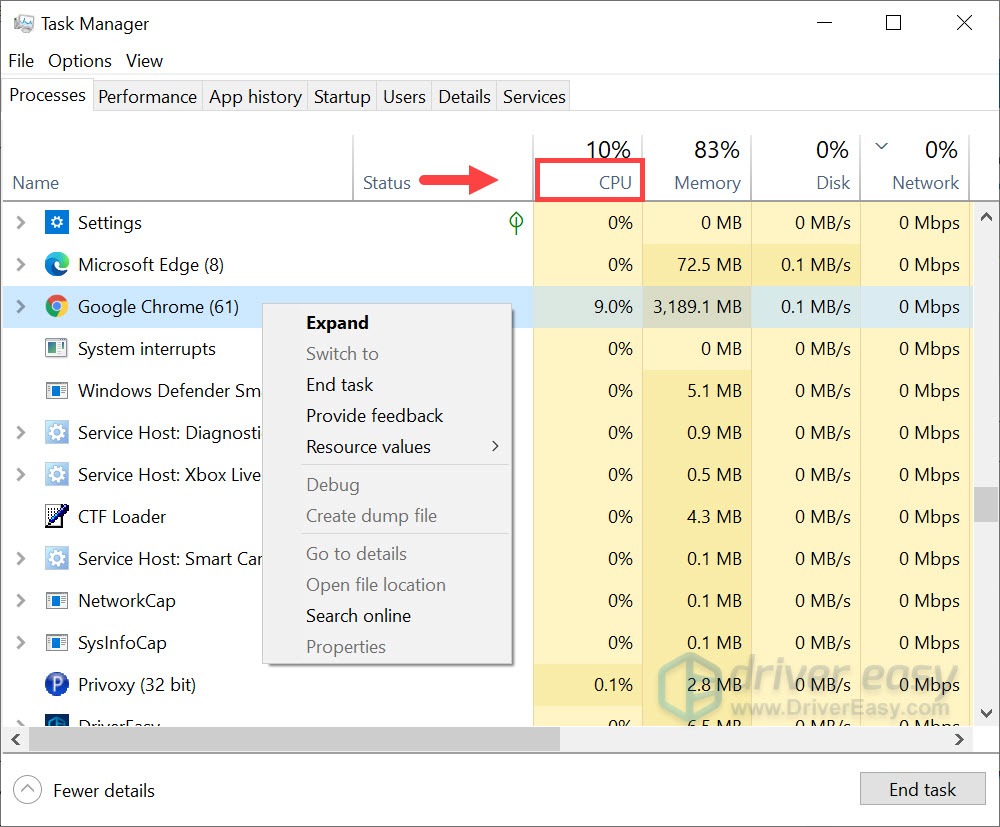
3) In the Startup tab, you can additionally prevent some programs from starting up on system boot. This will lower your overall CPU usage when using your PC.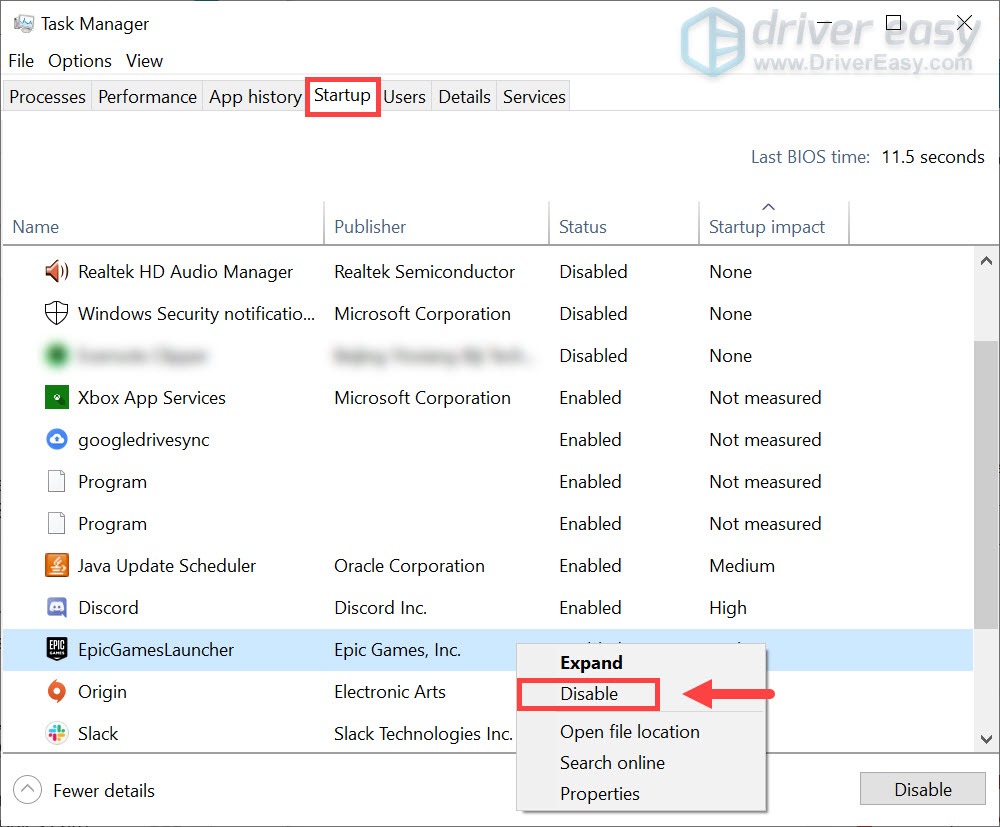
After you’ve done these, try launching your game to check if it works. If it doesn’t, try the next fix.
Method 2: Update your graphics driver
Game performance, such as slow frame rates or constant stutters, can be caused by an outdated or faulted graphics driver. In this case, you need to check for driver updates. They come with bug fixes and tackle compatibility issues for new programs. Therefore, to get rid of frequent FPS drops in Cold War, you should update your graphics driver.
There are mainly two ways you can update your graphics drivers: manually and automatically.
Option 1 – Manually update your graphics drivers
NVIDIA and AMD keep releasing driver updates. To get them, you need to go to the official websites, find the correct drivers, and download them manually.
Once you’ve downloaded the drivers, double-click on the downloaded file and follow the on-screen instructions to install the drivers.
Option 2 – Automatically update your drivers (recommended)
As described above, manually updating graphics drivers does take some time and patience. Also if you encounter other issues related to driver updates while playing the game in the future, you’ll again have to bother downloading and installing the latest drivers on your own. So to save you time, we recommend using Driver Easy as your great pick for driver updates.
Driver Easy will automatically recognize your system and find the correct drivers for it. With Driver Easy, you don’t need to know exactly what system your computer is running or risk downloading and installing the wrong driver.
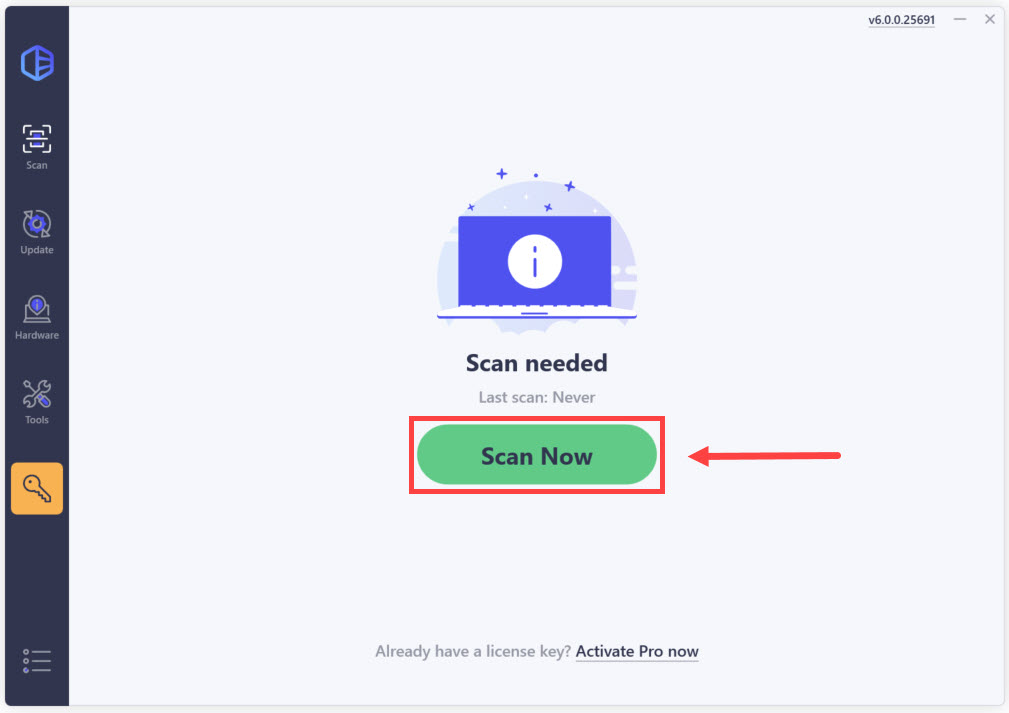
1) Download and install Driver Easy.
2) Run Driver Easy and click the Scan Now button. Driver Easy will then scan your computer and detect any problem drivers.
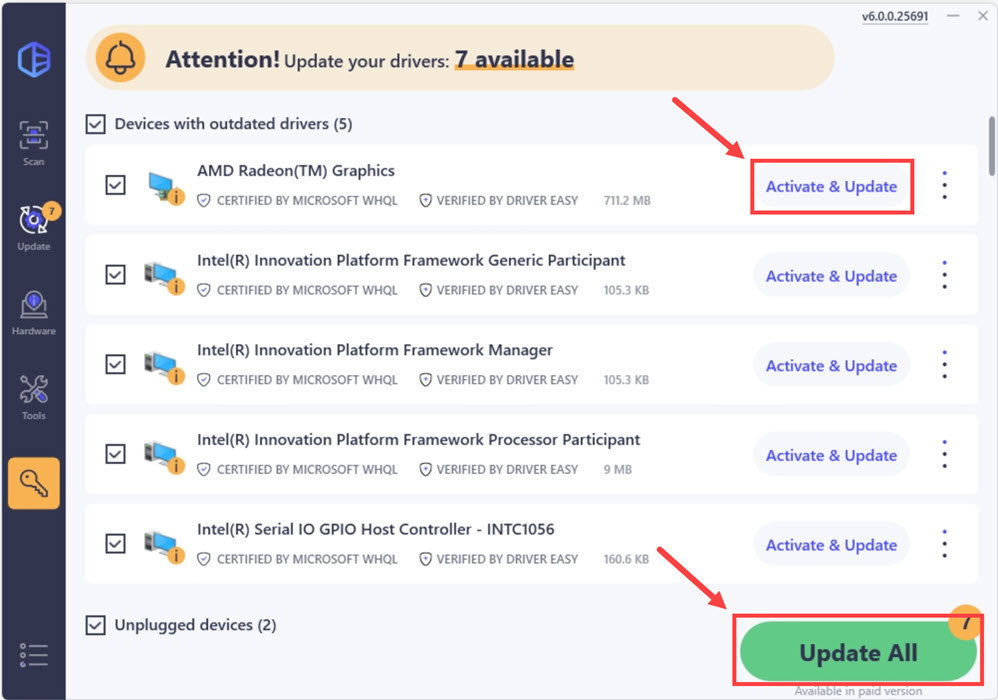
3) Click the Activate & Update button next to the flagged device to automatically download and install the correct version of this driver.
Or click Update All to automatically download and install the correct version of all the drivers that are missing or out of date on your system (You’ll need the Pro version for this – when you select Update All, you’ll get a prompt to upgrade. If you’re not prepared to purchase the Pro version yet, Driver Easy provides a 7-day trial at no cost, granting access to all Pro features like fast downloads and easy installation. No charges will occur until after your 7-day trial period ends.)
After updating your drivers, restart your computer and launch your game to check if you can get a higher FPS.
Method 3: Optimize Windows 10 for gaming
If you’re a Windows 10 user, you will have Game Mode turned on by default. It’s a feature that was supposed to make gaming a much better experience. But many PC gamers have noticed that with Game Mode enabled, many games actually encountered poorer frame rates, stutters, and freezes. So to increase your FPS, you need to turn off the game mode.
Here’s how you can do this:
1) In your Search bar, type game mode settings. Click Game Mode Settings from the results.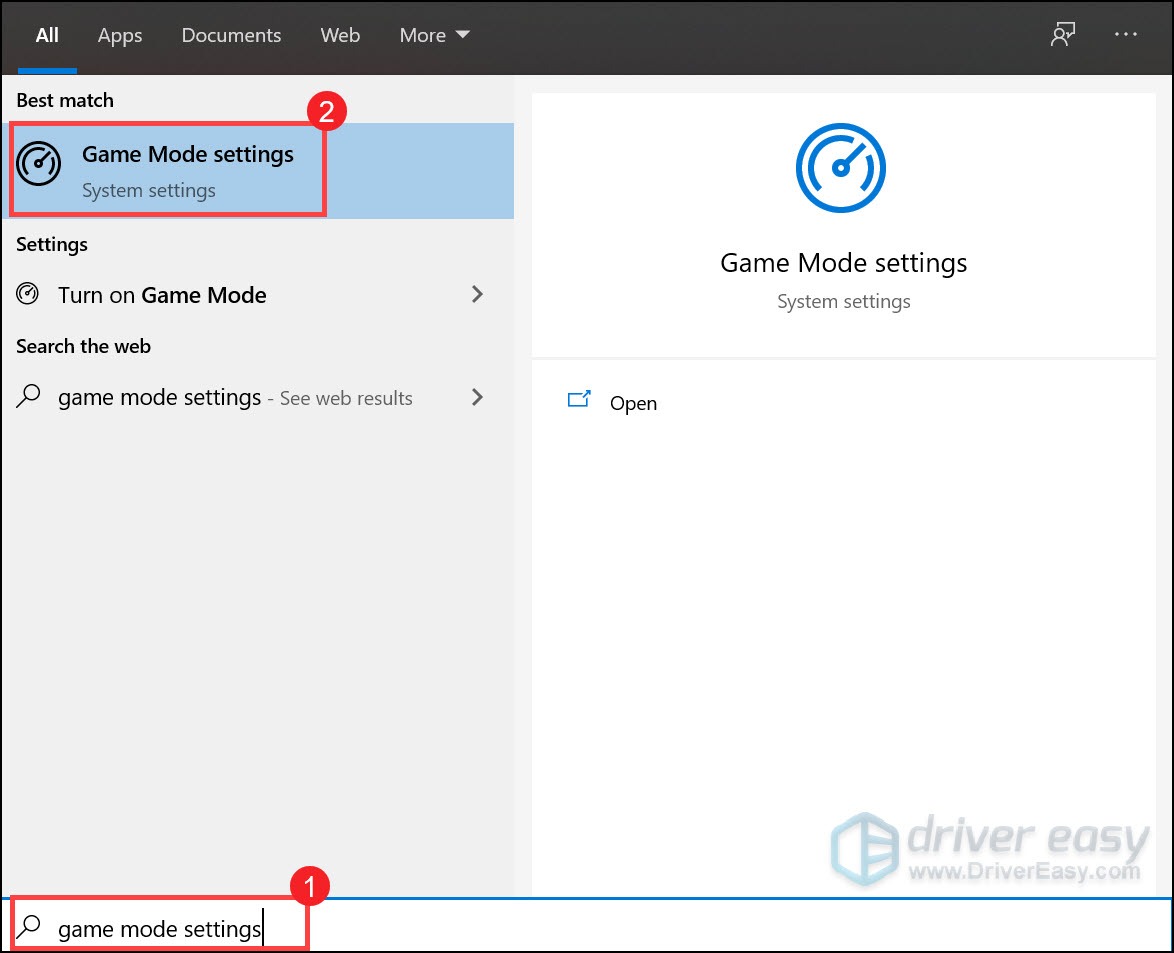
2) Click to toggle Game mode Off.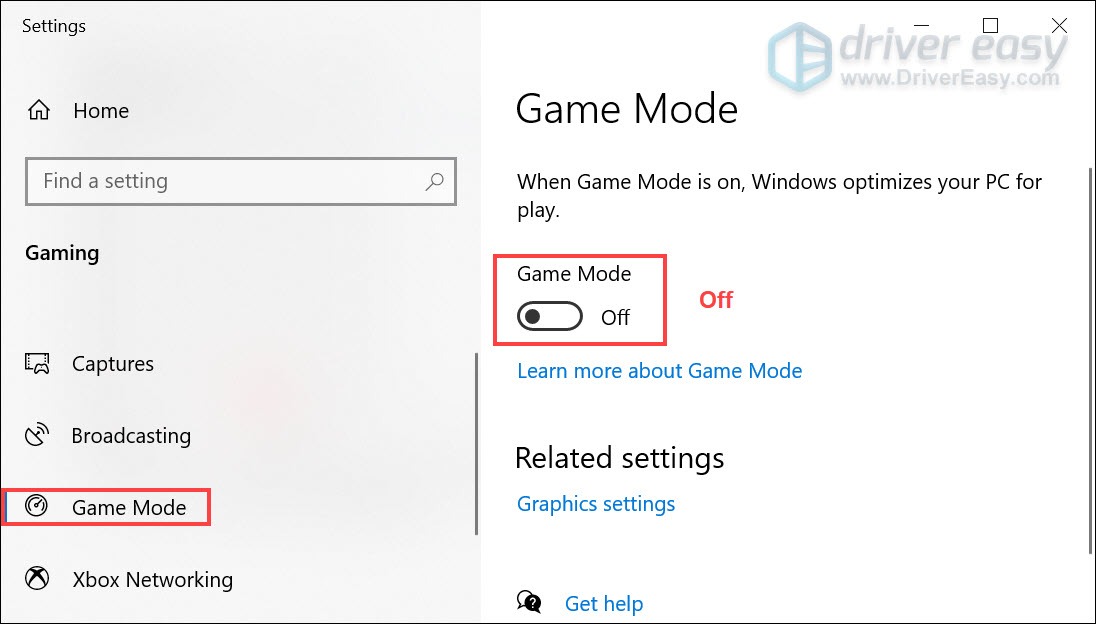
3) Select the Captures tab, and make sure to additionally disable the Background recording option.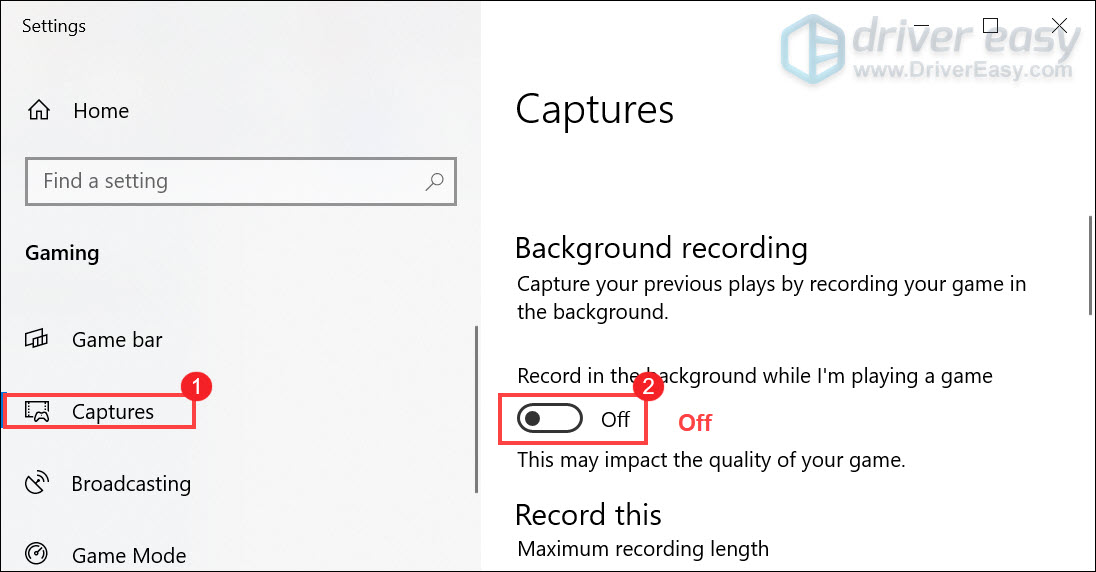
After applying the changes, launch your game to check if you have higher FPS.
Method 4: Disable overlays
It’s very important to remove all those overlays, Steam, Discord, or whatever overlay you’re using. It’s usually causing some issues like stuttering and thus affecting your performance.
You can disable overlays on Steam, Geforce Experience, and Discord by following the instructions below:
Disable Steam overlay
1) Launch the Steam client and select the tab LIBRARY.
2) Right-click on the game you’re using overlay and select Properties.
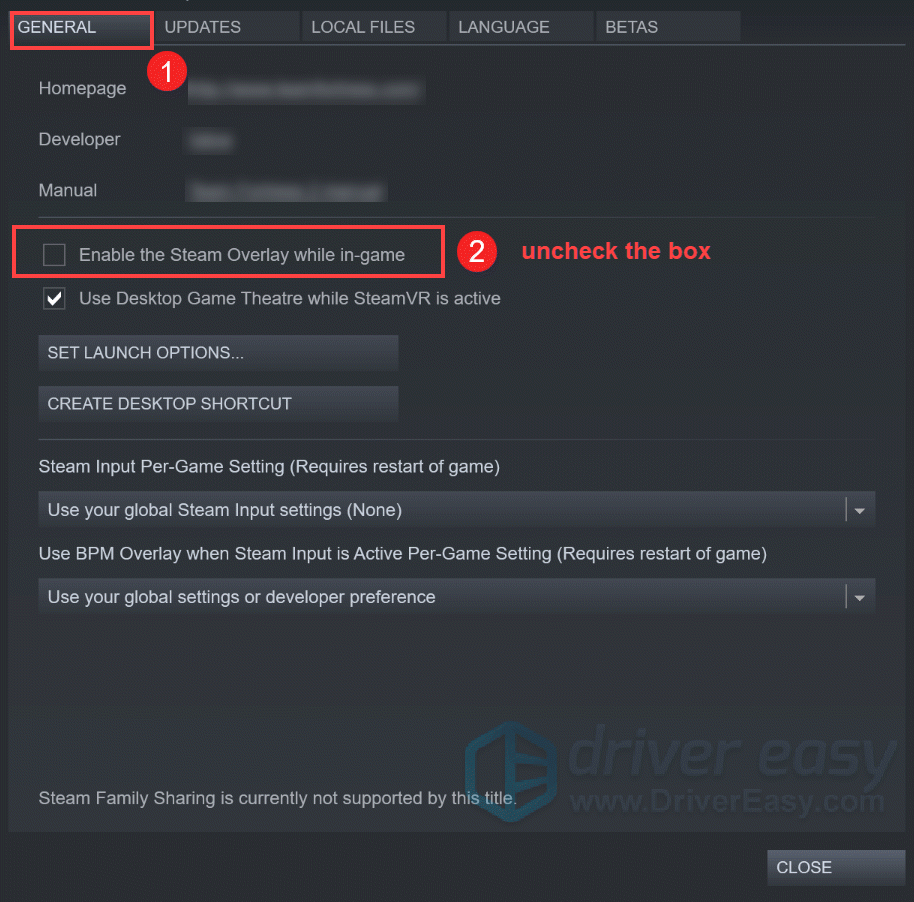
3) Select GENERAL and uncheck the box Enable the Steam Overlay while in-game.
After applying the changes, exit Steam and run your game to see if this fixed the issue.
Disable Geforce Experience in-game overlay
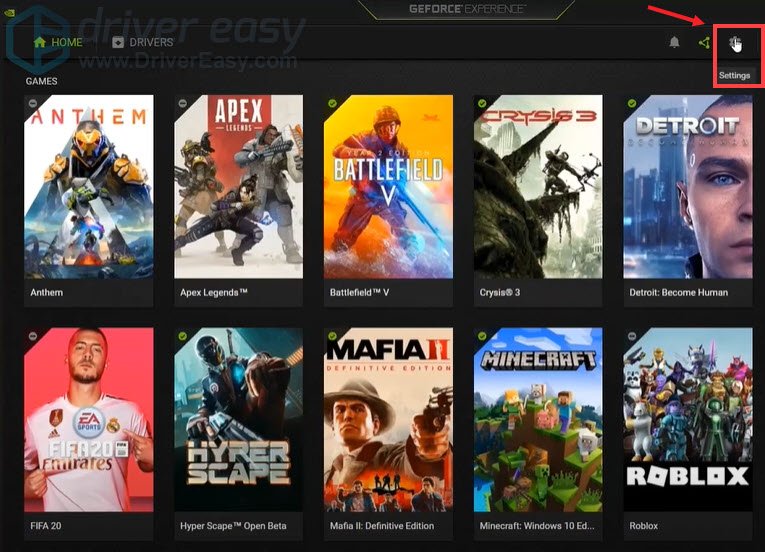
1) Click on the Settings icon.
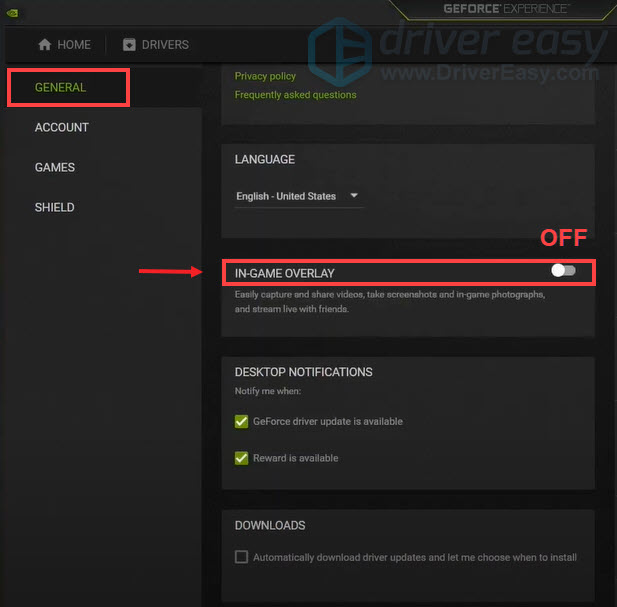
2) Under the GENERAL tab, scroll down and switch IN-GAME OVERLAY to OFF.
After you’ve applied the changes, remember to quit the app.
Disable Discord Overlay
If you have Discord running, you can disable overlay by following these steps:
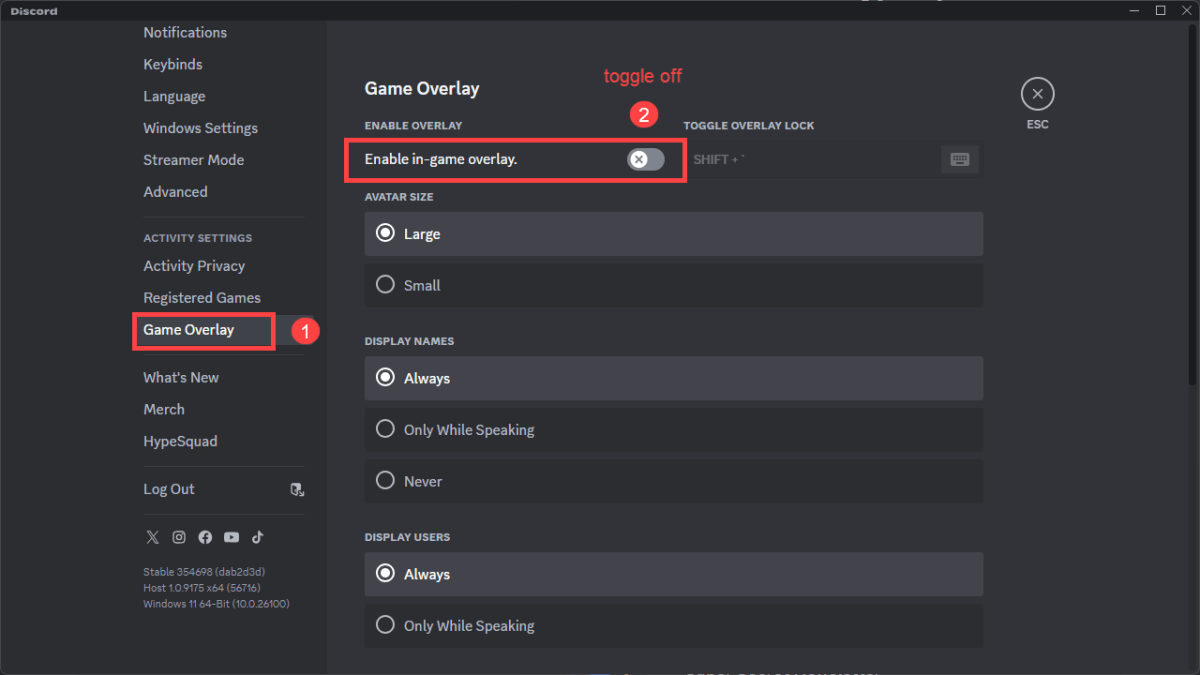
1) Click on the Users Settings icon.
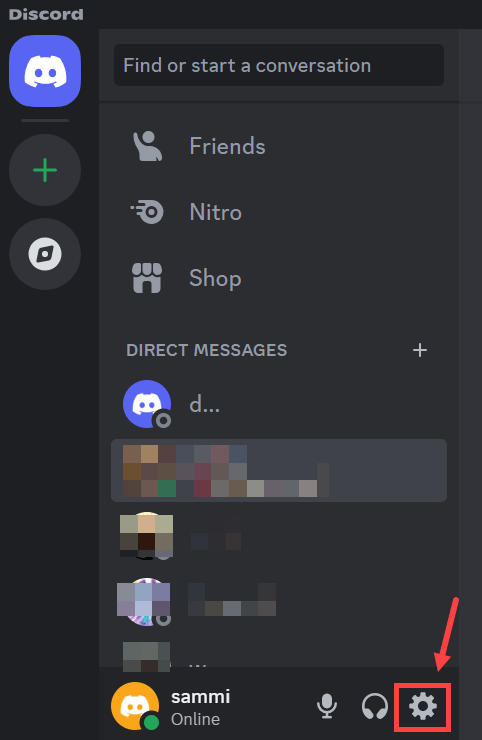
2) Scroll down, and click on Game Overlay. Then toggle off the option Enable in-game overlay.
After applying the changes, quit Discord.
Method 5: Disable fullscreen optimizations
Fullscreen Optimizations was designed for gamers to take up the entire screen, run at full speed, support fast alt-tab switching, and support overlays. But certain games, such as Call of Duty, are particularly affected by low FPS issues when you enable fullscreen optimizations. So to fix it, you need to disable it.
1) Open your Battle.net launcher and Navigate to the game Call of Duty: BOCW.
2) Click on the Options menu and select Show in Explorer.
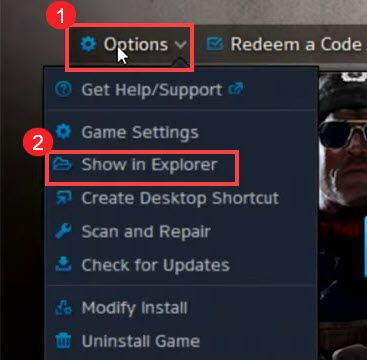
This will bring you to the installation directory of your game.
3) Double-click on the folder Call of Duty Black Ops Cold War.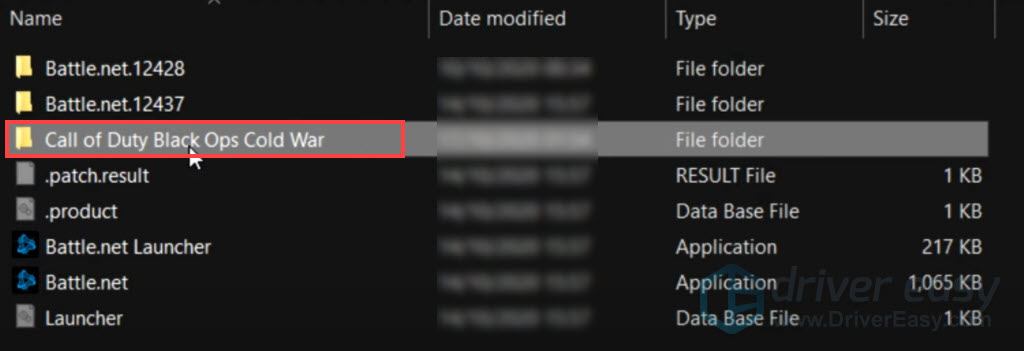
4) Now navigate to Black Ops Cold War Launcher. Right-click on it and select Properties.
5) Select the tab Compatibility. Make sure Disable full-screen optimisations has been checked. Then click Change high DPI settings.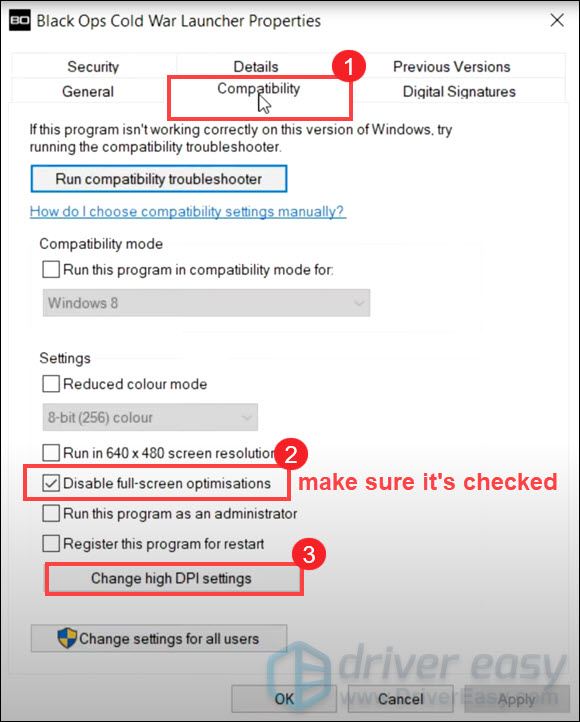
6) Make sure Override high DPI scaling behaviour has been checked. Then click OK.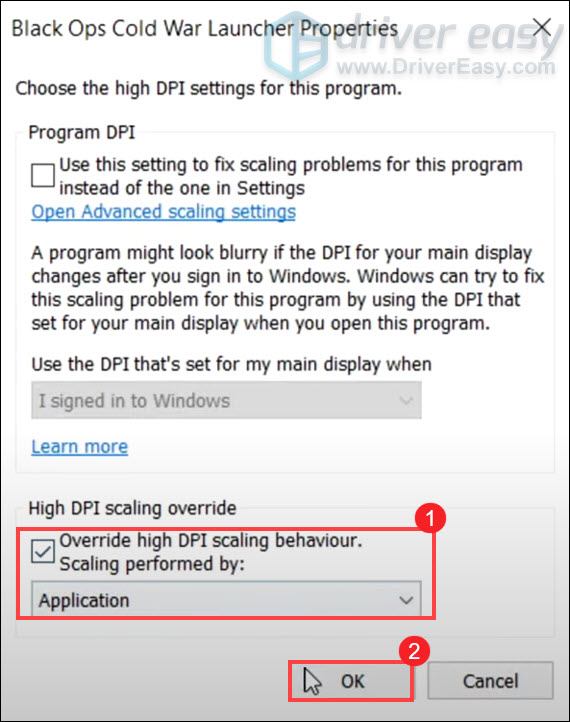
7) Click Apply > OK.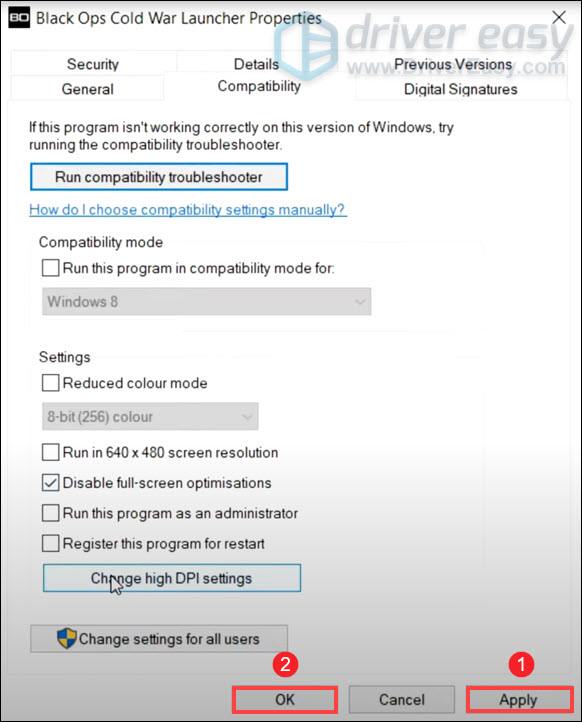
Then repeat the steps for BlackOpsColdWar application.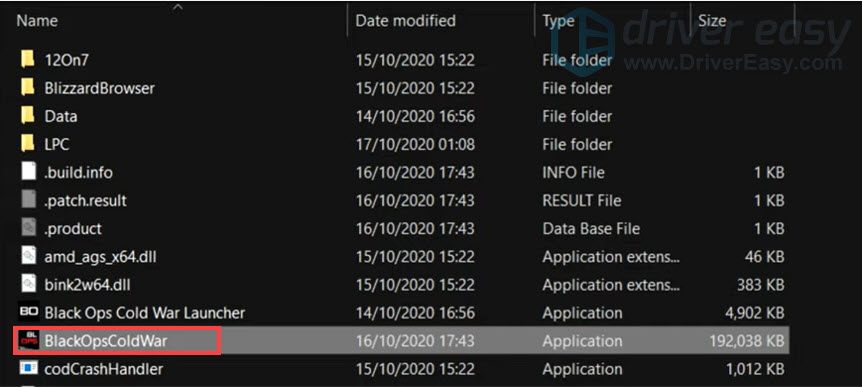
After disabling fullscreen optimizations, you’re supposed to get better performance. If that didn’t work, move on to the next fix.
Method 6: Set priority to high
“Priority” has something to do with CPU resources and RAM allocation. So if you still have to have many programs running, you can set priority to high in order to increase FPS and also get rid of stuttering. Here’s how you can do this:
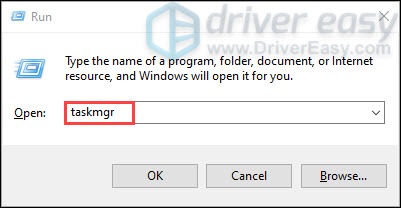
1) On your keyboard, press the Windows logo key  and R at the same time to invoke the Run box.
2) Type taskmgr, then press Enter on your keyboard.
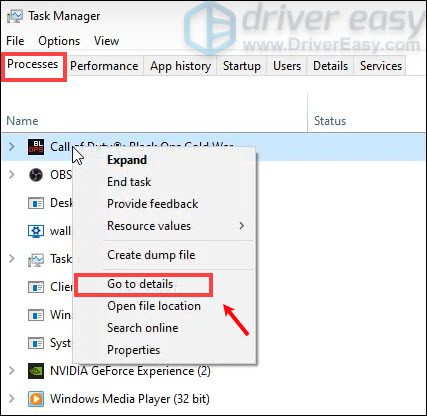
3) In the Processes tab, navigate to Call of Duty Black Ops Cold War. Right-click it and select Go to details.
4) In the Details tab, the BlackOpsColdWar.exe program should be highlighted. Simply right-click it and select Set priority > High.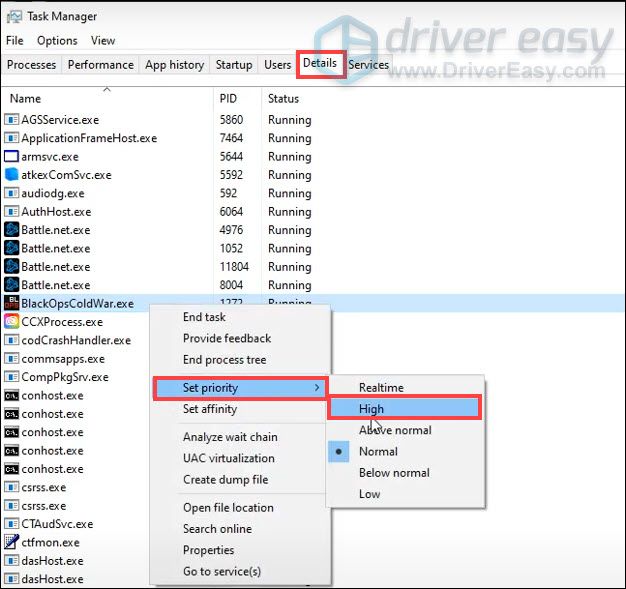
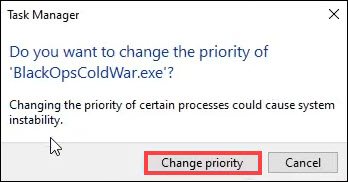
5) Click Change priority.
This will in turn allocate more resources to playing the game and should increase your performance especially if you have other programs running in the background.
After applying the changes, launch your game to check if you get a higher FPS.
Method 7: Optimize NVIDIA graphics card settings
If you have an NVIDIA graphics card, you can increase your game FPS by optimizing NVIDIA Control Panel settings. Simply follow the instructions below to do this:
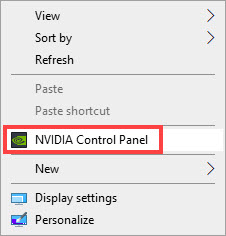
1) From your desktop, right-click on the empty space and select NVIDIA Control Panel.
2) From the left panel, click Manage 3D settings. Then select the tab Program Settings. Click Add to select to add a program to customize and then add Call of Duty: Black Ops Cold War from the program list. Now click Add Selected Program.
3) Now you need to change a few settings:
Scroll down and set the Power management mode to Prefer maximum performance.

And set the Texture filtering Quality to Performance.
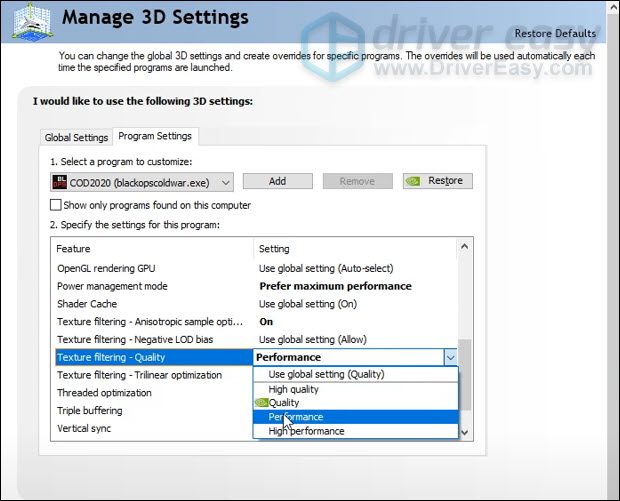
After you’ve made these changes, try playing your game to check if it helps.
Method 8: Change in-game settings
The in-game settings by default may not always give you the best possible result for your game. Some changes can really make a difference when you want to have a higher FPS.
Here are the best settings for your game, Call of Duty Black Ops Cold War:
1) GRAPHICS SETTINGS
First, in the HARDWARE section:
For the Display mode, make sure you’re playing Fullscreen. We suggest not going with windowed or borderless mode because you might lose a couple of FPS and also you can get some stuttering.
Also, remember to disable Gameplay V-Sync and Menu V-Sync. Disabling them can prevent input lag.
(Tips: players reported on Reddit that changing the Render Resolution from 100% to 99% helped fix the issue. So give it a try! )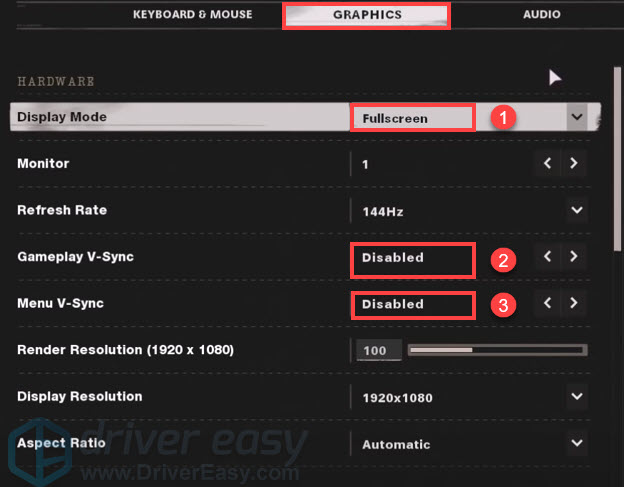
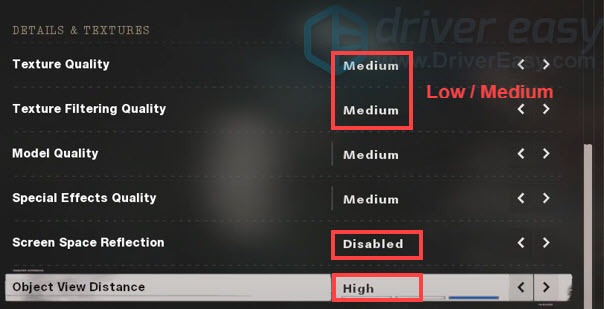
Second, in the DETAILS & TEXTURES section:
Reduce the Texture Quality and Texture Filtering Quality to Low/ Medium depending on your system specs.
Disable Screen Space Reflection.
And set the Object View Distance to High.
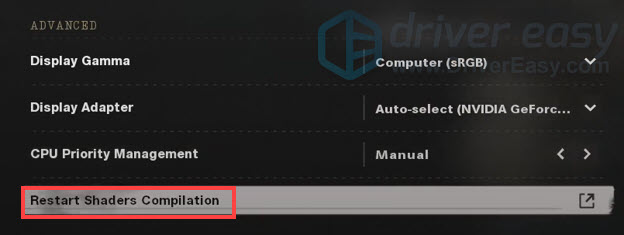
Third, in the ADVANCED section:
In case you’re getting random lag on a high-end system, then you should Restart Shaders Compilation, which will take about one minute to complete.
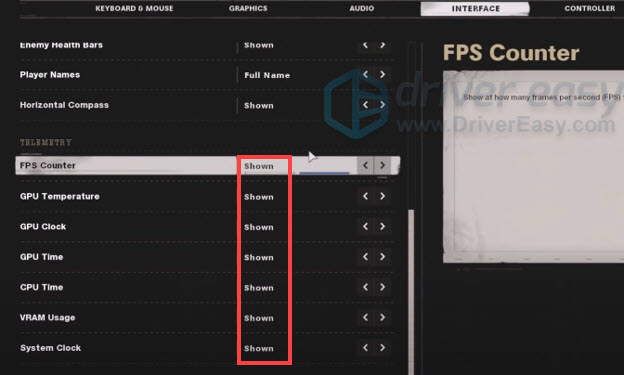
2) INTERFACE SETTINGS
In the TELEMETRY section:
Make sure that you’re showing your FPS Counter, GPU Temperature, GPU Clock, GPU Time, CPU Time, VRAM Usage, and System Clock. Everything needs to be as Shown. You need to have a look at your GPU temperature. If your GPU gets a high temperature, you probably have some throttle. This is why you’re losing FPS. So if your GPU is overheating, you should check if it’s caused by poor ventilation or by dust accumulating on the vents, fans, and heat sinks.
So these are the methods you can try to boost your FPS in Call of Duty: Black Ops Cold War. And most of these tweaks also work for other PC games.
If you have any ideas or questions, please leave us a comment below.
