


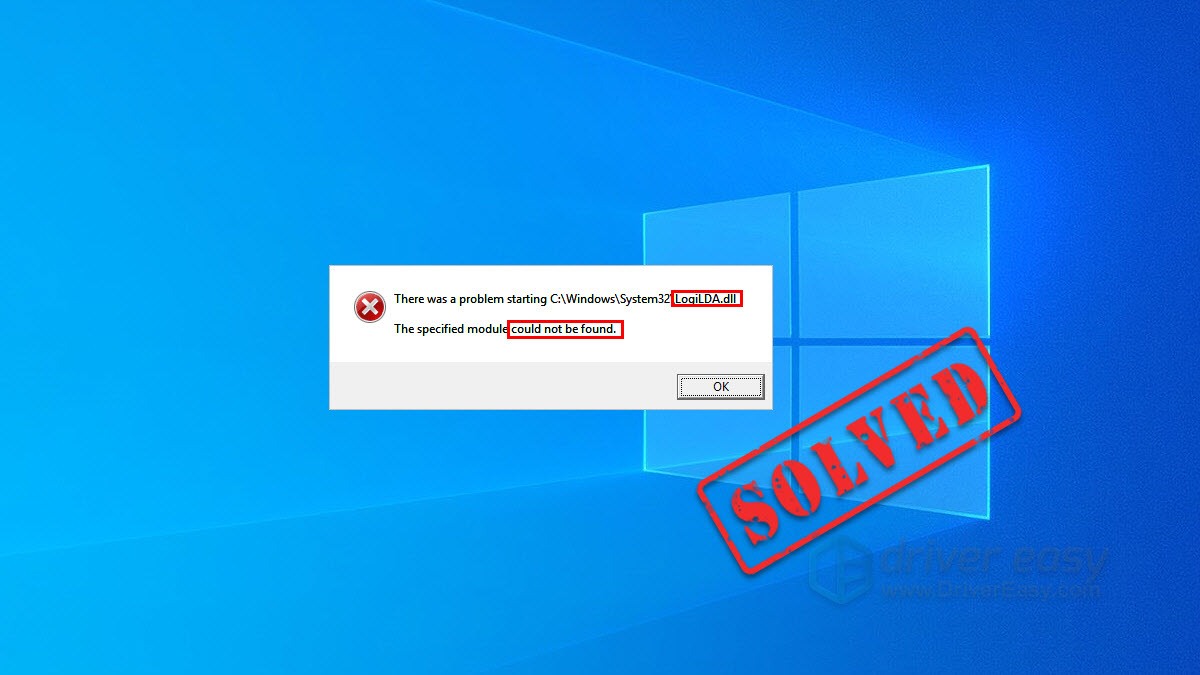
If you see the error message “There was a problem starting C:WindowsSystem32LogiLDA.dll. The specified module could not be found“, don’t worry. You’re definitely not the only person to experience this problem; thousands of users have recently reported the very same issue. After reading this post, you should be able to fix it pretty easily…
What is LogiLDA.dll?
As a Windows DLL (Dynamic Link Library) file, the file LogiLDA.dll is a software component of Logitech Download Assistant. This .dll file is located in the C: WindowsSystem32 folder. It contains the program code, data, and resources of Logitech Download Assistant. During startup, Logitech Download Assistant would run to check for newly released Logitech updates.
Fixes to try
Below is a list of fixes that have resolved this problem for other users.
You don’t have to try them all. Just work your way through the list until you find the one that does the trick for you.
- Restore the LogiLDA.dll file
- Disable LogiLDA from Startup in Task Manager
- Delete the Logitech Download Assistant Key from Registry Editor
- Uninstall the Logitech SetPoint Software
- Uninstall and Reinstall the Logitech mouse driver
- Bonus tip: Update your Logitech mouse driver
Fix 1: Restore the LogiLDA.dll file
LogiLDA.dll is a core component of Logitech’s gaming software that handles your Logitech devices like mice and keyboards. If this file is missing or corrupted, your Logitech devices might not work properly or could cause programs to crash. As a fix, you can download this file and restore it:
- Go to DLL-Files. Use the search box to look for the DLL file that is missing from your computer.
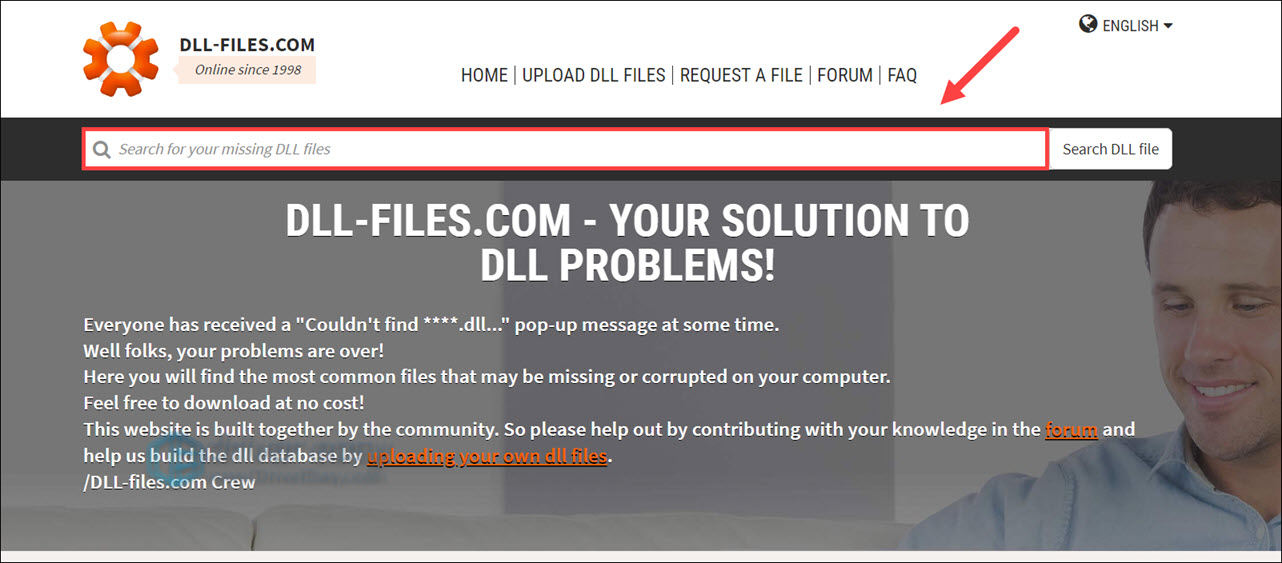
- Once it gets a hit in the database, you will see the available .dll files. You can then click the file and follow the instructions on the page to download the file to the designated location.
A side note:
In this process, you may find multiple files available. Mostly you can simply pick the highest version. However, when the versions are the same, it could mean that the files work for different architectures.
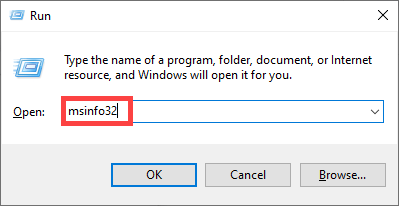
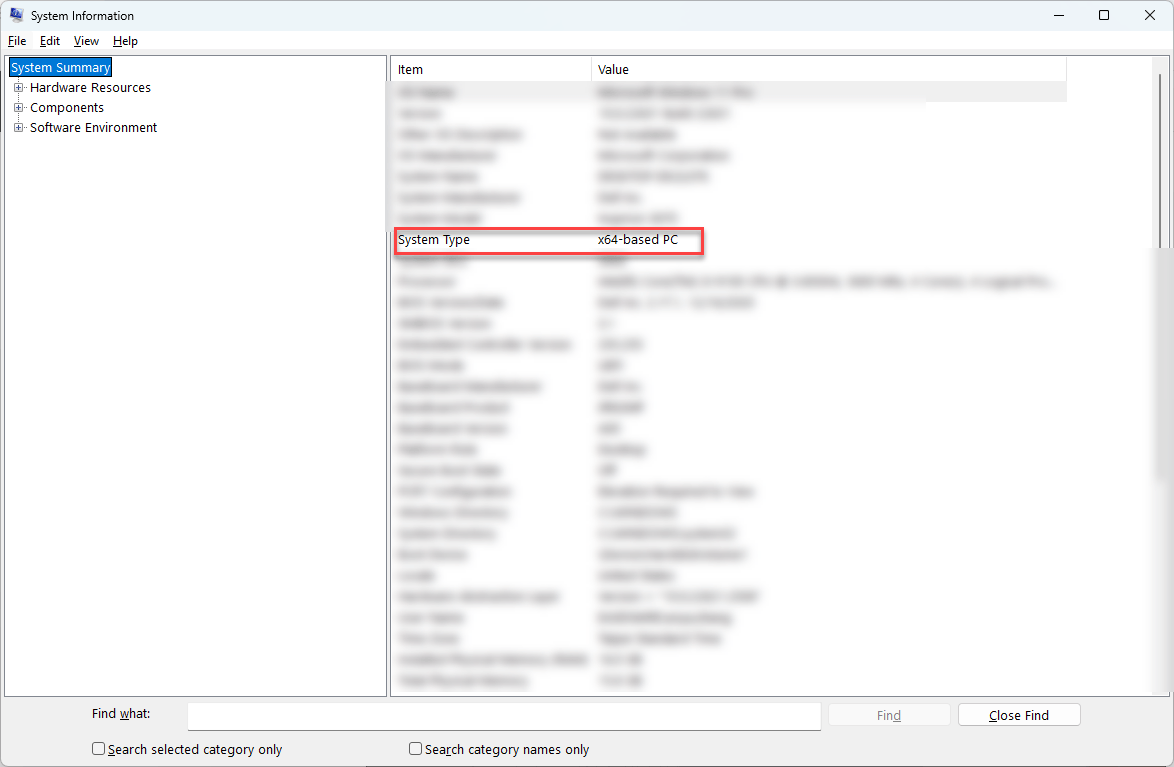
To find out the architecture of your system (whether it’s 64-bit or 32-bit), you can open System Information. Here are the quick steps:
- On your keyboard, press the Windows logo key and R keys, then type msinfo32 and press Enter.
- Locate the System type.
Once finished, check to see if you resolve this issue. If not, try the next fix, below.
Fix 2: Disable LogiLDA from Startup in Task Manager
If Fix 1 failed to fix this issue, you can try disabling LogiLDA from Startup in Task Manager. After you disabled LogiLDA from Startup in Task Manager, Logitech Download Assistant won’t run during startup to check for newly released Logitech updates, and that’s the only thing you would “sacrifice”. So, there is no harm to your PC by doing that. Here is how to do it:
- On your keyboard, press Ctrl, Shift and Esc to open Task Manager. You’ll be prompted for permission. Click Yes to open it.
- navigate to the Startup tab. Right-click Logitech Download Assistant and select Disable to disable it from startup.
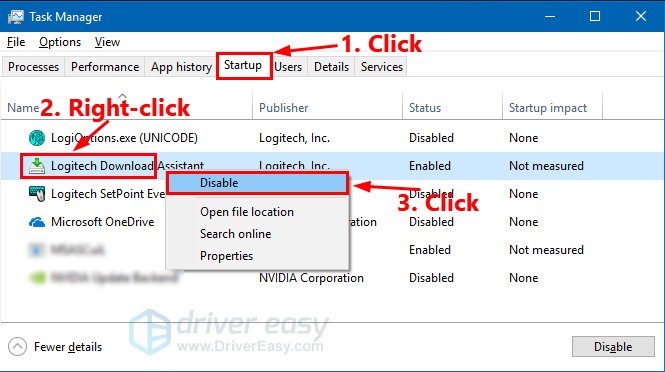
- Restart your PC.
See if you would see this error message again. If this issue persists, you can try the next fix.
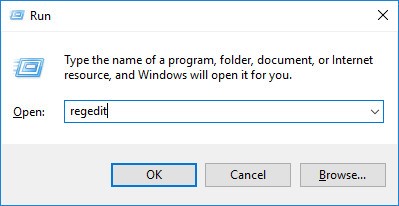
Fix 3: Delete the Logitech Download Assistant Key from Registry Editor
If this issue reappears after you disabled LogiLDA from Startup, you may need to delete the Logitech Download Assistant Key from Registry Editor. Here is how to do it:
- On your keyboard, press the Windows logo key and R at the same time to open the Run dialog. Type regedit and press Enter to open Registry Editor. You’ll be prompted for permission. Click Yes to open it.
- Follow the path to locate the Logitech Download Assistant Key:
HKEY_LOCAL_MACHINESoftwareMicrosoftWindowsCurrentVersionRun
- Right-click Logitech Download Assistant and select delete to delete this key.
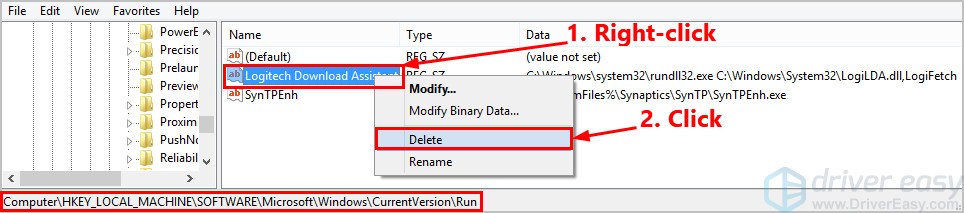
- Restart your PC.
See if you’ll get this error message again. If not, this issue is fixed. If this problem persists, you can try uninstalling the Logitech SetPoint Software.
Fix 4: Uninstall the Logitech SetPoint Software
Maybe this issue is caused by the Logitech SetPoint Software. If you installed this application on your PC, you can try uninstalling it to see if this issue reappears. Here is how to do it:
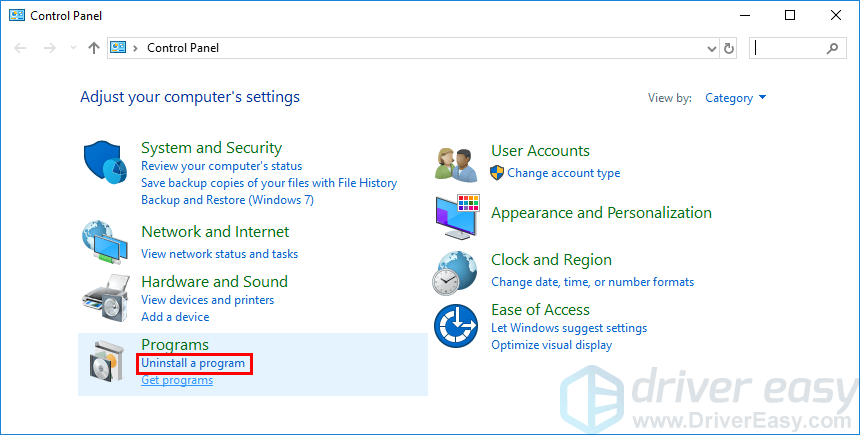
- On your keyboard, press the Windows logo key and R at the same time to open the Run dialog. Type control and press Enter to open Control Panel.
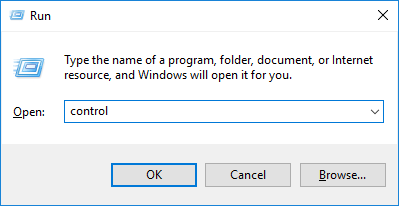
- Click Uninstall a program.
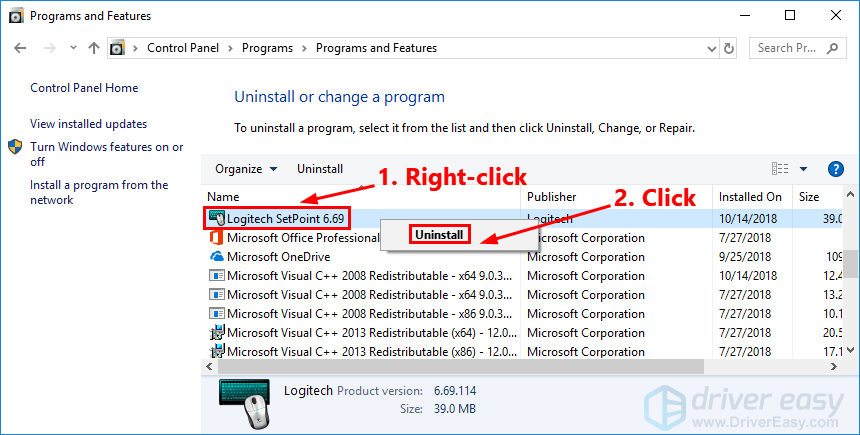
- Right-click Logitech SetPoint x.xx and click Uninstall to uninstall it.
- Restart your PC.
See if this issue reappears. If this problem persists, try uninstalling and reinstalling your Logitech mouse drivers.
Fix 5: Uninstall and Reinstall your Logitech mouse driver
If the fixes above failed to fix resolve this issue, try uninstalling and reinstalling your Logitech mouse driver. Here is how to do it:
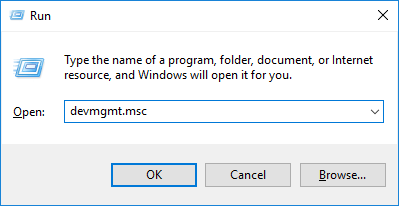
- On your keyboard, press the Windows logo key and R at the same time to open the Run dialog. Type devmgmt.msc and press Enter to open Device Manager.
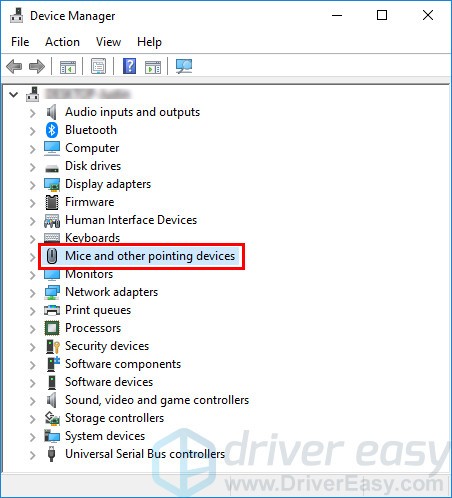
- Double-click Mice and other pointing devices to expand the list. Right-click your Logitech mouse and select Uninstall device to uninstall the driver for your Logitech mouse.
- Restart your PC. Your PC will automatically detect your Logitech mouse and reinstall the driver for it.
See if this issue persists. Normally, after reinstalling the driver, this issue can be fixed.
Bonus tip: Update your Logitech mouse driver
If you haven’t updated the driver for your Logitech mouse for a long time, we highly recommend you update it to the latest version. By updating the outdated drivers to the latest version, you can avoid many computer issues. There are two ways to update your Logitech mouse driver: manually and automatically.
Update your Logitech mouse driver manually – You can update your Logitech mouse driver manually by going to the official website of Logitech, and searching for the latest driver for your Logitech mouse. Be sure to choose the driver that is compatible with your Windows system.
or
Update your drivers automatically – If you don’t have the time, patience or computer skills to update your drivers manually, you can, instead, do it automatically with Driver Easy. You don’t need to know exactly what system your computer is running, you don’t need to risk downloading and installing the wrong driver, and you don’t need to worry about making a mistake when installing.
You can update your drivers automatically with either the 7-day free trial or the Pro version of Driver Easy. But with the Pro version, it takes just 2 clicks (and you get full support and a 30-day money-back guarantee):
- Download and install Driver Easy.
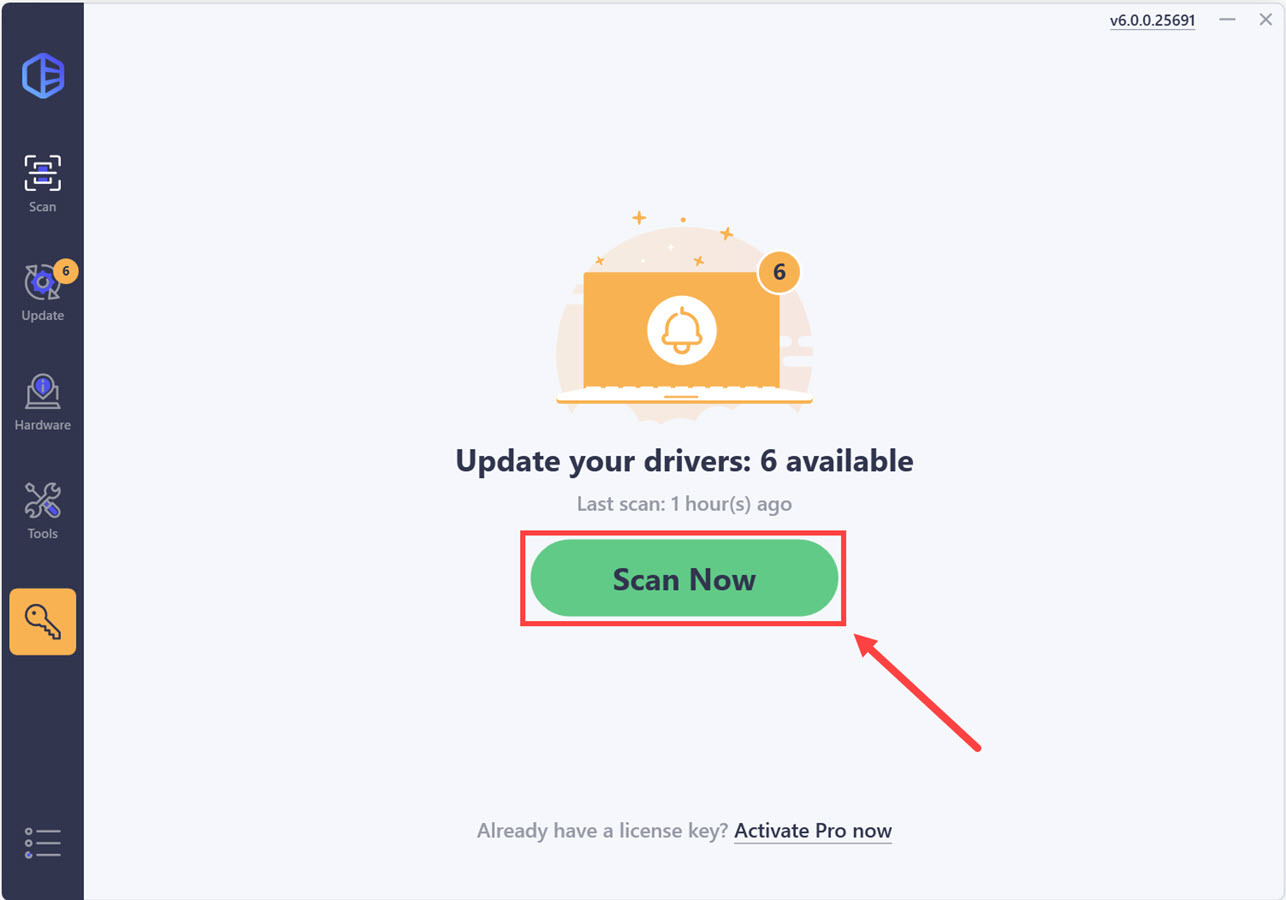
- Run Driver Easy and click the Scan Now button. Driver Easy will then scan your computer and detect any problem drivers.
- Click the Activate & Update button next to the flagged device to automatically download and install the correct version of this driver.
Or click Update All to automatically download and install the correct version of all the drivers that are missing or out of date on your system (You’ll need the Pro version for this – when you select Update All, you’ll get a prompt to upgrade. If you’re not prepared to purchase the Pro version yet, Driver Easy provides a 7-day trial at no cost, granting access to all Pro features like fast downloads and easy installation. No charges will occur until after your 7-day trial period ends.)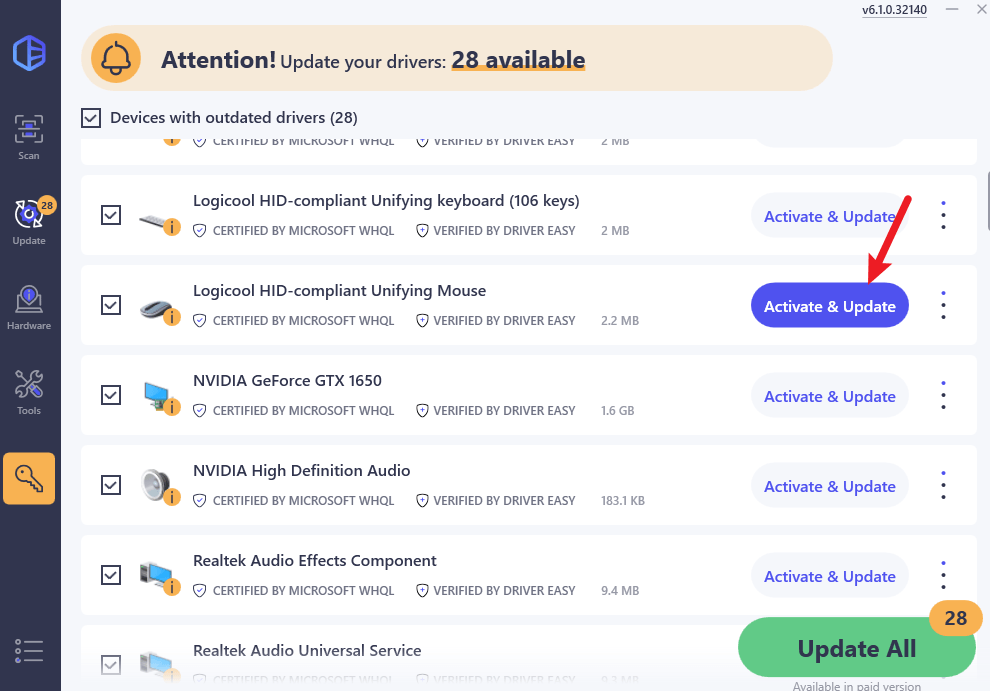
Hopefully, one of the fixes above resolved the LogiLDA.dll missing issue. Please leave your comment below if you have any questions or suggestions!