


You may familiar with the Blue Screen of Death if you’re a Windows user. But when your PC crashed and turned into a scary weird red screen, you might be confused. Don’t panic–it can be fixed.
Step 1: Enter your Windows system
If your computer restarted and entered the Windows system normally, you can move to Step 2.
Otherwise, you need to take a few minutes to read this part.
Way 1: Hard reset your computer
This is the first thing you can try when your computer didn’t restart or couldn’t enter the Windows system normally.
To hard reset your device:
- Press and hold the power button of your computer until it’s turned off.
- Disconnect the power cable and the battery (if any) from your computer.
- Leave your computer for over 1 minute.
- Re-connect the power cable (and the battery) to your computer.
- Turn on your computer.
Then check to see if you can get into the Windows system as usual. If not, don’t worry, try the next one.
Way 2: Enter safe mode
Safe mode is a diagnostic mode of Windows. When the hard reset doesn’t work, you need to enter Safe mode to trigger the problem. Safe mode will be running with a minimal set of drivers and services which is easier for you to identify the problem.
If you’re able to enter safe mode and see your screen, try the fixes below to get rid of the RSOD (Red screen of death) issue.
Step 2: Try these fixes
When you enter the Windows system, you can try these fixes. The aim of fixes is to prevent RSOD from happening again. You may not have to try them all; just work your way down the list until you find the one that works for you.
- Stop overclocking
- Check your hardware devices
- Update your device drivers
- Update your BIOS
- Repair system files
- Revert your system from a restore point
- Reset or reinstall Windows
Fix 1: Stop overclocking
Overclocking is a way to improve the performance of your equipment. Overclocking CPU or GPU could give you higher speed but this operation could also cause trouble. In the worst case, overclocking will cause harm to your hardware.
If you were overclocking your hardware and encounter with RSOD issue, you’d better stop overclocking and remove settings from your device.
To do this, you need to enter the BIOS system, then set settings back to default.
Fix 2: Check your hardware devices and temperature
It’s possible that the RSOD problem is caused by your hardware issue or computer overheating. You should take a look at your hardware devices to check for any hardware problems.
There are a few things you should do:
Check for connection issues
Check if all your connections (cable/power/…) are working properly. You may need to try using different ports or cables to fix connection issues.
Try a different display
Test your computer with another display (monitor/TV/…) to see if your red screen issue is not caused by your display.
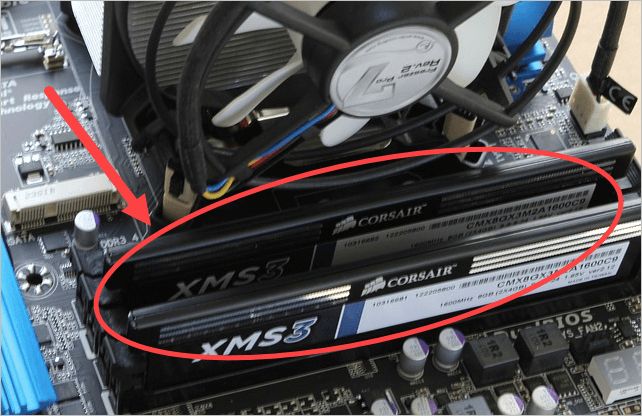
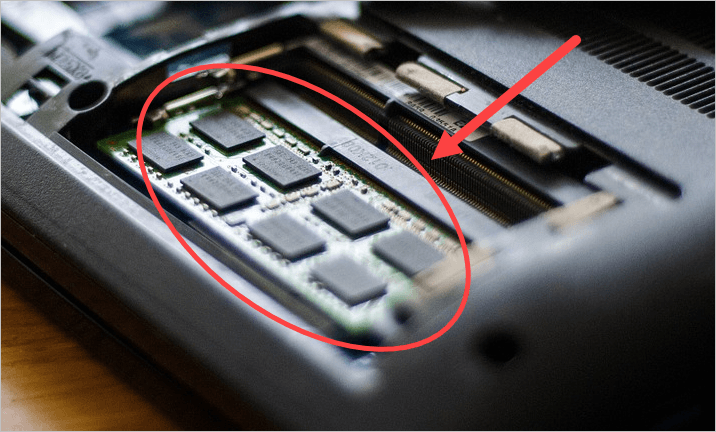
Reinstall your memory
It is also possible that your RSOD issue is happening because the memory (RAM) on your computer isn’t working properly. To fix this issue, you can try reinstalling your memory:
- Turn off your computer and disconnect the power cable and the battery (if any) from it.
- Remove the cover on your computer. (You may need to check the manual or the official guides of your product for instructions on how to do this.)
- Remove the memory from your computer. (Check out the screenshots below to see what memory looks like)
- Rub the golden contact of your memory with an eraser. (This can clean the golden contact of your memory.)
- Install the memory back to your computer.
- Place the cover back to your computer.
- Connect the power cable and the battery back to your computer.
- Turn on your computer and see if your issue is fixed.
Hopefully, this fix could help you get rid of this issue.
Fix 3: Update your device drivers
The RSOD issue could also relate to wrong and outdated device drivers. If that’s the case for you, you should update your device drivers on your computer. It’s no harm to try.
There are two ways you can update your drivers: manually and automatically.
Option 1 – Manually– You’ll need some computer skills and patience to update your drivers this way, because you need to find exactly the right the driver online, download it and install it step by step.
OR
Option 2 – Automatically (Recommended)– This is the quickest and easiest option. It’s all done with just a couple of mouse clicks – easy even if you’re a computer newbie.
Option 1 – Download and install the driver manually
You can download graphics drivers from the manufacturer official website. Search for the model you have and find the correct driver that suits your specific operating system. Then download the driver manually.
Option 2 – Automatically update drivers
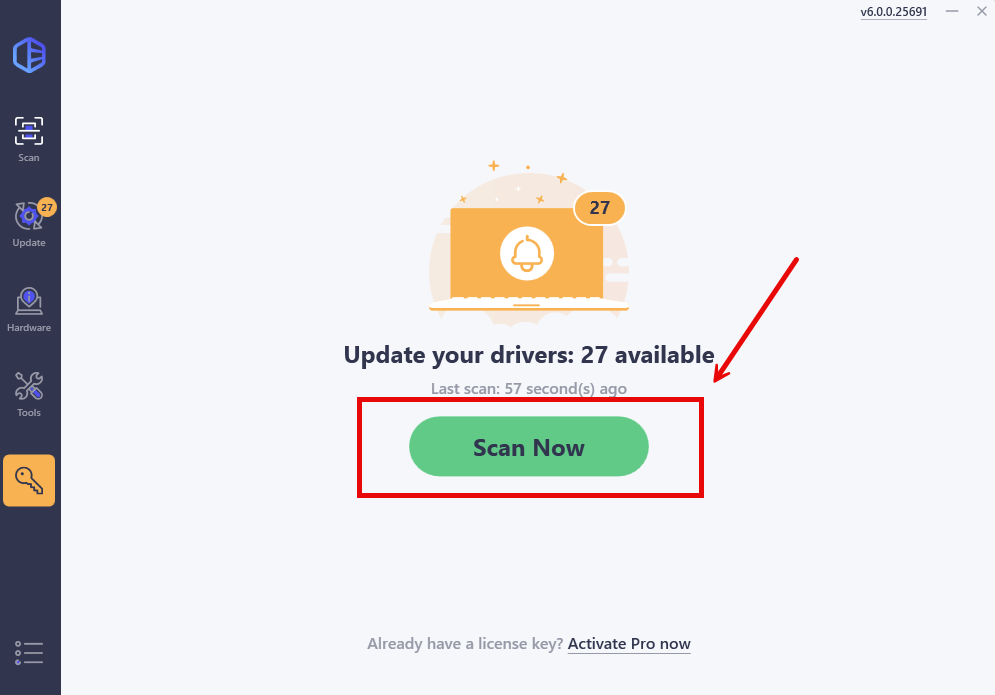
If you don’t have time or patience to manually update your drivers, you can do it automatically with Driver Easy.
Driver Easy will automatically recognize your system and find the correct drivers for it. You don’t need to know exactly what system your computer is running, you don’t need to risk downloading and installing the wrong driver, and you don’t need to worry about making a mistake when installing.
You can update your drivers automatically with either the 7-day free trial or the Pro version of Driver Easy. But with the Pro version it takes just 2 clicks (and you get full support and a 30-day money back guarantee):
- Download and install Driver Easy.
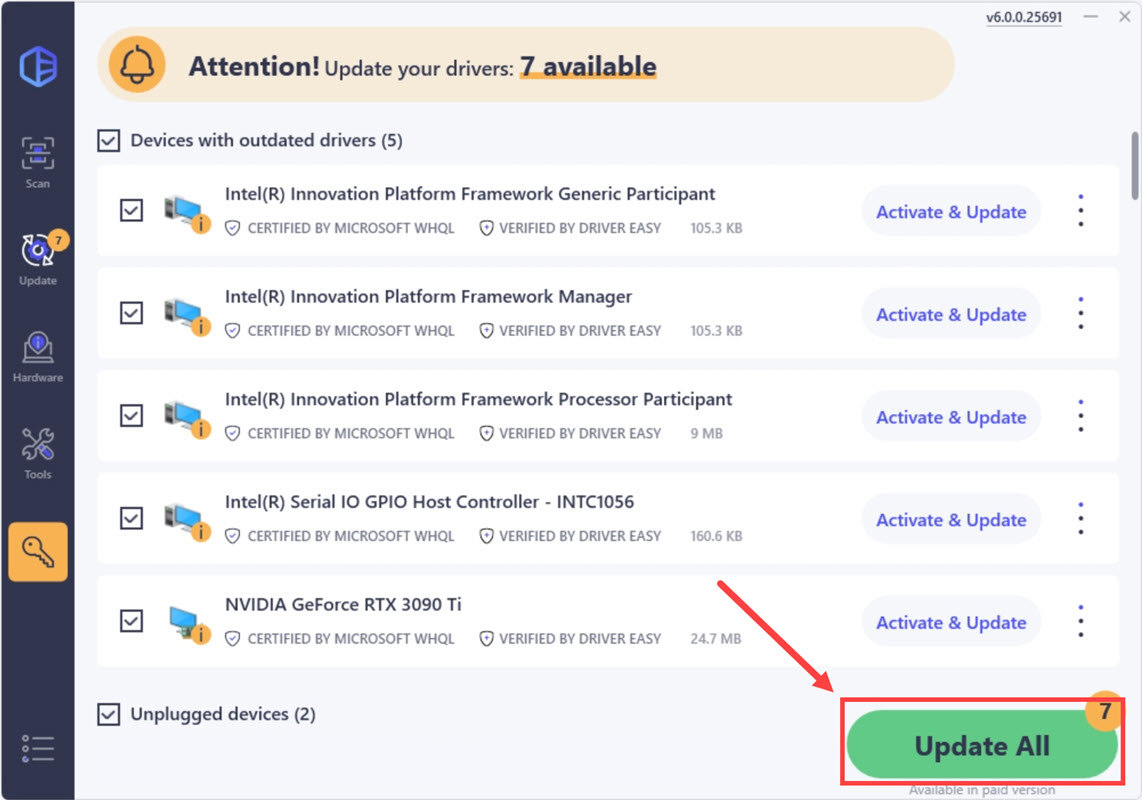
- Run Driver Easy and click the Scan Now button. Driver Easy will then scan your computer and detect any problem drivers.
- Click Update All to automatically download and install the correct version of all the drivers that are missing or out of date on your system. (Note: Upon selecting the ‘Update All’ option, you will be asked to upgrade to the Pro version. A 7-day free trial, including all Pro features like high-speed download and one-click install, is available if you’re not ready for the Pro version yet. Rest assured, you won’t incur any charges until after the 7-day trial.)
Be sure to attach the URL of this article if needed for more expedient and efficient guidance.
Fix 4: Update your BIOS
BIOS (Basic Input/Output System) performs the hardware initialization and jumpstarts the processes during the booting process of your computer. In some cases, the red screen on Windows 10 may be related to it.
To fix it, we could try updating our BIOS.
Because different motherboard manufacturers have different instructions, the steps below are an overall guide.
- On your keyboard, press the Windows logo key and R at the same time, then copy & paste msinfo32 into the box and press Enter.
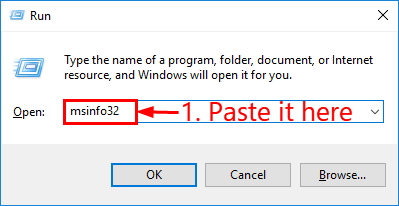
- In the information in BIOS Version/Date and go to the manufacturer’s official website.
- Check out the Support (or Download) section and search for the latest BIOS update.
- Download the file and install it properly.
- Restart your computer and check if this red screen error appears or not.
Fix 5: Repair system files
The dreaded “Red Screen of Death” often strikes when critical Windows system files become corrupted, preventing your PC from functioning normally. Fortunately, Windows includes two built-in repair tools: System File Checker (SFC) and Deployment Image Servicing and Management (DISM), allowing you to repair any corrupted system files and potentially fix the issue.
Here are the steps:
Step 1. Scan corrupt files with System File Checker
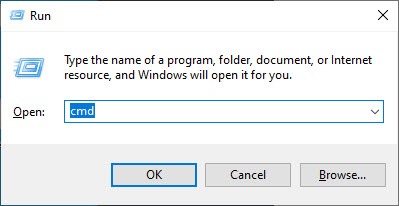
1) On your keyboard, press the Windows logo key and R at the same time to open the Run box. Type cmd and press Ctrl+Shift+Enter to run Command Prompt as administrator.
Click Yes when prompted for permission to make changes to your device.
2) In the Command Prompt, type the following command and hit Enter.
sfc /scannow
3) System File Check will begin to scan all system files and repair any corrupted or missing ones it detected. This may take 3-5 minutes.
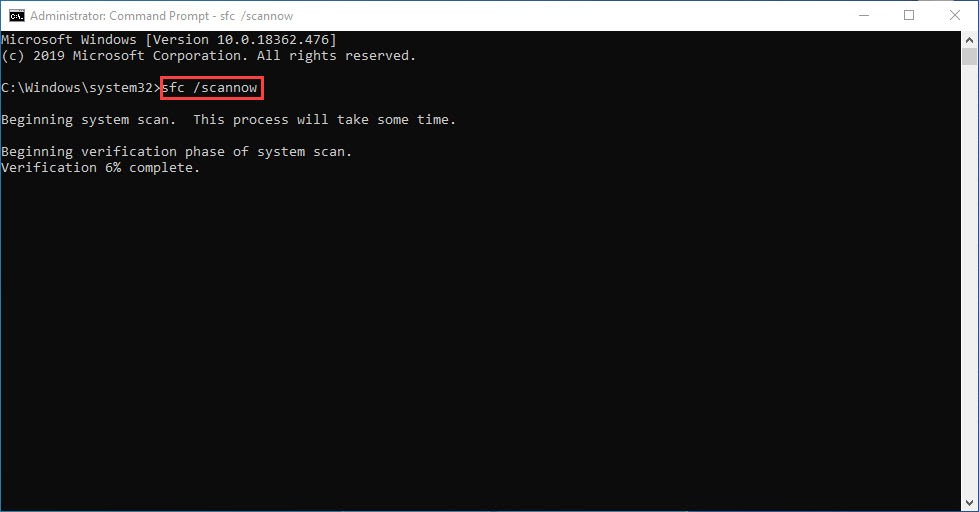
4) You may receive something like the following messages after the verification.
- no errors
- it fixed some errors
- could not fix all errors
- could not fix errors at all
- ……
No matter what message you receive, you can try running dism.exe (Deployment Image Servicing and Management) to further scan the health of your PC.
Step 2. Run dism.exe
1) Run Command Prompt as admin and enter the following commands.
- This command line will scan the health of your PC:
dism.exe /online /cleanup-image /scanhealth
- This command line will restore the health of your PC:
dism.exe /online /cleanup-image /restorehealth
2) After the restore health process finishes, you may get some error messages.
- If restore heath gave you errors, you can always try this command line. This will take up to 2 hours.
dism /online /cleanup-image /startcomponentcleanup
- If you get Error: 0x800F081F with the restore health scan, reboot your PC and run this command line.
Dism.exe /Online /Cleanup-Image /AnalyzeComponentStore
If the System File Check finds any files corrupted, follow the on-screen instructions to repair them, and then restart your computer for the changes to take full effect.
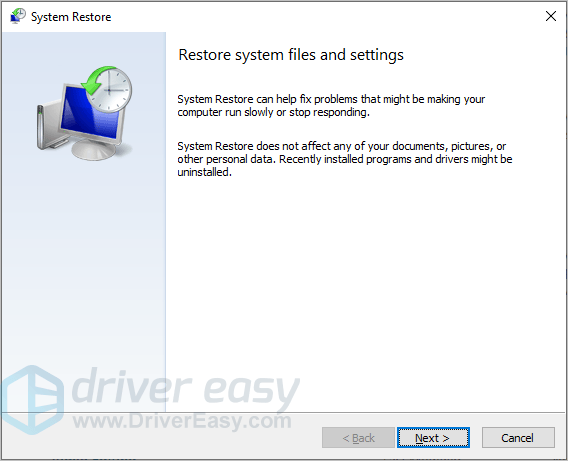
Fix 6: Revert your system from a restore point
You can also fix your red screen issue by reverting your Windows system to a previous state. You do this with System Restore. Here’s how:
- On your keyboard, press the Windows logo key and R to open the Run dialog.
- Type rstrui.exe in the Run box, then press Enter.
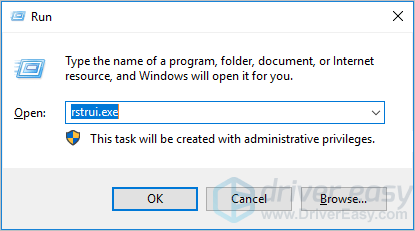
- Follow the on-screen instructions of the System Restore wizard to restore your system from a restore point.
Fix 7: Reset or reinstall Windows
If all else fails, you may have to reset Windows, or maybe even reinstall it together. We all know reinstalling will delete all the data on your hard drive, you have to back up all your important files before doing it.
But treat these options as a last resort, because they both take quite a long time.
We hope you find the above information helpful. And if you have any ideas, suggestions, or questions, feel free to leave a comment below.