


As a Windows 10 user, you may have noticed that: Windows 10 Safe Mode F8 key no longer works. You probably can’t help but wonder: does Windows 10 remove this feature? The answer is NO. You can still enter the Safe Mode by pressing the F8 key. You may need to manually re-enable this feature with only a few simple steps.
This article introduces how to fix Windows 10 Safe Mode F8 not working issue, and also provides alternative methods for you to start Safe Mode. So you can try whichever way you prefer.
Fix Windows 10 F8 key to start Safe Mode
There is a workaround to re-enable Windows 10 F8 key to start Safe Mode easily. You can skip to How to fix it directly if you already know the reason why the F8 key doesn’t work in Windows 10.
Why doesn’t Windows 10 F8 key work?
In Windows 7, you can easily enter the Safe Mode by pressing the F8 key before Windows starts loading, but this has changed in Windows 8 and Windows 10. The reason is that Microsoft has reduced the time for the F8 key to almost zero interval (less than 200 milliseconds). As a result, people almost can’t press the F8 key within such a short time, and there is little chance of detecting the F8 key to invoke the boot menu and then start Safe Mode.
If you are lucky enough, you can keep pressing the F8 key during the boot, then you can sometimes get into the screen of Safe Mode boot options. But most of the time, you might try in vain. However, the good news is that you can still get your F8 key to work again if you can access to your Windows normally. You just need to manually re-enable this feature.
How to fix it?
Note: You can try this method to get your F8 key to work again only when your Windows can boot normally. If you can’t start Windows normally, you may start Safe Mode when your Windows can’t start normally.
As known, F8 no longer works in starting Safe Mode. But you can re-activate it with the Boot Configuration Data (BCD) Edit command. BCD Edit is a built-in tool to control how the operating system is started. With that, you can re-enable F8 boot menu easily. Follow these steps:
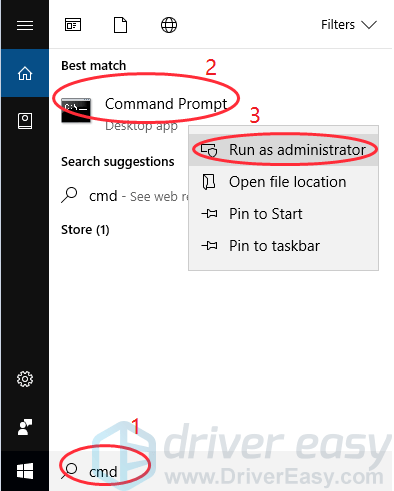
1) Type cmd in the search box, right-click Command Prompt to select Run as administrator, then click Yes to confirm.
2) Copy the command below and paste it into the Command Prompt, and press Enter.
bcdedit /set {default} bootmenupolicy legacy
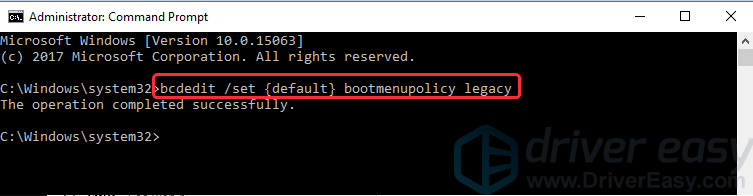
3) After the operation is completed successfully, restart your PC.
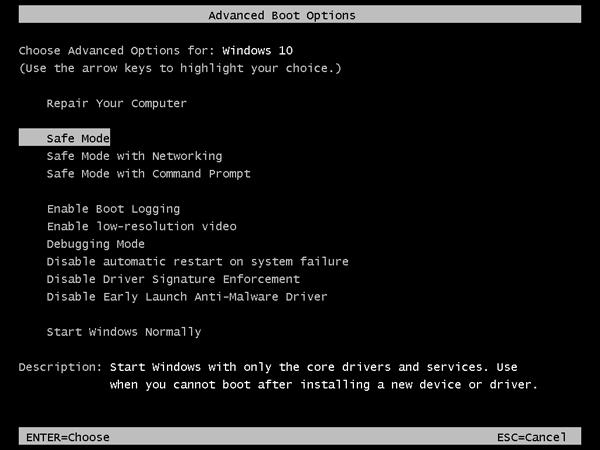
4) Before the Windows logo appears, press F8 to access Advanced Boot Options as the screenshot below. Select the Safe Mode you want to boot into, and press Enter.
Safe Mode: Safe Mode with a minimal set of drivers and services.
Safe Mode with Networking: Safe Mode with the network drivers and services needed to access the Internet.
Safe Mode with Command Prompt: Safe Mode with a Command Prompt window instead of the usual Windows interface. This option is intended for IT pros and system admins.
Then your Windows will start into Safe Mode.
Note: After entering Safe Mode, you may see this message on your screen. This is normal because many applications don’t run in Safe Mode. Just click Close to close the window.

Alternative methods to start Safe Mode
In addition to F8 boot menu options, Windows 10 also provides other effective methods for you to enter Safe Mode. You can also try the methods below.
Method 1: Start Safe Mode from the Start menu
If you can start and run your Windows properly, you can try entering Safe Mode from the Start menu on your screen. This is a worth considering method as well:
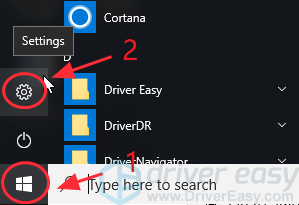
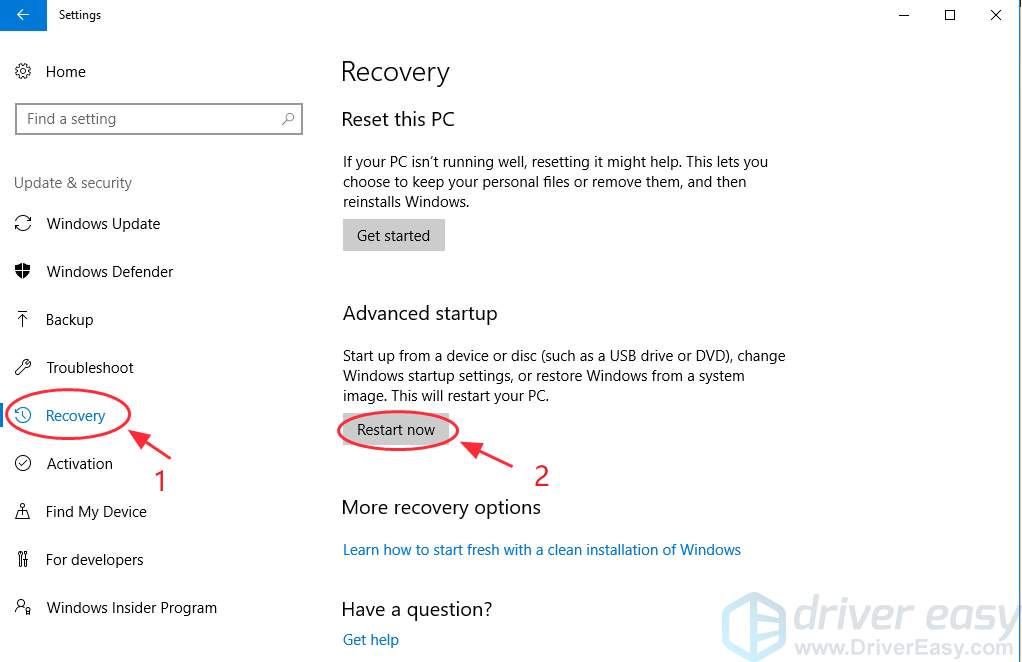
1) Click the Start button at the bottom left, and then click the Settings button.
2) Click Update & security.

3) Click Recovery on the left pane, then click Restart now.
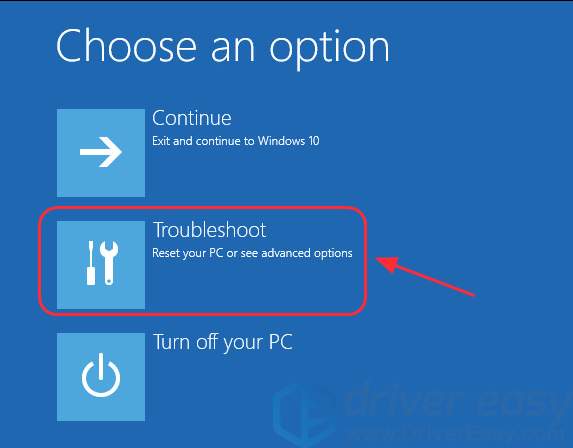
4) Your Windows will automatically restart. Then the Advanced troubleshooting tools screen will appear, and click Troubleshoot.
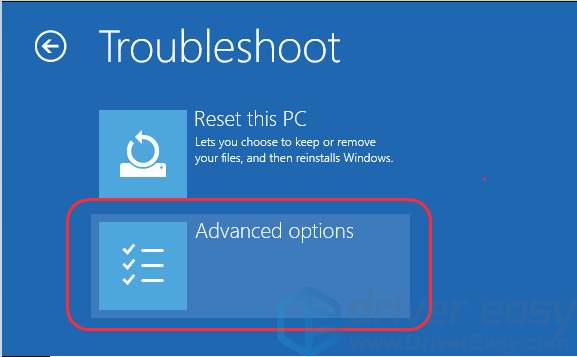
6) Click Startup Settings.
7) Click Restart. Then your computer will automatically restart and a screen appears to show different startup options.
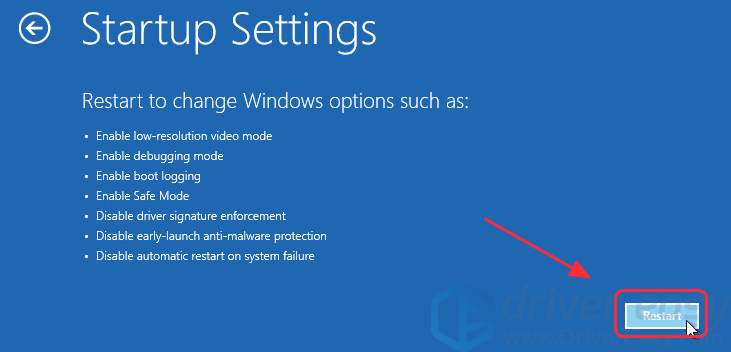
8) On your keyboard, click the 4 number key or F4 key to enter Safe Mode. (You can also press the corresponding key to enter Safe Mode with networking/Command Prompt. That depends on your needs.)

Tips: You have another choice to start Safe Mode from the Start menu:
1) Click the Start button at the bottom left corner, and right-click the power button.
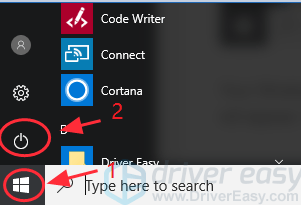
2) Hold down the Shift key on your keyboard when you click Restart.
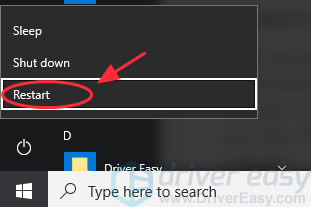
Your Windows will automatically restart. Then the Advanced troubleshooting tools will appear. Repeat the steps from step 4) above to continue.
Method 2: Start Safe Mode by System Configuration
When you are troubleshooting your system, you may need to boot into Safe Mode several times. Repeating all the steps above to enter Safe Mode would be a huge nuisance. In that case, you can start Safe Mode by System Configuration to save your time. This will help boot into Safe Mode every time you restart your computer.
System Configuration is also referred to MSConfig. It’s a system utility to troubleshoot the Windows startup process. It can disable or re-enable the programs and device drivers that run during the boot process. Then you will be able to determine the cause of your problem.
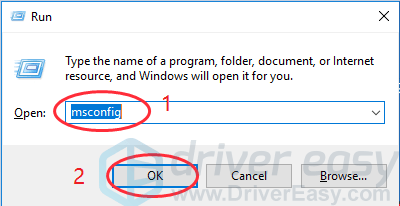
1) On your keyboard, press the Windows logo key  + R at the same time to invoke the Run box.
2) Type msconfig in the Run box and click OK.
3) Click Boot. In Boot options, check the box next to Safe boot and select Minimal, and click OK. Or you can select other Safe Mode options according to your demand.
Minimal: normal Safe Mode.
Alternate shell: Safe Mode using only the Command Prompt.
Active Directory repair: Used only for repairing an Active Directory server.
Network: Safe Mode with networking support.
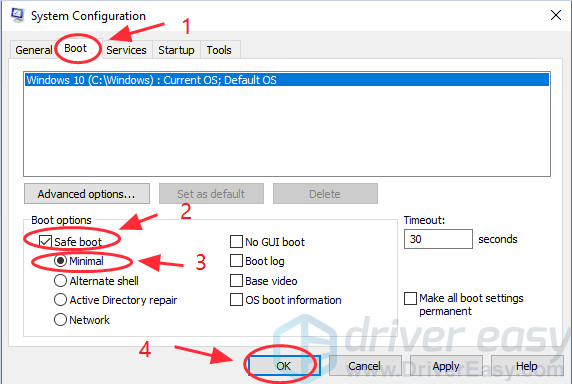
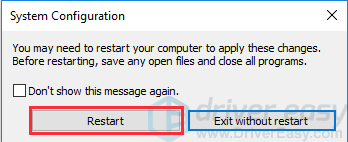
4) Click Restart to apply the changes. Then your Windows will restart into Safe Mode.
How to exit Safe Mode from System Configuration
Windows will start Safe Mode with System Configuration every time you boot your computer. So if you don’t want Safe Mode, you can exit Safe Mode by following these steps:
1) On your keyboard, press the Windows logo key + R at the same time to invoke the Run box.
2) Type msconfig in the Run box and click OK.
3) Click Boot. In Boot options, uncheck the box next to Safe boot, and click OK.

4) Click Restart to apply the changes and restart your computer in normal mode.
Method 3: Start safe mode when your Windows can’t start normally
As mentioned above, Safe Mode runs with a minimum set of drivers and programs. Generally speaking, if your Windows can’t boot normally, there won’t be a problem to enter Safe Mode as well. Therefore, you can reboot your computer twice in a row to access the Automatic Repair screen where you can initiate Safe Mode. Follow the instructions below.
Note: Before getting started, make sure your computer is off.
1) Press the power button to turn on your computer, then hold the power button to shut it down (about 5 seconds). Repeat this more than twice until you see the Preparing the Automatic Repair screen.
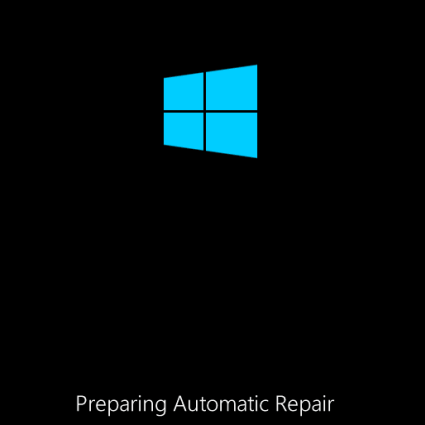
Note: this step helps to activate the Preparing Automatic Repair screen. If your Windows doesn’t restart normally, this screen pops up and Windows tries to fix the problem by itself. So if you see this screen for the first time when you power on the computer, just skip to the next step.
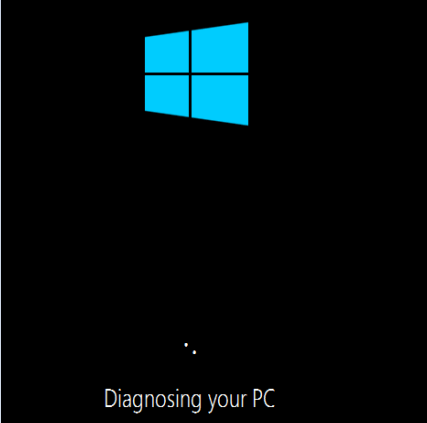
2) Then the Diagnosing your PC screen will appear.
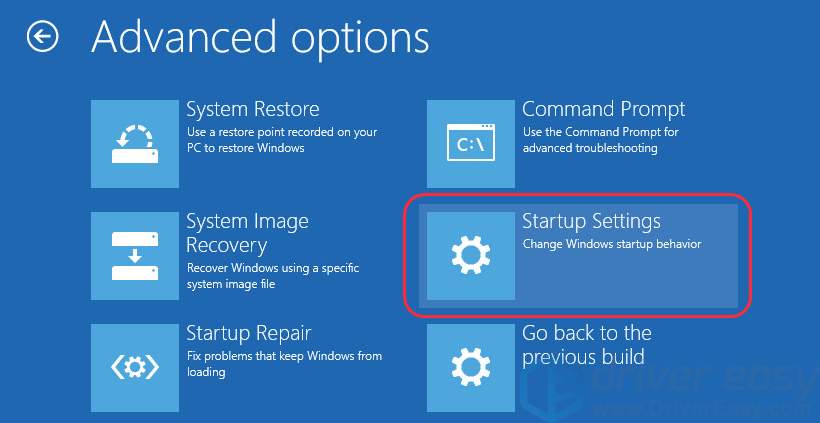
3) The Startup Repair screen appears, and click Advanced options.
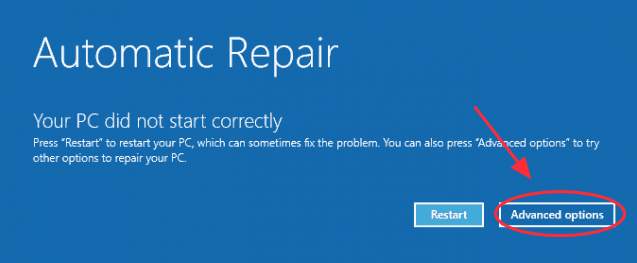
4) You will enter the Advanced troubleshooting tools screen, then click Troubleshoot.
Then repeat the instructions from steps 5) to 8) in Method 2 above to finish the settings, and your Windows will boot into Safe Mode.
These are the easy methods to enter Safe Mode. Hope it helps solve your issue. Feel free to comment below if you have any questions, and we will see what more we can further help.