


Found your XP-Pen pen or tablet not working properly? You’re not alone. Many users are reporting the same XP Pen not working issue, but the good new is that this problem is not hard to fix.
Before getting started:
Before trying the more complicated solutions below, you need to do some basic troubleshooting first:
- Make sure your XP Pen is fully charged.
- Re-connect the graphics tablet to your PC, and you can also insert the USB cable or wireless receiver to another USB port to test.
Try these fixes:
If the steps above don’t help, here are 3 effective fixes for you. You don’t have to try them all; just work your way down the list until you find the one that does the trick.
Fix 1 – Turn off Sleep Mode
If you have trouble using the XP-Pen pen after waking the computer from the Sleep Mode, try to disable this mode. Here’s how:
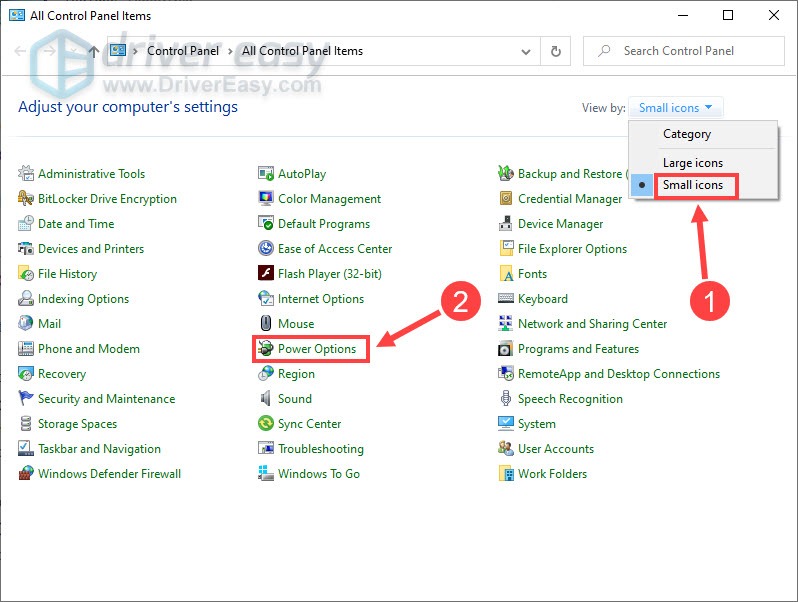
- On your keyboard, press the Windows logo key and R at the same time to invoke the Run command. Then, type control and click OK.

- Select Small icons from the drop-down menu next to View by, and click Power Options.
- Click Change plan settings next to your preferred plan.

- Set the time to put the computer to sleep as Never and click Save changes.

After turning off the Sleep Mode, reboot your PC and test if your XP Pen works properly. If not, check out the next fix below.
Fix 2 – Update your tablet driver
A variety of device glitches comes down to the driver issue. If your XP-Pen tablet or pen isn’t working, there is possibly something wrong with your tablet driver and you should update it to fix the problem. To update the driver, here are two options for you: manually or automatically.
Option 1 – Download and install the driver manually
XP-Pen keeps updating drivers. To get them, you need to go to its official support website, find the drivers corresponding with your specific flavor of Windows version (for example, Windows 32 bit) and download the driver manually.
Once you’ve downloaded the correct drivers for your system, double-click on the downloaded file and follow the on-screen instructions to install the driver.
Option 2 – Automatically update the tablet driver (recommended)
If you don’t have the time, patience or computer skills to update the tablet driver manually, you can do it automatically with Driver Easy.
Driver Easy will automatically recognize your system and find the correct drivers for it. You don’t need to know exactly what system your computer is running, you don’t need to risk downloading and installing the wrong driver, and you don’t need to worry about making a mistake when installing.
You can update your drivers automatically with either the FREE or the Pro version of Driver Easy. But with the Pro version it takes just 2 clicks:
- Download and install Driver Easy.
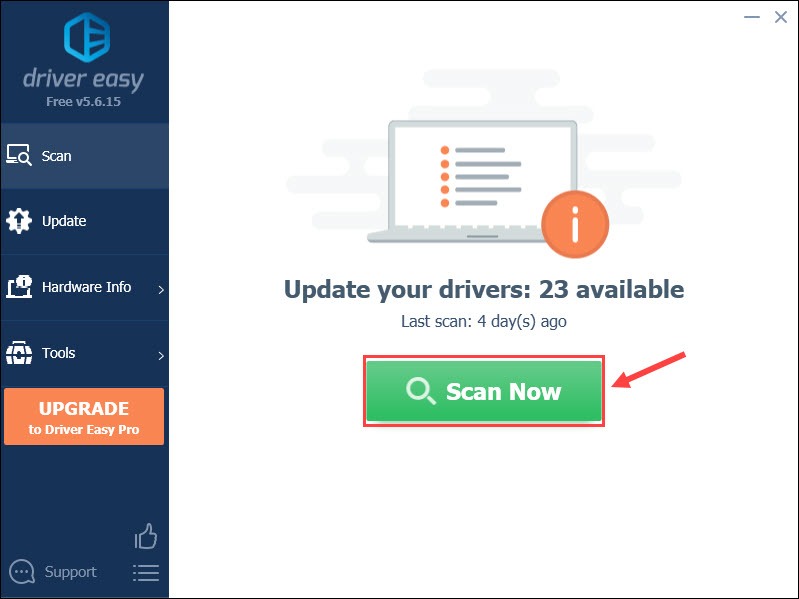
- Run Driver Easy and click the Scan Now button. Driver Easy will then scan your computer and detect any problem drivers.
- Click the Update button next to the flagged Pentablet HID driver to automatically download the correct version of that driver, then you can manually install it (you can do this with the FREE version).
Or click Update All to automatically download and install the correct version of all the drivers that are missing or out of date on your system. (This requires the Pro version which comes with full support and a 30-day money back guarantee. You’ll be prompted to upgrade when you click Update All.)
If you need assistance, please contact Driver Easy’s support team at support@drivereasy.com.
The right and up-to-date tablet driver should make your XP Pen devices work perfectly as always. But if this method doesn’t help, keep reading the third fix below.
Fix 3 – Disable Windows Ink Workspace
Windows Ink Workspace is a new feature designed to improve the users’ experience with their digital pens on Windows 10. While in some cases, it doesn’t bring the expected result and can cause brush lags or other similar issues with your pens. Simply remove it via the following steps and see how things go.
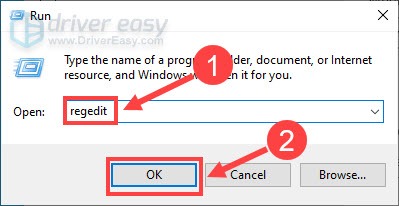
- On your keyboard, press the Windows logo key and R at the same time to open the Run command. Then type regedit in the field and click OK.
- Navigate to the following path on the left pane:
HKEY_LOCAL_MACHINE\SOFTWARE\Policies\Microsoft\WindowsInkWorkspace.
If you don’t see this folder, right-click the Microsoft key and select New > Key to create WindowsInkWorkspace.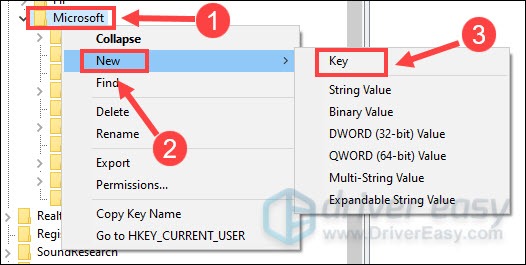
- On the right pane, double-click the AllowWindowsInkWorkspace and set the value data to 0. Then, click OK.
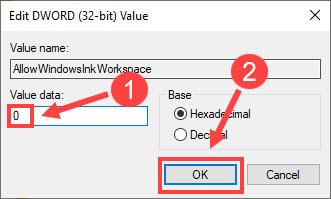
As above, if you don’t see this setting, right-click any empty space on the right pane and select New > DWORD (32-bit) Value. Then name the new key as AllowWindowsInkWorkspace and set its value data to 0.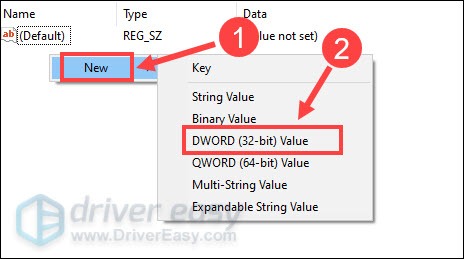
- Restart your PC to apply the changes.
After you complete the process, your XP Pen should return to the normal state now.
Hopefully one of the fixes above solves your XP Pen not working issue. If you have further questions or suggestions, please feel free to leave a comment below.