


If you’re wondering how to switch to Windows 11, you’ve come to the right place! This guide will show you the easiest way to upgrade your Windows 7, 8, or 10 device to Windows 11 step by step.
Table of contents
Is My PC Eligible for the Upgrade?
Not every PC is able to run Windows 11. If you’re using an old PC, chances are it might not be able to install the new OS. So before you start, you want to make sure your device is compatible. Or, in other words, your computer meets the minimum system requirements for installing Windows 11.
Option 1 – Check Windows 11 Minimum Requirements
| Processor | 1 gigahertz (GHz) or faster with 2 or more cores on a compatible 64-bit processor or System on a Chip (SoC). |
| RAM | 4 GB |
| Storage | 64 GB or larger |
| System firmware | UEFI, Secure Boot capable |
| TPM | Trusted Platform Module (TPM) version 2.0. |
| Graphics card | Compatible with DirectX 12 or later with WDDM 2.0 driver. |
| Display | High definition (720p) display that is greater than 9” diagonally, 8 bits per color channel. |
Option 2 – Run Microsoft PC Health Check Tool
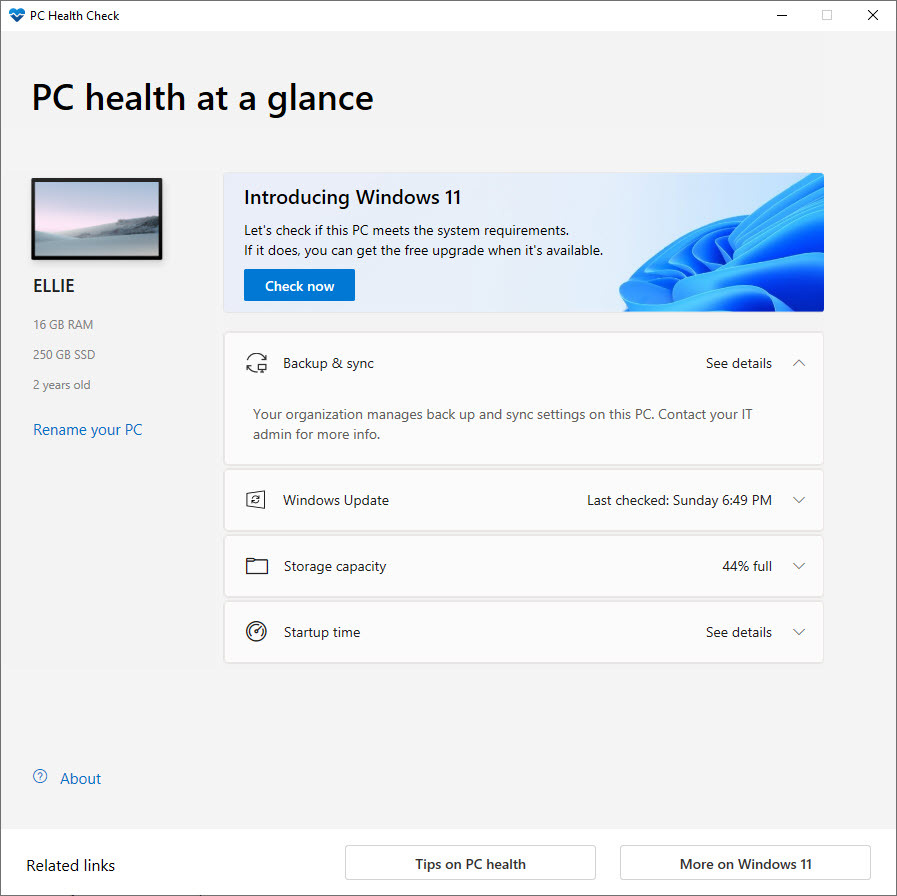
If you’re running Windows 10, the easiest way to verify if your computer meets these requirements is to run Microsoft PC Health Check Tool.
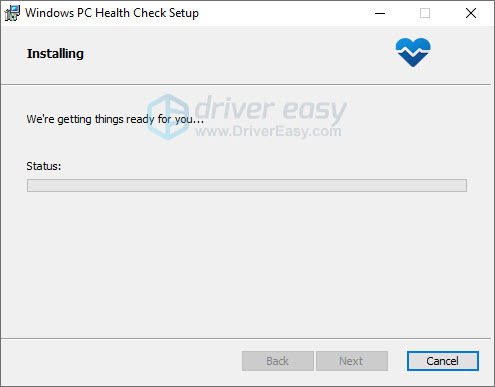
1) Download PC Health Check Tool from the Microsoft website.

2) Double-clicked the downloaded file and follow the on-screen instructions to install the tool.
3) Click Check now to see if your PC is ready for the upgrade.
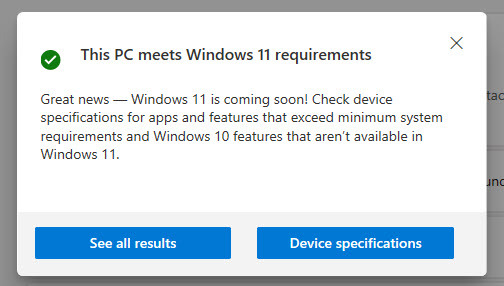
4) If you see the message saying The PC meets Windows 11 requirements and you’re prepared to try the new build, read on and see how to upgrade to Windows 11 step by step.
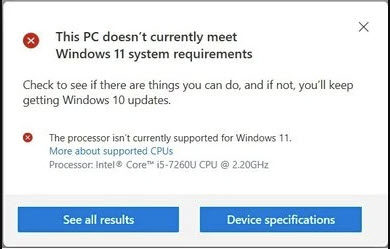
If, unfortunately, you get the message saying “This PC doesn’t currently meet Windows 11 system requirements”, meaning your PC can’t handle the demands of Windows 11, don’t give up yet!
Skip to the final part of this post to see what you can do when your PC does meet the requirements, and whether you really have to upgrade to Windows 11 or not.
How to Upgrade Windows 10/7/8.1 to Windows 11?
Microsoft offers many ways for users to get the new Windows 11 OS. We’ve listed them below with step-by-step instructions. You don’t have to try them all, just pick the method that works best for you.
Method 1 – Check for Windows Update in Settings (for Windows 10 users)
If you’re on a Windows 10 device, you can check if Windows 11 is ready for your device through system settings. This is the easiest way to perform the upgrade on a compatible device.
1) Make sure you’ve got everything you need backed up.
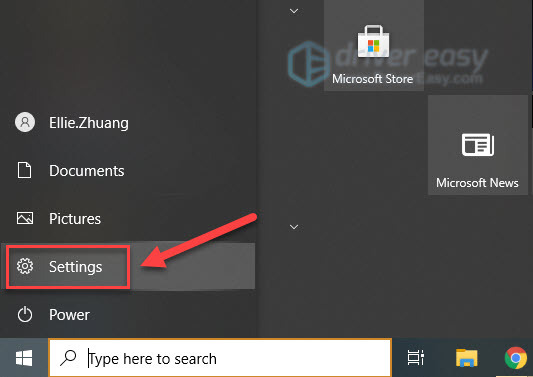
2) Click the Windows logo on the lower left and select Settings.
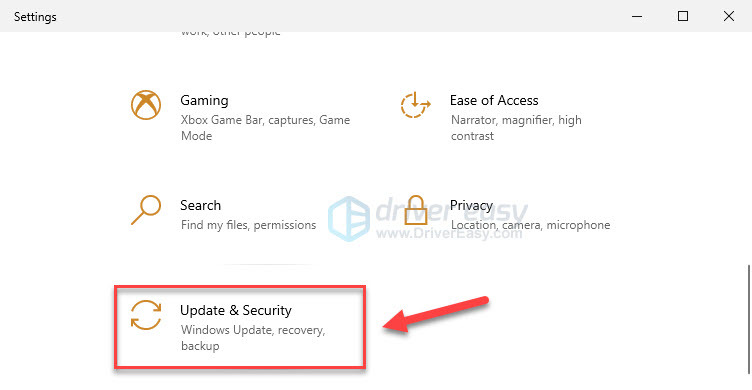
3) Select Update & Security.
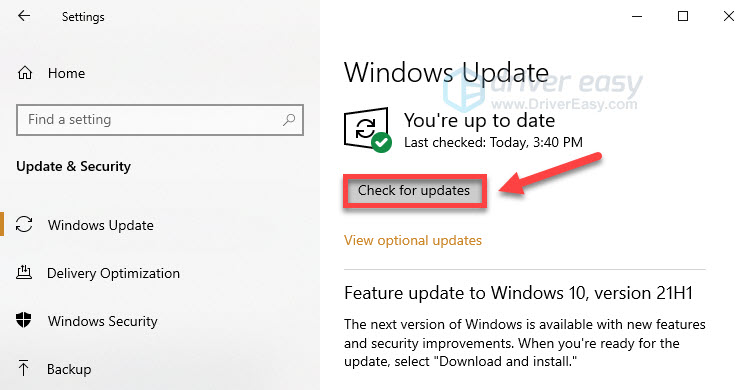
4) Click Check for Updates. This might take a few minutes, wait for the process to complete.
You might see a list of updates, go through the list and look for Windows 11 upgrade. If it’s on the list, select the file and click Download and install. If it’s not there, try the next method.
Method 2 – Use the Windows 11 Installation Assistant (for Windows 10 users)
It’s recommended that you wait until your device has been offered the upgrade to Windows 11. But if your computer meets the system requirement to run Windows 11 and you don’t feel like waiting, then follow the instructions below:
1) Make sure you’ve got everything you need backed up.
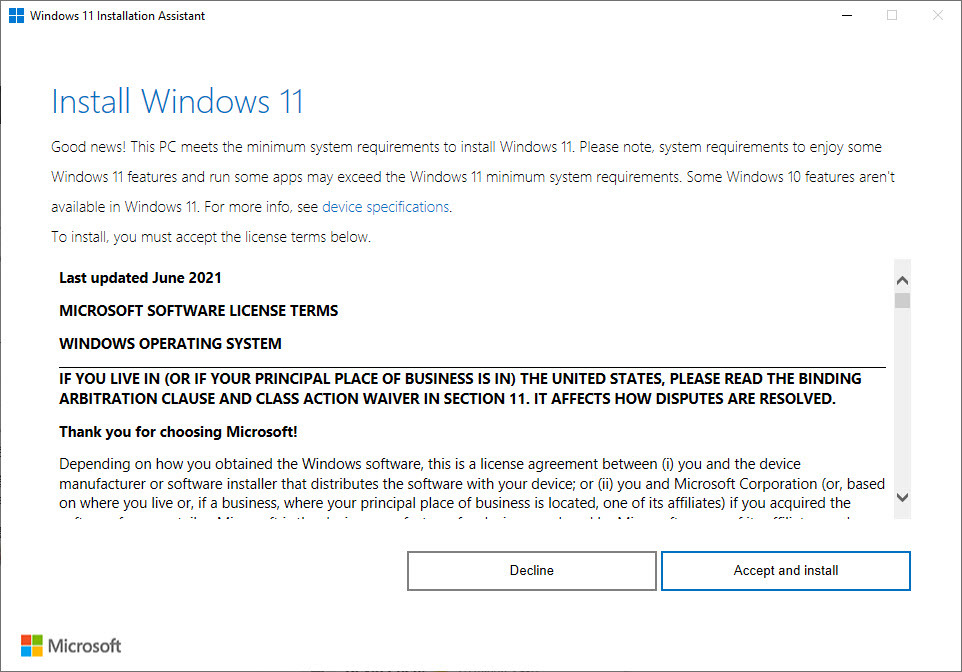
2) Download Windows 11 Installation Assistant from the Microsoft official website and install it.
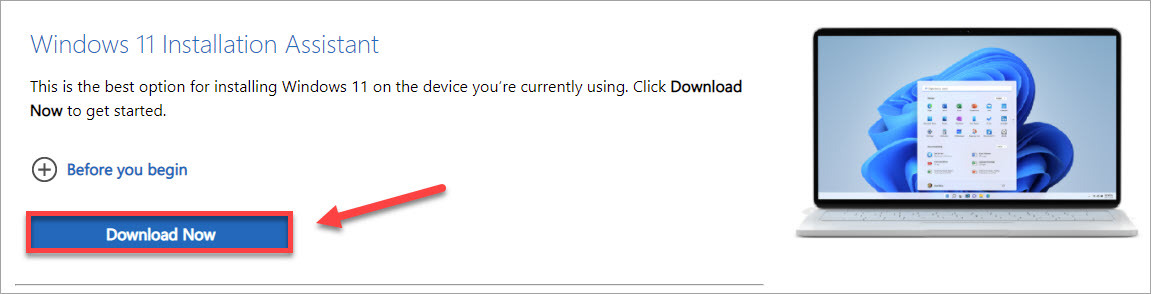
3) Open the app and follow the on-screen instruction to install Windows 11 on your device.
Method 3 – Upgrade to Windows 11 using ISO (for Windows 7/8/10 users)
You can also upgrade your device using Windows 11 Disk Image (ISO).
1) Make sure you’ve got everything you need backed up.
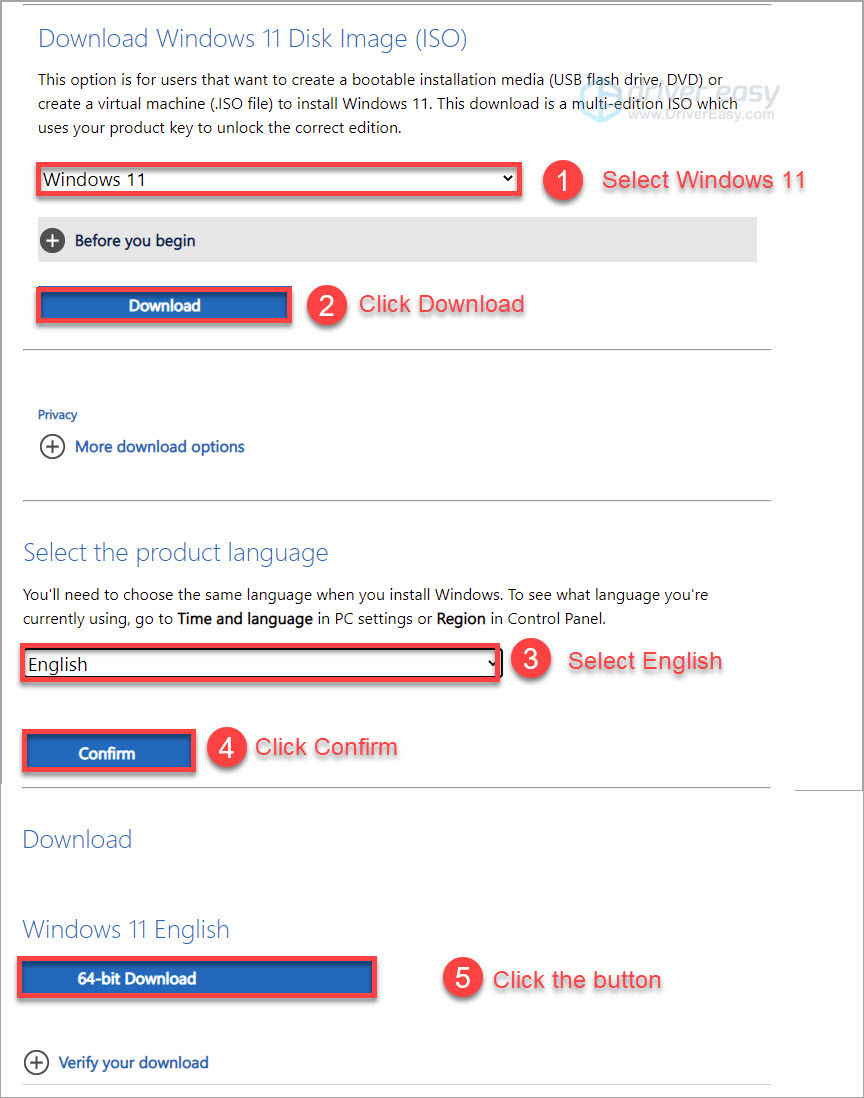
2) Download the Windows 11 ISO file from the Microsoft official website.
Just select Windows 11 from the download box, click Download, and select the language you’re using. Click Confirm > 64-bit Download.
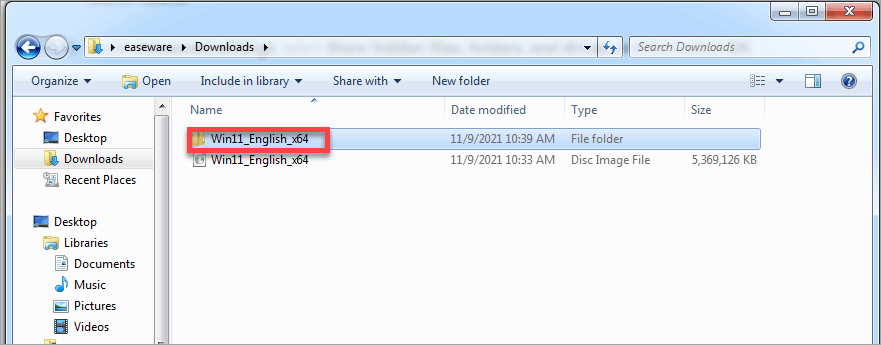
3) Right-click the downloaded ISO file, extract the ISO files.
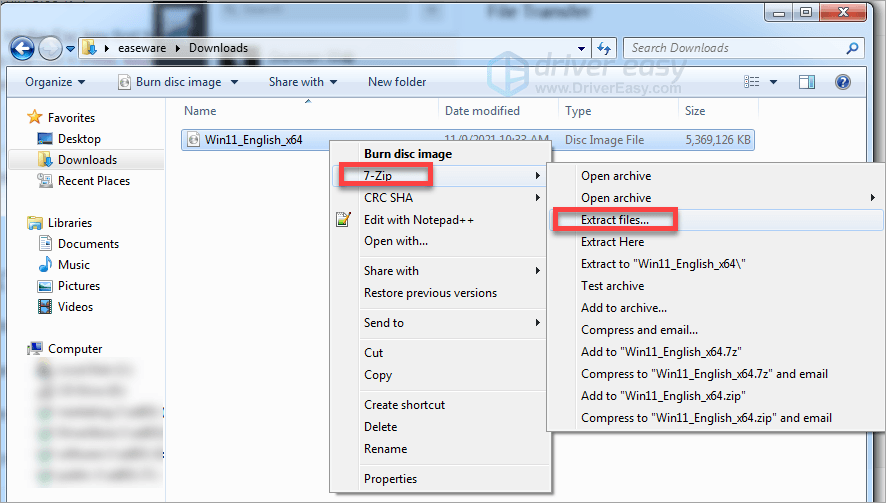
4) Find extracted ISO files in the destination folder.
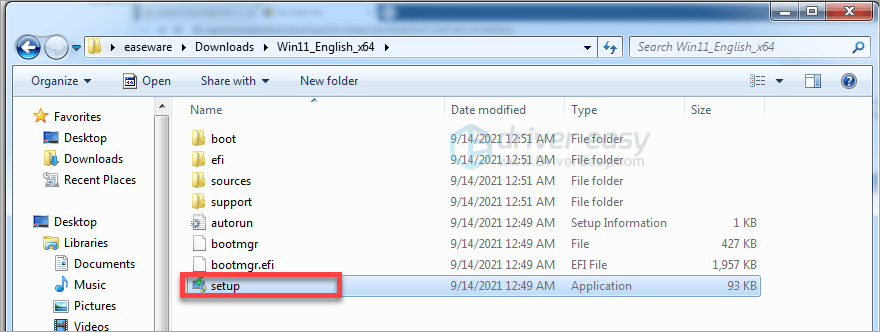
5) Double-click Setup.
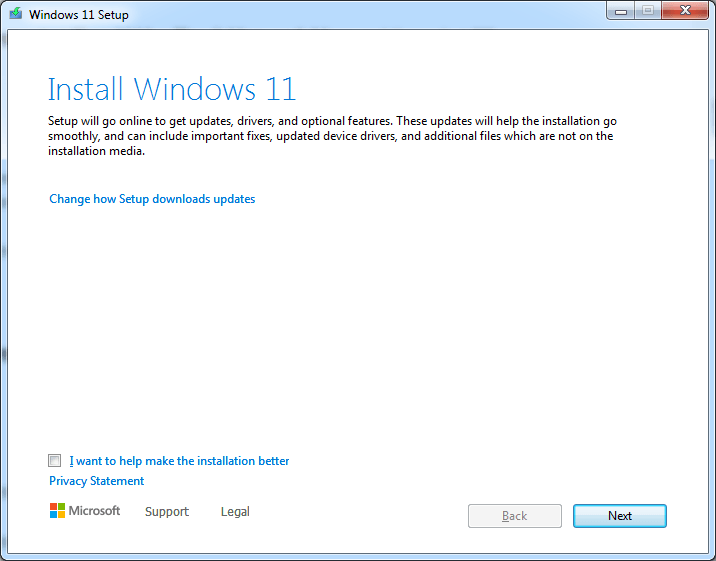
6) Follow the on-screen instructions to install Windows 11 on your device.
Method 4 – Perform a Clean Install (for Windows 7/8/10 users)
Installing Windows 11 from fresh is going to wipe your machine, so please make sure you’ve made a full backup before you proceed.
This upgrade path will install Windows 11 on your device from scratch. To proceed, you’ll need a USB flash drive with at least 8GB of space.
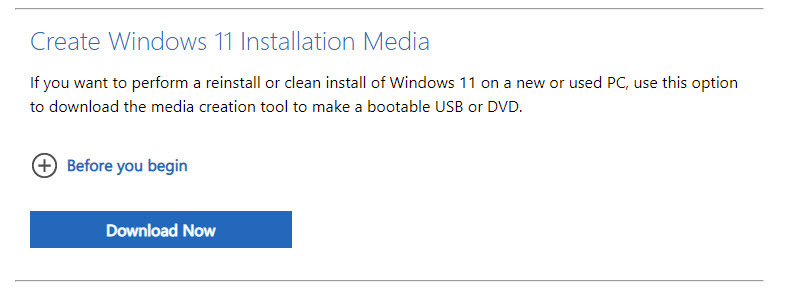
1) Download the Media Creation Tool.
2) Double-click the downloaded file to run the Media creation tool. Then click Accept.

3) Click Next.
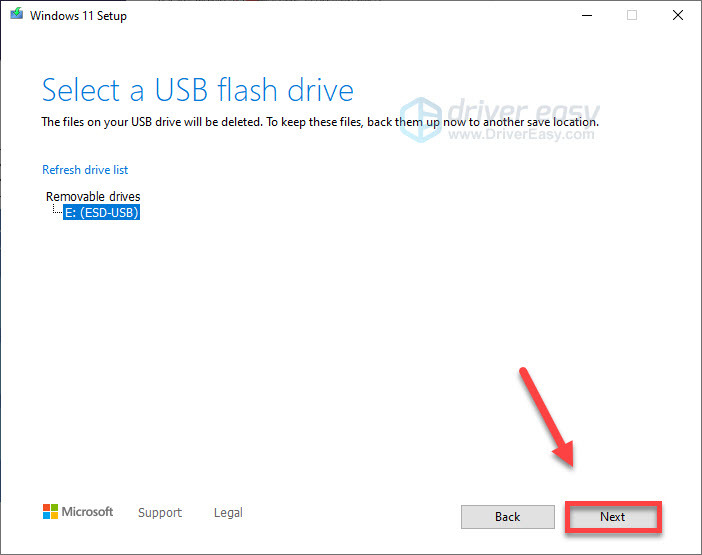
4) Select USB flash drive then click Next.

5) Plug your USB drive into your computer. Select the drive from the drive list and click Next.
6) Wait for Windows 11 to be downloaded. This could take a while depending on your Internet speed.
7) After the process is complete, you can start installing Windows 11 on your device. If you’re using a Windows 7 device, follow the instructions below to see how to do it. If you’re a Windows 8/10 user, skip to the next part for instructions.
Install Windows 11 on Windows 7 devices
1) Restart your computer with your USB drive inserted. Repeatedly press F2 to boot into BIOS.
2) Press the right arrow key to select the Boot pane. 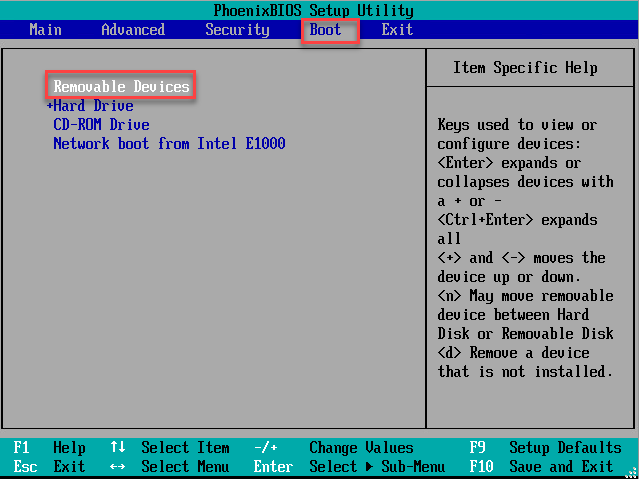
3) Under the Boot pane, find your USB flash drive’s section, it may be Removable Devices, USB HDD, or something like that. Change the section to the top of the boot order list.
If you have different USB devices connected to your computer, make sure your USB flash drive is listed 1st of the section.
4) Press F10 to save your setting and exit BIOS. Then press Enter with Yes selected. 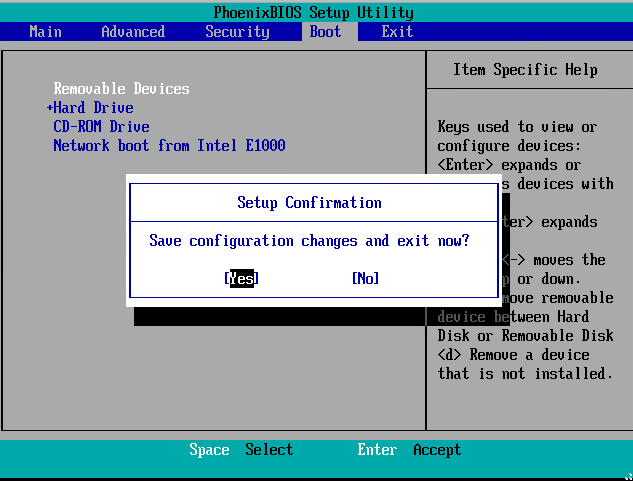
5) Your computer will restart and boot from your USB flash drive. Follow the on-screen instruction to install Windows 11 on your device.
Install Windows 11 on Windows 8/10 devices
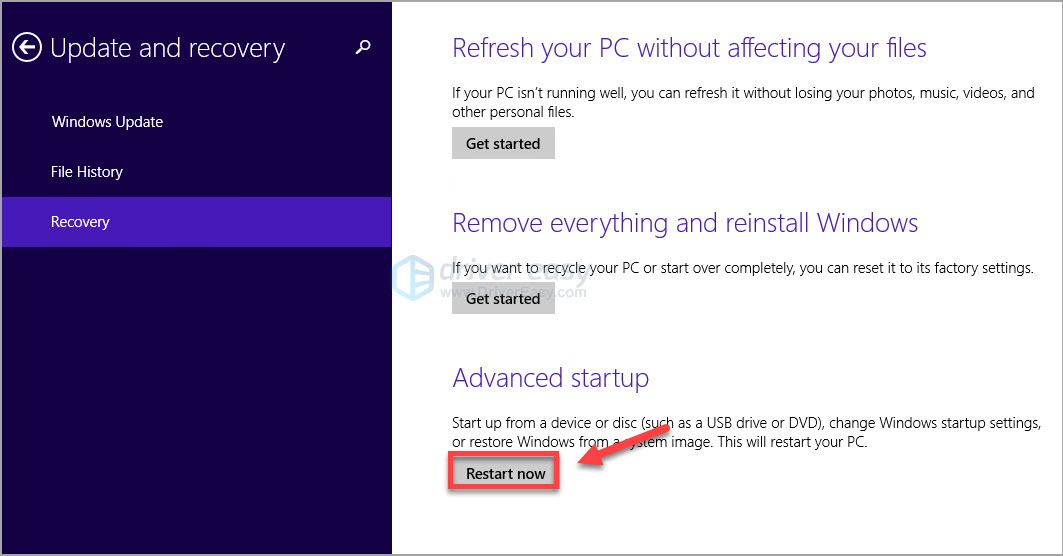
1) Go to Start > Settings> Update & security> Recovery> Restart now button under Advanced startup.
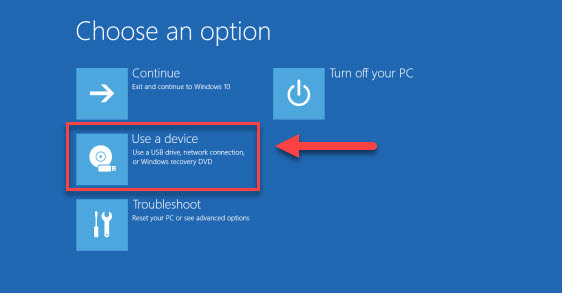
2) Select Use a device and follow the onscreen instruction to install Windows 11 on your device.
How to Fix “This PC Doesn’t Currently Meet All the System Requirements for Windows 11” Error
Fix 1: Enable TPM 2.0 in BIOS
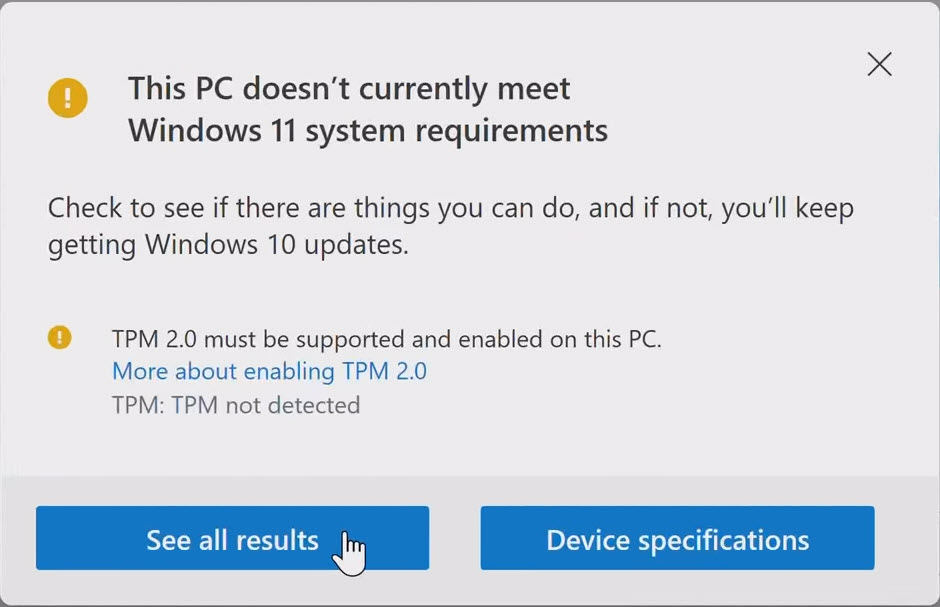
If your computer is relatively up to date, then you probably already have a TPM. The reason that many users are given the TPM not detected error is simply because the module is usually disabled by default. And to fix this, you just have to enable TPM 2.0 in the BIOS:
1) Make sure you have TPM 2.0 on your device.
If you’re using an AMD Ryzen 2000 processor (not including 2200G and 2400G) or newer, or an Intel 8000-series processor or newer, then you should have a TMP 2.0 module. Anything older than that, including first-generation AMD Ryzen, and Intel 7000 series CPUs, do not support TMP 2.0.
3) Find the TPM option. Depending on your manufacturer, you may find it in the Security or Advanced tab. On Asus motherboards, you will find it under PCH-FW Configuration (Intel) or AMD fTPM configuration (AMD).
4) Toggle it to On, Enabled, or Firmware TPM depending on your manufacturer’s particular UEFI/BIOS.
5) Select Save and Exit, or Exit and, when prompted, confirm you want to save before doing so.
6) Run Microsoft PC Health Check tool to see if your PC is ready for the Windows 11 upgrade.
Fix 2: Disable system check for TPM and Secure Boot
For Windows 10 user
If you’re running an older device, you can use this workaround to upgrade your Windows 10 device which fails to meet the hardware requirements for Windows 11.
According to one Microsoft support document, installing Windows 11 on a device that doesn’t meet the requirements is not recommended and may result in compatibility issues.
This PC doesn’t meet the minimum system requirements for running Windows 11 – these requirements help ensure a more reliable and higher quality experience. Installing Windows 11 on this PC is not recommended and may result in compatibility issues. If you proceed with installing Windows 11, your PC will no longer be supported and won’t be entitled to receive updates. Damages to your PC due to lack of compatibility aren’t covered under the manufacturer warranty.
If you decide to proceed to install Windows 11 on your device, you’ll need to disable the system check in the registry for TPM and Secure Boot.
1) Back up your registry before proceeding.
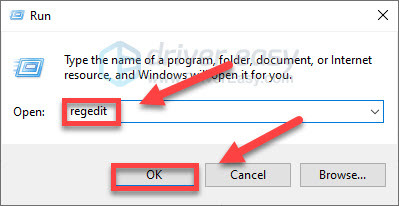
2) On your keyboard, press the Windows logo key and R at the same time. Type regedit and press OK.
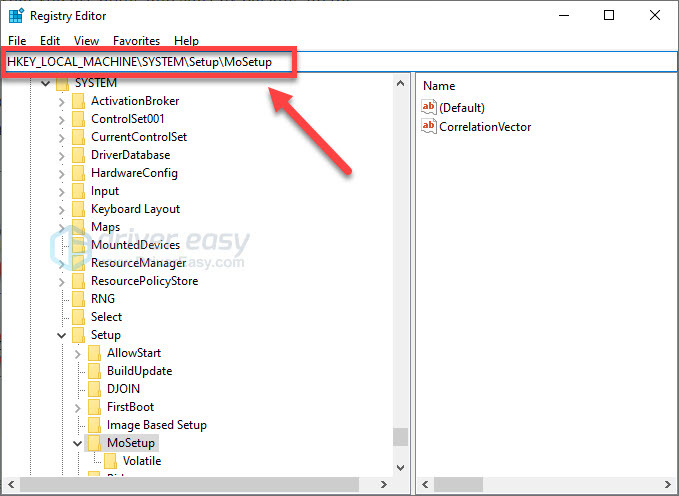
3) Copy HKEY_LOCAL_MACHINE\SYSTEM\Setup\MoSetup and paste it in the address bar, then press Enter.
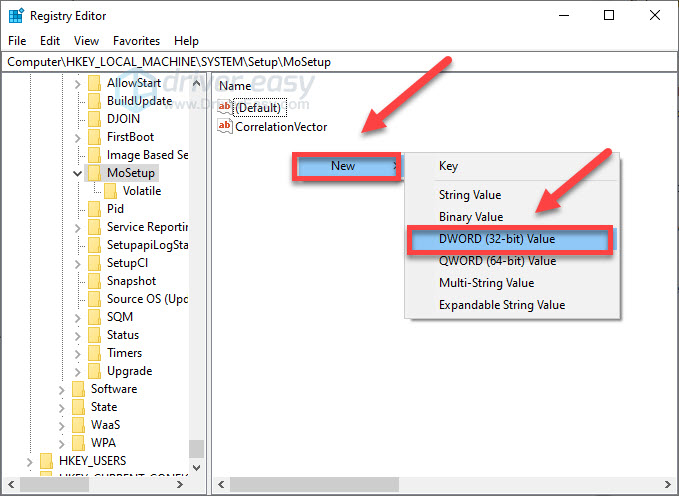
4) Right-click an empty space on the right panel and select New > DWORD (32-bit) Value.
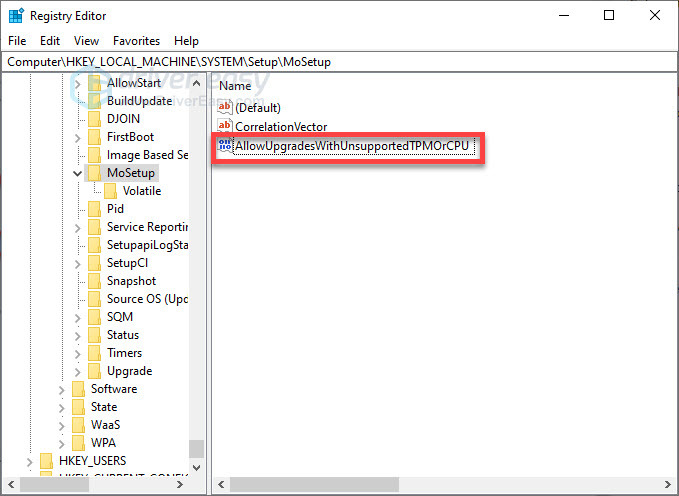
5) Name the new registry key AllowUpgradesWithUnsupportedTPMOrCPU.
6) Right-click the registry key and select Modify.
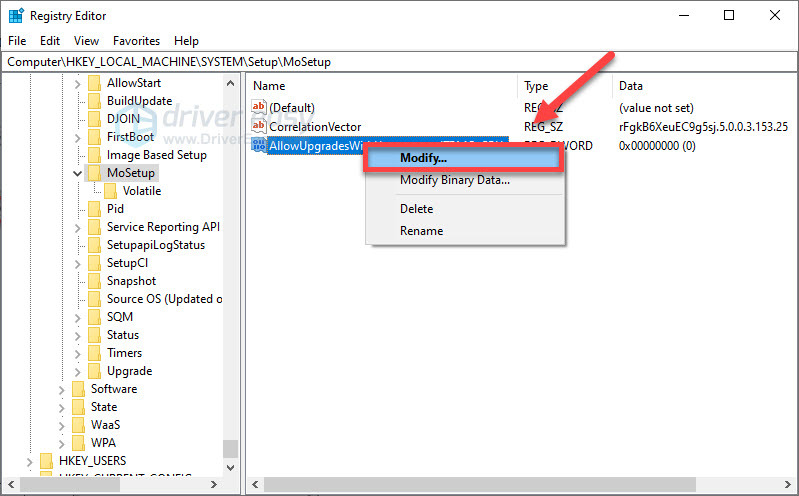
7) Enter 1 into the Value data box and click OK.
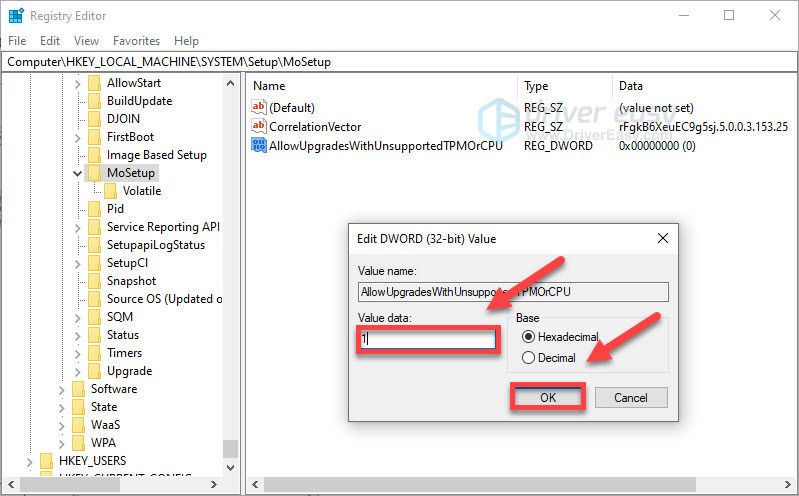
8) Restart your PC and check how to install Windows 11 now.
For Windows 7/8 Users
If your Windows 7 or 8 device doesn’t meet Windows 11 requirements because of TPM and Secure Boot, follow the instructions below:
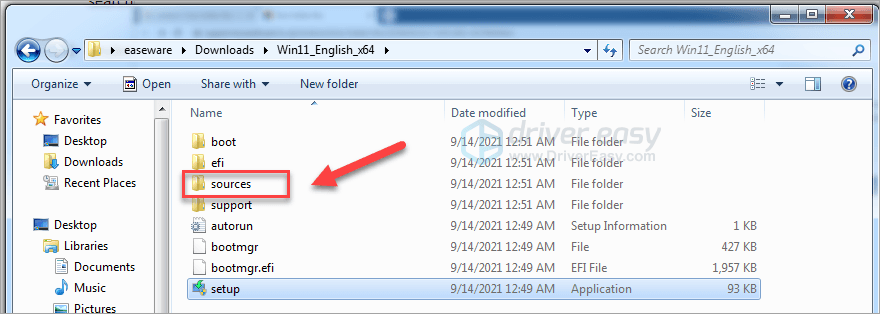
1) Download the Windows 11 ISO file from the Microsoft official website.
Just select Windows 11 from the download box, click Download, and select the language you’re using. Click Confirm > 64-bit Download.
2) Right-click the downloaded ISO file, extract the ISO files.
4) Find extracted ISO files in the destination folder.
5) Double-click the sources folder.
6) Find the appraiserres.dll file and delete it.
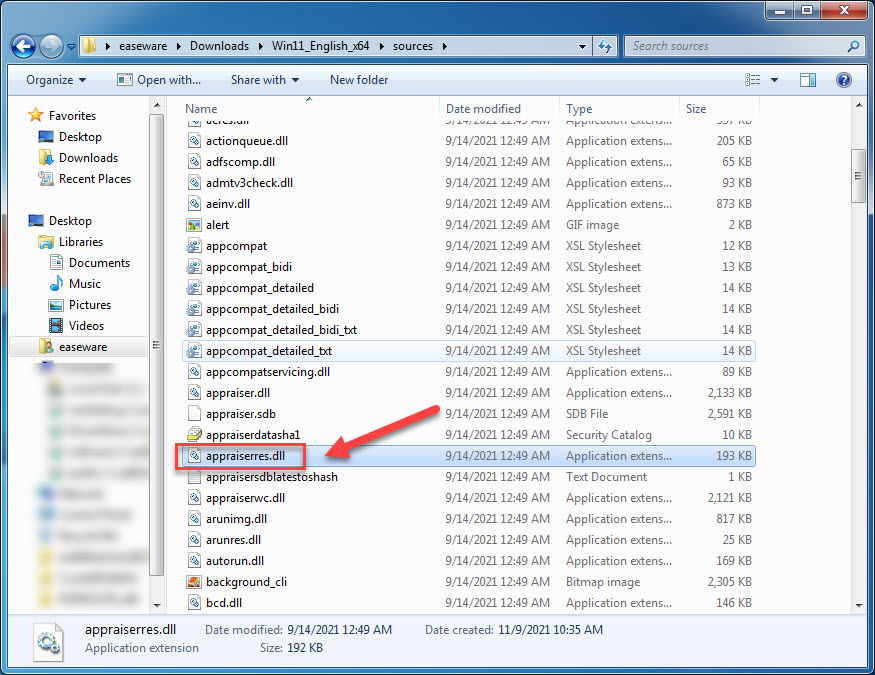
7) Double-click Setup.
7) Follow the on-screen instructions to install Windows 11.
Do I Have to Upgrade to Windows 11?
As Windows 11 began its rollout, Windows 10 is lowly on the way out.
If you don’t feel like upgrading to Windows 11, or your PC doesn’t meet the system requirements for the new OS, you need to be aware that Microsoft will end the Windows 10 support in 2025, according to the official announcement.
After the support ends, you can still run the Windows 10 OS on your device – just like many people are still using Windows 7 or Windows 8, but Microsoft will not provide any technical support, software updates, security updates, and any other fixes to Windows 10. This could leave your computer vulnerable.
If your PC hardware supports Windows 11, we recommend that you upgrade to Windows 11 as it’s a better operating system and gives your computer the security level needed.
Hopefully, this post helped. Feel free to leave a comment below if you have any questions or suggestions.