


If the Internet is connected on your computer but you can’t browse the Internet, or you’re experiencing lag while playing video games, or it takes forever to download files…It could be super frustrating. But before call your ISP(Internet Service Provider), there’re some solutions you could try…
 Otherwise, browse the Internet to see if it works.
Hopefully this post helps you fix the issue. Feel free to comment below with your own experiences and share with your friends if they’re experiencing the same problem.
Try these fixes:
- Reboot all your devices
- Reset your TCP/IP settings
- Update your network driver
- Run the built-in network troubleshooter on your system
- Set your network adapter to obtain IP and DNS automatically
Solution 1: Reboot all your devices
No joke. A simple restart could help you fix lots of computer woes. When you find your internet is connected but doesn’t work, try to restart all your devices, including your computer, modem and router. Once you do, try to browse the Internet to see if it goes well.Solution 2: Reset your TCP/IP settings
TCP/IP refers to your computer network protocols. You can try to reset your TCP/IP settings when your Internet connection gets corrupted. Here’s how to reset TCP/IP:- On your keyboard, press the Windows logo key.
- Type cmd in the search box. Then right-click on Command Prompt to select Run as administrator.
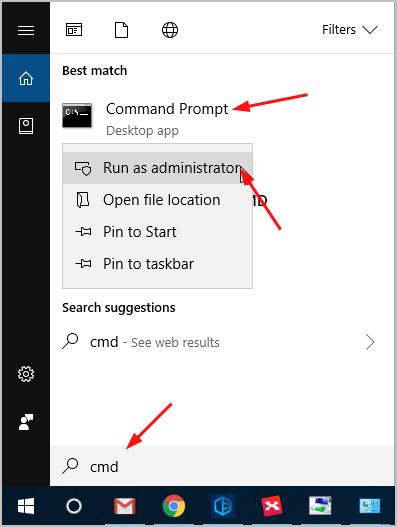
- Click Yes when prompted by User Account Control.

- On the open black window, type the following command and press Enter.
netsh int ip reset resetlog.txt
Solution 3: Update your network driver
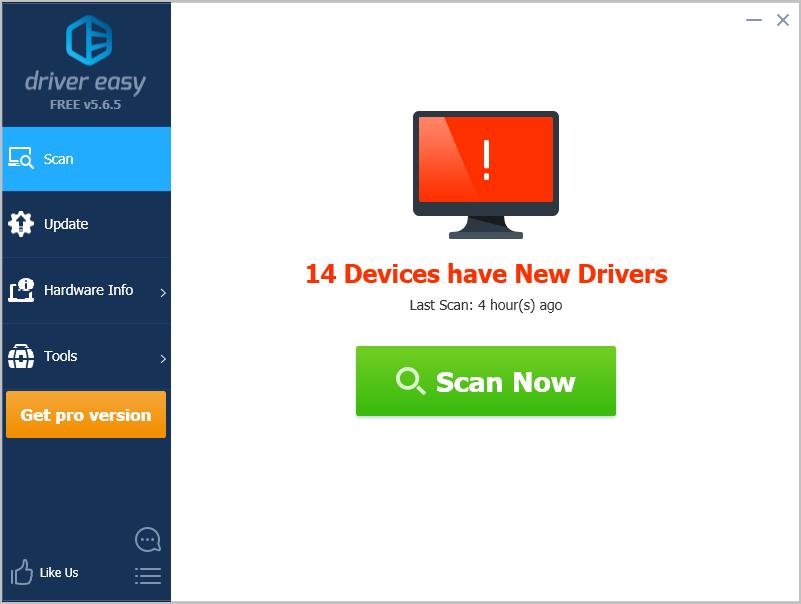
This problem could be also caused a corrupted, missing or outdated network driver on your computer. You can solve it by updating your network driver. You can get update your network driver either manually or automatically.Manual driver update
You can update your network driver manually by going to the manufacturer’s website for your network adapter, say, Realtek, and searching for the most recent correct driver. Be sure to choose only drivers that are compatible with your Windows version. As you couldn’t browse the Internet to search and download the driver on your problem computer, you can search and download the driver on a working computer and save it to the removable drive, say, a USB flash drive, then install the driver on the problem computer though the removable drive.Automatic driver update
If you don’t have the time, patience or computer skills to update your network driver manually, you can, instead, do it automatically with Driver Easy. Driver Easy will automatically recognize your system and find the correct driver for your exact network adapter, and your Windows version, and it will download and install them correctly. Driver Easy also requires network connection to work, however, you can try the Offline Scan feature of it to locate the most accurate network driver for your computer.
Solution 4: Run the built-in network troubleshooter on your system
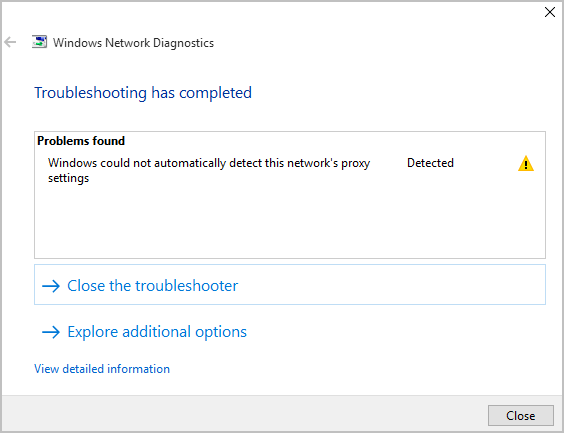
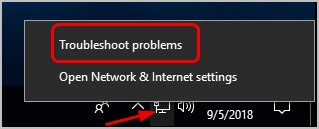
The built-in network troubleshooter could help you fix some pesky internet problems and if it cannot fix the problem detected, you would be prompted the exact error message. Here’s how to run the network troubleshooter on your system:- On your desktop, right-click on the network icon to select Troubleshoot problems.
- The Windows Network Diagnostics utility would then be running automatically.
Otherwise, browse the Internet to see if it works.
Solution 5: Set your network adapter to obtain IP and DNS automatically
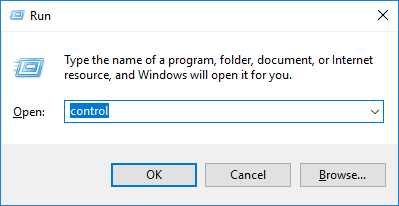
You can set your network adapter to obtain IP and DNS automatically to try to solve your Internet not working issue:- On your keyboard, hold down the Windows logo key and press R to bring up the Run box.
- Type control and press Enter.
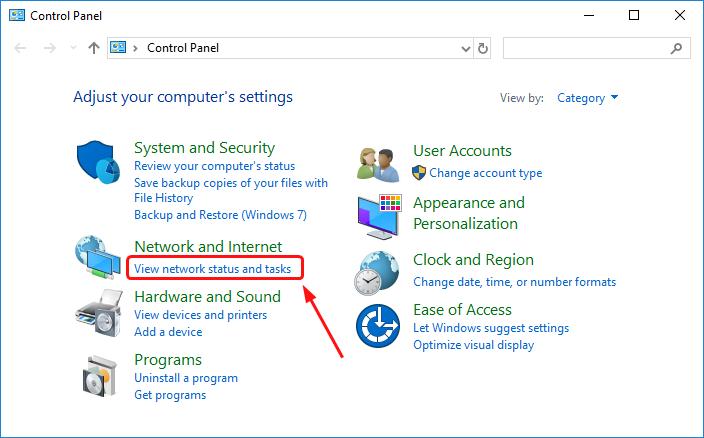
- Click View network status and tasks when selected to View by Category.
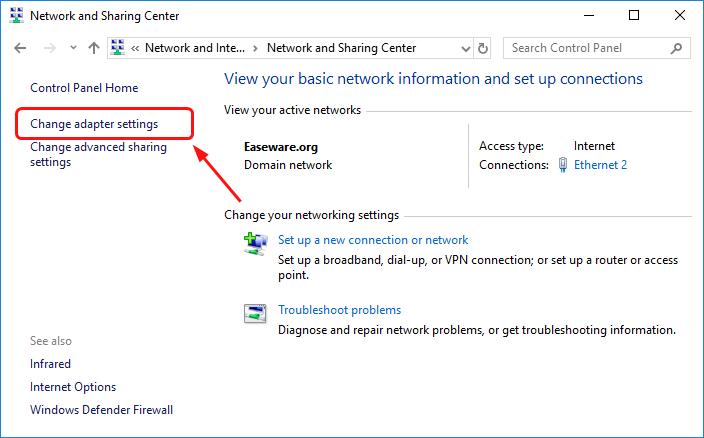
- Click Change adapter settings.
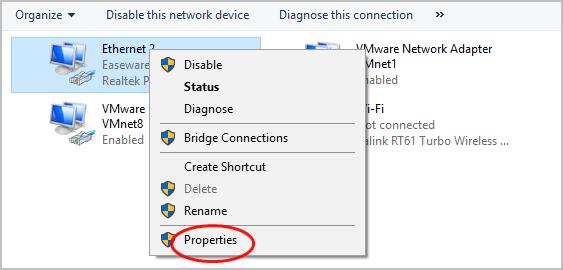
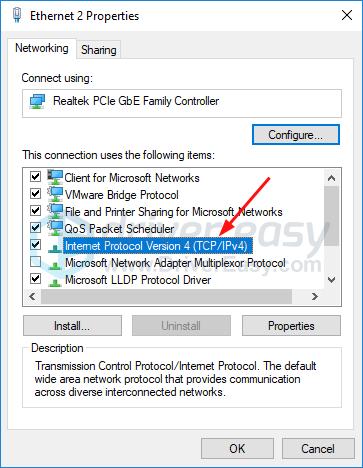
- Right-click on your network adapter to select Properties.
- Double-click Internet Protocol Version 4(TCP/IP4).
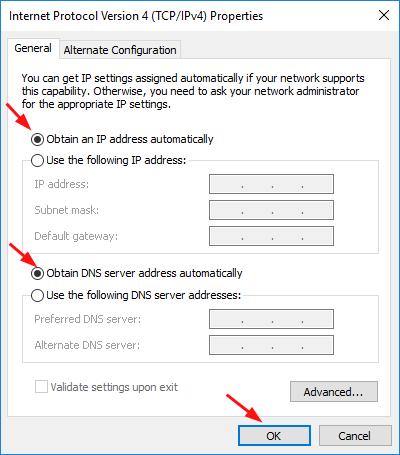
- Tick on Obtain an IP address automatically and Obtain DNS server address automatically. Then OK.
Hopefully this post helps you fix the issue. Feel free to comment below with your own experiences and share with your friends if they’re experiencing the same problem.
1
1 people found this helpful
0 Comments
Most Voted