


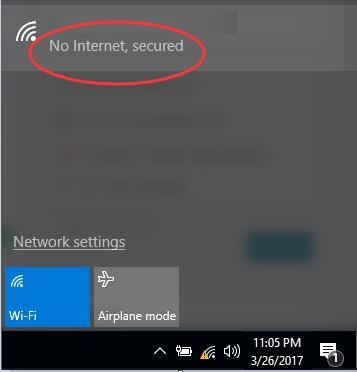
 Sometimes you may come across No Internet, secured error on Windows 10. It mostly appears right after you upgrade system to Windows 10. You may be annoyed by such error. It’s a good thing we’ve got the answer for you! This guide will be telling you the effective ways to fix the error. Just go on with the steps below.
1. Run Network Troubleshooter
2. Update Network Adapter driver
3. Check these Windows services are enabled
4. Disable your security software temporarily
Sometimes you may come across No Internet, secured error on Windows 10. It mostly appears right after you upgrade system to Windows 10. You may be annoyed by such error. It’s a good thing we’ve got the answer for you! This guide will be telling you the effective ways to fix the error. Just go on with the steps below.
1. Run Network Troubleshooter
2. Update Network Adapter driver
3. Check these Windows services are enabled
4. Disable your security software temporarily
Fix 1. Run Network Troubleshooter
1) Type troubleshooting in search box at Start menu. Then click Troubleshooting Control Panel on the top.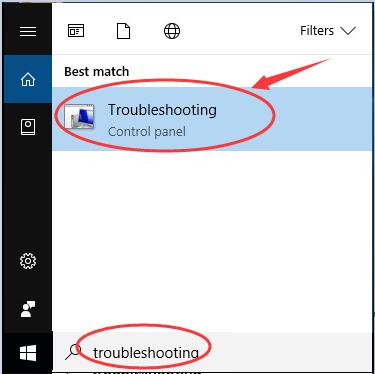 2)
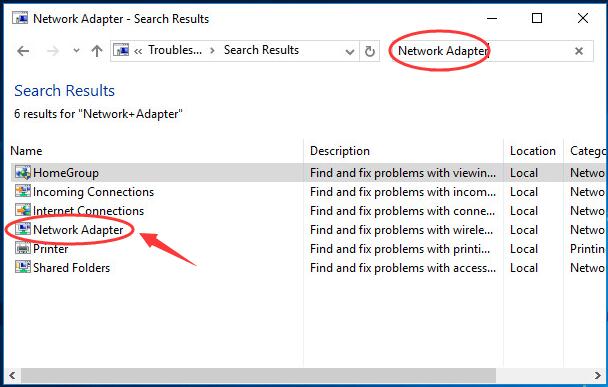
Type Network Adapter in the search box.
Then click Network Adapter.
2)
Type Network Adapter in the search box.
Then click Network Adapter.
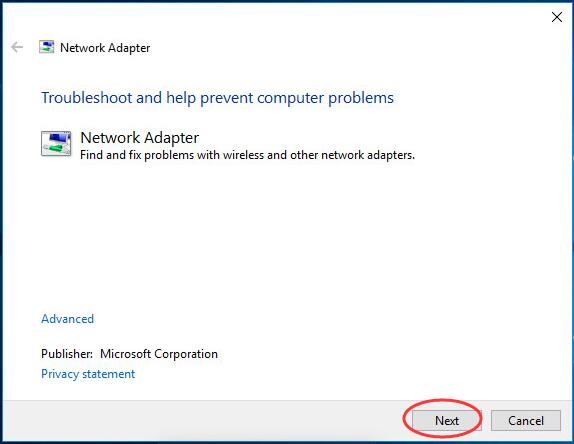
 3)
Click Next.
3)
Click Next.
 4)
Wait for it detects problems.
Then follow the on-screen instructions.
4)
Wait for it detects problems.
Then follow the on-screen instructions.
Fix 2. Update Network Adapter driver
No Internet, secured error could be also probably being caused by driver issues. The steps above may resolve it, but if they don’t, or you’re not confident playing around with drivers manually, you can do it automatically with Driver Easy. Driver Easy will automatically recognize your system and find the correct drivers for it. You don’t need to know exactly what system your computer is running, you don’t need to risk downloading and installing the wrong driver, and you don’t need to worry about making a mistake when installing. You can update your drivers automatically with either the FREE or the Pro version of Driver Easy. But with the Pro version it takes just 2 clicks (and you get full support and a 30-day money back guarantee): Note: Driver Easy should work with network connection. Due to the error, you may cannot use the Internet, then you can use its Offline Scan feature to help you fix the error. 1) Download and install Driver Easy. 2) Run Driver Easy and click Scan Now button. Driver Easy will then scan your computer and detect any problem drivers.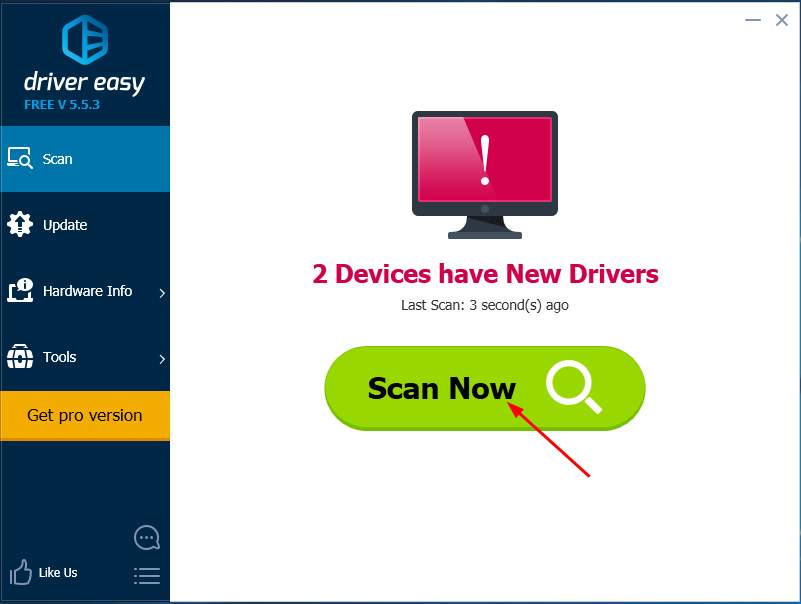 3)
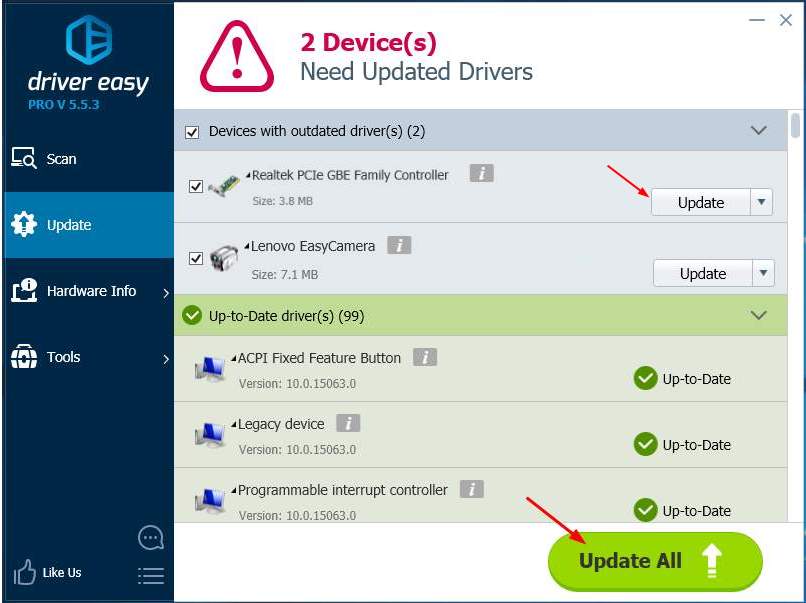
With Free version: Click the Update button next to a flagged network card driver to automatically download and install the correct version of this driver.
With Pro version: Click Update All to automatically download and install the correct version of all the drivers that are missing or out of date on your system. (and you get full support and a 30-day money back guarantee)
3)
With Free version: Click the Update button next to a flagged network card driver to automatically download and install the correct version of this driver.
With Pro version: Click Update All to automatically download and install the correct version of all the drivers that are missing or out of date on your system. (and you get full support and a 30-day money back guarantee)
Fix 3. Check these Windows services are enabled
Different Windows services could be disabled due to virus or malware activities. And it causes Wi-Fi error on your Windows 10. So be sure to check these services:– TCP/IP NetBIOS Helper service
– Wireless lan – DHCP – DNS Client – Function Discovery Resource Publication – SSDP Discovery – UPnP Device Host How to check: 1) Press Windows logo key + R key at the sametime. Then type services.msc in the box and hit Enter to open Services window.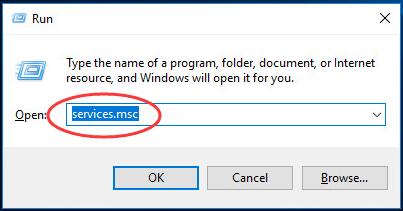 2)
Check the services above one by one.
Take SSDP Discovery as an example.
Scroll down to find it on Services windows.
Then check if its status is running.
2)
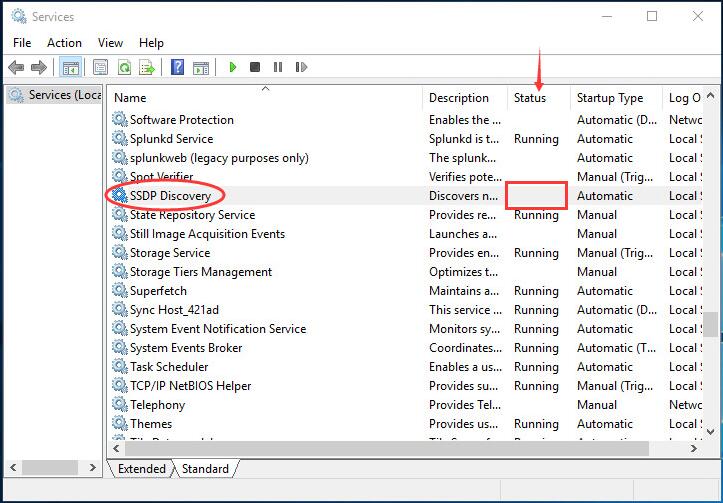
Check the services above one by one.
Take SSDP Discovery as an example.
Scroll down to find it on Services windows.
Then check if its status is running.
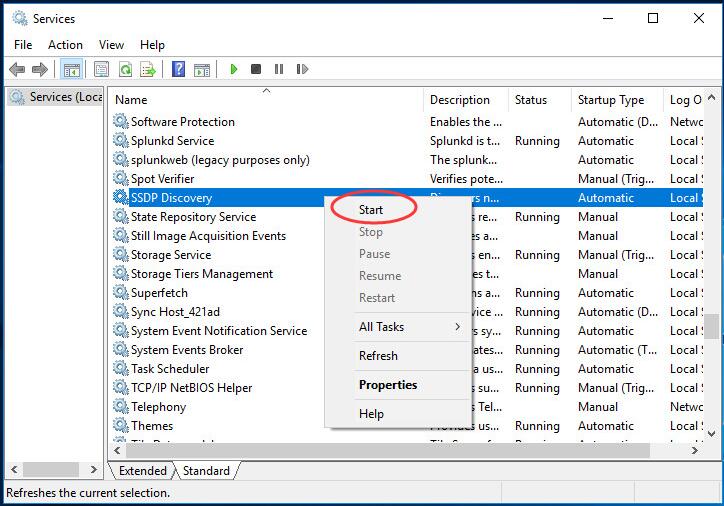
 3)
If not, right-click on the service.
Then click Start.
3)
If not, right-click on the service.
Then click Start.
 Note: make sure you’d checked all the services listed above.
Fix 4. Disable your security software temporarily
Sometimes your security software can block the internet connection. Thus, disabling it might fix the Wi-Fi error for you. But remember to re-enable it as soon as you’re done. That’s it. 10
10 people found this helpful
0 Comments
Most Voted