


If you’re on Windows 10 and you find that Service Host: Local System is taking much of your CPU, Disk or Memory usage, you’re not alone. Many Windows users are reporting this problem as well. But no worries, it’s possible to fix.
Here are 5 methods for you to try. You may not have to try them all; just work your way down and find the one works for you.
1: Disable Superfetch
2: Troubleshoot Windows Update
3. Update Available Drivers
4: Disable Certain Services
5: Run SFC and DISM
1: Disable Superfetch
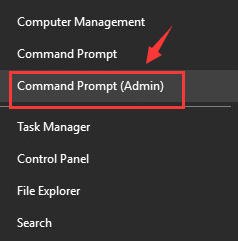
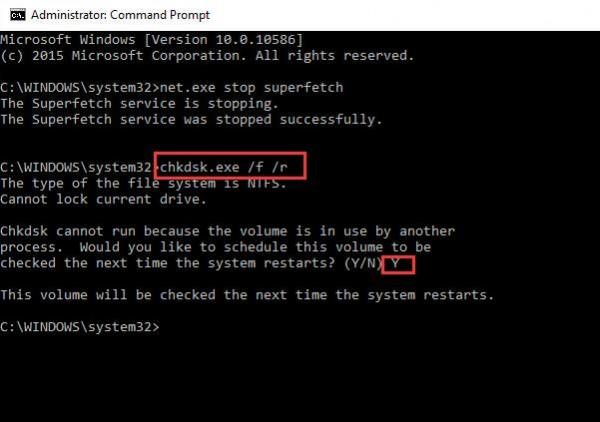
SuperFetch helps to decrease boot time and make must-load programs more efficiently. However, it has been identified as a potential cause of disk performance issues in Windows 8 and later versions of Windows, including Windows 10. Here’s how to stop this service:1) On your keyboard, press the Windows key and X at the same time, then click Command Prompt (Admin).
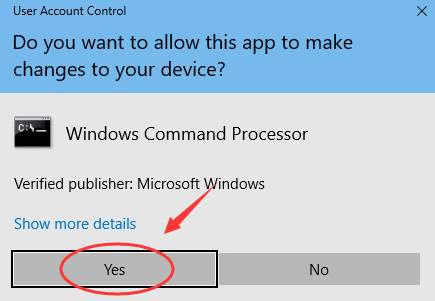
Click Yes to continue.
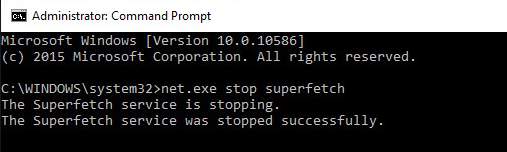
2) Type the following command:
net.exe stop superfetch
and press the Enter key on your keyboard.
Wait for a few minutes to see if changes can be seen on your computer’s performance.
If you want, you can also run a disk check by typing the following command and press the Enter key on your keyboard.
chkdsk.exe /f /r
Then type Y to confirm the disk check.
3) See if the problem is resolved.
2: Troubleshoot Windows Update
Windows Update is said to be one of the causes for abnormally high CPU, or Disk usage. You can run the troubleshooter to see if it’s the culprit:
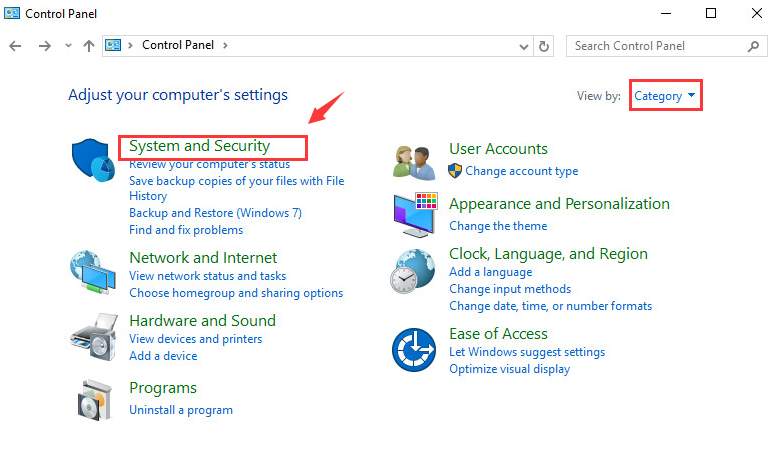
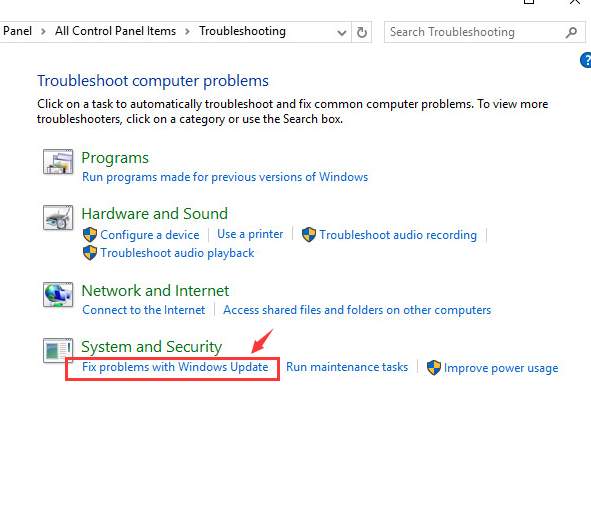
1) On your keyboard, press the Windows logo key and click Control Panel.
2) View by Category, click System and Security.
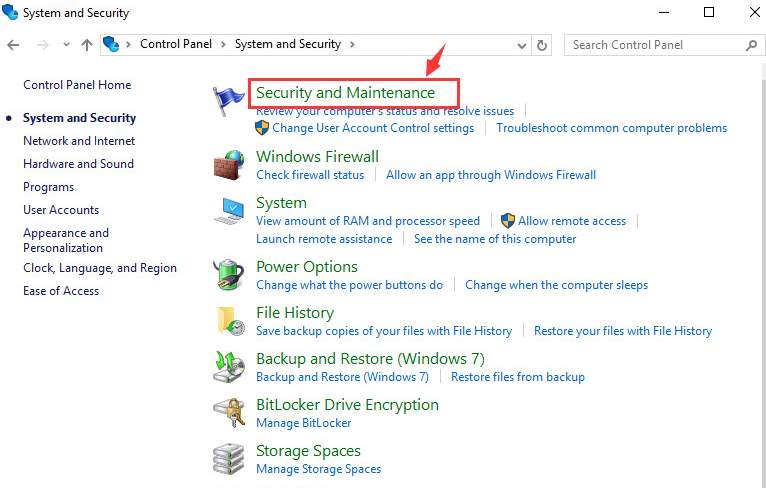
3) Click Security and Maintenance.
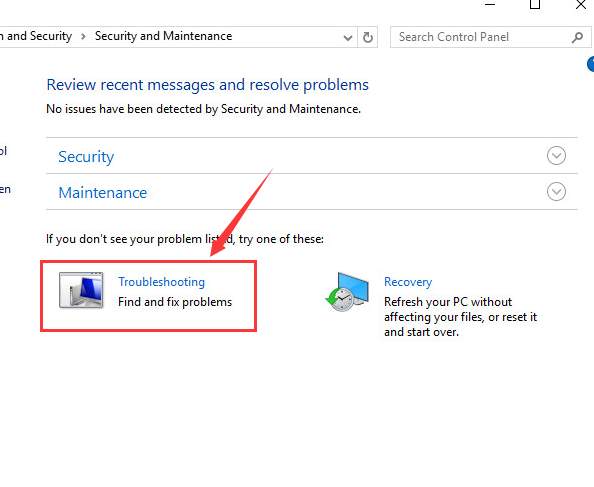
4) Click Troubleshooting.
5) Click Fix problems with Windows Update.
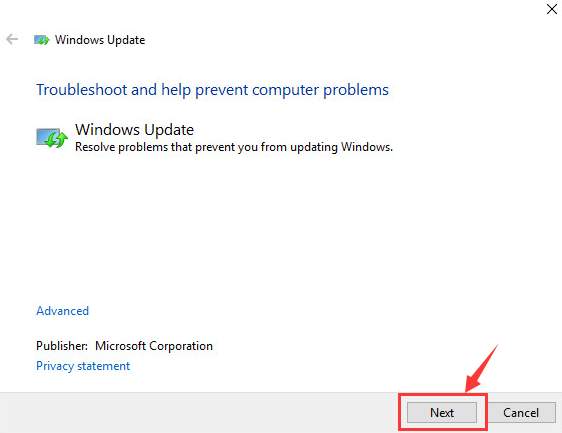
6) Click Next.
7) Click Try troubleshooting as an administrator.
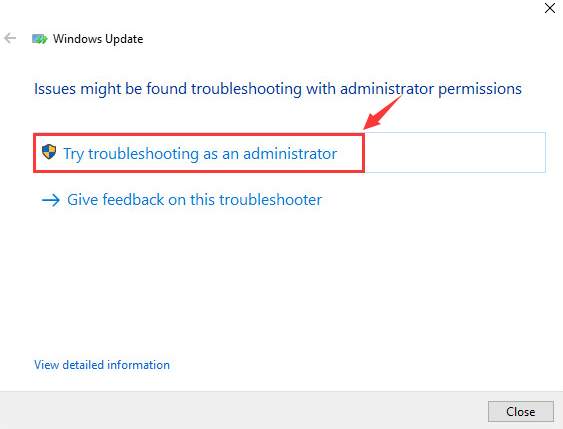
8) This should be able to help you fix the problem. If not, please restart your computer and try the next step.
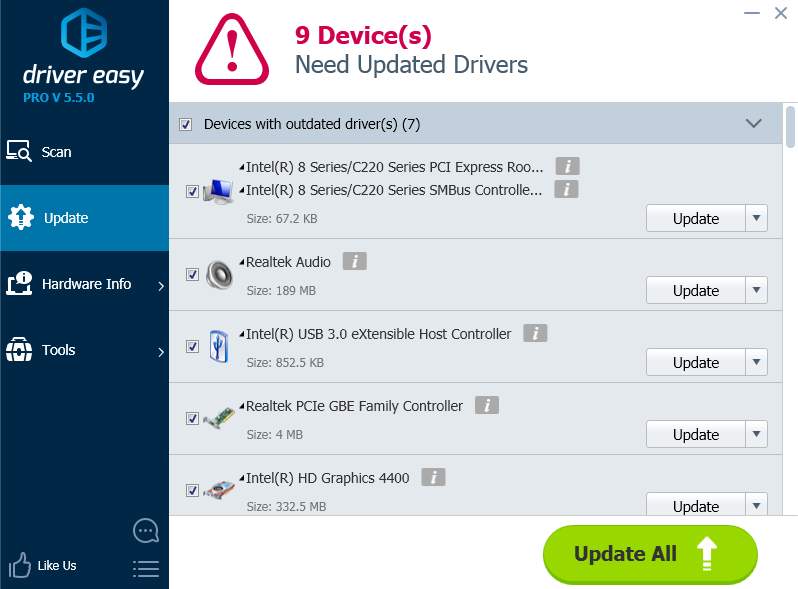
3. Update Available Drivers
If the steps above don’t resolve your CPU or Disk usage problem in Windows 10, it may be caused by a device driver.
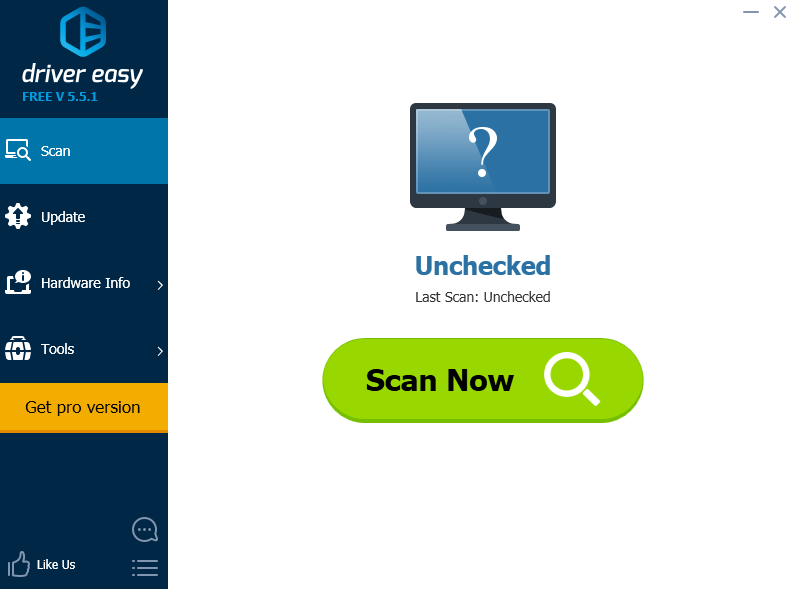
You can automatically update all your device drivers to the latest correct version with Driver Easy.
Driver Easy will automatically recognize your system and find the correct drivers for it. You don’t need to know exactly what system your computer is running, you don’t need to risk downloading and installing the wrong driver, and you don’t need to worry about making a mistake when installing.
You can update your drivers automatically with either the FREE or the Pro version of Driver Easy. But with the Pro version it takes just 2 clicks (and you get full support and a 30-day money back guarantee):
1) Download and install Driver Easy.
2) Run Driver Easy and click Scan Now button. Driver Easy will then scan your computer and detect any problem drivers.
3) Click the Update button next to any flagged drivers to automatically download and install the correct version of that driver (you can do this with the FREE version).
Or click Update All to automatically download and install the correct version of all the drivers that are missing or out of date on your system (this requires the Pro version – you’ll be prompted to upgrade when you click Update All).
4: Disable Certain Services
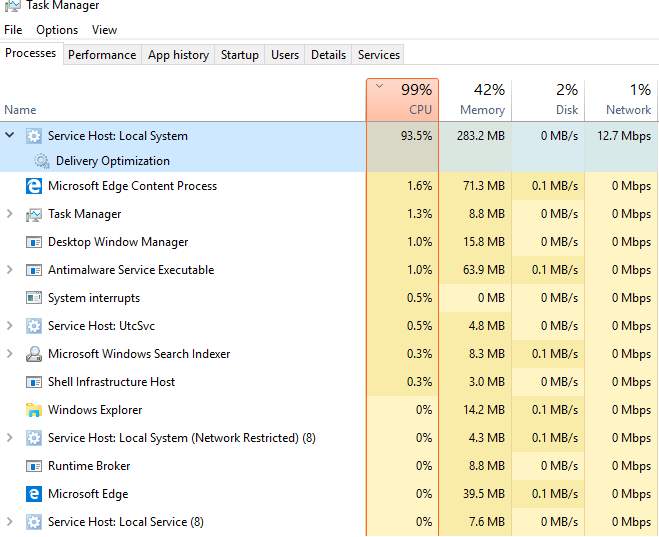
You can also locate the culprit services that are hogging your CPU or disk usage and disable them to make a difference.
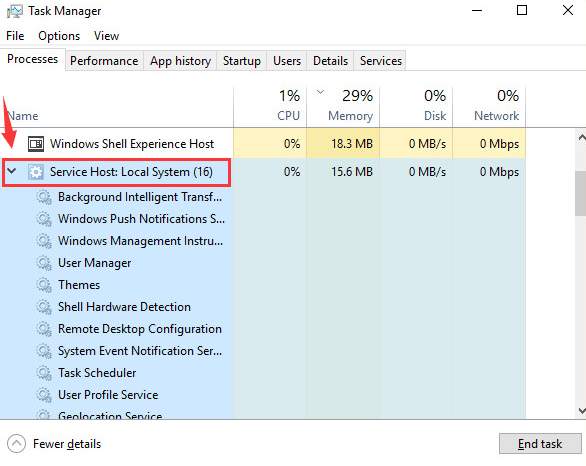
1) Right-click the task bar at the bottom of your desktop and click Task Manager.

2) Click the arrow button of the category Service Host: Local System. This will help you see more clearly what items are hogging your CPU usage.
3) Click and select one of the items under this category, then click End Task.
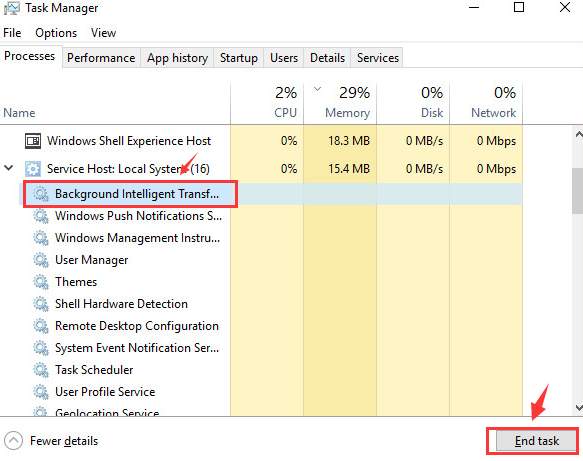
Repeat this step with every item under category Service Host: Local System.
Keep a close eye to the change of the CPU usage. If you can locate the culprit, follow the steps below to get it disable in Services.
4) Right-click the item that you suspect to be the culprit and click Open Services.
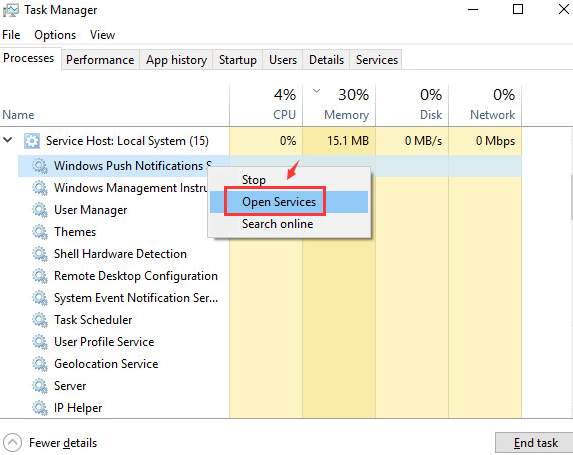
5) Locate the service with the same name as what you can see in Task Manager. Then right-click it to select Stop.
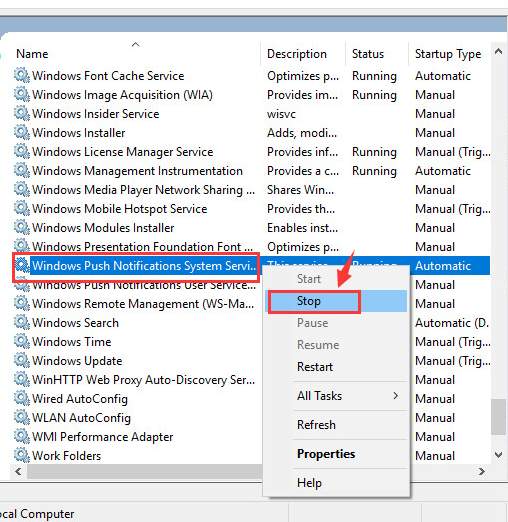
If this is helping you, then you have locate the culprit.
You can try to disable this service by doing the following steps:
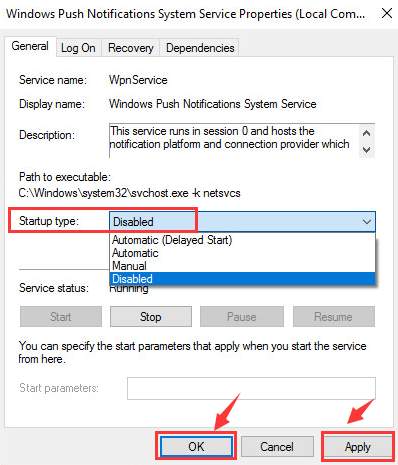
Double click it, and then choose from the drop-down menu and change the Startup type of it to Disabled. Then click Apply and OK to save the change.
5: Try SFC and DISM
If the above steps are not able to help you with this problem, then please consider performing a system file check. If that won’t help either, try running a DISM. For more information and more detailed instructions, please visit the web page below:
Windows 10: Fix Problems with SFC and DISM