


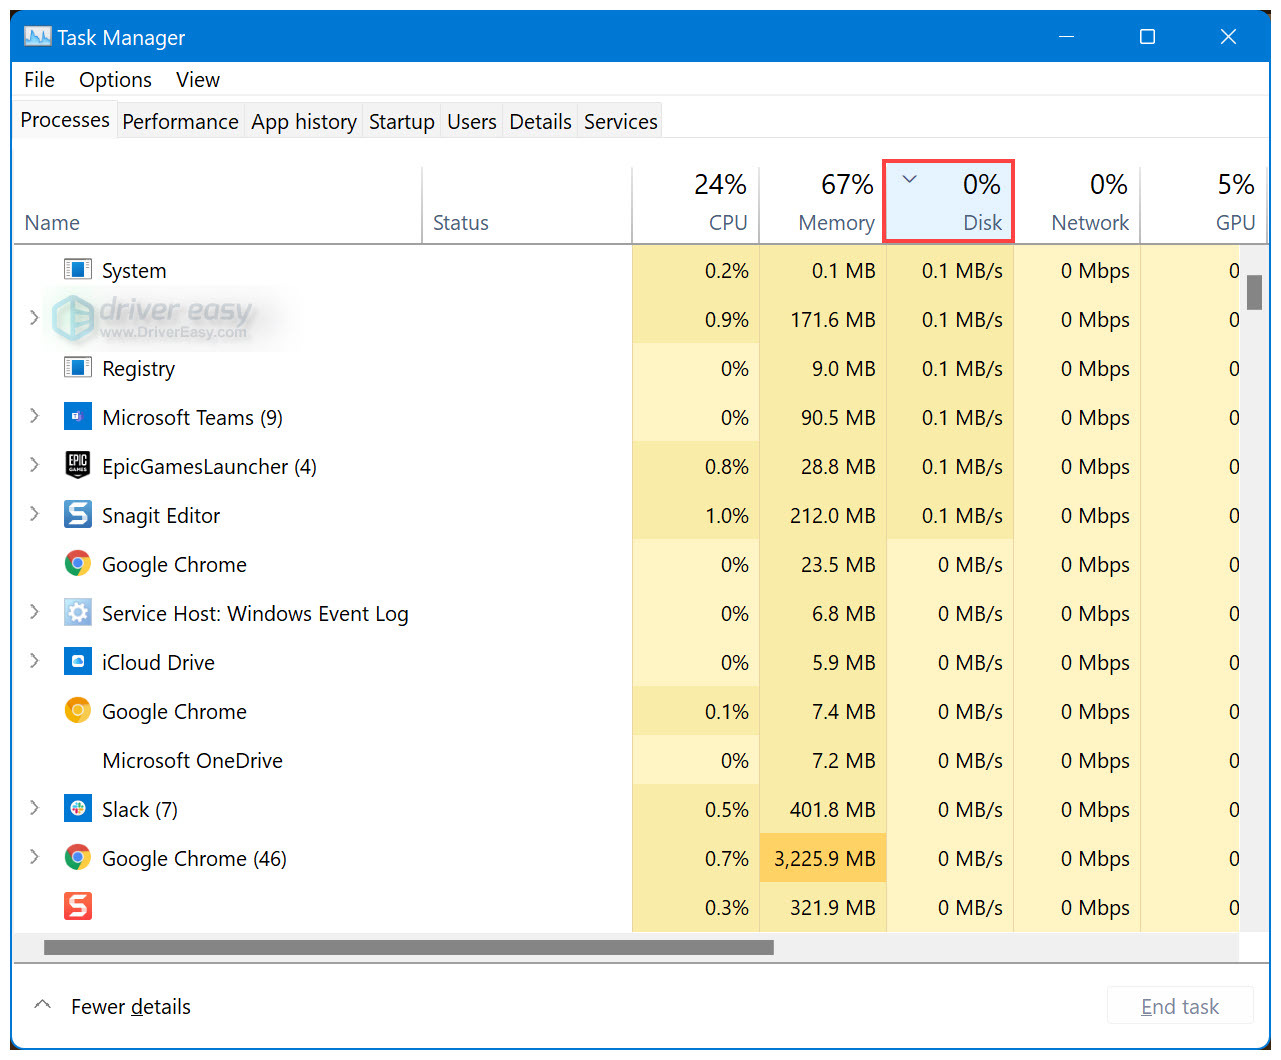
100% disk usage (or high disk usage) always hampers your Windows 11 experience. If Windows 11 Task Manager shows 100% disk usage, something is causing your hard drive to over-work.
This complete guide includes the most effective fixes for you to try. After reading it, you should be able to fix the Windows 11 100% disk usage issue on your own quickly & easily!
Try these fixes
Here are the most effective fixes that have helped other users resolve their Windows 11 100% disk usage issue. You may not need to try them all; just work your way down the list until you find the one that works for you.
- Try to identitfy the resource-hogging process
- Stop SuperFetch service (Sysmain)
- Update your device drivers
- Reset virtual memory
- Perform a disk check
- Disable content indexing
- Clean boot Windows 11
Fix 1: Try to identify the resource-hogging process
First off, you can try to locate and end the process that makes your disk overload. A typical way is to look for the culprit in Task Manager. If you can’t find any leads in Task Manager, try using a more advanced tool like Resource Monitor to get more insights.
Here’s how:
- One your keyboard, press Win+R to invoke the Run box. Type or paste resmon and click OK. This will open Resource Monitor.
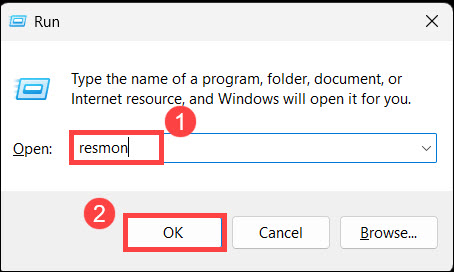
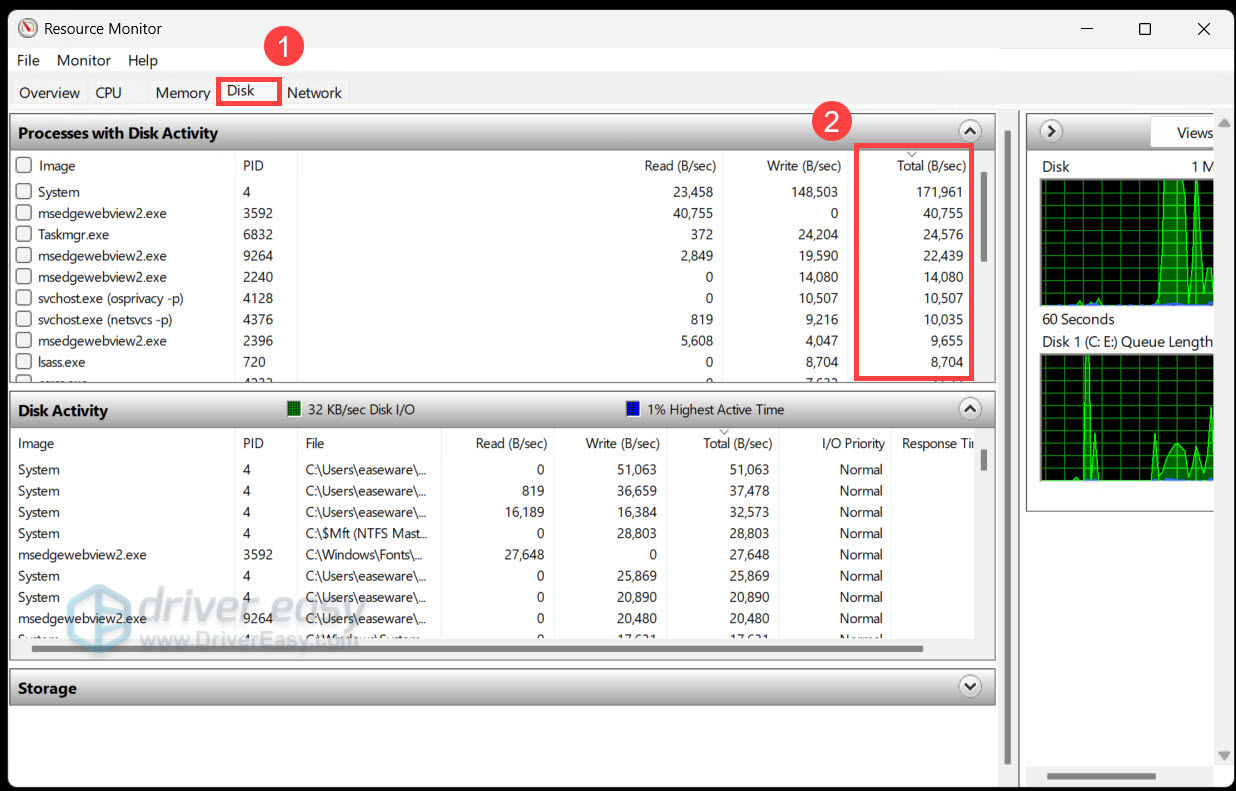
- Navigate to the Disk tab. In the Processes with Disk Activity section, review the Total column and check which process is generating the most disk activity. Once found, you can then right click the process to end it when you’re sure it’s safe to do so.
If you can’t locate the process, or the disk usage spikes when nothing is running, check out the next fix.
Fix 2: Stop SuperFetch service (Sysmain)
Introduced in Windows Visita, Superfetch is now known as Sysmain in the latest version of Windows 11 and Windows 10. The official description of the Superfetch (Sysmain) service says that it “maintains and improves system performance over time”. It’s a Windows service running in the background that can predict which applications you’ll run next and pre-load the necessary data into your memory.
According to many Windows users, SuperFect often slows down the SSD and causes high disk usage issue. If you’re experiencing the 100% disk usage issue, you should stop this service:
- On your keyboard, press the Windows logo key and R at the same time to invoke the Run dialog. Type
services.mscand press Enter to open the Services window.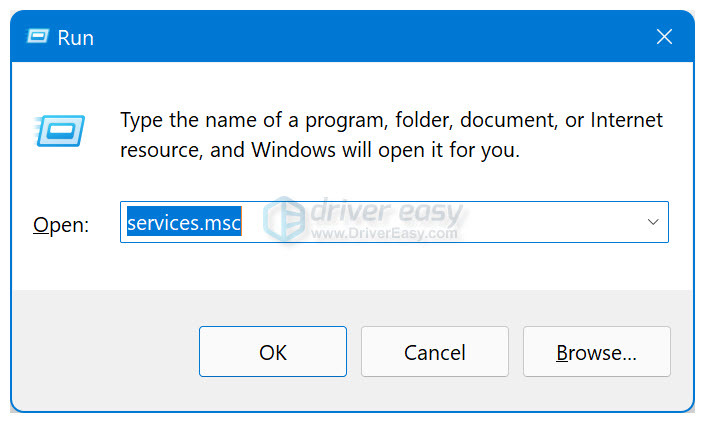
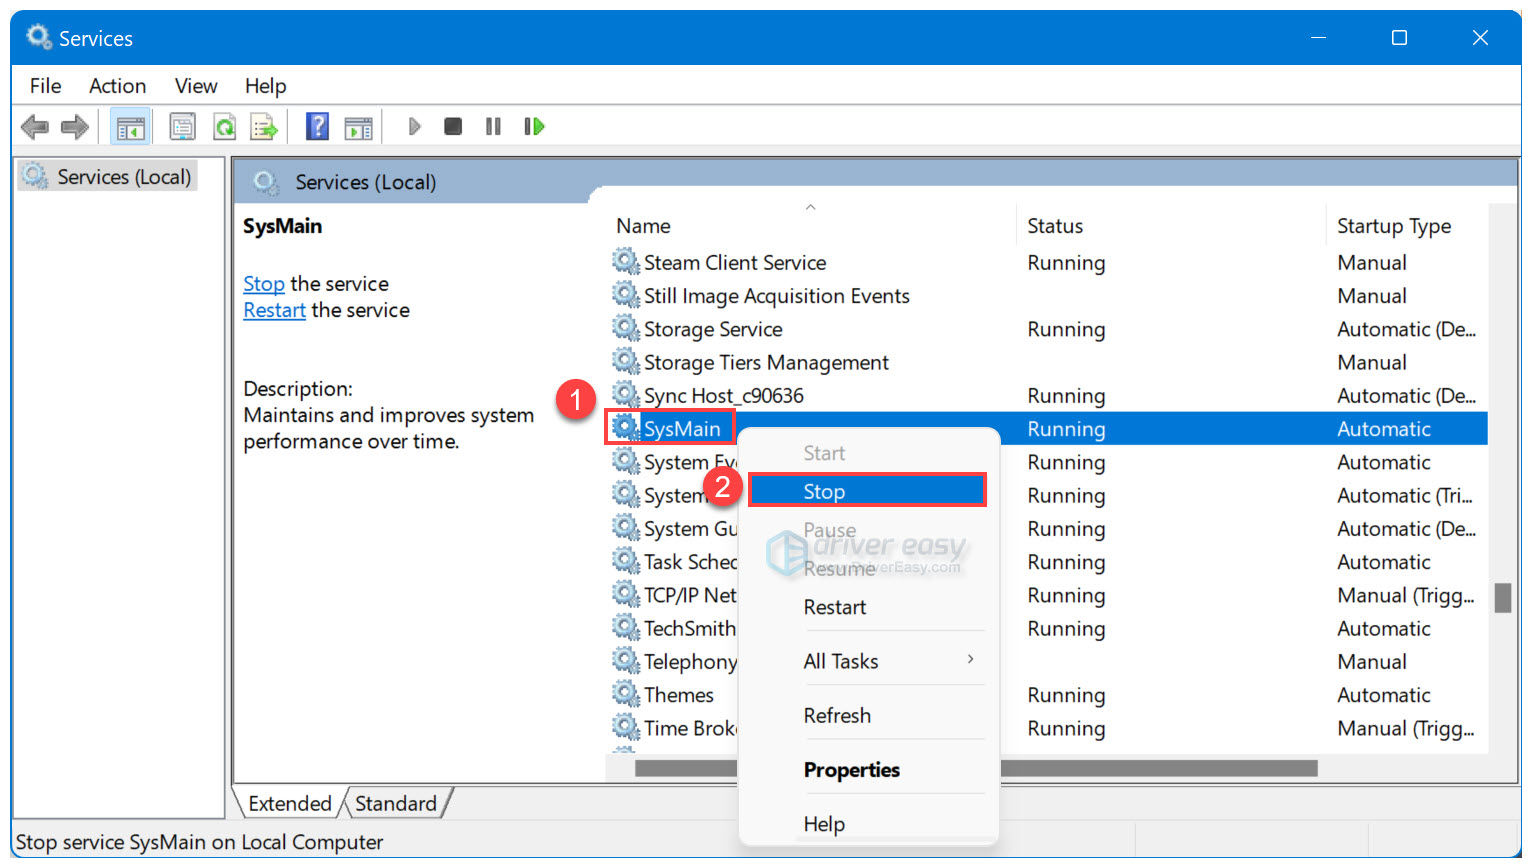
- Scroll down to locate the Sysmain service. Right-click on it and select Stop to stop the Sysmain service.
- Wait a few minutes and then press ESC, Shift, and Ctrl on your keyboard at the same time to open Task Manager. See if the 100% disk usage issue persists.
If it’s no longer 100%, congratulations! You’ve resolved this issue! If the 100% disk usage persists, try the next fix, below.
Fix 3: Update your device drivers
Your 100% disk usage issue may also be caused by a device driver. If the steps above didn’t fix your 100% disk usage issue in Windows 11, you should update your drivers.
You can automatically update all your device drivers to the latest correct version with Driver Easy.
Driver Easy will automatically recognize your system and find the correct drivers for it. You don’t need to know exactly what system your computer is running, you don’t need to risk downloading and installing the wrong driver, and you don’t need to worry about making a mistake when installing.
You can update your drivers automatically with either the 7 days free trial or the Pro version of Driver Easy. It takes just 2 clicks, and you get full support and a 30-day money-back guarantee with the Pro version:
- Download and install Driver Easy.
- Run Driver Easy and click the Scan Now button. Driver Easy will then scan your computer and detect any problem drivers.
- Click the Activate & Update button next to the flagged device to automatically download and install the correct version of this driver.
Or click Update All to automatically download and install the correct version of all the drivers that are missing or out of date on your system (You’ll need the Pro version for this – when you select Update All, you’ll get a prompt to upgrade. If you’re not prepared to purchase the Pro version yet, Driver Easy provides a 7-day trial at no cost, granting access to all Pro features like fast downloads and easy installation. No charges will occur until after your 7-day trial period ends.)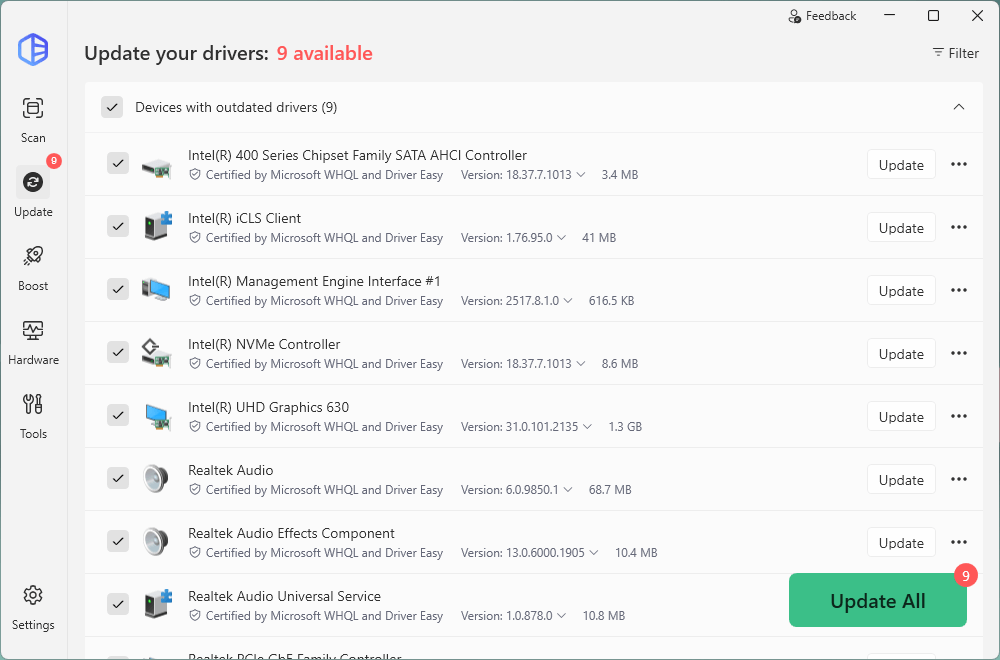
- Open Task Manager and look at the % at the top of the Disk column. See if the disk usage on your Windows 11 computer is 100%. If it’s no longer 100%, you’ve fixed this issue.
If the 100% disk usage problem persists, try the next fix, below.
Fix 4: Reset virtual memory
Virtual memory, or the paging file, is an area on the hard drive that Windows uses as if it were RAM. When your physical memory is running low, Windows will temporarily store files in virtual memory, then swap them back to RAM when required.
Some Windows 11 users find that the 100% disk usage issue can be resolved by resetting virtual memory. To reset virtual memory:
- On your keyboard, press the Windows logo key and R at the same time to invoke the Run dialog. Type
SystemPropertiesAdvancedand press Enter to open the System Properties window.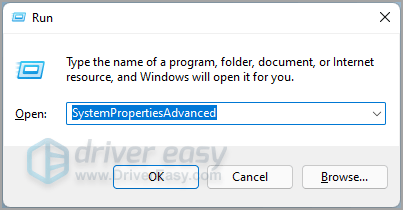
- Click on the Settings… button in the Performance section to view performance options.
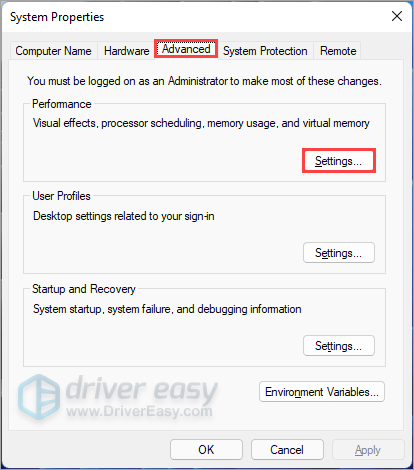
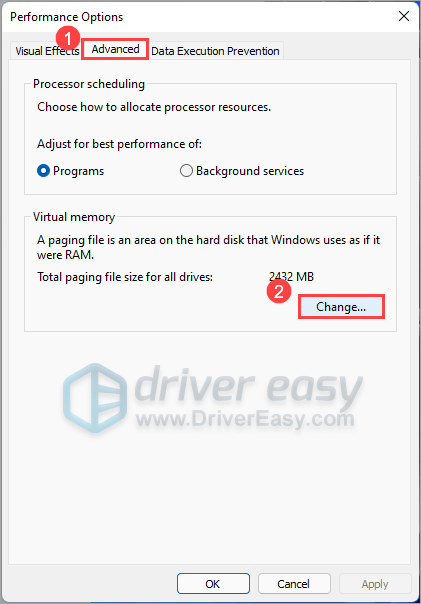
- In the Performance Options window, navigate to the Advanced tab. Then click the Change… button in the Virtual memory section.
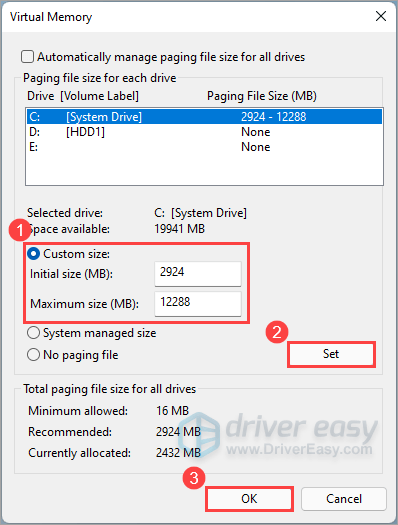
- Uncheck the box next to Automatically manage paging file size for all drives. Select your window drive (the drive or partition that has Windows 11 installed on it – usually C:). Select Custom size to enter an Initial size and Maximum size for your virtual memory:
– Initial size – If you’re not sure what value to use, just enter whatever the number is in the Recommended category.
– Maximum size – The maximum size should be about 1.5 times the size of your physical RAM. For example, a PC with 8 GB (8,192 MB) of RAM should have no more than about 12,288 MB virtual memory (8192 MB x 1.5). - Once you’ve entered your virtual memory values, click Set, then click OK to continue.
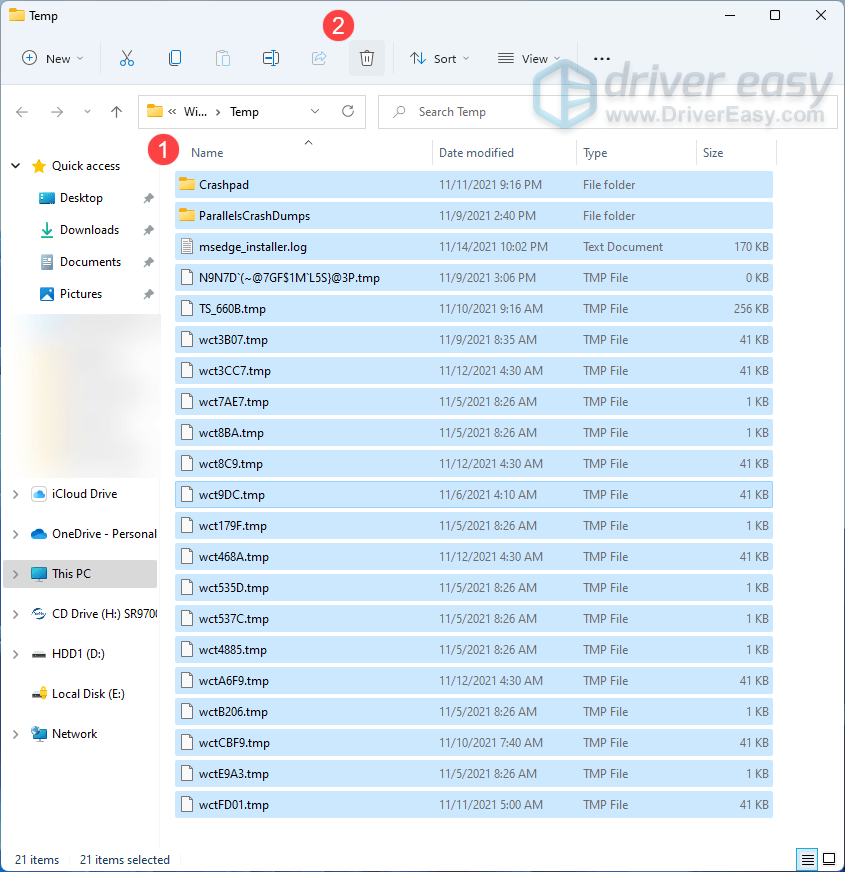
- Clear the temp files on your computer. To do so, on your keyboard, press the Windows logo key and R at the same time to open the Run dialog. Type
tempand press Enter. This will invoke Windows Explorer with your Temp folder open.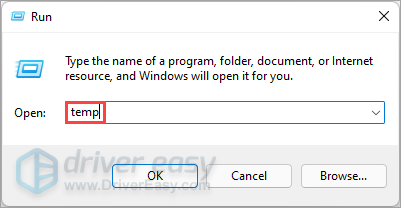
- Select all the files in the Temp folder and delete them.
- Check the disk usage on your computer again. If it’s not 100%, it suggests that this issue has been fixed.
If the 100% disk usage issue remains, try the next fix, below.
Fix 5: Perform a disk check
Hard drive errors may also lead to the 100% disk usage issue. If you are not sure whether there are errors on your hard drive, you can use the built-in CHKDSK (Check Disk) feature to analyze hard drive errors and run repairs automatically.
To perform a disk check, follow the steps below:
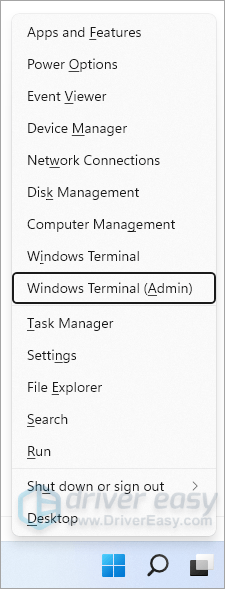
- On your keyboard, press the Windows logo key and X at the same time and choose Windows Terminal (Admin) to open Windows Terminal as administrator.
- In the Windows Terminal window, type in the following command:
chkdsk.exe /f /r - Press Enter on your keyboard, then type Y to confirm that you’d like to perform the disk check the next time you restart your computer.
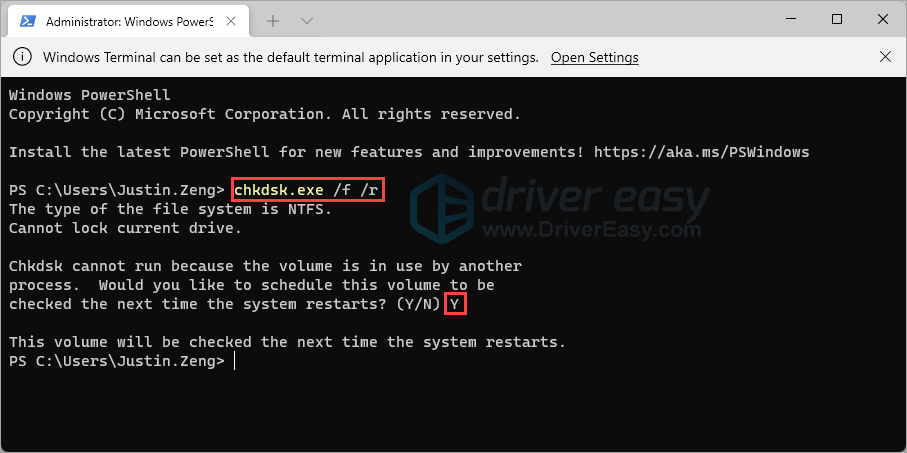
NOTE: Disk check might take some time to complete. When you restart, if you don’t have time to wait for the disk check to complete, you can skip it. You’ll need to reschedule it again, as described above, though. - Once you restart your computer and complete the disk check, open Task Manager to check the disk usage again.
See if the disk usage is still 100% after the disk check, don’t worry. Try the next fix below.
Fix 6: Disable content indexing
By default Windows scans file contents to improve the search experience, which may hamper disk performance on some computers. You can try to disable this feature and see if it fixes your issue.
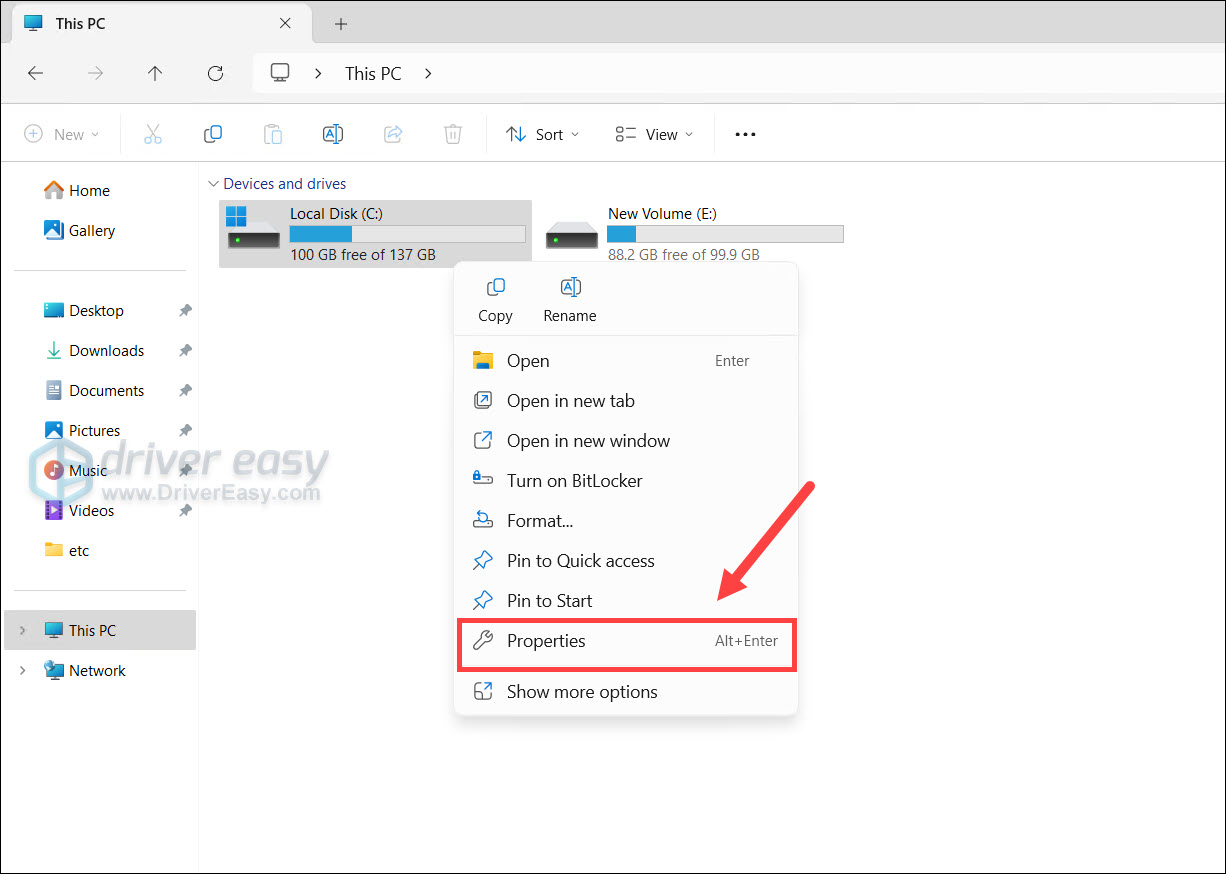
- On your keyboard, press Win+E to open File Explorer. In the left pane, click This PC.
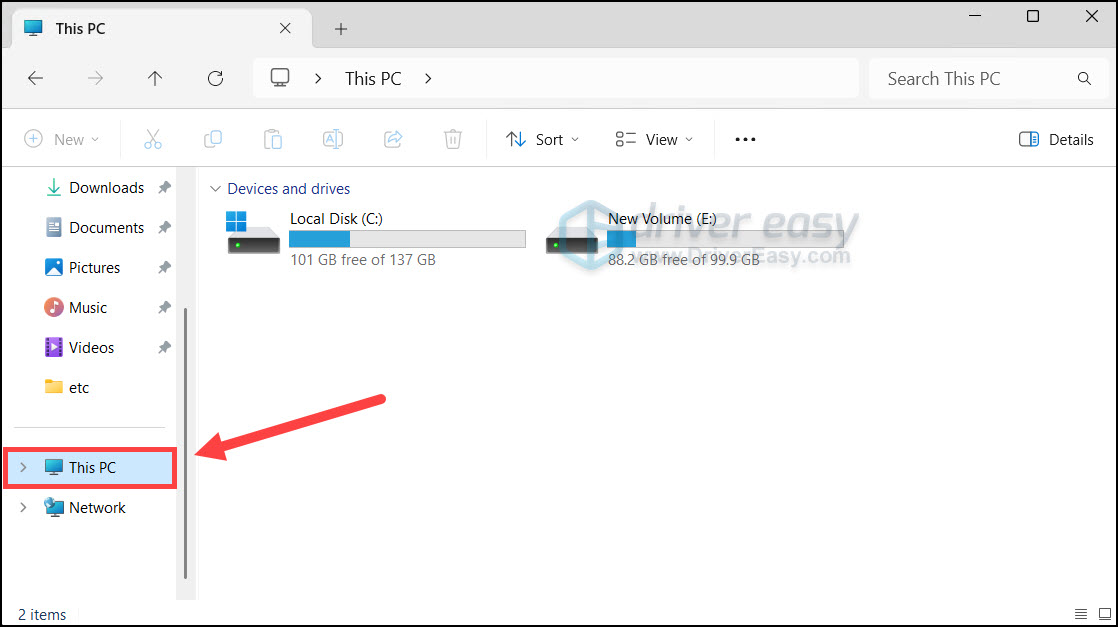
- Right click the system drive (C:) and select Properties.
- (Note that this may take some time to complete since it needs to go through all the files inside that drive. You may want to circle back to this fix if you have unfinished jobs.)
Uncheck the box next to Allow files on this drive to have contents indexed in addition to file properties. Click Apply.
Then you will see a Confirm Attribute Changes pop-up window. Select Apply changes to drive, subfolders and files. And click OK.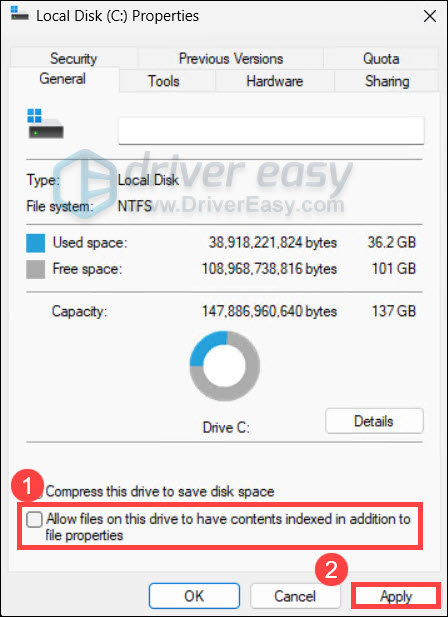
Note that by disabling the content indexing feature, you might not be able to search files in the taskbar search box (You can still search for Apps or Windows features).
Fix 7: Clean boot Windows 11
The 100% disk usage issue may also be caused by some problematic applications or services. If you don’t know which application is causing this issue, you can perform a clean boot to find it out.
A clean boot starts the Windows 11 OS with just the required programs and drivers, which helps you identify the cause behind the 100% disk usage.
To clean boot Windows 11, follow the instructions below:
- On your keyboard, press the Windows logo key and R at the same time to invoke the Run dialog. Type
msconfigand press Enter to open the System Configuration window.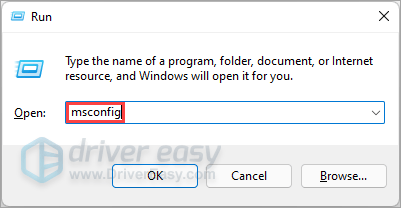
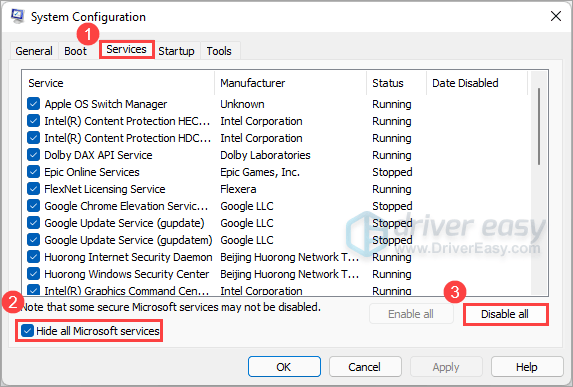
- Navigate to the Services tab, check Hide all Microsoft services, and then click Disable all.
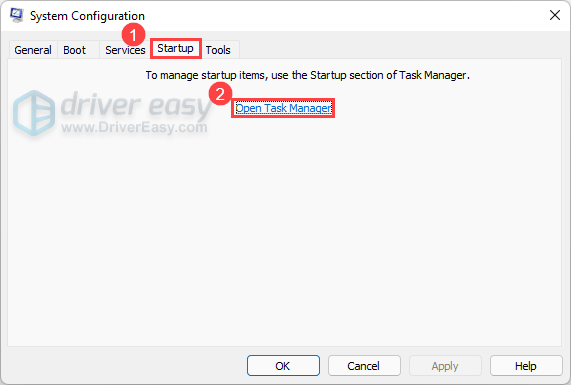
- Select the Startup tab and click Open Task Manager.
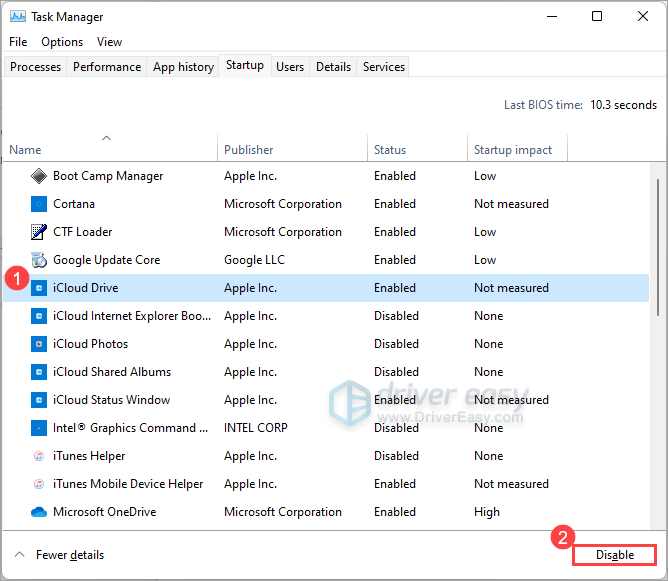
- On the Startup tab in Task Manager, disable the programs you believe may be leading to the 100% disk usage issue. Once done, close Task Manager.
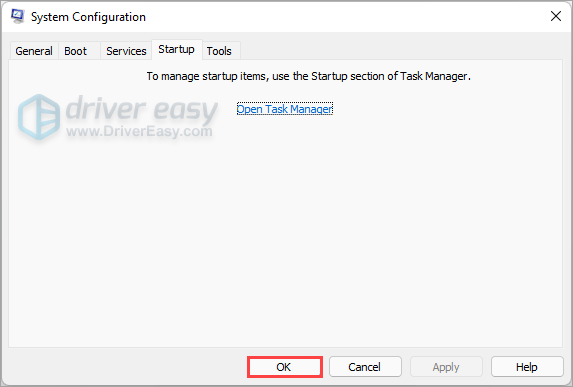
- Go back to the System Configuration window and click OK.
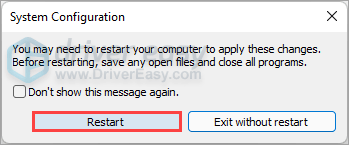
- Click Restart to restart your PC.
Restart your PC and open Task Manager to check if the 100% disk usage persists. If the high disk usage issue reappears, it suggests that it’s not the programs or drivers, but something else that is causing this issue.
However, if the disk usage remains under normal levels most of the time, it may be one of the services or programs you earlier disabled that triggered this issue. In that case, you need to enable them one at a time until you identify the problematic one.
Once you find out the problematic program that is causing the 100% disk usage issues, you can uninstall it to avoid this issue in the future.
Hopefully, one of the fixes above helped you resolve the 100% disk usage issues on your Windows 11 computer. If you have any suggestions or questions, feel free to drop a line in the comment area below. Thanks for reading!