


If you want to connect your Brother printer to your computer but don’t know how to do it, you’ve come to the right place!
This post will guide your through how to connect the Brother printer wirelessly or via a USB cable, quickly and easily!
- Method 1: Connect the printer to your computer
- Method 2: Configure printer settings
- Bonus tip: Update your printer driver automatically
Method 1: Connect your printer to your computer
There are two ways to connect your printer to your computer: wireless connection and wired connection. Here is how to make it:
Connect the printer to your computer wirelessly
If your printer has the wireless capability, make it work wirelessly should always be your go-to option, so you can place your printer in any convenient location in your home.
Here are 2 common ways to connect your printer to your wireless network:
Option 1: Connect your printer to your wireless network using the WPS button
If your printer and router both have a WPS pairing button, press the WPS button on the printer and then press the corresponding button on the router within 2 minutes.
Here is what a WPS pairing button looks like:
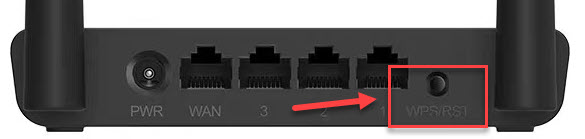
The connection will be completed automatically after you press the button.
Option 2: Connect your printer to your wireless network from your printer’s control panel
If you don’t have the WPS button, go to the Wireless settings on your printer’s control panel. Then, follow the on-screen instructions to enter the Wi-Fi network name and password.
After the wireless connection is made, your computer will detect your printer and install the corresponding driver for it automatically. If it didn’t, follow method 2 to configure your printer on your computer manually.
Connect the printer to your computer via a cable
If you want to connect your printer to your computer via a cable, follow the instructions below to see how to make it:
1) Check the ports on the rear of your printer and your computer to see which type of cables is required to make the connection.
Basically, there are three types of printer cables: the USB AB cable, the Ethernet cable and the parallel cable.

2) Attach the cable to your printer and to your computer.
When you finish this step, your computer will detect your printer and install the corresponding driver for it automatically. If it didn’t, read on and see how to add your printer to your computer manually.
Step 2: Configure printer settings
You’ll need to check which Windows operating system you are in, then follow the instructions below to configure your printer on your computer:
Add your printer to your computer on Windows 7
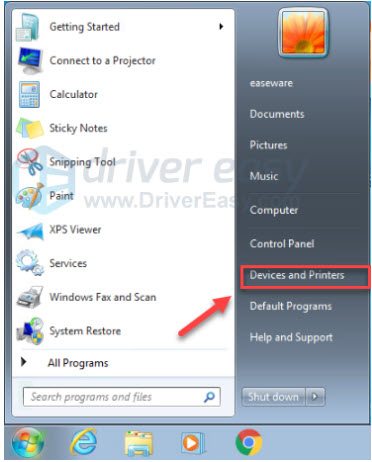
1) Turn on your printer.
2) On your keyboard, press the Windows logo key and select Devices and Printers.
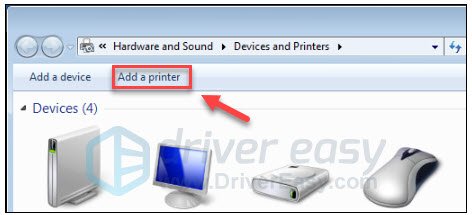
3) Click Add a printer.
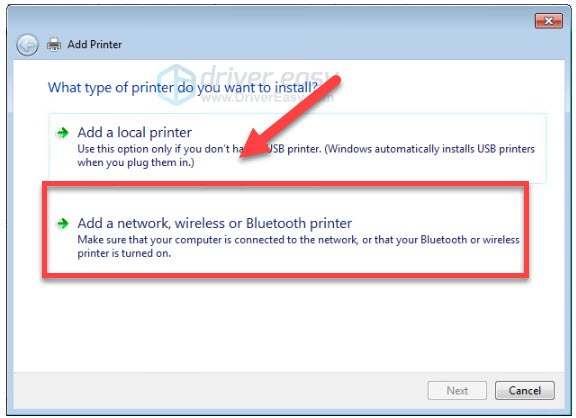
4) Select Add a local printer if your printer is connected to your computer via a cable; otherwise, select Add a network, wireless or Bluetooth printer.
5) Follow the on-screen instructions to install the corresponding driver for your printer.
You should be able to use your printer after you complete this step.
To keep your printer running smoothly, it’s essential that you have the latest correct drivers for your printer at all times. Check our bonus tip to see how to do it.
Add your printer to your computer on Windows 10
1) Turn on your printer.
2) On your keyboard, press the Windows logo key and click the Settings button.
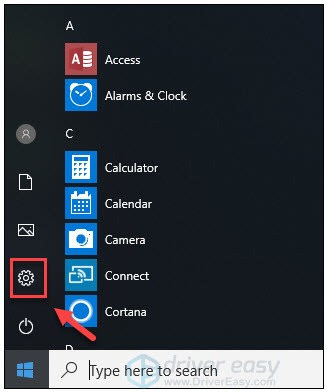
3) Select Devices.
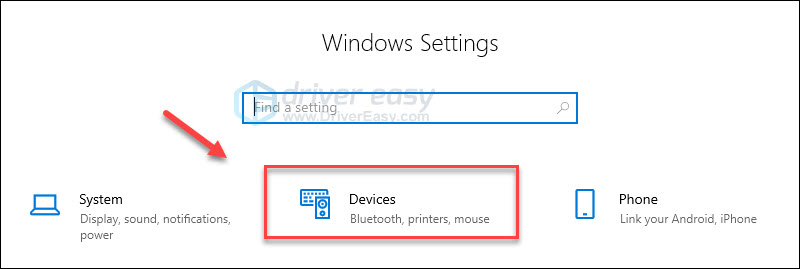
4) Select Printers & scanners, and then click Add a printer or scanner.
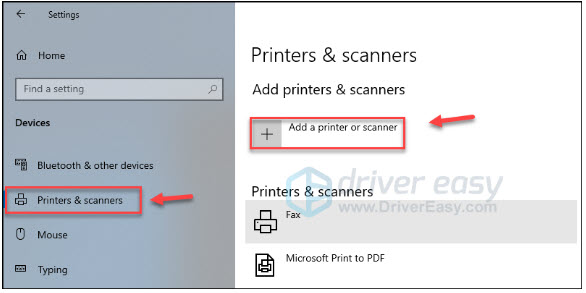
5) Select the printer you want and click Add device.

6) Wait for your computer to install the corresponding driver for your printer.
To keep your printer running smoothly, it’s essential that you have the latest correct drivers for your printer at all times. Check our bonus tip to see how to do it.
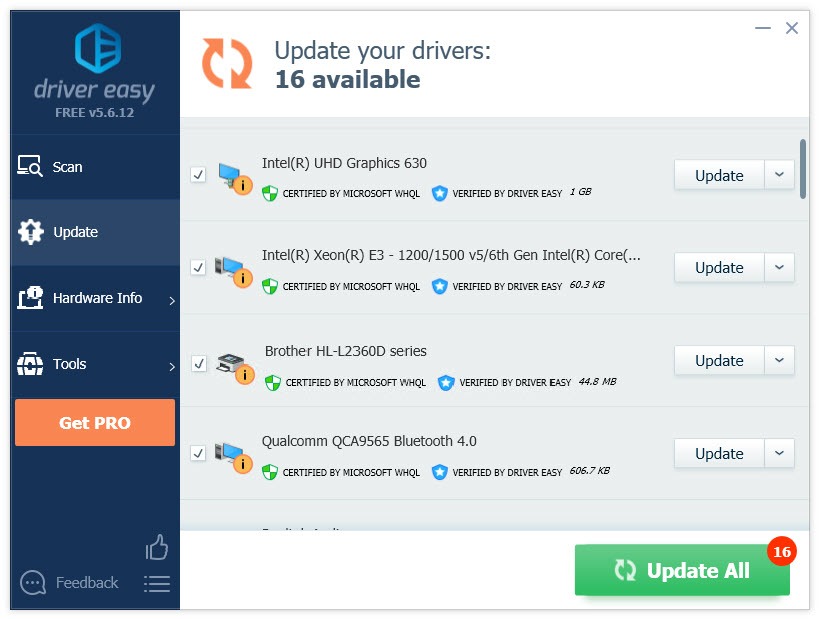
Bonus tip: Update your printer driver automatically
If your printer didn’t work as it should, it’s possible that you are using the wrong printer driver. Manually updating drivers requires time, patience and computer skills. If you don’t feel like updating the driver manually, you can do it automatically with Driver Easy.
Driver Easy will automatically recognize your system and find the correct drivers for it. You don’t need to know exactly what system your computer is running, you don’t need to be troubled by the wrong driver you would be downloading, and you don’t need to worry about making a mistake when installing.
You can update your drivers automatically with either the FREE or the Pro version of Driver Easy. But with the Pro version it takes just 2 steps (and you get full support and a 30-day money back guarantee):
1) Download and install Driver Easy.
2) Run Driver Easy and click the Scan Now button. Driver Easy will then scan your computer and detect any problem drivers.
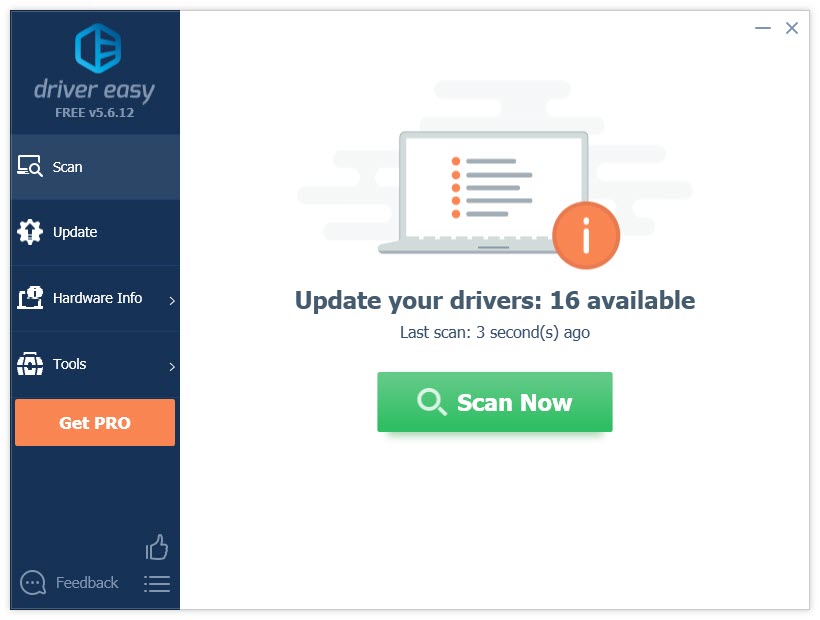
3) Click Update All to automatically download and install the correct version of all the drivers that are missing or out of date on your system (this requires the Pro version – you’ll be prompted to upgrade when you click Update All).
Hopefully, this article helped! Please feel free to leave a comment below if you have any questions and suggestions.