


Your printer stopped working after Windows 10 Update? You’re certainly not alone – hundreds of users are reporting it. The good news is, it’s not hard to fix at all…
How to fix printer stopped working after Windows 10 Update
Here are 5 fixes that have helped other users resolve the printer stopped working after Windows 10 Update problem. You may not have to try them all; just work your way down the list until you find the one that works for you.
- Power cycle your printer
- Make sure your printer is connected
- Update your printer driver
- Reset the print spooler
- Run Windows Troubleshooter
Fix 1: Power cycle your printer
Power cycling is often an effective way to fix mysterious glitches on different devices. So you can give it a try to see if this fixes the problem for you.
Here is how to power cycle your printer:
1) Turn off your printer and unplug it from the power socket.
2) Wait 30 seconds.
3) Plug your printer back in and turn the printer back on.
4) Test to see if your printer works properly. If yes, then great! If the issue remains, please try Fix 2, below.
Fix 2: Make sure your printer is connected
If your printer is not properly connected, your printer probably won’t work. So you should make sure it is well connected.
Once you have confirmed the connection, check to see if the printer not printing problem is fixed. If yes, then you’ve solved the problem. If it still doesn’t work, please try Fix 3, below.
Fix 3: Update your printer driver
This problem may occur if you are using the wrong printer driver or it’s out of date. So you should update your printer driver to see if it fixes your problem. If you don’t have the time, patience or skills to update the driver manually, you can do it automatically with Driver Easy.
Driver Easy will automatically recognize your system and find the correct drivers for it. You don’t need to know exactly what system your computer is running, you don’t need to be troubled by the wrong driver you would be downloading, and you don’t need to worry about making a mistake when installing. Driver Easy handles it all.
You can update your drivers automatically with either the FREE or the Pro version of Driver Easy. But with the Pro version it takes just 2 steps (and you get full support and a 30-day money back guarantee):
1) Download and install Driver Easy.
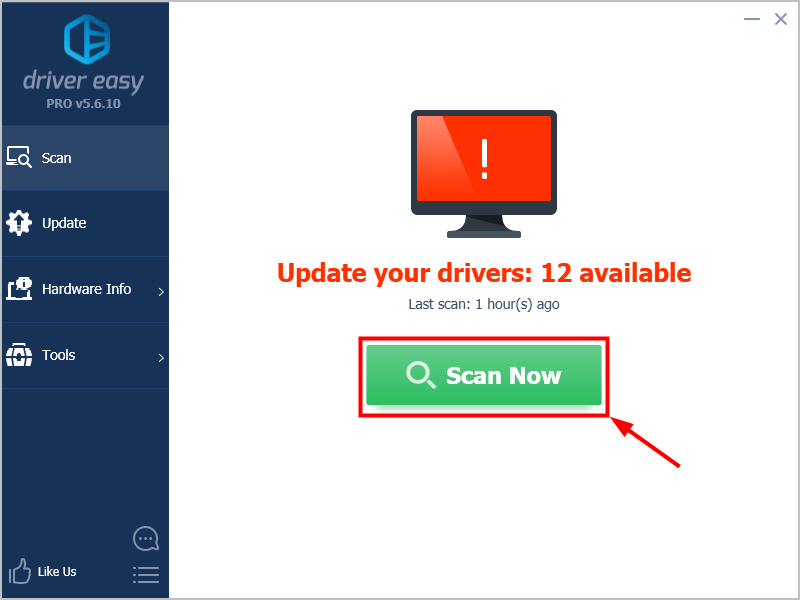
2) Run Driver Easy and click the Scan Now button. Driver Easy will then scan your computer and detect any problem drivers.
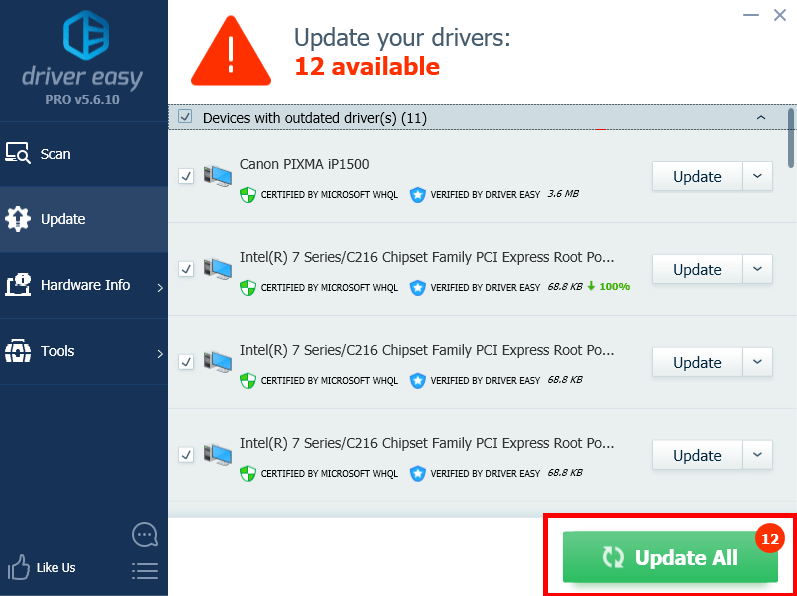
3) Click Update All to automatically download and install the correct version of ALL the drivers that are missing or out of date on your system (this requires the Pro version – you’ll be prompted to upgrade when you click Update All).
4) Restart your computer for the changes to take effect.
5) Check to see if the printer stopped working issue has been resolved. If yes, then congrats! If the problem still persists, please move on to Fix 4, below.
Fix 4: Reset the print spooler
A print spooler is a software program in Windows that manages the print jobs being sent to the printer. If your printer suddenly stops working, you can reset the spooler service to see if solves the problem.
Here is how to do it:
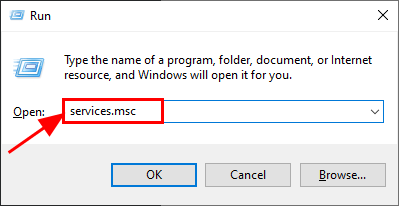
1) On your keyboard, press the Windows logo key and R at the same time, then type services.msc and press Enter.
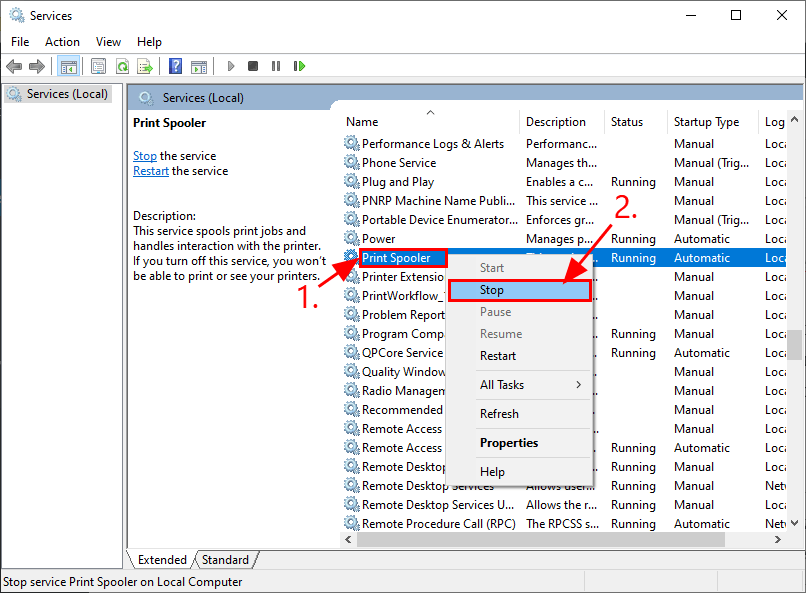
2) In the Services window, scroll down until you find Print Spooler, then right-click on it and click Stop.
3) On your keyboard, press the Windows logo key and R at the same time, then type %WINDIR%\system32\spool\printers and press Enter.
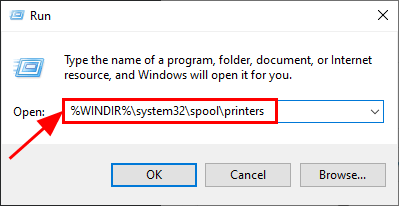
4) Select all the files within the folder and delete them. This is to clear the print queues.
5) Go back to the Services window, locate Print Spooler and double-click on it.

6) Click Start, then in Startup Type, select Automatic and click OK to save the changes.

7) Check to see if your printer works properly. If it still doesn’t work, please move on to Fix 5, below.
Fix 5: Run Windows Troubleshooter
Windows comes with a number of ‘troubleshooters’ that are designed to detect the hardware components on your computer and solve the issues for you. So you can run the printer troubleshooter to see if it can detect the problem and hopefully sort it out.
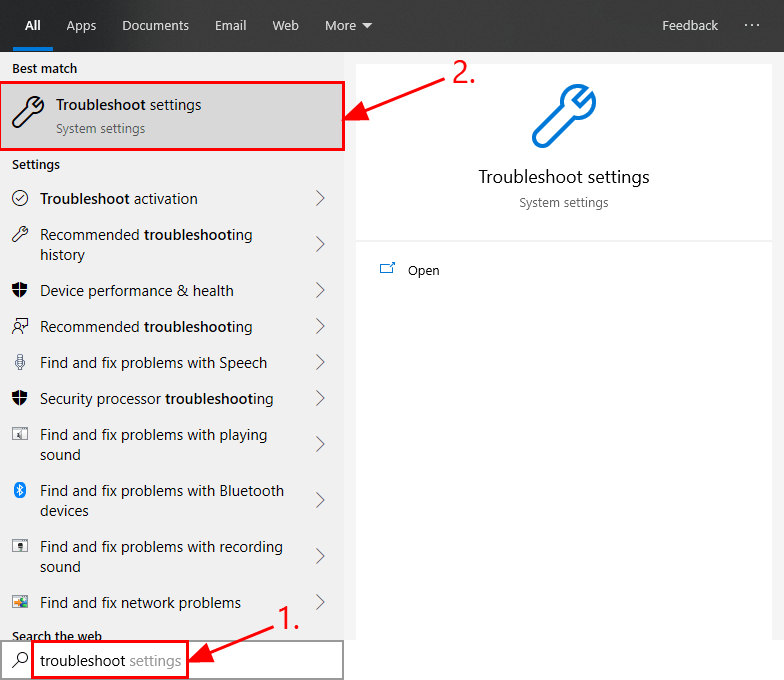
1) On your keyboard, press the Windows logo key and type troubleshoot, then click on Troubleshoot settings once it pops up as a search result.
2) In the Troubleshoot window, scroll down to the Get up and running section, click on Printer > Run the troubleshooter.

3) Wait for Windows to diagnose the problem and follow the on-screen instructions to resolve the printing not working situation.
Hopefully you have successfully fixed the printer stopped working after Windows 10 Update by now. If you have any ideas, suggestions or questions, please leave us a comment below. Thanks for reading!