


Many players reported that SteamVR isn’t working correctly, like crashing or not starting, and this has completely spoiled their VR experience. If you happen to be one of them, don’t worry. You don’t have to search for the solutions everywhere. In this post, we’ve rounded up all the common & effective fixes for the SteamVR not working issue.
Fixes to try:
Here are 8 fixes that helped other players with SteamVR not working. It’s suggested you try the solutions one by one until the issue gets fixed.
- Change the PC power plan
- Update your graphics driver
- Adjust the NVIDIA settings
- Run Steam as an administrator
- Disable SteamVR add-ons
- Opt into SteamVR beta
- Verify the integrity of tool files
- Disable in-game overlay
If you’re using Oculus devices with SteamVR but bump into some weird audio problems, here are other guides to troubleshoot your Oculus Rift S and Quest 2.
Fix 1 – Change the PC power plan
If your computer is running on the Balanced or Power saver plan as default, try switching to the High Performance option. This will increase the PC performance and might solve your SteamVR not working issue.
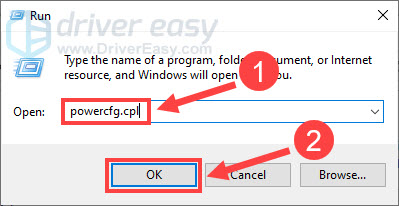
- On your keyboard, press the Windows logo key and R at the same time to open the Run command. Then, type powercfg.cpl and click OK.
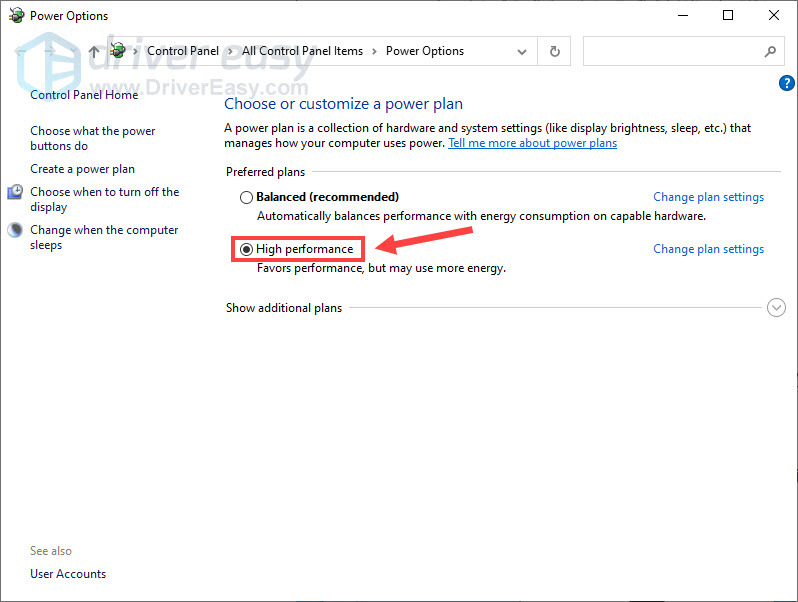
- Select High performance. If you don’t see it, click the downward arrow next to Show additional plans to expand the list.
After the changes are applied, test your SteamVR again. If the issue is still there, check out the second fix.
Fix 2 – Update your graphics driver
To ensure SteamVR runs properly and brings the best possible VR gameplay, it’s necessary for you to install the latest graphics driver on your PC. If the GPU driver is outdated or corrupted, you’ll run into various issues during the VR gaming. To update your graphics driver the right way, here are two options: manually or automatically (recommended).
Option 1 – Download and install the driver manually
GPU manufacturers keep updating their drivers for performance improvements. To update your driver manually, you need to visit the website of AMD or NVIDIA and find the drivers corresponding with your specific flavor of Windows version (for example, Windows 32 bit).
Once you’ve downloaded the correct drivers for your system, double-click on the downloaded file and follow the on-screen instructions to install the driver.
Option 2 – Automatically update your graphics driver
If you don’t have the time, patience or computer skills to update the graphics driver manually, you can do it automatically with Driver Easy.
Driver Easy will automatically recognize your system and find the correct drivers for it. You don’t need to know exactly what system your computer is running, you don’t need to risk downloading and installing the wrong driver, and you don’t need to worry about making a mistake when installing.
You can update your drivers automatically with either the 7 days free trial or the Pro version of Driver Easy. It takes just 2 clicks, and you get full support and a 30-day money-back guarantee with the Pro version:
- Download and install Driver Easy.
- Run Driver Easy and click the Scan Now button. Driver Easy will then scan your computer and detect any problem drivers.

- Click the Activate & Update button next to the flagged device to automatically download and install the correct version of this driver.
Or click Update All to automatically download and install the correct version of all the drivers that are missing or out of date on your system (You’ll need the Pro version for this – when you select Update All, you’ll get a prompt to upgrade. If you’re not prepared to purchase the Pro version yet, Driver Easy provides a 7-day trial at no cost, granting access to all Pro features like fast downloads and easy installation. No charges will occur until after your 7-day trial period ends.)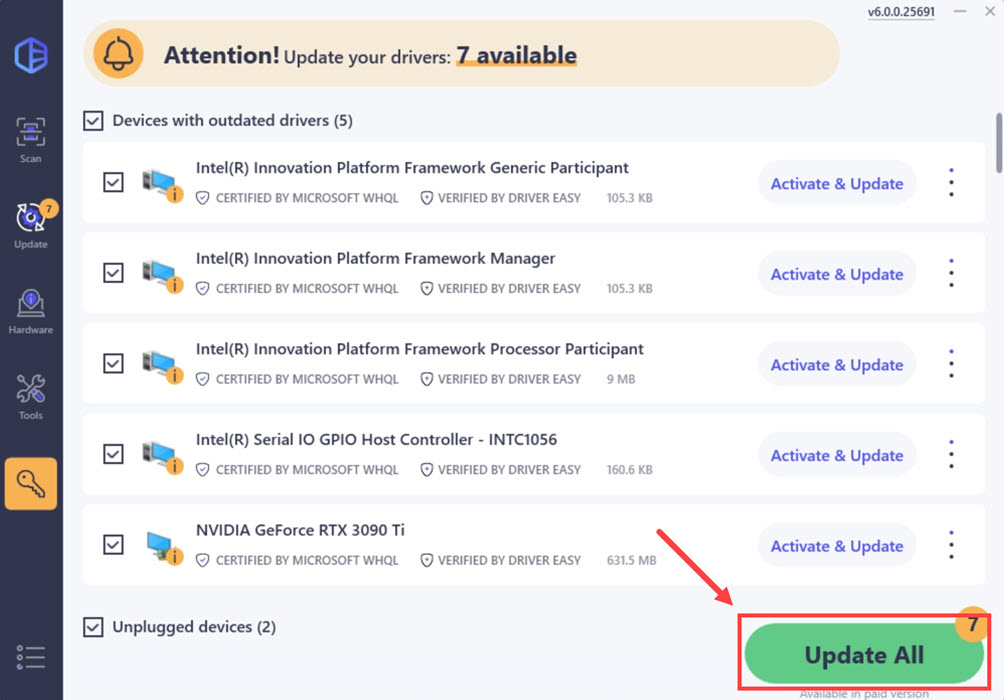
- After updating, restart your computer to take effect.
Driver update is a solid fix for many types of program glitches. But if it doesn’t help your case, take a look at the following fixes.
Fix 3 – Adjust the NVIDIA settings
If you’re using an NVIDIA graphics card, you should set the power management mode correctly to avoid performance issues with SteamVR. Here’s how:
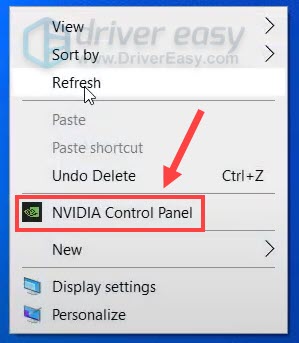
- Right-click any empty space on your desktop and click NVIDIA Control Panel.
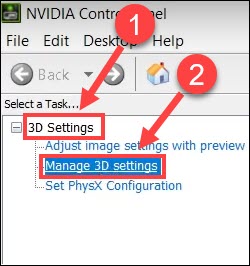
- Select 3D settings > Manage 3D settings from the left pane.
- Click the Program Settings tab and click Add to select Steam to customize.
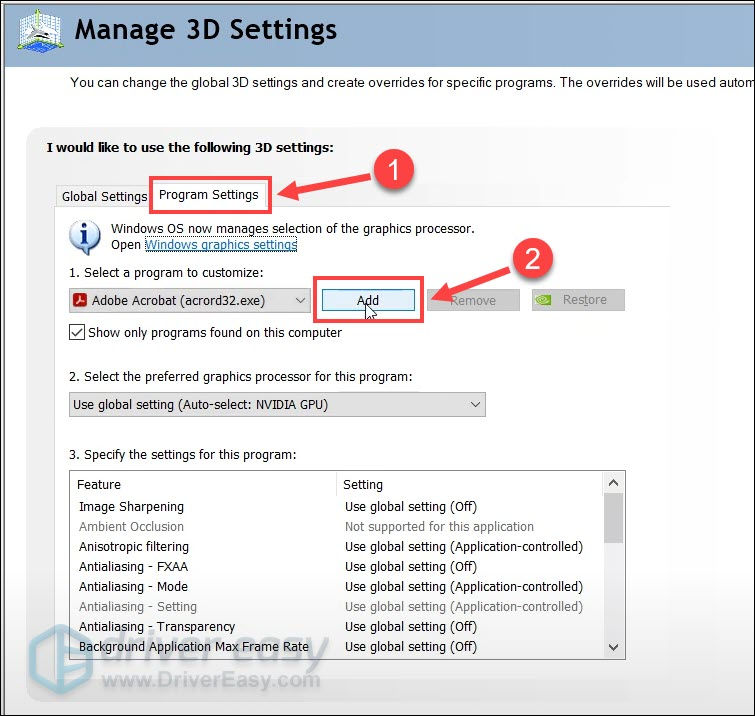
- In the settings list, locate Power management mode and set it to Prefer maximum performance.
Once completed, check if SteamVR returns to normal. If the problem reoccurs, there are a few more methods for you.
Fix 4 – Run SteamVR as an administrator
SteamVR won’t work properly when your Steam client fails to access the necessary permissions it requires. So to resolve this, you should run Steam as an administrator.
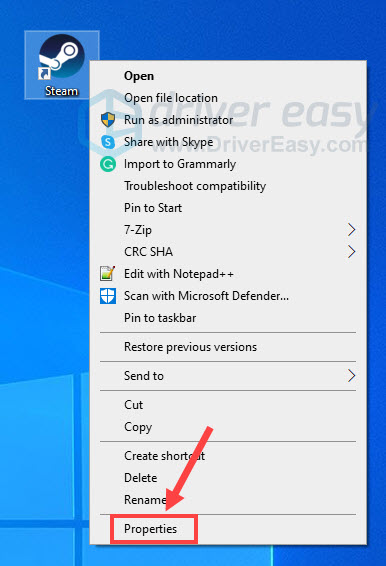
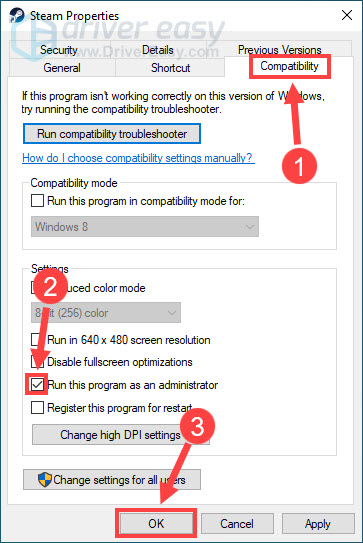
- Right-click the Steam icon on your desktop and select Properties.
- Navigate to the Compatibility tab. Then tick Run this program as an administrator and click OK.
Relaunch SteamVR to see if it functions well. If not, move on to the next method below.
Fix 5 – Disable SteamVR add-ons
As some players reported, when certain add-ons are enabled, SteamVR starts to malfunction. You can simply disable them all or do it one by one to identify the cause.
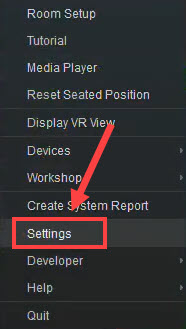
- Launch SteamVR. Then click the icon at the top left corner and select Settings.
- Select the Startup/Shutdown tab.
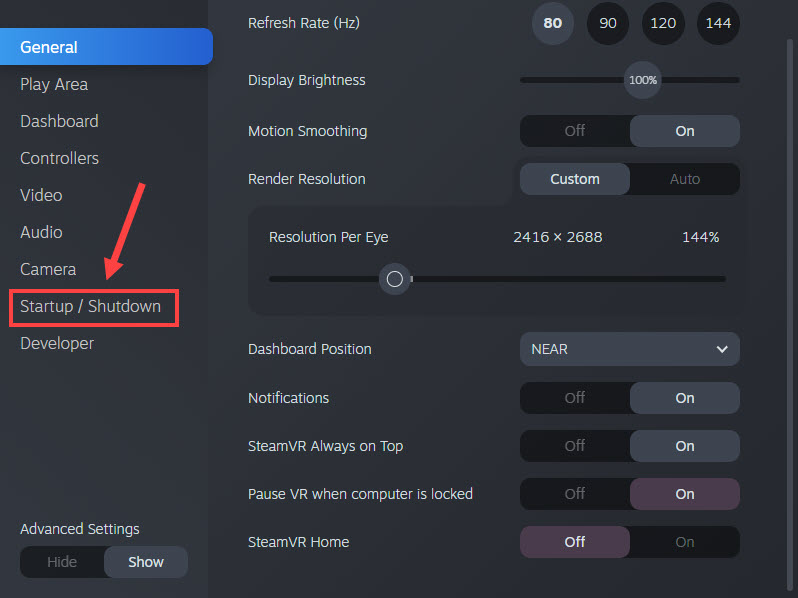
- Click MANAGE ADD-ONS.
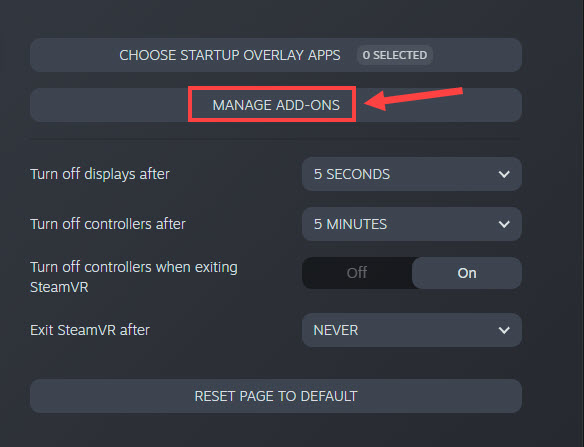
- Disable all the add-ons or you could test each one until you find what triggers the problem.
Does SteamVR work as expected? If not, check out the next solution.
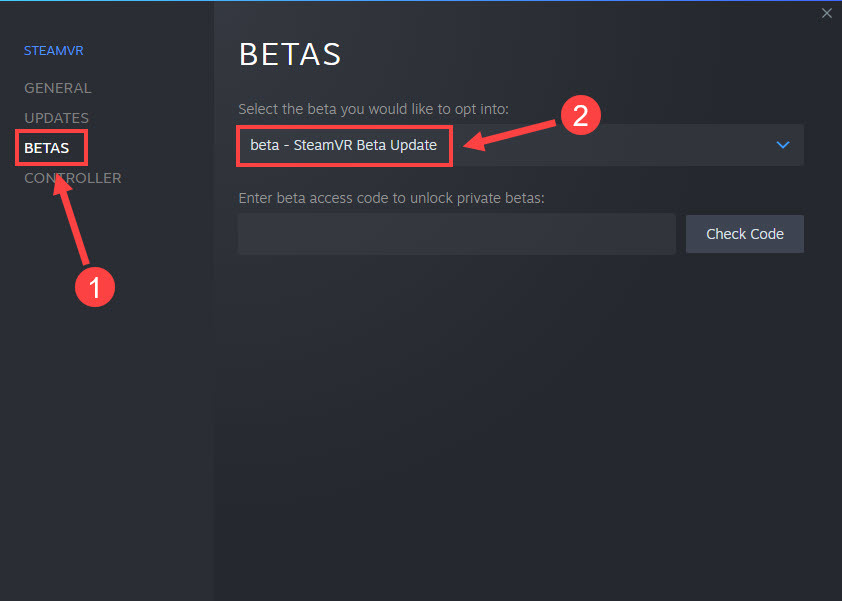
Fix 6 – Opt into SteamVR beta
If SteamVR isn’t performing the right way, then consider enrolling in the Beta version. It delivers the latest features and comes with bug fixes that may bring your SteamVR back on track.
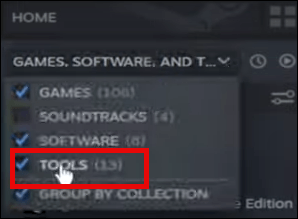
- Launch the Steam client and go to the Library tab. Make sure the TOOLS option is selected on the search bar.
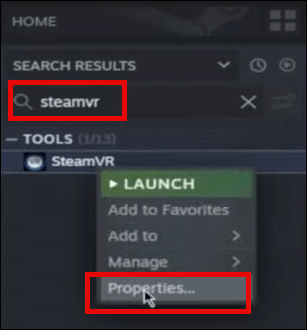
- Search for Steamvr and click SteamVR from the list and click Properties.
- Select the BETAS tab. Then on the right pane, choose beta – SteamVR Beta Update from the drop-down menu and close the window.
Restart SteamVR to see if it runs without trouble now. If not, revert the settings back and proceed to the last fix.
Fix 7 – Verify the integrity of tool files
If the above method doesn’t help, you can also try to verify the integrity of tool files to see it fixes the Steam VR issue. To do so:
- Launch the Steam client and go to the Library tab. Make sure the TOOLS option is selected on the search bar.
- Search for Steamvr and click SteamVR from the list and click Properties.
- Select LOCAL FILES on the left side panel, and click Verify integrity of tool files…
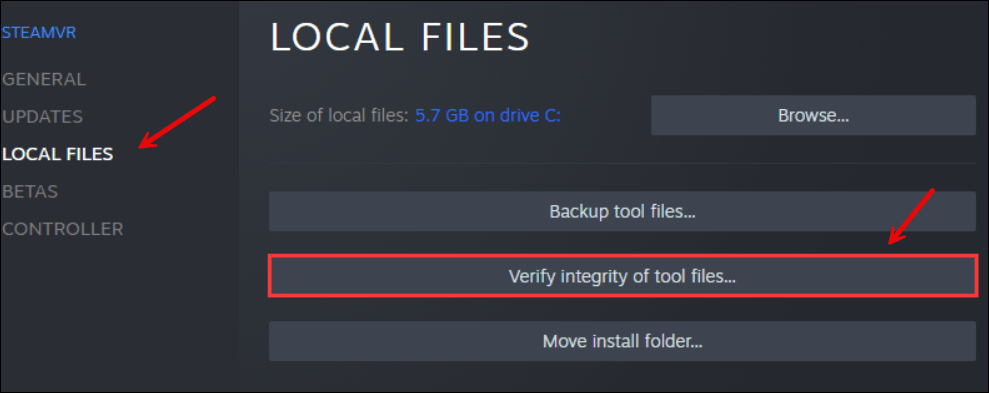
- Wait for the verification to finish.
Check if your Steam VR is back on track. If not, please move on to the next fix below.
Fix 8 – Disable in-game overlay
According to other players, the in-game overlay can also be a culprit of the SteamVR not working problem. To see if that’s the cause, try to disable any overlays you’re using on Steam, NVIDIA GeForce Experience or Discord.
Below we’ll show you how to turn off the Steam overlay:
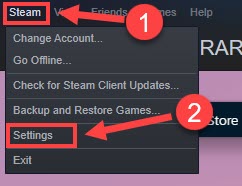
- Launch Steam. Then click Steam at the top left corner and click Settings.
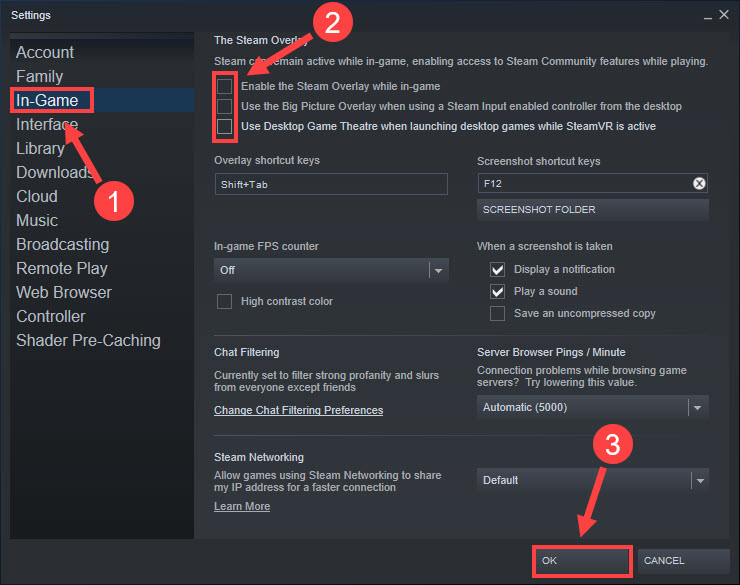
- Select the In-Game tab and uncheck the boxes as the screenshot. Then click OK to save the changes.
Try SteamVR with your devices and see if everything works fine now. If all the fixes above didn’t do the trick, try to perform a full system repair.
Hopefully this post helped. If you have further questions or suggestions, please feel free to leave a comment below.