


USB device not recognized message pops up or nothing happens after plugging in your devices? It can be rather infuriating when your USB ports go on strike for no reason. But don’t panic. You can fix it easily. This guide should resolve your problem.
Try these fixes
There are 6 possible solutions here. You may not need to try them all; just work your way down until you find the one that works for you.
- Restart your laptop
- Adjust Power Management
- Reinstall USB drivers
- Update USB drivers
- Disable USB Selective Suspend
- Remove your laptop battery
Before getting started
Before getting started, you can try some easy testings first. It can save you a lot of trouble by doing so.
1. Physical damage of USB ports?
Take a close look at your USB ports to see if there is anything stuck inside. Gently remove it if you see something down there.
If the USB port looks okay physically and there is no obstruction inside it. You can plug a USB device into the port and try to wiggle it up and down gently. If it wiggles with ease, that’s a sign that the port’s damaged.
2. Device problems?
If you have another computer or laptop at hand, then try plugging your USB device into it. If it starts to work, then you should know it’s a USB port problem.
If it still doesn’t work, then you will know it’s a device problem.
If you don’t have a spare computer, but you do have an extra USB device, then try plugging it in to rule out the device problem.
Fix 1: Restart your laptop
Sometimes, a simple reboot can fix an unrecognized USB device. Plug your USB device out, wait for a few minutes, then restart your laptop. Plug your USB device back in again to see if it works.
Luckily, it will resolve your problem all at once, and you don’t need to worry about it anymore.
If not, you’ll need to move on to the next fix.
Fix 2: Adjust Power Management
In order to save power, Windows switches your USB controllers off when they’re not in use, and switches them back on again when they’re needed. Unfortunately, sometimes Windows fails to switch your USB controllers again.
To rule this out as the cause, you will need to adjust its Power Management by following the steps below:
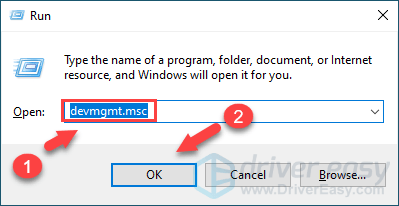
1) On your keyboard, press the Windows logo key and R at the same time to invoke the Run box. Then type devmgmt.msc in the box and click OK.
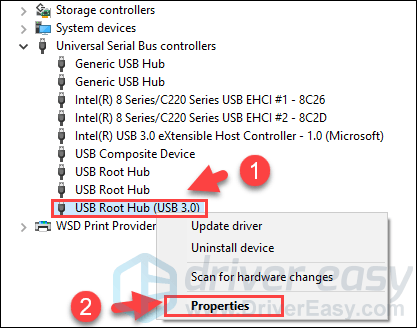
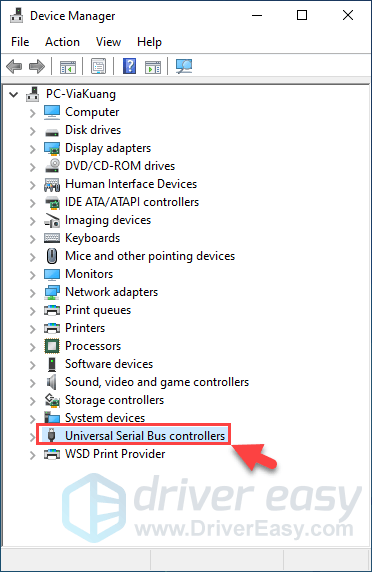
2) In the Device Manager window, double click Universal Serial Bus controllers to expand the drop-down list.

3) Right click USB Root Hub device in the list, and select Properties.
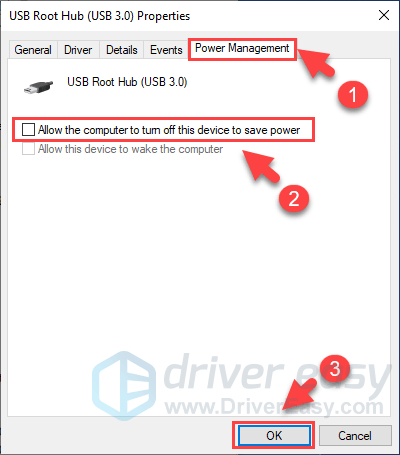
4) Click the Power Management tab. Then uncheck the Allow the computer to turn off this device to save power option, and click OK.
5) Repeat steps 3-4 for each USB Root Hub device in your list of Universal Serial Bus controllers.

After completing the steps above, you can check if your USB ports work again. If it works properly, then congrats! If not, you can try the next method.
Fix 3: Reinstall USB drivers
You can also try uninstalling all USB devices from your system with Device Manager. Windows will reinstall the USB drivers automatically after restarting.
1) On your keyboard, press the Windows logo key and R at the same time to invoke the Run box. Then type devmgmt.msc in the box and click OK.
2) Double click Universal Serial Bus controllers to expand the drop-down list.
3) Right-click USB Root Hub device in the list, and select Uninstall device.
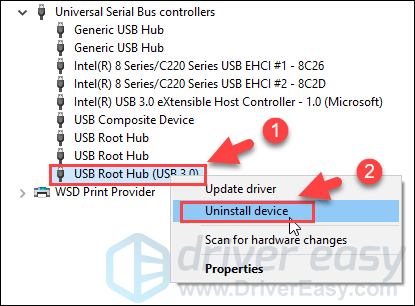
4) Repeat steps 3-4 for each USB Root Hub device in your list of Universal Serial Bus controllers.
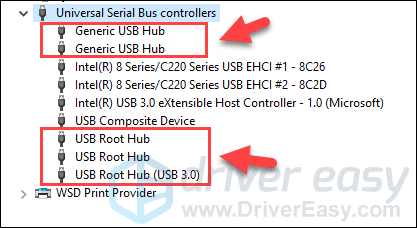
5) Restart your laptop to take effect. See if the USB ports work again.
Fix 4: Update USB drivers
If the steps above don’t resolve your problem, it’s very likely that you’re using a wrong or outdated USB driver altogether. Your USB drivers need an update. If you’re not confident playing around with drivers manually, you can do it automatically with Driver Easy.
Driver Easy will automatically recognize your system and find the correct drivers for it. You don’t need to know exactly what system your computer is running, you don’t need to risk downloading and installing the wrong driver, and you don’t need to worry about making a mistake when installing.
You can update your drivers automatically with either the FREE or the Pro version of Driver Easy. But with the Pro version it takes just 2 clicks (and you get full support and a 30-day money back guarantee):
1) Download and install Driver Easy.
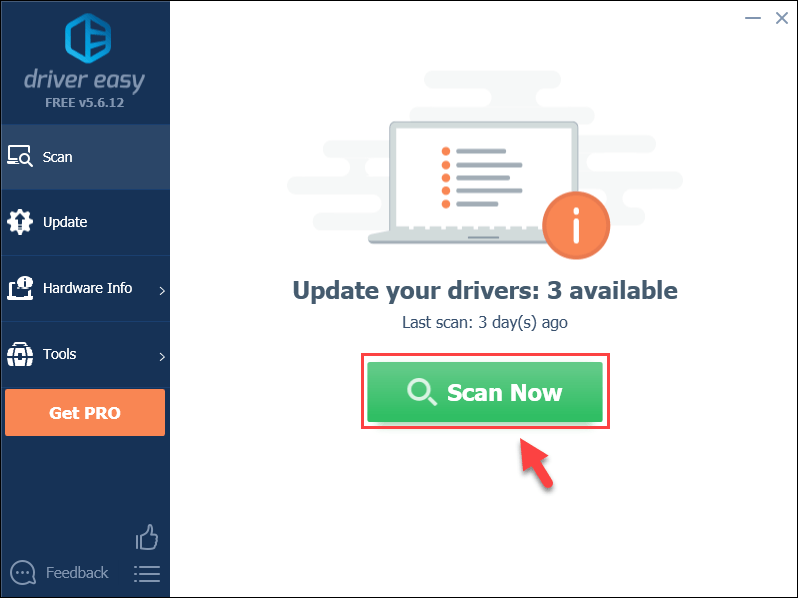
2) Run Driver Easy and click Scan Now button. Driver Easy will then scan your computer and detect any problem drivers.
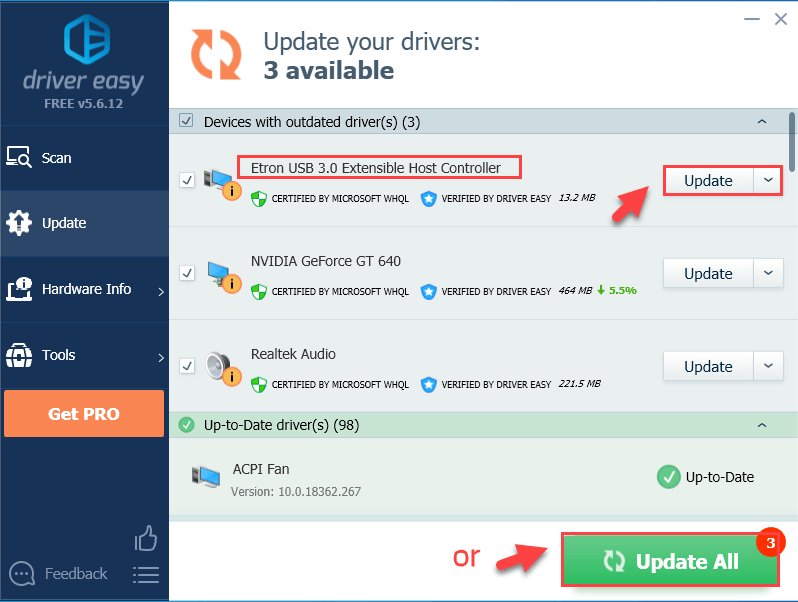
3) Click the Update button next to a flagged USB driver to automatically download the correct version of this driver, then you can manually install it (you can do this with the FREE version).
Or click Update All to automatically download and install the correct version of all the drivers that are missing or out of date on your system (this requires the Pro Version – you’ll be prompted to upgrade when you click Update All).
4) Restart your laptop for the changes to take effect.
After completing the steps above, your USB drivers should be up-to-date. See if the USB ports on your laptop work properly now.
Fix 5: Disable USB Selective Suspend
If the USB problem still exists, you can try to disable USB Selective Suspend. USB Selective Suspend prevents your computer from using too much unnecessary power by putting a certain USB port(s) in a low-power state. Disabling this feature might help you solve your USB problems.
1) Type choose a power plan in the search box and click Choose a power plan.

2) Click Change plan settings next to the plan option you’re having now.

3) Click Change advanced power settings.
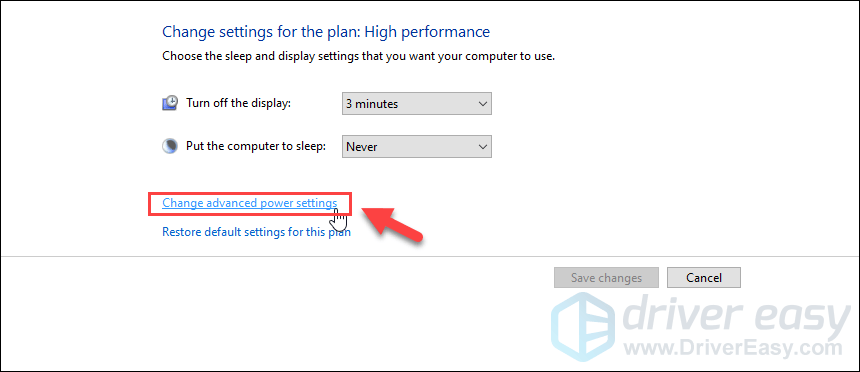
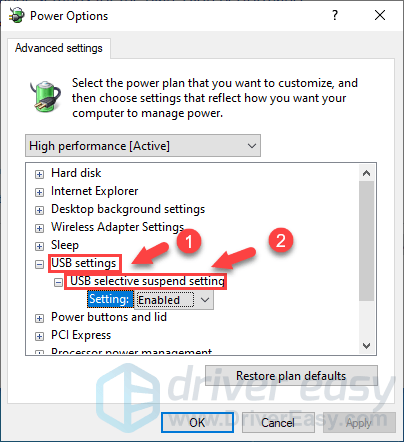
4) Double click USB settings, then double click USB selective suspend setting.
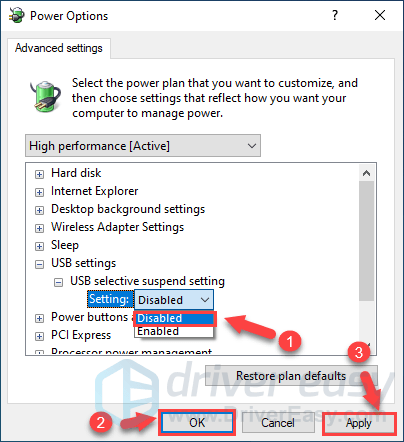
5) Click Enabled to expand the drop-down list, then select the Disabled option. Finally, click Apply and OK to save the change.
You can see if your USB ports work properly again now.
Fix 6: Remove your laptop battery
If USB ports are still not working on your laptop, you might be able to fix this problem by removing your laptop battery.
According to users, many of them fixed the problem by removing the battery and keeping the power button pressed for 30 seconds or more.
By doing that you’ll cause your capacitors to discharge completely. Some users are also recommending leaving your laptop turned off without a battery over the night in order for capacitors to fully discharge.
After doing that, the problem with the USB should be resolved completely.