


It’s really annoying when you find your Windows 11 PC failed to enter sleep mode and remains on. Many users have complained about Windows 11 won’t sleep and are eager to find a workaround. Don’t worry, you’re not alone. We provide safe and working fixes for you to try.
Try these fixes:
Make sure your PC is safe. Perform a quick virus and malware scan on your device before trying fixes.
You don’t have to try them all; just work your way down the list until you find the one that works for you.
- Unplug your external devices
- Check for processes and devices
- Use the Power Troubleshooter
- Enable Hybride and Hibernation mode
- Update your device driver
- Stop entering Away Mode
- Perform a clean boot
Fix 1: Unplug your external devices
Let’s start with an easy fix. Unplugging your external devices like mouse and keyboard and see if it fixes your PC won’t enter sleep mode issue.
Many users reported the culprit of the Windows 11 won’t sleep issue is their mouse or keyboard device preventing their PC from entering sleep mode.
If this method works for you, you can try plugging your mouse or keyboard into another USB port and removing the other USB input to see if it works.
Fix 2: Check for processes and devices
This is the further step of Fix 1. Windows has an inbuilt command prompt to help you find the device and processes that prevent your PC into sleep mode. Once you have found out the culprit, you can stop it to fix the issue.
Here’s how:
- Press the Windows logo key + R together to open the Run box.
- Type cmd and press Ctrl + Shift + Enter together to open the Command Prompt as administrator.
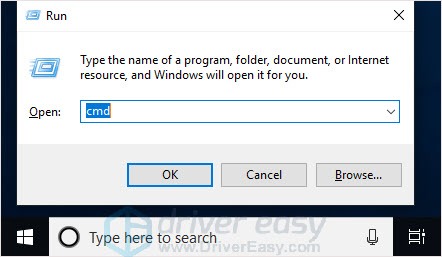
- Type powercfg /requests (there’s a space after g) and press Enter.
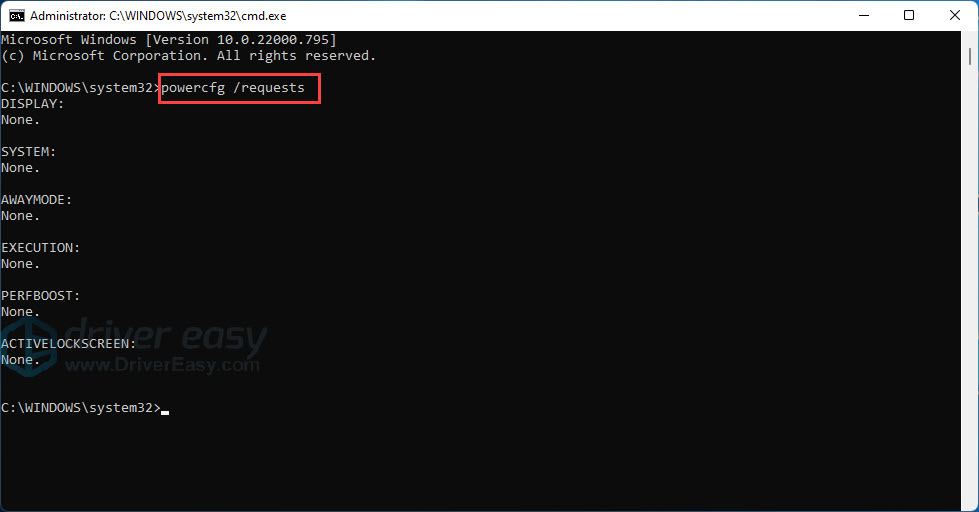
- Disable the program that disrupts sleep mode. Then check whether the problem is resolved or not.
Note that this command line can’t guarantee to find out all the disrupting processes that prevent your PC into sleep mode. So here is the list of possible software that may lead to the Windows 11 won’t sleep issue. If your PC has one of them, you may disable it and see if it makes a difference.
- GOG Galaxy
GOG may have a hotfix to fix the issue - In-Game Overlay in GeForce Experience
Turn off In-Game Overlay and see the result. - explorer.exe
Disable the program to check and then restart explorer.exe manually to see if it fixes.
Fix 3: Use the Power Troubleshooter
Windows system has an inbuilt program to help you solve problems easily. You can give it a try as it’s easy and does fix the issue for some users.
- Press the Windows logo key + I. In the System tab, click Troubleshoot.

- Click Other troubleshooters and then scroll down to find Power. Click the Run button.
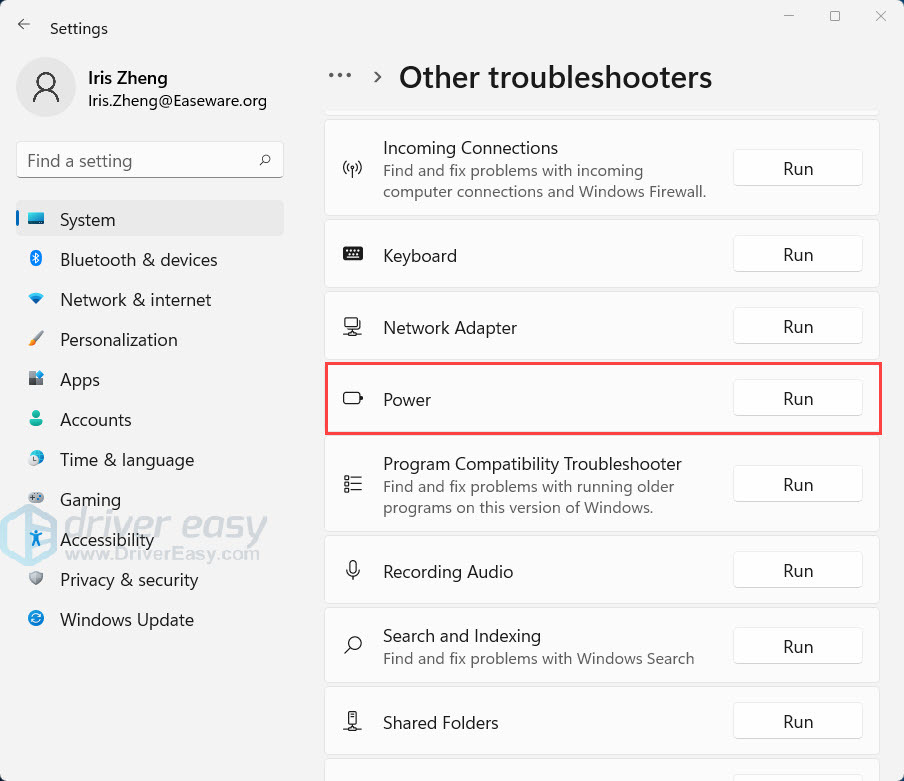
- Follow the on-screen instructions to finish the process.
- Check whether Windows 11 won’t sleep issue is resolved or not.
Fix 4: Enable Hybride and Hibernation mode
Although Hibernation mode and sleep mode are different things, you can enable Hibernation mode to let your PC rest without shutting it down. Save the PC power by following steps:
- Press the Windows key + S together and type control panel.
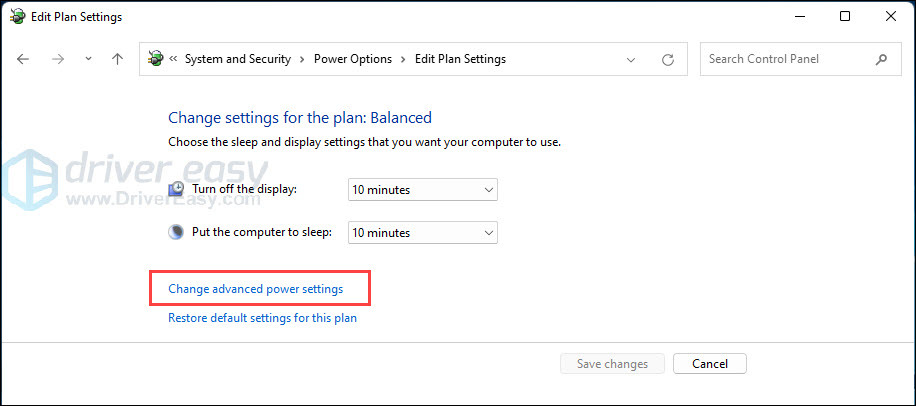
- Open Control Panel. Click System and Security > Power Options and select Balanced (recommended). Then click Change plan settings.
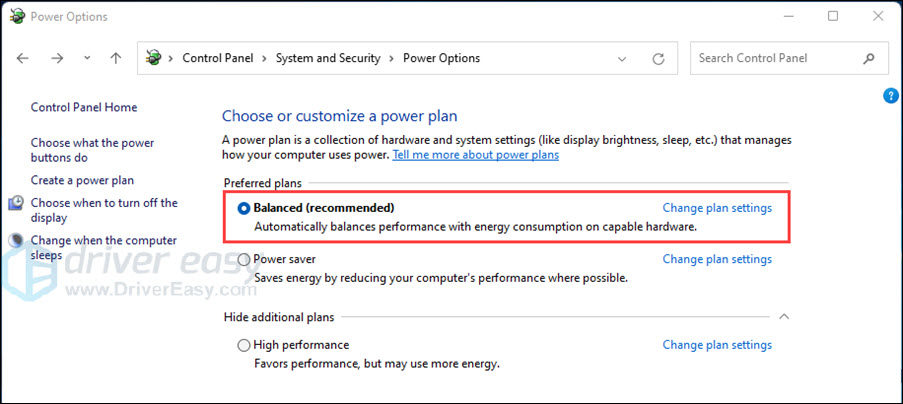
- Click Change advanced power settings.
- Click Sleep > Allow hybrid sleep > Setting. Select On.
Click Hibernate after > Settings and set the time you want.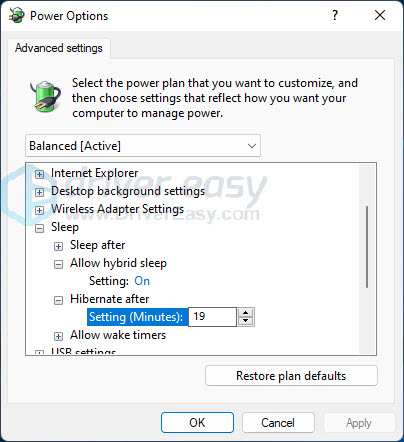
- Click Apply > OK.
Fix 5: Update your device driver
Your hardware may have an incompatible driver which leads to the Windows system can’t go to Sleep Mode. Updating your drivers to the correct and the latest version may solve the issue.
There are two ways you can update your drivers:
Option 1 – Manually – You’ll need some computer skills and patience to update your drivers this way because you need to find exactly the right driver online, download it and install it step by step.
OR
Option 2 – Automatically (Recommended) – This is the quickest and easiest option. It’s all done with just a couple of mouse clicks – easy even if you’re a computer newbie.
Option 1 – Download and install the driver manually
Devices keep updating drivers. To get them, you need to go to the manufacturer’s website, find the drivers corresponding with your specific flavor of Windows version (for example, Windows 32 bit) and download the driver manually.
Once you’ve downloaded the correct drivers for your system, double-click on the downloaded file and follow the on-screen instructions to install the driver.
Option 2 – Automatically update drivers
If you don’t have the time, patience or computer skills to update drivers manually, you can do it automatically with Driver Easy.
Driver Easy will automatically recognize your system and find the correct drivers for it. You don’t need to know exactly what system your computer is running, you don’t need to risk downloading and installing the wrong driver, and you don’t need to worry about making a mistake when installing.
You can update your drivers automatically with either the 7 days free trial or the Pro version of Driver Easy. It takes just 2 clicks, and you get full support and a 30-day money-back guarantee with the Pro version:
- Download and install Driver Easy.
- Run Driver Easy and click the Scan Now button. Driver Easy will then scan your computer and detect any problem drivers.

- Click the Activate & Update button next to the flagged device to automatically download and install the correct version of this driver.
Or click Update All to automatically download and install the correct version of all the drivers that are missing or out of date on your system (You’ll need the Pro version for this – when you select Update All, you’ll get a prompt to upgrade. If you’re not prepared to purchase the Pro version yet, Driver Easy provides a 7-day trial at no cost, granting access to all Pro features like fast downloads and easy installation. No charges will occur until after your 7-day trial period ends.)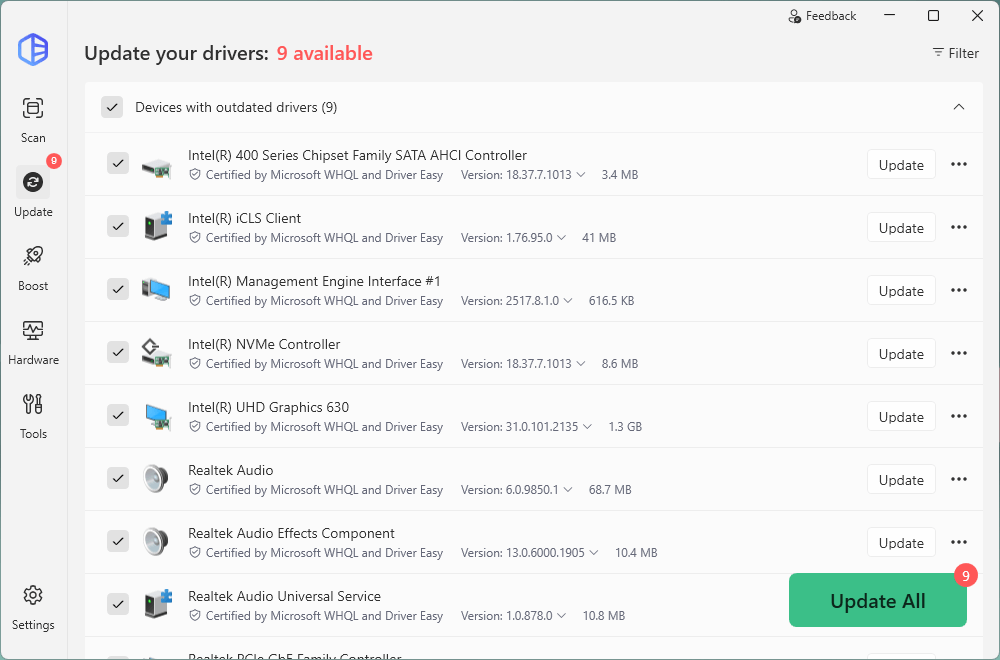
- After updating, restart your computer to take effect.
Fix 6: Stop entering Away Mode
When your system is entering Away Mode, your PC would act like it never sleeps. However, the Away Mode is not visible in the power settings, you need to find it and then turn it off.
Here’s how:
- Press the Windows key + R together to open the Run box. Type regedit and click OK to open Registry Editor.

- Copy and paste the key into the Registry Editor address bar.
HKLM\SYSTEM\CurrentControlSet\Control\Power\PowerSettings\238C9FA8-0AAD-41ED-83F4-97BE242C8F20\25DFA149-5DD1-4736-B5AB-E8A37B5B8187
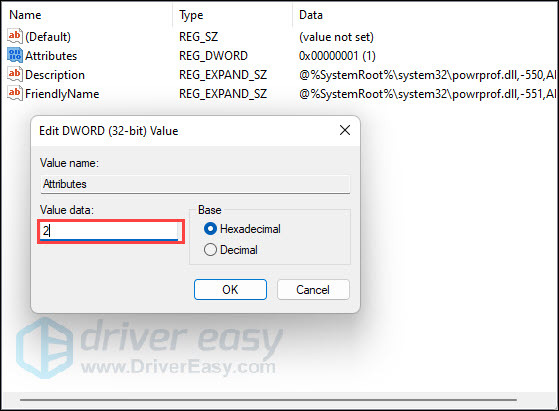
- In the right panel, right-click on Attributes and select Modify…
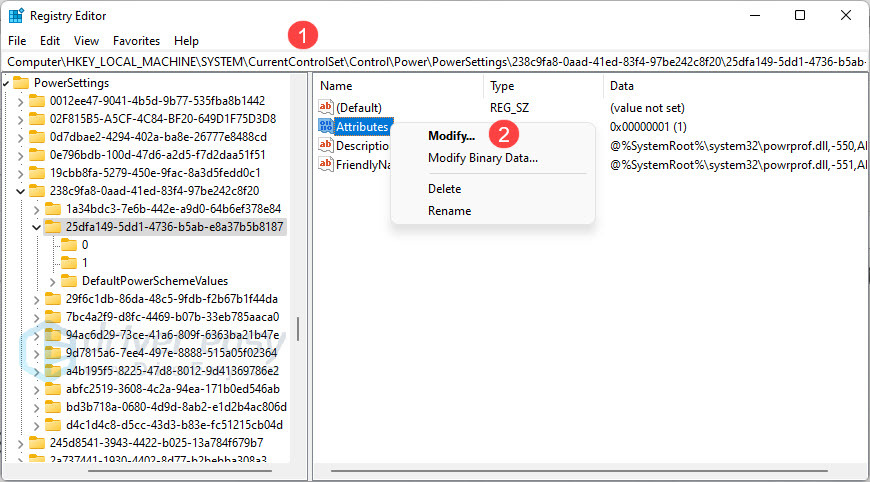
- Change the value to 2 and click OK.
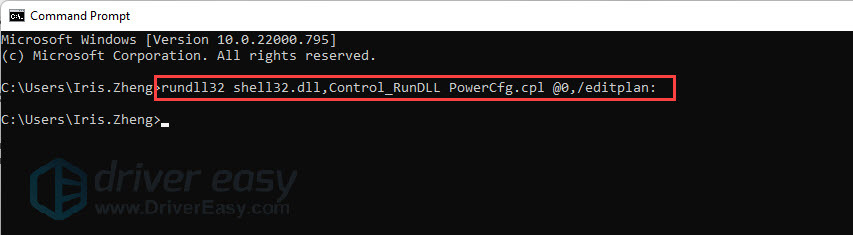
- Press the Windows key + R together to open the Run box. Type cmd and press the Enter key to open Command Prompt.
- Copy and paste the command line, then press Enter to open Power Option.
rundll32 shell32.dll,Control_RunDLL PowerCfg.cpl @0,/editplan:
- Click Sleep and you’ll see Allow Away Mode Policy. Click Setting and change Yes to No/Never to turn it off.
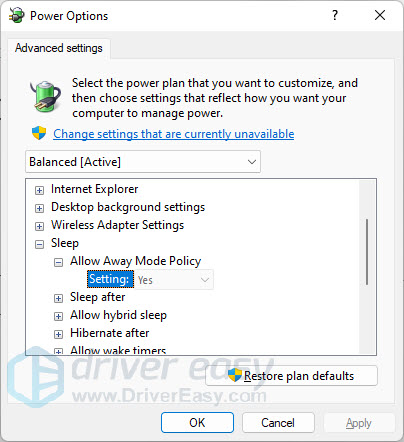
- Check if your PC can enter sleep mode or not.
Fix 7: Perform a clean boot
If the issue still persists, I would suggest you boot the computer in a clean boot state and check the issue. Performing a clean boot on the computer helps to eliminate software conflicts and to determine what is causing the problem.
If a clean boot won’t help, you can check the latest update to upgrade your operating system and see if Windows releases a patch that would solve the problem.
We hope you find the above information helpful. And if you have any ideas, suggestions, or questions, feel free to leave a comment below.