


If you’re one of the “victims” of the WiFi connected but still no Internet access problem, you’re not alone. Thousand of users have reported the same. But luckily, they’ve successfully tackled the problem with the following fixes…
How to fix WiFi connected but no Internet
Before you try the following fixes, please check whether other devices that are connected to the same network have proper access to the Internet.
- If YES, they can access the Internet, then please start with Fix 1 and work your way down the list until you find the one that works for you.
- If NO, the other devices cannot access the Internet either, then the fault probably lies with your router. You can restart your router for basic troubleshooting or consult your Internet service provider for additional help.
- Change your DNS server address
- Flush your DNS
- Disable Fast Startup
- Uninstall conflict apps
- Update your Wi-Fi adapter driver
Fix 1: Change your DNS server address
If you accidentally configure the DNS server settings in a wrong way, it may cause the no Internet issue. So you should make sure to have the right DNS server settings to see if it fixes the issue.
Here is how to do it:
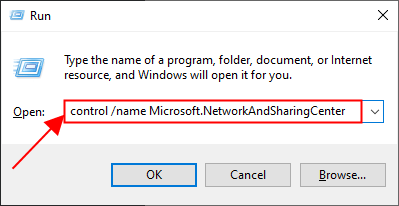
1) On your keyboard, press the Windows logo key![]() and R at the same time, then type control /name Microsoft.NetworkAndSharingCenter and press Enter.
and R at the same time, then type control /name Microsoft.NetworkAndSharingCenter and press Enter.
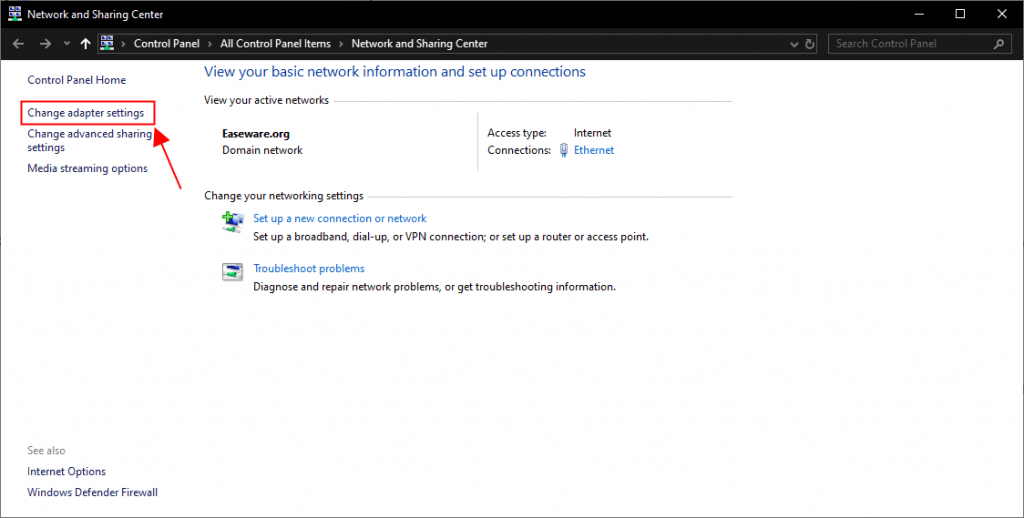
2) Click Change adapter settings.
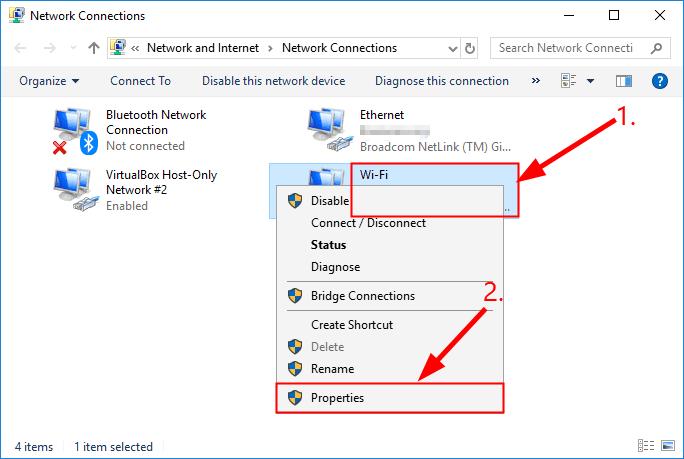
3) Right-click on Wi-Fi and click Properties.
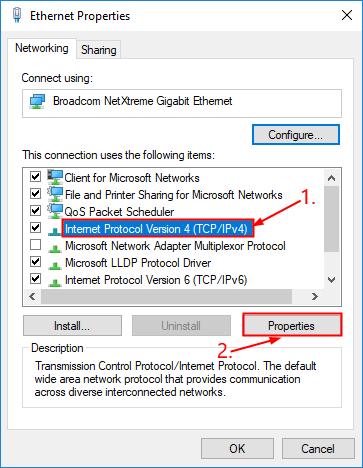
4) Click Internet Protocol Version 4 (TCP/IPv4) and then click Properties.
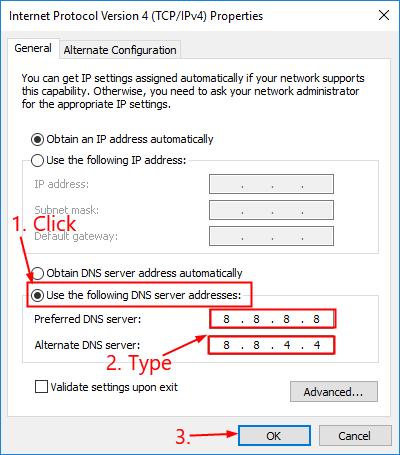
5) Click Use the following DNS server addreses,
- for Preferred DNS server, enter 8.8.8.8;
- for Alternate DNS server, enter 8.8.4.4.
6) Click OK.
7) Check to see if your computer can be connected to the Internet. If yes, then great! If there is still no Internet, please move on to Fix 2, below.
Fix 2: Flush your DNS
Flushing DNS cache, as many users reported it, has been another helpful way out the WiFi connected but no Internet issue.
Here’s how:
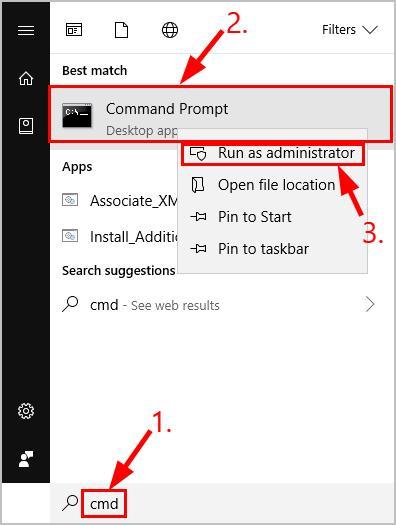
- On your keyboard, press the Windows logo key and R at the same time, then type cmd and press Enter.
- Type the following commands and press Enter after each one:
ipconfig /flushdns
ipconfig /release
ipconfig /renew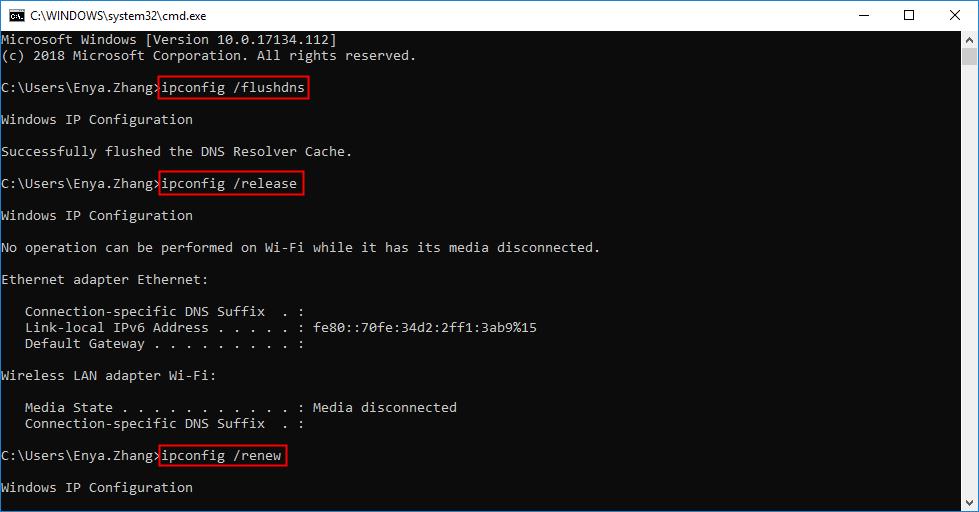
- Close the window.
- Check to see if you can get onto the Internet on your computer now. If yes, then congrats! If the issue persists, please try Fix 3, below.
Fix 3: Disable Fast Startup
Fast Startup is a feature in Windows 10 that helps our computer restart faster. But it can also interfere with the shutdown & restart process, hence the connected to Wifi but no Internet problem.
Here’s how to disable Fast Startup:
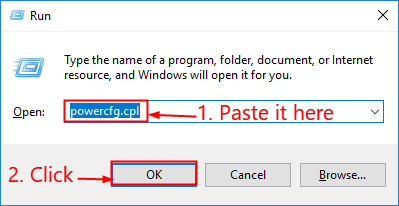
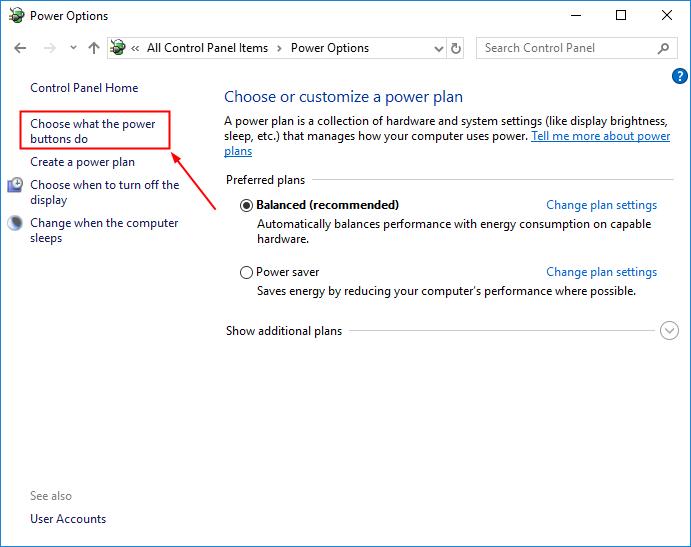
- On your keyboard, press the Windows logo key and R at the same time, then copy & paste powercfg.cpl into the box and click OK.
- Click Choose what the power buttons do.
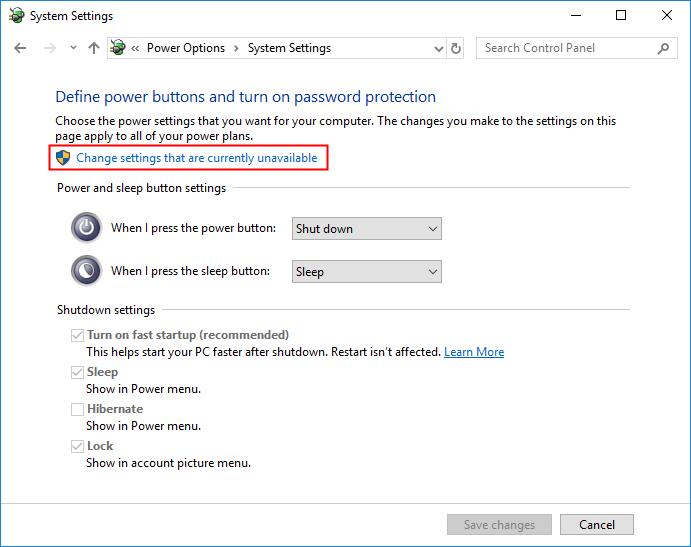
- Click Change settings that are currently unavailable.
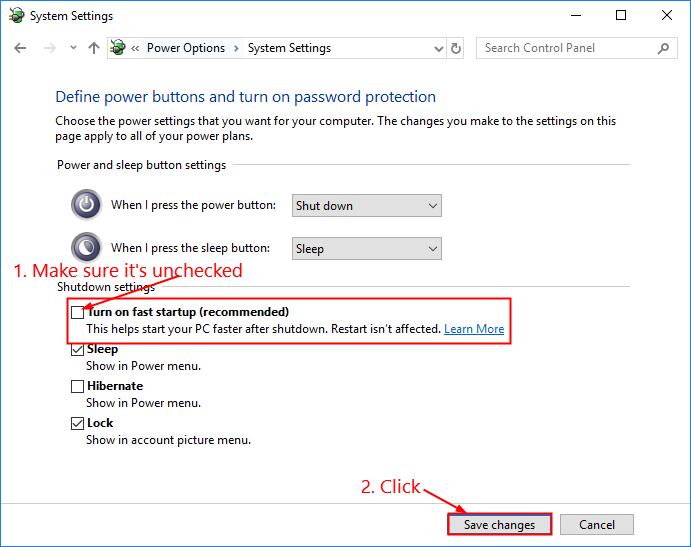
- Make sure the box before Turn on fast startup (Recommended) is unchecked, then click Save changes and close the window.
- Restart your computer and check if you have Internet access this time. If yes, then you’ve solved the issue! If no, there is still no Internet connection on your computer, please try Fix 4, below.
Fix 4: Uninstall conflict apps
Apps on our computer can also mess up with our system and cause this Wifi connects but no Internet problem. And as reported by many users, the antivirus app McAfee is one of them. You can try to uninstall McAfee or any apps you’ve recently installed to see if the problem is resolved.
Still no joy? Please try Fix 5, below.
Fix 5: Update your Wi-Fi driver
Your WiFi connected but no Internet problem is probably being caused by driver issues. The steps above may resolve it, but if they don’t, or you’re not confident playing around with drivers manually, you can do it automatically with Driver Easy.
Driver Easy is a driver updater tool that will automatically recognize your system and find the correct drivers for it. You don’t need to know exactly what system your computer is running, you don’t need to risk downloading and installing the wrong driver, and you don’t need to worry about making a mistake when installing. Driver Easy handles it all.
Don’t have proper Internet connection at the moment? Don’t worry – Driver Easy also comes with it an offline scan feature that enables you to update drivers even when you can’t get online.
It works pretty much like this: you run a scan on the problem computer as usual, use the offline scan feature to save the scan results, upload the scan results file, it finds the correct drivers for you to download, then you transfer it to the problem computer. And that’s it! The process may a bit complex by the looks of it, but it’s in fact a massive helper and time saver, compared to the manual procedure (especially when you don’t have time, patience or computer skills to do it).
Here is a step-by-step walk-through:
1) On a computer with Internet access, download Driver Easy. Then save the setup file of Driver Easy in a USB flash drive and transfer it to the target computer (the computer without Internet connection).
2) On the target computer, run the Driver Easy setup file to install Driver Easy.
3) Run Driver Easy and click Tools in the left pane.

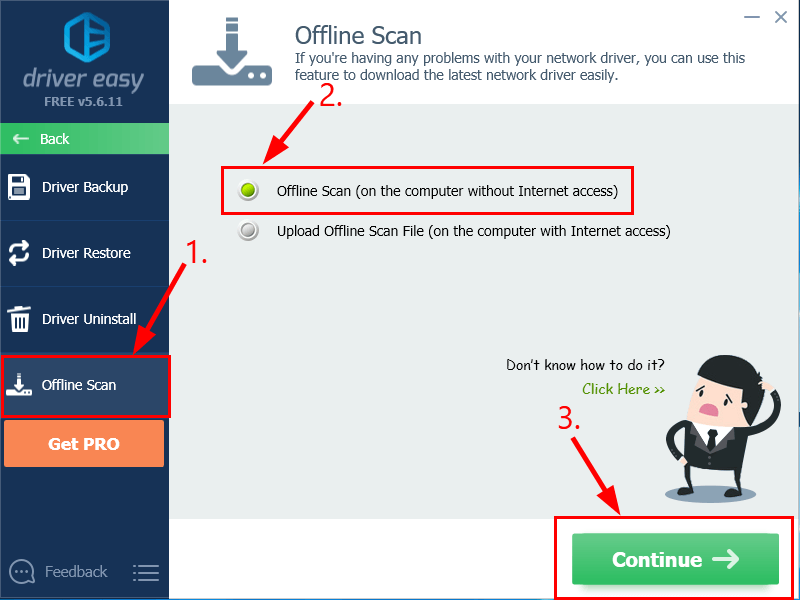
4) Click Offline Scan. Then select Offline Scan (on the computer without Internet access) and click Continue.
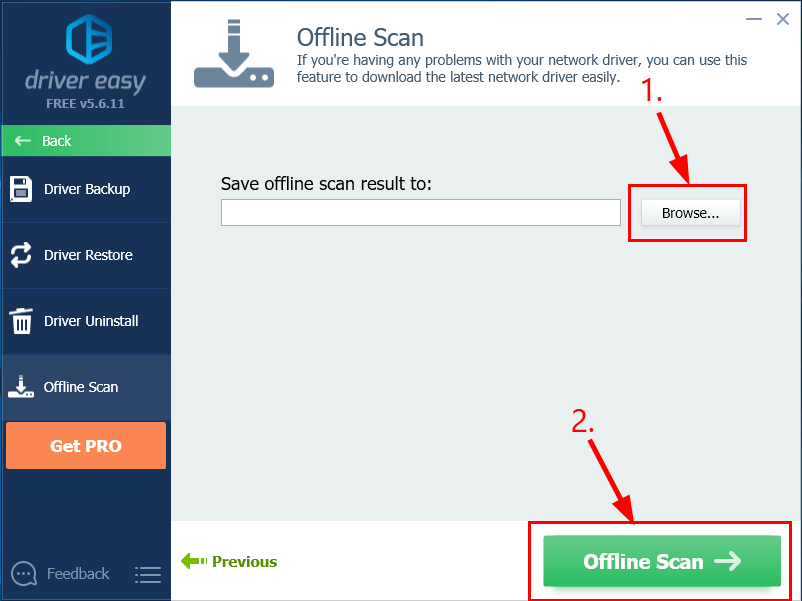
5) Click Browse…, then choose a destination folder in your computer to save the offline scan file. After that, click Offline Scan.
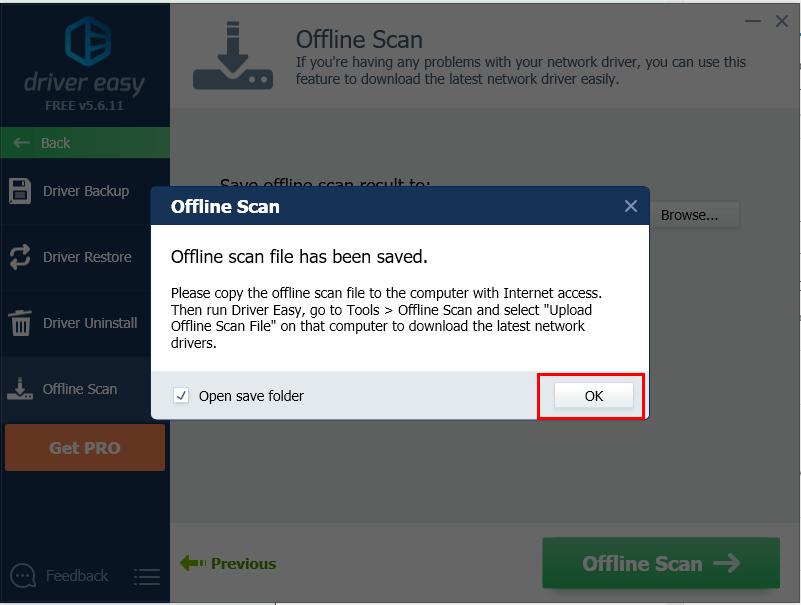
6) A window will pop up telling you that the offline scan file has been saved. Click OK to confirm.
7) Open the folder where you’ve saved the offline scan file. Then save the file in a USB flash drive and transfer it to another computer with Internet connection.
8) On the computer with Internet connection, (download and) install Driver Easy.
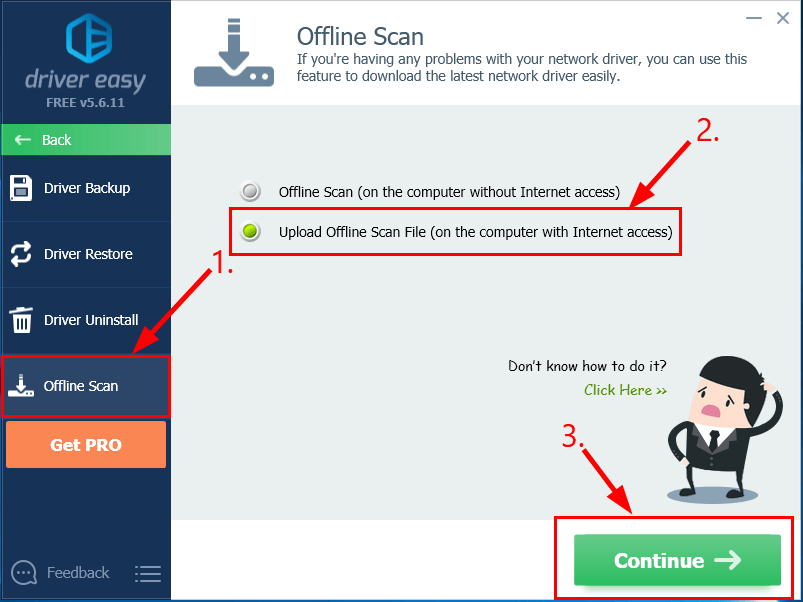
9) Run Driver Easy and click Tools in the left pane.
10) Click Offline Scan. Then select Upload Offline Scan File (on the computer with Internet access) and click Continue.
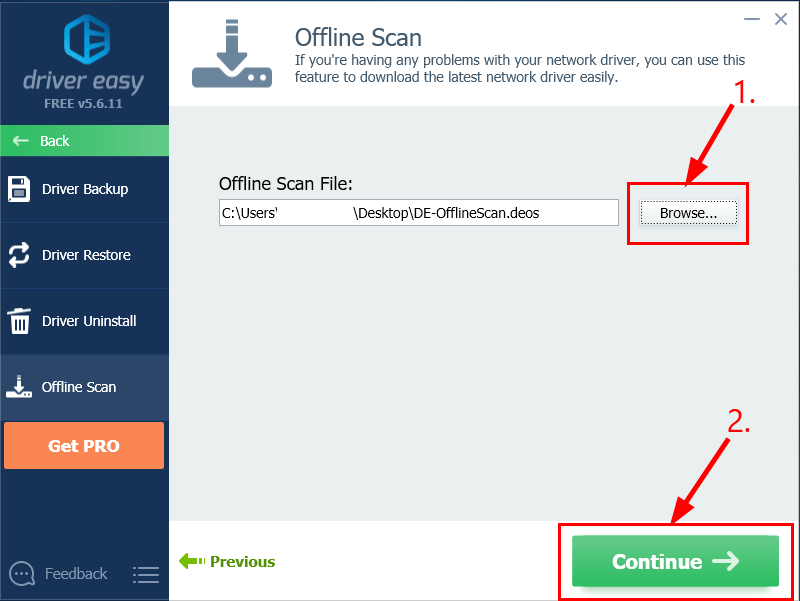
11) Click Browse… to locate the offline scan file. Then click Continue.
12) Click the Download button next to your wireless driver.

13) Wait until the computer completes. When it does, save the downloaded file to your USB drive and transfer it to the target computer.
14) You can follow Step 3 of Driver Easy Help to manually install your WiFi driver.
15) Remember to restart your computer for the changes to take effect even if you’re not asked to.
16) Hopefully after updating the driver for your WiFi adapter, you get the Internet up and running again. But if it still doesn’t work, don’t worry – here’re a few more fixes for you to try.
Hopefully the article has pointed you in the right direction in resolving the WiFi connected but no Internet issue . If you have any questions, ideas or suggestions, please let me know in the comments. Thanks for reading!