


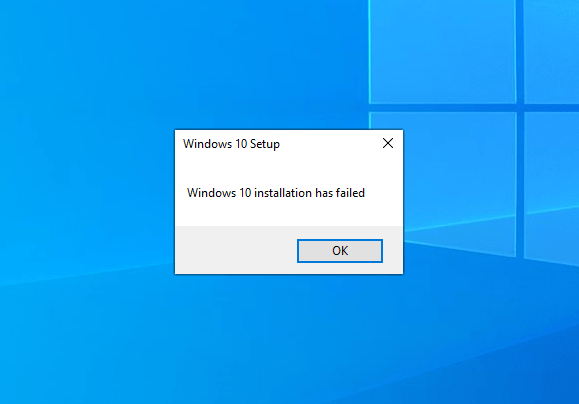
The “Windows 10 installation has failed” error is one of the most reported errors that users get when they try to install Windows 10. If you also encounter this exact error and have no clue what to do, you’ve come to the right place. In this post, we’ll walk you through the steps to fix the “Windows 10 installation has failed” error.
Try these fixes…
You don’t have to try them all, just work your way down the list until you find the one that does the trick!
- 1: Remove the peripheral devices
- 2: Clear an attribute of $WINDOWS.~BT installation folder
- 3: Uninstall the language pack
- 4: Rebuild the Boot Configuration Data
- 5: Perform a clean boot installation
- 6: Repair corrupted system files
- Bonus tip: how to keep your PC at top condition
Fix 1: Remove the peripheral devices
The first quick fix you can try is to unplug any unnecessary peripheral devices from your PC and try to install Windows 10 again. For example, scanners, printers, a secondary monitor, speakers, etc. When any of these devices uses a generic driver, it may interfere with the installation and cause the “Windows 10 installation has failed” error.
If the installation proceeds and turns out successful, you can plug the devices back in after your system gets updated. But if this doesn’t help, try the next fix.
Fix 2: Clear an attribute of $WINDOWS.~BT installation folder
The “Windows 10 installation has failed” error could be triggered when the installer tries to repeatedly copy the files in a certain folder. You can try to clear an attribute of the $WINDOWS.~BT installation folder to see if it solves your problem. Here’s how:
- Press the Windows logo key and E to open the File Explorer, and navigate to the C drive.
- From the toolbar, click View and make sure you tick the checkbox of Hidden items.
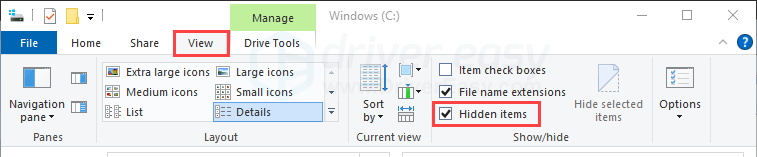
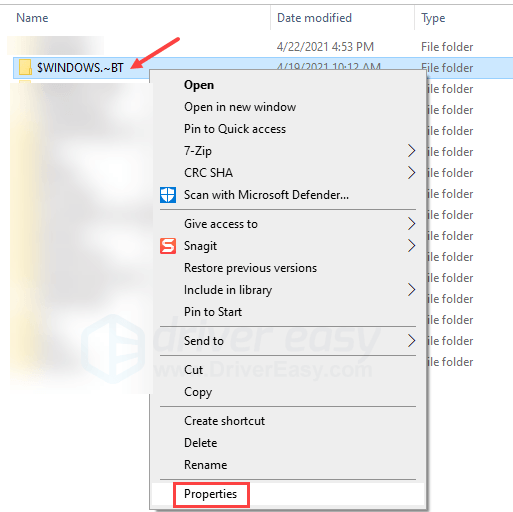
- You should find the $WINDOWS.~BT folder here. Right-click it and click Properties.
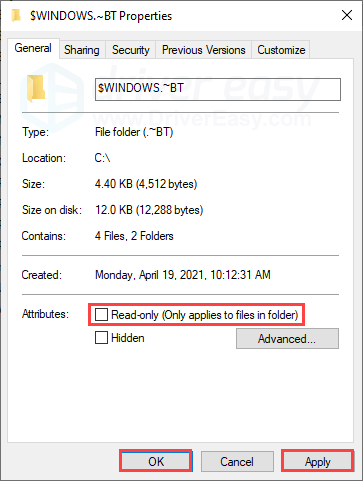
- Uncheck the checkbox of Read-Only, then click Apply and OK.
- Run the installation again.
If this fix doesn’t solve the installation error you have, try the next fix.
Fix 3: Uninstall the language pack
The “Windows 10 installation has failed” error may be triggered when the language pack of your previous Windows iteration is not the same as the localization. If that’s the case for you, you may need to remove the language pack. Here’s how:
On Windows 10
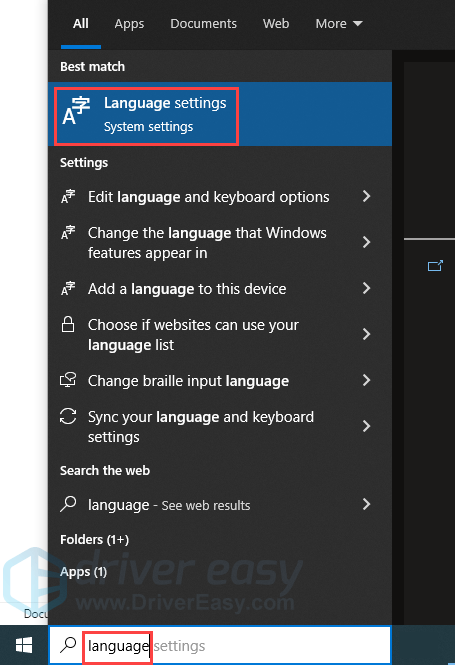
- In the search bar on your taskbar, type language, then click Language settings.
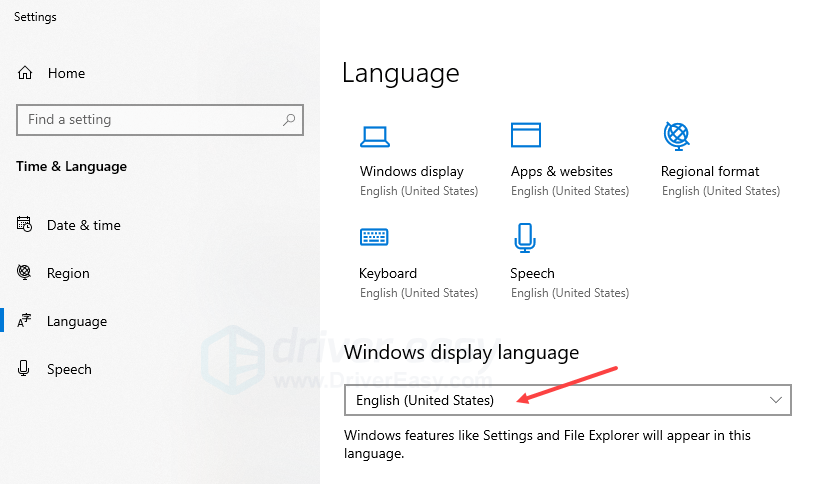
- Make sure your Windows display language is set to English.
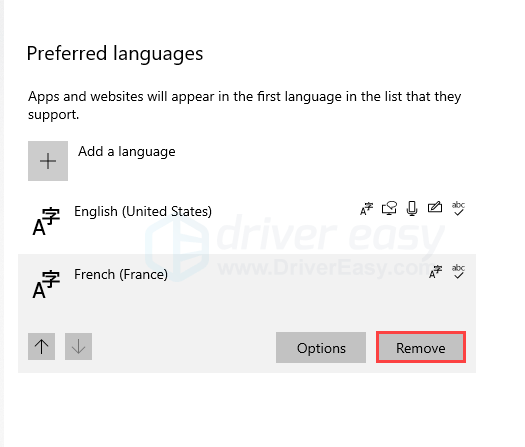
- Remove all the non-English language packs you have.
- Run the installer again.
On Windows 7
- Click the Start button. Type language in the search bar, then click Change display languages.

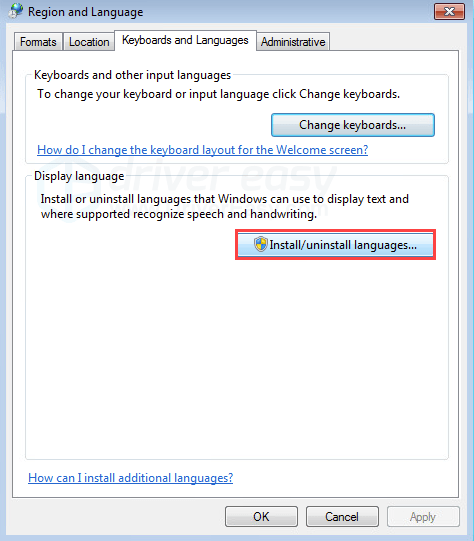
- Click Install/uninstall languages. You may be prompted for permission, just click OK.
- Click Uninstall display languages.
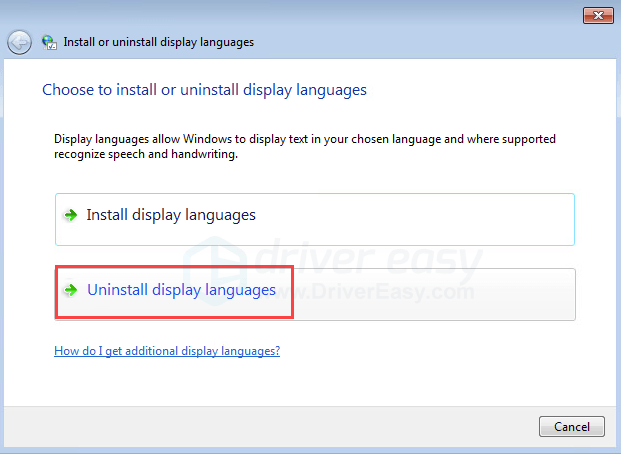
- Remove any non-English language packs per instructions. Make sure you save the changes.
- Run the installer again.
If this doesn’t solve your problem and you keep running into the error, try the next fix.
Fix 4: Rebuild the Boot Configuration Data
Any error found in Boot Manager could lead to the “Windows 10 installation has failed” error. The easiest way to fix the Boot Manager is to rebuild the Boot Configuration Data (BCD). It may seem a bit complicated, but the process is very straightforward. Here’s how:
On Windows 10/8
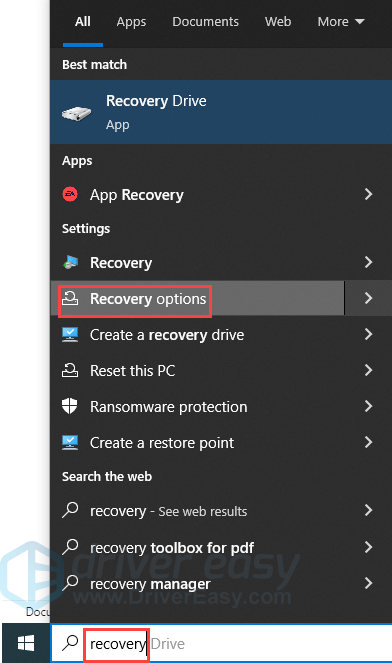
- Press the Windows key, search for recovery, then click Recovery options.
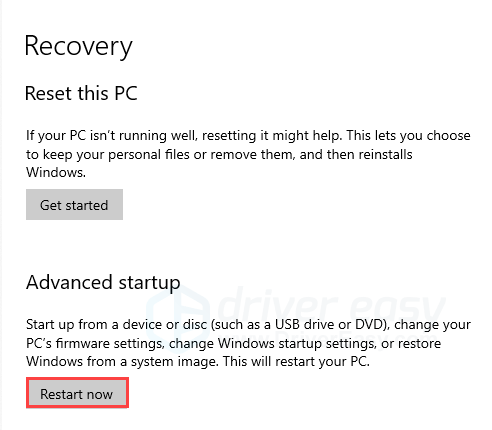
- Under Advanced Startup, click Restart now.
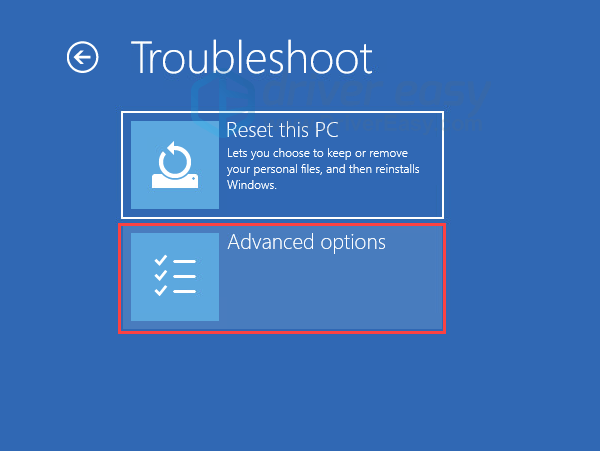
- Click Troubleshoot.
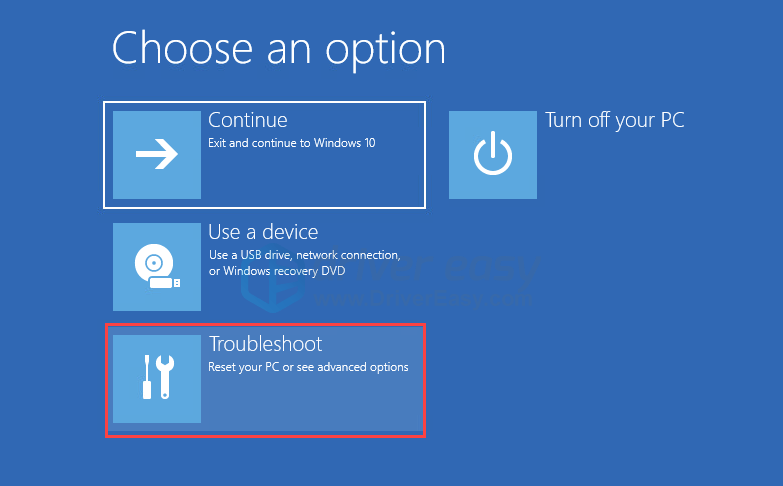
- Click Advanced options.
- Select Command Prompt. You may be prompted to log in to your account at this step.

On Windows 7
- Restart your PC. When you see the manufacturer logo, keep pressing the F8 key to enter the Advanced Boot Options screen.
- Use the arrow keys to select Safe Mode with Command Prompt, then press Enter.
Once you’ve opened the Command Prompt window, follow the steps below:
- In the Command Prompt window, type in the following command lines. Make sure you press Enter after every command line and wait for it to complete.
bootrec /RebuildBcd
bootrec /fixMbr
bootrec /fixboot - Close the Command Prompt window, and click Continue to exit to your desktop.
- Run the installer again to test the issue.
Fix 5: Perform a clean boot installation
Sometimes the programs on your PC may interfere with Windows installation. If you’ve got a specific error code, it’s likely due to an incompatible software or driver. Removing the problematic software or updating your driver may solve the problem.
But when that doesn’t help or you don’t have an error code, then you may run a clean boot installation to identify the cause and fix the problem. Here’s how:
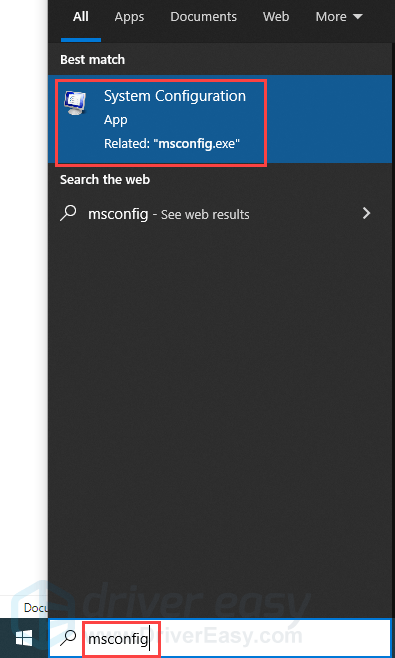
- Press the Windows key, type msconfig in the search bar, and click System Configuration.
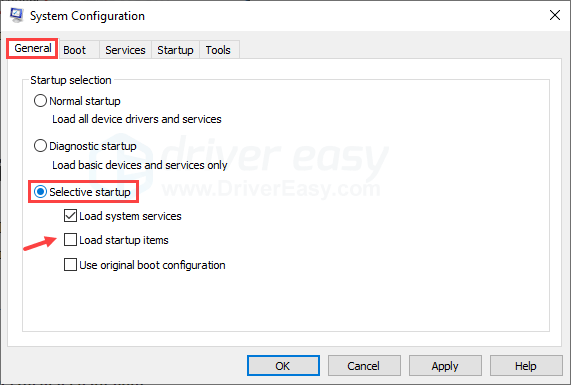
- Under the General tab, choose Selective startup, and make sure the checkbox of Load startup items is unticked.
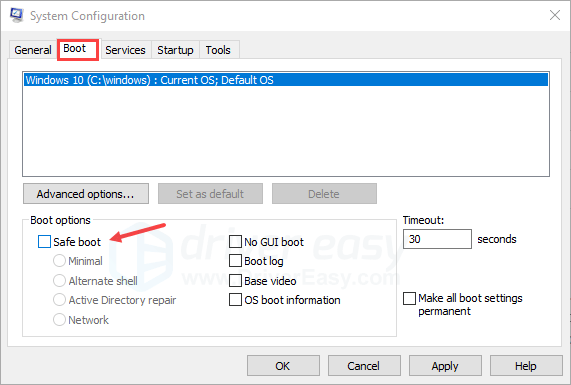
- Go to the Boot tab, untick the checkbox of Safe boot.
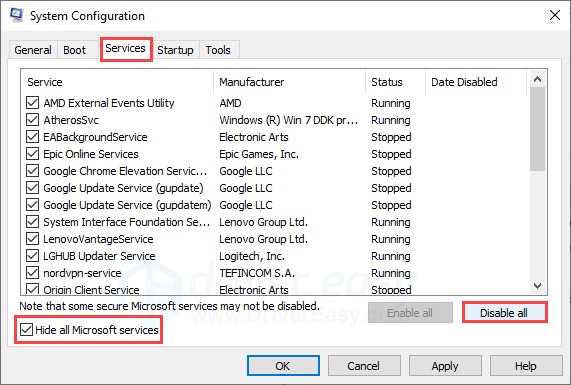
- Under the Services tab, choose Hide all microsoft services, then click Disable all.
- Switch to the Startup tab, click Open Task Manager.
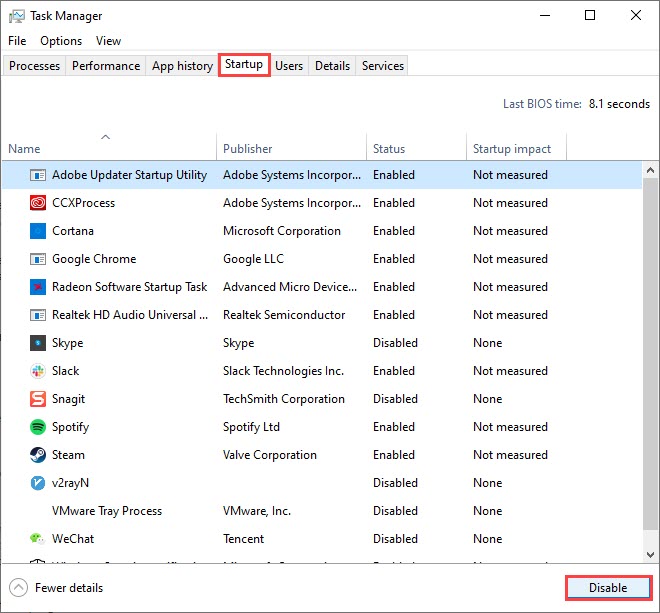
(If you’re on Windows 7, right-click anywhere empty on your taskbar to find the option of task manager.)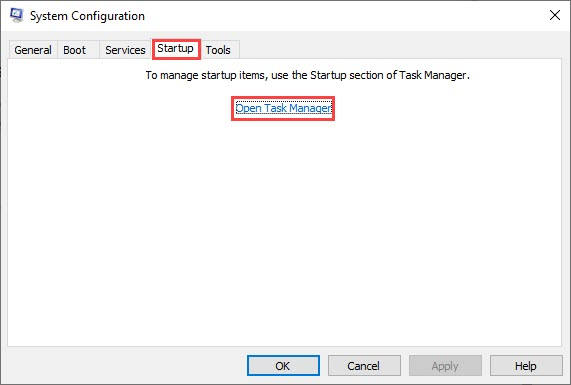
- Under the Startup tab, select every enabled startup item and click Disable until you’ve disabled all startup items.
- Restart your PC and try to run the Windows installer.
If performing a clean boot installation doesn’t solve the error for you, there’s one more fix you can try.
Fix 6: Repair corrupted system files
If the fixes above didn’t solve the “Windows 10 installation has failed” error on your PC, you may be looking at a system-wide error. When the system files required for the Windows installation process are corrupted, it could trigger an installation error. You can use the System File Checker tool (sfc /scannow) to look for any critical system corruption.
To do this, follow these steps:
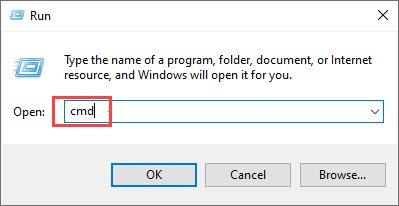
- Press the Windows logo key and R on your keyboard to invoke the Run box.
- On your keyboard, type cmd and press Ctrl, Shift and Enter at the same time to run Command Prompt as administrator.
- You’ll be prompted for permission. Click Yes to open Command Prompt.
- Type sfc/scannow, then press Enter.
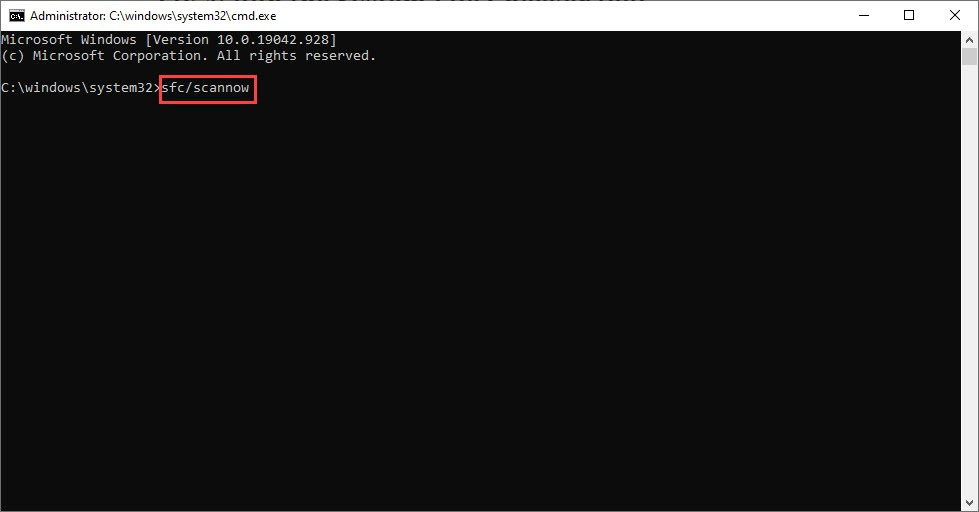
- The System Files Checker tool will automatically scan for corrupt or missing files and fix them, if there’s any.

Restart your PC to see if the issue persists.
Bonus tip: how to keep your PC in top condition
Outdated or faulty drivers may trigger this error, although not very common. And as we briefly mentioned before, if a driver issue caused this installation error, you’re likely to get a specific error code. But in general, keeping your device drivers up-to-date can help prevent and solve many random computer issues.
There are two ways to keep your drivers up-to-date. One is to update the drivers via Device Manager. You may have to manually check every device and update them when Windows detects available updates.
Automatic driver update – If you don’t have the time, patience, or computer skills to update your drivers manually, you can do it automatically with Driver Easy. Driver Easy will automatically recognize your system and find the correct drivers for your PC and your Windows version, then it will download and install the drivers correctly.
You can update your drivers automatically with either the 7 days free trial or the Pro version of Driver Easy. It takes just 2 clicks, and you get full support and a 30-day money-back guarantee with the Pro version:
- Download and install Driver Easy.
- Run Driver Easy and click the Scan Now button. Driver Easy will then scan your computer and detect any problem drivers.

- Click the Activate & Update button next to the flagged device to automatically download and install the correct version of this driver.
Or click Update All to automatically download and install the correct version of all the drivers that are missing or out of date on your system (You’ll need the Pro version for this – when you select Update All, you’ll get a prompt to upgrade. If you’re not prepared to purchase the Pro version yet, Driver Easy provides a 7-day trial at no cost, granting access to all Pro features like fast downloads and easy installation. No charges will occur until after your 7-day trial period ends.)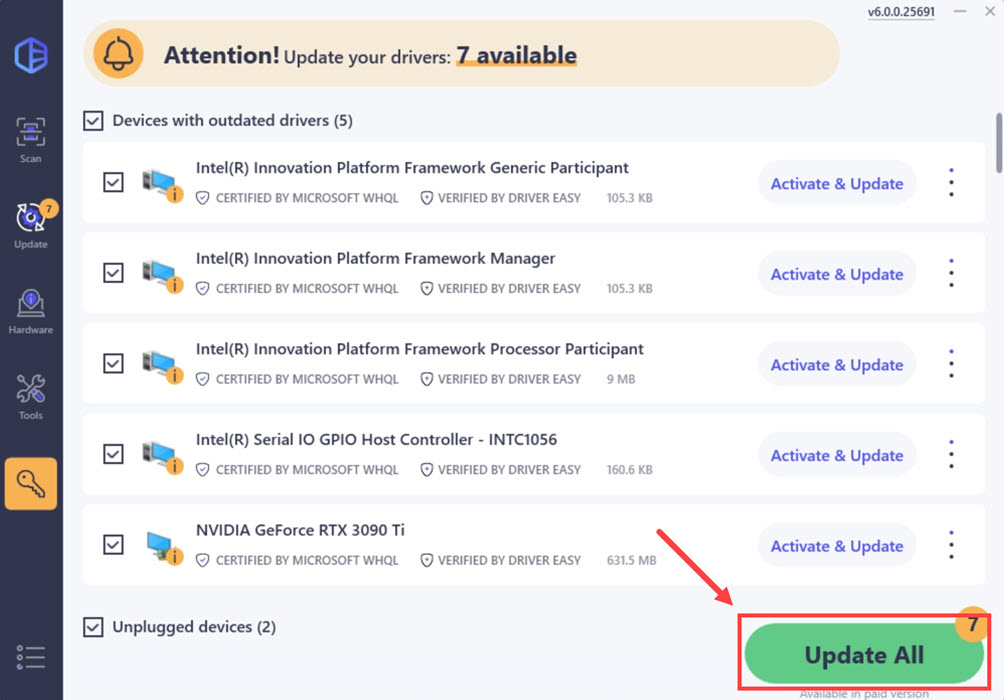
- After updating, restart your computer to take effect.
Hopefully, this article helps! If you have any questions or suggestions, please feel free to leave a comment down below.