


 Are your running into Windows 10 WiFi not working issue? Don’t worry… Although it’s incredibly frustrating, you’re definitely not the only person to experience this problem. Thousands of Windows 10 users have recently reported the very same issue. More importantly, you should be able to fix it pretty easily…
Fixes to try
- Before we start
- Reboot your network
- Run the network troubleshooter
- Reset network connection settings
- Roll back the driver for your wireless network adapter
- Update the driver for your wireless network adapter
Fix 1: Before we start
There are many factors that would trigger Windows 10 WiFi not working issue. Before we go any further, make sure you’ve tried things listed below. By doing that, you can narrow down the problem, or even resolve this issue.- Make sure airplane mode is turned off. Here is how to check it:
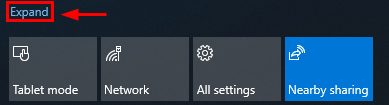
- On your keyboard, press the Windows logo key and A at the same time to open action center (you can also access it by clicking the bubble icon in the lower-right corner of your screen). If it is collapsed, click Expand to expand it.
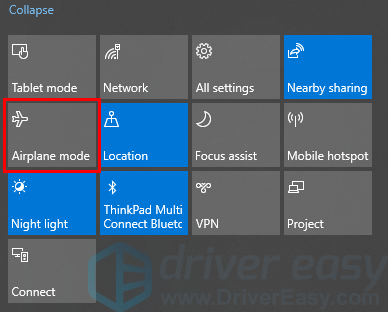
- If Airplane mode is gray, it is turned off. If it is blue, click it to turn it off.
- On your keyboard, press the Windows logo key and A at the same time to open action center (you can also access it by clicking the bubble icon in the lower-right corner of your screen). If it is collapsed, click Expand to expand it.
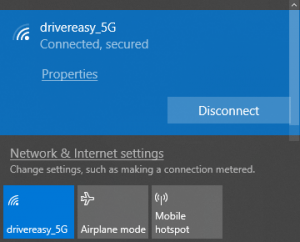
- Make sure WiFi is turned on. Here is how to check it:
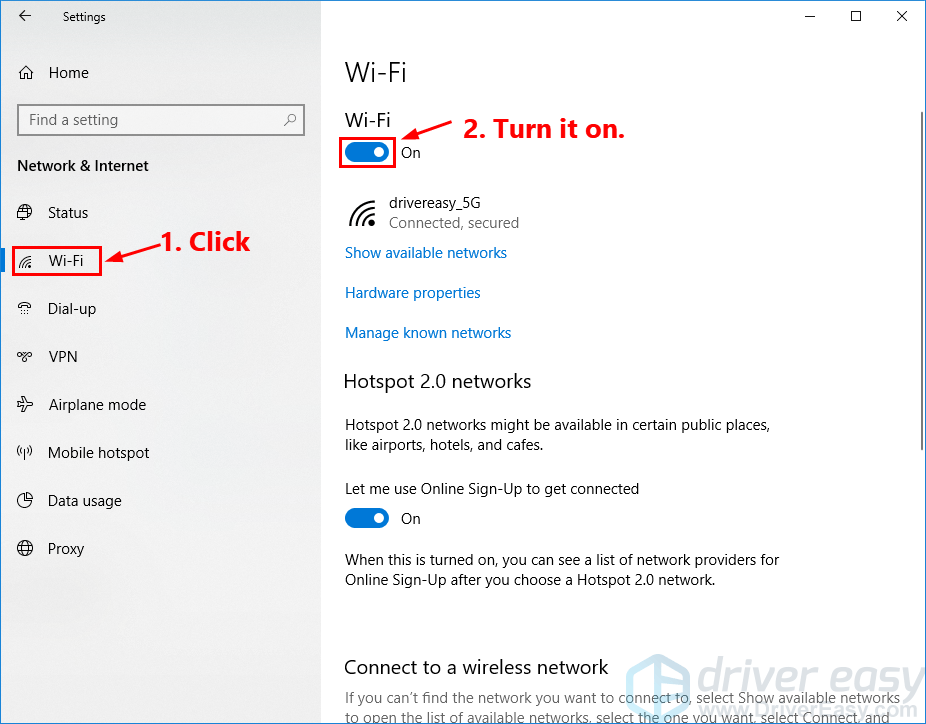
- On your keyboard, press the Windows logo key and I at the same time to open Windows Settings. Then click Network & Internet.

- On the left panel, click Wi-Fi. Then turn on the toggle under Wi-Fi if it was turned off.
- On your keyboard, press the Windows logo key and I at the same time to open Windows Settings. Then click Network & Internet.
- Make sure it is not a problem with your wireless router or Internet service provider (ISP). Here is how to check it:
- Use another device to connect to the same WiFi network, see if it can connect to the Internet. If it also falls to connect to the Internet, it may suggest it might be a problem with your wireless router or ISP.
- On your keyboard, press the Windows logo key and R at the same time to open the Run dialog. Type cmd and press Ctrl, Shift and Enter at the same time to run Command Prompt as administrator. You’ll be prompted for permission. Click Yes to open Command Prompt.

- In Command Prompt, type ipconfig and press Enter.

- Locate Wireless LAN adapter Wi-Fi. Then write down its Default Gateway for later use. The default gateway address could be like: 192.168.1.1.
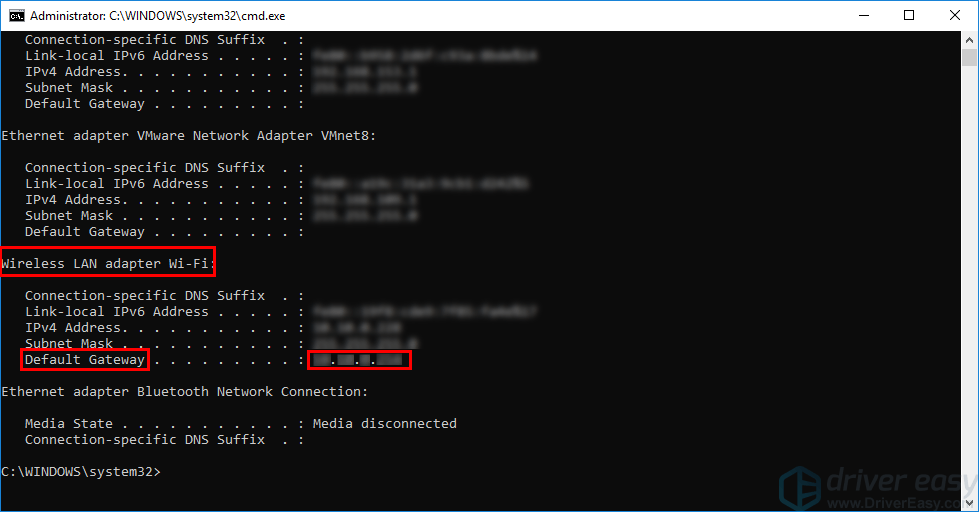
- In Command Prompt, type ping <Default gateway> and press Enter (For example: ping 192.168.1.1). The result should be something like the following:
 If you see the results similar to the results above, but your Windows 10 PC still can’t connect to the Internet, there may be a problem with your modem or your ISP. Please contact your ISP for further support.
Fix 2: Reboot your network
By rebooting your network, you create a new connection to your Internet service provider (ISP). By doing that, you may resolve this issue. Here is how to do it:- Shut down your PC.
- Unplug your modem (and your wireless router, if it’s a separate device) from power for 60 seconds.
Modem 
Wireless router - Plug in your network devices again and wait until the indicator lights are back to its normal state.
- Restart your PC and connect it to your WiFi network.
Fix 3: Run the network troubleshooter
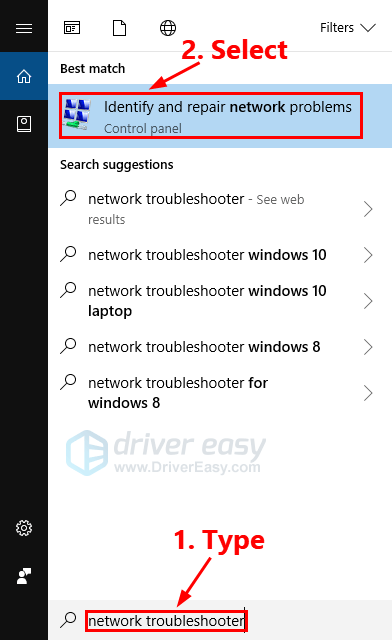
The network troubleshooter is a built-in tool in Windows 10 system that helps you resolve network issues. Follow the instructions below to run the network troubleshooter:- On your keyboard, press the Windows logo key and type network troubleshooter. Then select Identify and repair network problems in the list of search results to run the network troubleshooter.
- The network troubleshooter will automatically detect the network problems on your PC. You just need to follow the steps in the network troubleshooter and see if this issue can get fixed.
Fix 4: Reset network connection settings
If the network troubleshooter can’t resolve this issue for you, you can try resetting your network connection settings to see if this issue will be fixed. Here is how to do it:- On your keyboard, press the Windows logo key and R at the same time to open the Run dialog. Type cmd and press Ctrl, Shift and Enter at the same time to run Command Prompt as administrator. You’ll be prompted for permission. Click Yes to open Command Prompt.
- In Command Prompt, type the following commands in listed order.
- Type netsh winsock reset and press Enter.
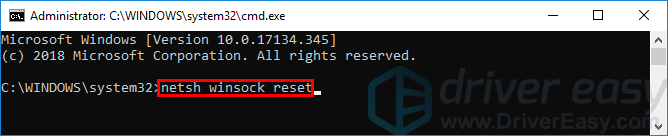
- Type netsh int ip reset and press Enter.

- Type ipconfig /release and press Enter.

- Type ipconfig /renew and press Enter.

- Type ipconfig /flushdns and press Enter.

- Type netsh winsock reset and press Enter.
Fix 5: Roll back the driver for your wireless network adapter
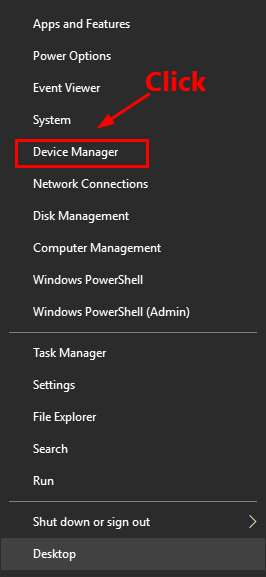
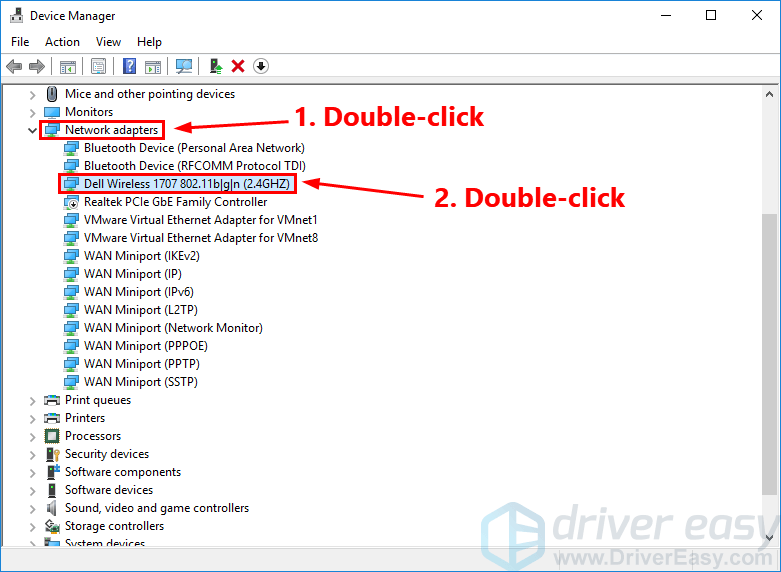
If you’ve installed a new driver for your wireless network adapter recently, and this issue occurs after that point of time, this issue may be triggered by its driver. You can try rolling back the driver for your wireless network adapter. Here is how to do it:- On your keyboard, press the Windows logo key and X at the same time. Then click Device Manager. You’ll be prompted for permission. Click Yes to open Device Manager.
- Double-click Network adapters to expand the list. Then double-click your wireless network adapter (the device whose name contains the word “wireless”).
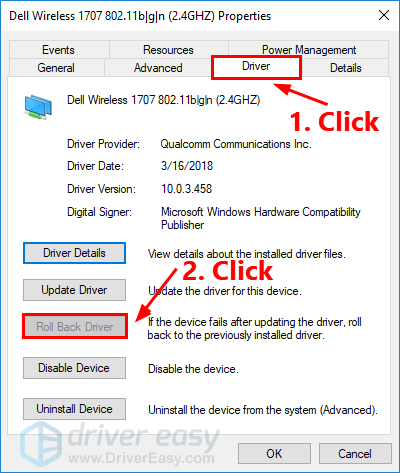
- In the pop-up window, navigate to the Driver tab. Then click Roll Back Driver.
Fix 6: Update the driver for your wireless network adapter
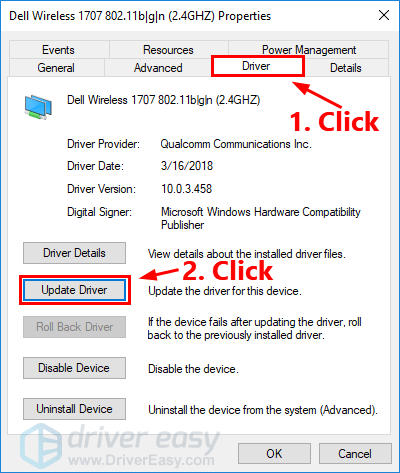
If you’ve updated the driver for your wireless network adapter for a long time, or if its driver is missing or corrupted, you may encounter this issue. Try updating its driver to the latest version and maybe this issue can be fixed. You can update its driver in Device Manager. Here is how to do it:- In Device Manager, double-click Network adapters to expand the list. Then double-click your wireless network adapter (the device whose name contains the word “wireless”).
- In the pop-up window, navigate to the Driver tab. Then click Update Driver.
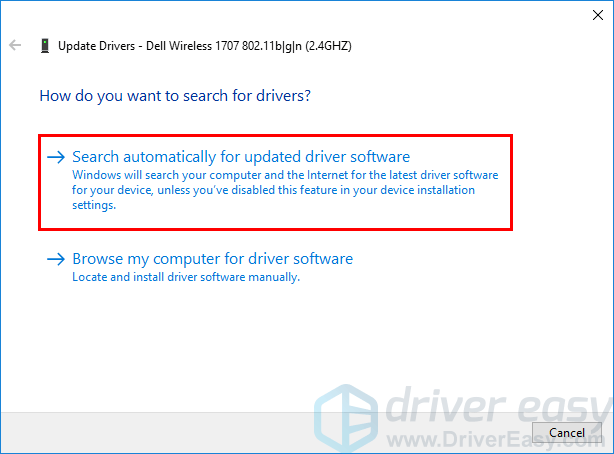
- Select Search automatically for updated driver software.
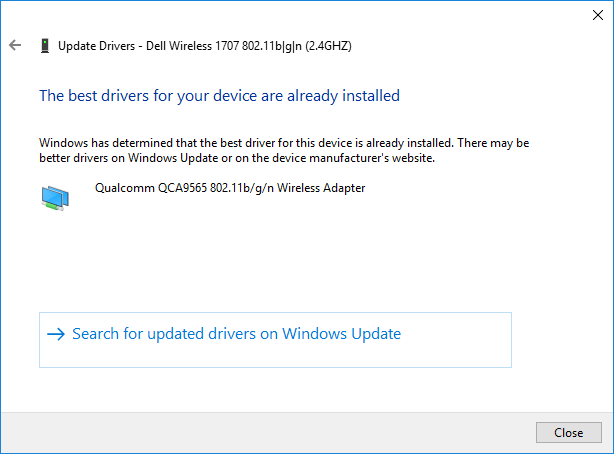
- If Windows finds its updated driver, you can follow the on-screen instructions to update the driver. If Windows doesn’t find its updated driver, you’ll see a window like the following one:
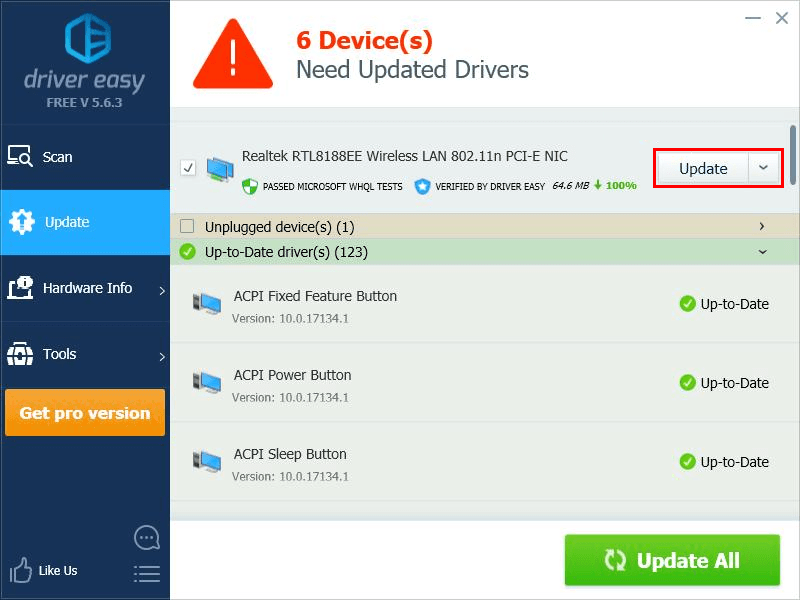
- Download and install Driver Easy.
- Run Driver Easy and click Scan Now. Driver Easy will then scan your computer and detect any problem drivers.

- Click Update next to your wireless network adapter to automatically download the correct version of its driver, then you can install it manually. Or click Update All to automatically download and install the correct version of all the drivers that are missing or out of date on your system (This requires the Pro version – you’ll be prompted to upgrade when you click Update All. You get full support and a 30-day money back guarantee).
You can do it for free if you like, but it’s partly manual.
If you need assistance, please contact Driver Easy’s support team at support@drivereasy.com.
If you have any questions or suggestions, please leave your comment below.
7
7 people found this helpful
0 Comments
Most Voted