


If you’re running into Dying Light lag issue, don’t worry. You’ve come to the right place! Although it’s incredibly frustrating, you’re definitely not the only person to experience this problem. Thousands of players have reported the very same issue. More importantly, you should be able to fix it pretty easily…
Try these fixes
Here’s a list of fixes that have resolved this problem for other Dying Light players. You don’t have to try them all. Just work your way through the list until you find the one that does the trick for you.
- Install the latest game patch
- Update your graphics driver
- Modify the graphics settings
- Use Steam Launch options for Dying Light
- Set process affinity for DyingLightGame.exe
Fix 1: Install the latest game patch
The developers of Dying Light release regular game patches to fix bugs. It’s possible that a recent patch has caused this lag issue, and that a new patch is required to fix it.
If a patch is available, just download and install it to see if it can fix the game lag issue; if there’s no patches available, or if the issue persists after you installed the latest patch, try the next fix, below.
Fix 2: Update your graphics driver
The outdated or broken graphics driver may also lag the game.
As we all know, an outdated or corrupted graphics driver would trigger game crashing, stuttering (FPS dropping, or lagging) and even screen flickering issues. We always recommend gamers to keep their graphics drivers up to date so as to avoid such issues. The latest graphics driver will enhance your graphics card performance and unlock the full potential of your graphics card, which will give you an edge in PC video games.
If you don’t remember when was the last time you updated your drivers, definitely do it now.
Option 1: Manually
You’ll need some computer skills and patience to update your drivers this way, because you need to find exactly the right the driver online, download it and install it step by step.
Graphics card manufacturers like Nvidia, AMD and Intel keeps updating their graphics drivers. To get them , you need to go to the website of your graphics card manufacturer:
Then find the graphics driver corresponding with your specific flavor of Windows version (for example, Windows 64 bit) and download the driver manually.
Once you’ve downloaded the correct drivers for your system, double-click on the downloaded file and follow the on-screen instructions to install the driver.
Or
Option 2: Automatically
This is the quickest and easiest option. It’s all done with just a couple of mouse clicks – easy even if you’re a computer newbie.
If you don’t have the time, patience or computer skills to update the graphics driver manually, you can do it automatically with Driver Easy.
Driver Easy will automatically recognize your system and find the correct drivers for it.
You don’t need to know exactly what system your computer is running, you don’t need to risk downloading and installing the wrong driver, and you don’t need to worry about making a mistake when installing.
You can update your drivers automatically with either the FREE or the Pro version of Driver Easy. But with the Pro version it takes just 2 clicks:
- Download and install Driver Easy.
- Run Driver Easy and click the Scan Now button. Driver Easy will then scan your computer and detect any problem drivers.

- Click Update All to automatically download and install the correct version of all the drivers that are missing or out of date on your system.
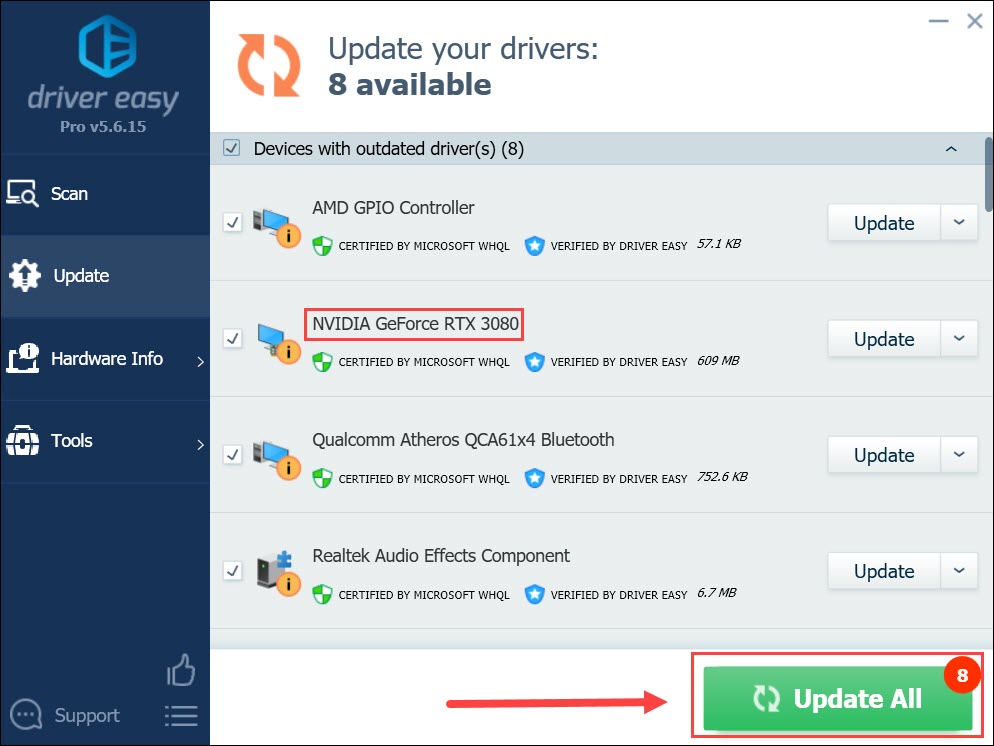
(This requires the Pro version – you’ll be prompted to upgrade when you click Update All. If you don’t want to pay for the Pro version, you can still download and install all the drivers you need with the free version; you just have to download them one at a time, and manually install them, the normal Windows way.)
You need to restart your PC after you finished updating your graphics driver.
Launch Dying Light to see if it can run smoothly on your PC. Normally, after you updated the graphics driver, the game crashing issue will disappear.
If the latest graphics driver didn’t fix the game lag issue, just read on to try the next fix, below.
Fix 3: Modify the graphics settings
Modifying the graphics settings is another easy fix to reduce lags in Dying Light. You need to modify the graphics settings both in Nvidia Control Panel and in the game.
Modify the graphics settings in Nvidia Control Panel
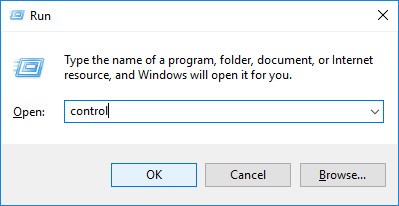
- On your keyboard, press the Windows logo key and R at the same time to open the Run dialog. Then type control and press Enter to open Control Panel.
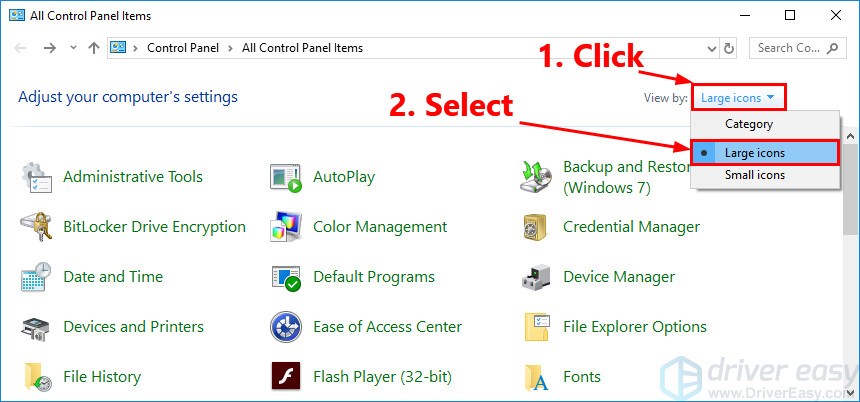
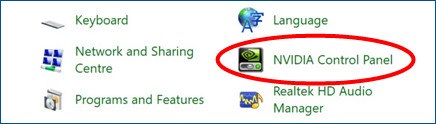
- View Control Panel by Large icons.
- Click NVIDIA Control Panel to open it.
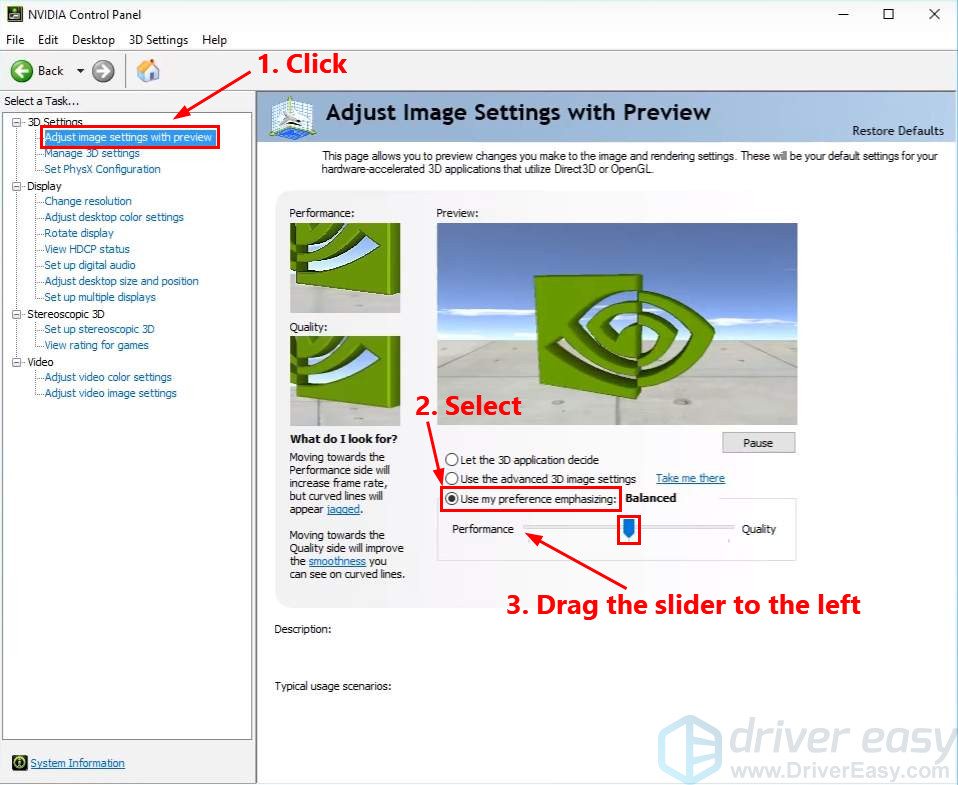
- Click 3D Settings and select Adjust image settings with preview. Then select Use my preference emphasizing and drag the slider to the left.
Lower the in-game graphics settings
- Launch Dying Light and modify the following in-game video settings:
Resolution: Max
Full Screen: On
Borderless Window: Off
Vertical Synchronization: Off
Frame Rate Cap: Uncapped
Texture Quality: High (for machines that have 4 GB or more VRAM); Medium (for machines that have 2 GB VRAM)
Shadow Map Size: Low
Foliage Quality: Low
View Distance: default or 50%
Ambient Occlusion: Off
Nvidia HBAO+: Off
Nvidia Depth of Field: Off
Nvidia PCSS: Off
Motion Blur: Off
Antialiasing: Off
Film Grain Effect: Off
Chromatic Aberration Effect: Off - Save the changes and launch the game again.
See if the game lag issue persists. If not, try the next fix, below.
Fix 4: Use Steam launch options for Dying Light
If your PC didn’t meet the recommended system requirements for Dying Light, and you’re suffering from the lag in-game, you can also try using Steam launch options for Dying Light. If you want a full FPS boost, you can follow the steps below to Launch the game:
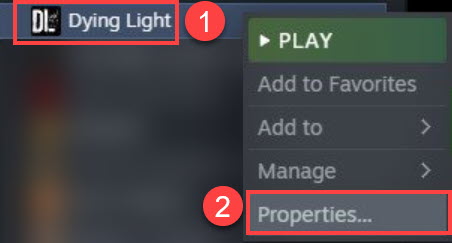
- Launch the Steam client and go to Steam Library.
- Right-click on Dying Light and select Properties.
- In the window that pops up, click SET LAUNCH OPTIONS… under the GENERAL tab.
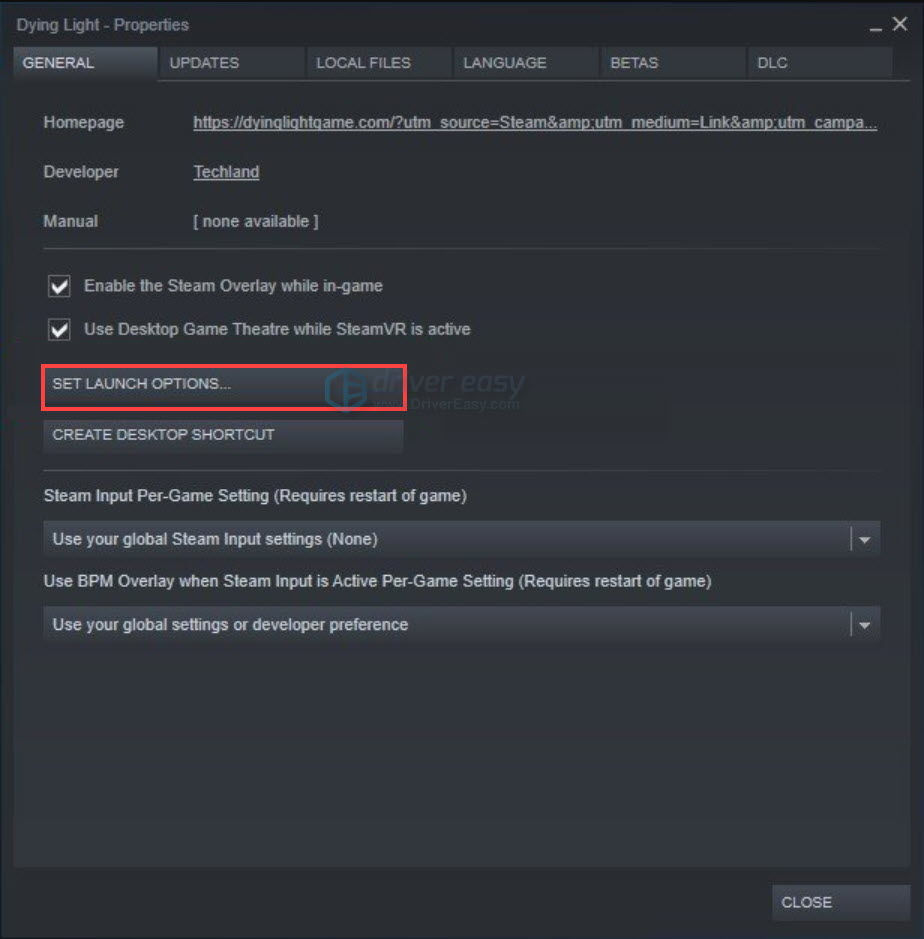
- Copy and paste the commands below and click OK.
-nologos -high -useallavailablecores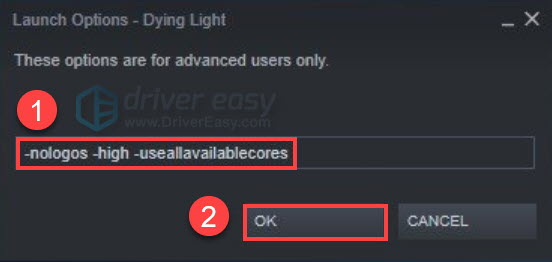
- Save these steam settings and run the game.
See if this fix reduces the lags in-game. If not, try the next fix, below.
Fix 5: Set process affinity for DyingLightGame.exe
Some players reported that they fixed the Dying Light lag issue by setting process affinity for DyingLightGame.exe. If you haven’t tried this fix yet, just give it a shot.
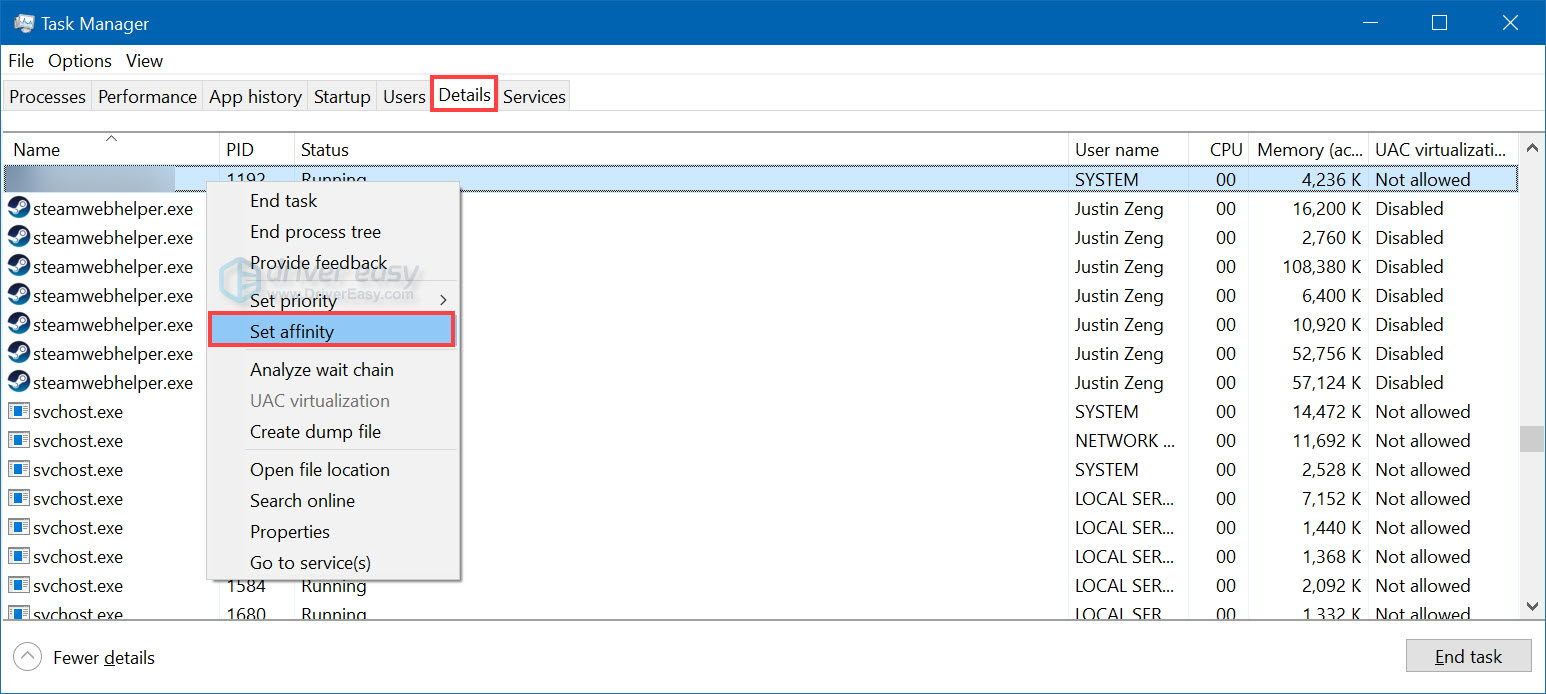
- On your keyboard, press Ctrl, Shift and Esc at the same time to open Task Manager.
- Launch Dying Light.
- On your keyboard, press Alt and Tab at the same time and switch to Task Manager.
- Navigate to the Details tab and locate DyingLightGame.exe.
- Right-click on DyingLightGame.exe and select Set affinity.
- Check CPU 0 and uncheck the rest. (The game will freeze in the background, but don’t worry)
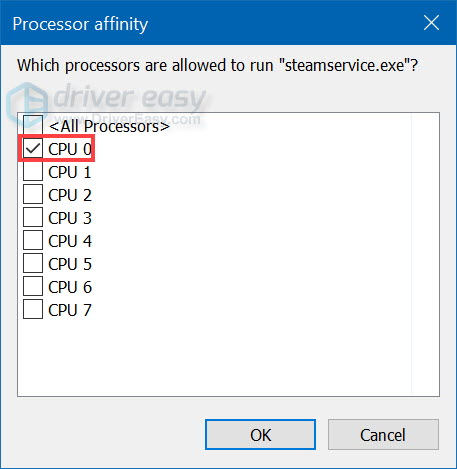
- If the Affinity window closes, right-click on DyingLightGame.exe and open it again, then re-enable. The game will start running again as before.
See if the game runs more smoothly than before. If this fix still didn’t work, try reinstalling the game. Normally, after reinstalling the game, you’ll be able to fix the crashing issue.
Hopefully, one of the fixes above helped you fix Dying Light lag issue. If you have any questions or suggestions, feel free to leave us a comment below. Thanks for reading!