


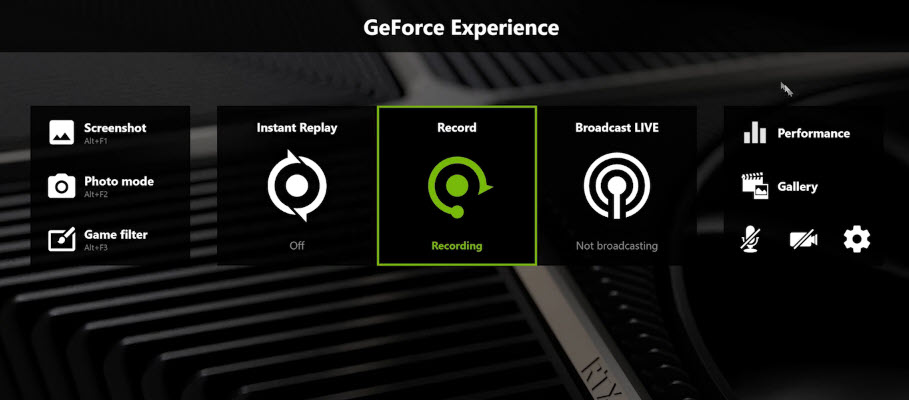
Pressing Alt and Z can’t bring up your NVIDIA GeForce Experience overlay? You’re not alone. Many players have reported this issue — GeForce overlay not working in game. But don’t worry. Here we will tell you some working solutions to this problem.
Fixes for Nvidia overlay not working
You don’t have to try them all; just work your way down the list until you find the one that works for you.
- Make sure GeForce in-game overlay is enabled
- Restart your computer
- Update your graphics driver
- Install all Windows updates
- Run GeForce Experience as an administrator
- Enable experimental features
- Disable third-party services
- Repair Microsoft Visual C++ Redistributable Package
- Install a Media Feature Pack
- Reinstall GeForce Experience
Fix 1: Make sure GeForce in-game overlay is enabled
Before beginning to troubleshoot the GeForce overlay not working issue, you need to make sure the in-game overlay is turned on inside GeForce Experience. Here’s how:
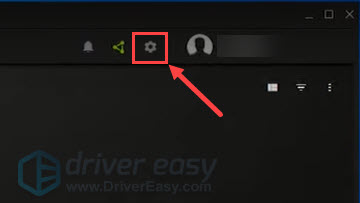
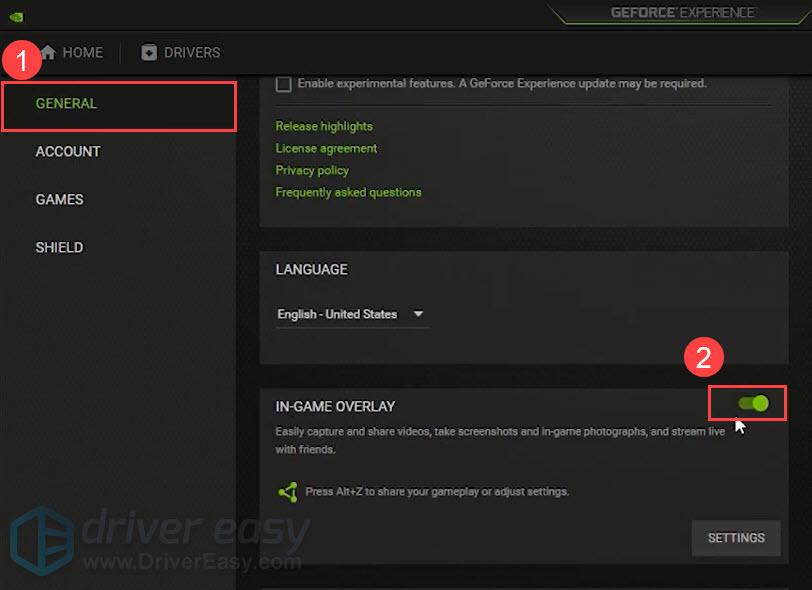
- Open GeForce Experience, then click the gear icon to open Settings.
- In the left panel, select GENERAL, then toggle the switch to turn on IN-GAME OVERLAY.
Run a game to see if your GeForce overlay shows up. If not, try the next fix.
Fix 2: Restart your computer
The GeForce overlay not working issue can sometimes be resolved by a simple reboot since this action will refresh your operating system and remove any corrupt temporary data that may cause the problem. So you should give it a shot first.
After restarting your computer, check if your GeForce overlay is working.
If the issue remains, continue to the next fix below.
Fix 3: Update your graphics driver
If you’re using a corrupt or outdated graphics driver, you’ll possibly encounter the GeForce overlay not working issue in game. To fix the potential problems and ensure the GeForce overlay working properly, you should keep your graphics driver up to date.
One way to do that is to visit the NVIDIA official website and search for your model, then download and install the graphics driver manually. But if you don’t have the time, patience or computer skills to update the driver manually, you can do it automatically with Driver Easy.
Driver Easy will automatically recognize your system and find the correct drivers for it. You don’t need to know exactly what system your computer is running, you don’t need to risk downloading and installing the wrong driver, and you don’t need to worry about making mistakes when installing.
You can update your drivers automatically with either the 7 days free trial or the Pro version of Driver Easy. It takes just 2 clicks, and you get full support and a 30-day money-back guarantee with the Pro version:
- Download and install Driver Easy.
- Run Driver Easy and click the Scan Now button. Driver Easy will then scan your computer and detect any problem drivers.

- Click the Activate & Update button next to the flagged device to automatically download and install the correct version of this driver.
Or click Update All to automatically download and install the correct version of all the drivers that are missing or out of date on your system (You’ll need the Pro version for this – when you select Update All, you’ll get a prompt to upgrade. If you’re not prepared to purchase the Pro version yet, Driver Easy provides a 7-day trial at no cost, granting access to all Pro features like fast downloads and easy installation. No charges will occur until after your 7-day trial period ends.)
- After updating, restart your computer to take effect.
After updating your drivers, restart your computer and check if the GeForce overlay not working issue still occurs.
If the issue remains, try the next fix below.
Fix 4: Install all Windows updates
Windows often releases new updates to fix the latest bugs. Some players reported that they fixed the GeForce overlay not working issue by installing the Windows updates. So we suggest that you give it a try. To do so:
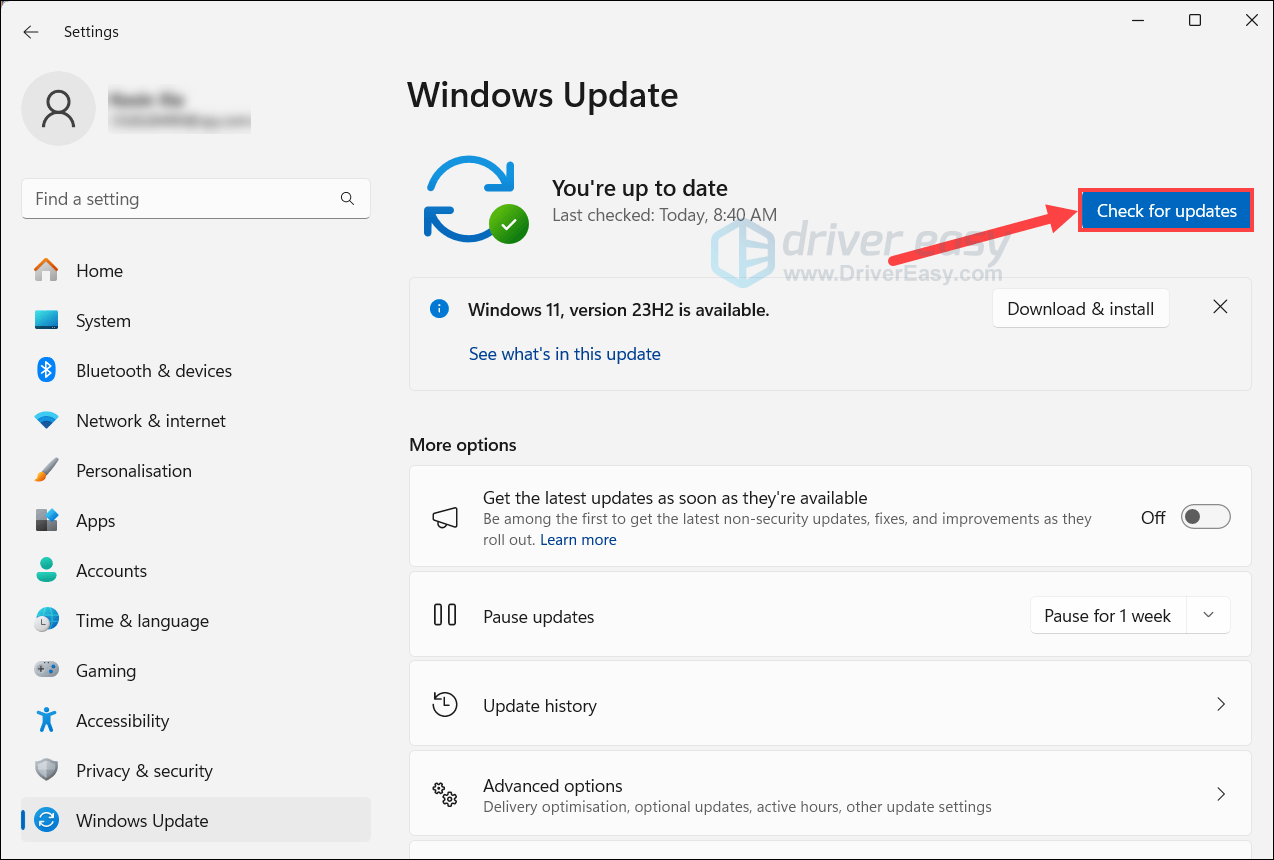
- On your keyboard, press the Windows logo key and I to open Settings.
- Click Windows Updates.

- Under Windows Update, click check for updates. It’ll take some time for Windows to search and install system updates.
- Restart your computer.
Now you can check if your GeForce overlay is working.
If the overlay is still no function, check out the next fix below.
Fix 5: Run GeForce Experience as an administrator
To be able to access all files GeForce Experience needs to run properly, you’ll need to have administrator permissions. This might help you solve the problem of GeForce overlay not working. Here’s how:
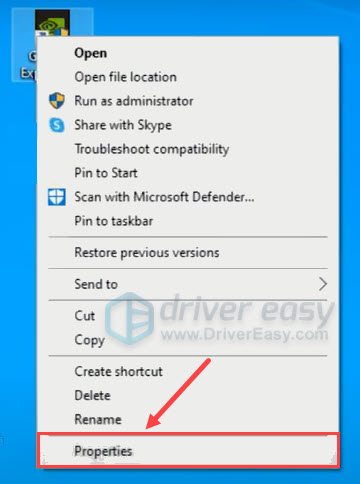
- On your desktop, right-click GeForce Experience and select Properties.
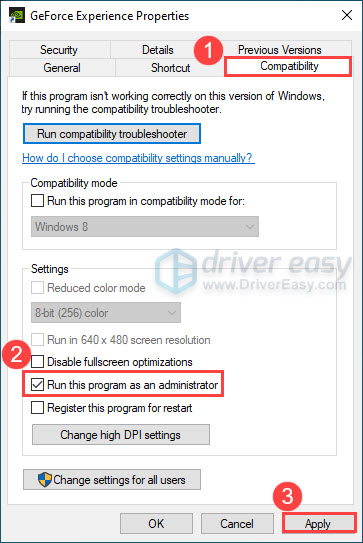
- Navigate to the Compatibility tab, check the box of Run this program as an administrator. Then click Apply to save changes.
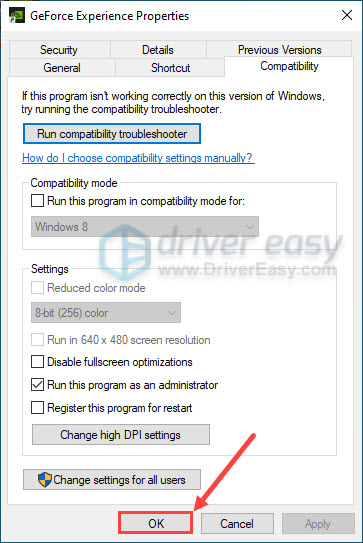
- Click OK to exit the window.
Check if the GeForce overlay not functioning issue still occurs.
If the issue persists, go ahead with the next fix below.
Fix 6: Enable experimental features
Enabling experimental features in GeForce Experience allows you to access updates and features that haven’t been released to all users. Try this solution to see if the GeForce overlay not working issue persists. Here’s how:
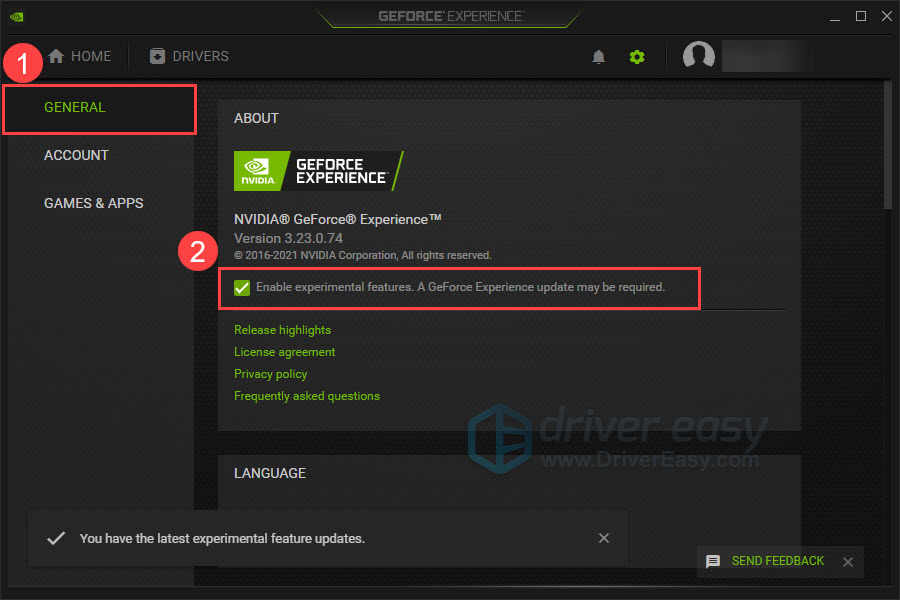
- Open GeForce Experience, then click the gear icon to open Settings.
- In the left panel, select GENERAL. Under the ABOUT section, tick the box next to “Enable experimental features. A GeForce Experience update may be required.”.
Once done, check if your GeForce overlay is working.
If not, move on to the next fix below.
Fix 7: Disable third-party services
Sometimes the third-party services may prevent GeForce overlay from working properly. Try temporarily disabling them to see if your GeForce overlay works or not. If GeForce overlay starts working again, try to enable third-party services one at a time to figure out the problematic services. Here’s how:
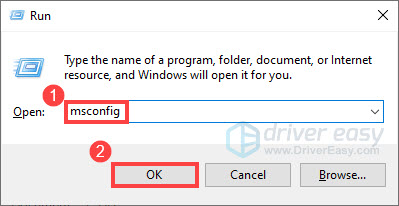
- On your keyboard, press the Windows logo key and R at the same time to invoke the Run box.
- Type msconfig and click OK to open System Configuration.
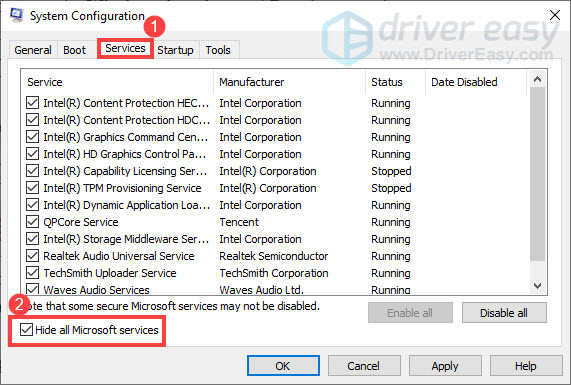
- In System Configuration, navigate to the Services tab, check the box of Hide all Microsoft services.
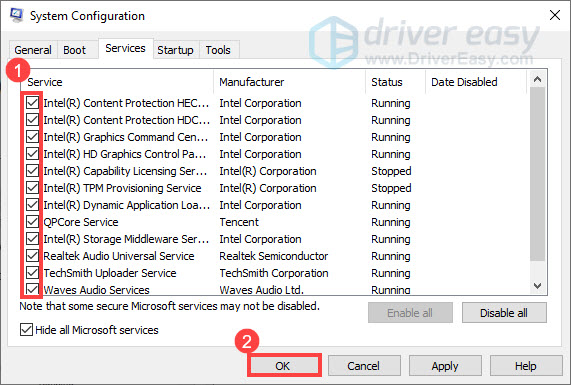
- Uncheck all the services EXCEPT NVIDIA services, then click OK to save changes.
- Restart your computer.
After the computer completely reboots, check if your GeForce overlay is working. If it starts working now, you’ll need to re-enable services one by one in System Configuration until you find the problematic one. Then restart your computer to apply the changes.
If this method doesn’t do the trick, move on to the next fix.
Fix 8: Repair Microsoft Visual C++ Redistributable Package
The Microsoft Visual C++ Redistributable Packages basically make sure some programs work and function properly without experiencing conflicts. If these redistributables are corrupt, it may lead to your GeForce overlay not working. You can follow the steps below to fix this issue:
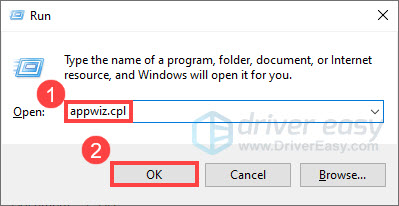
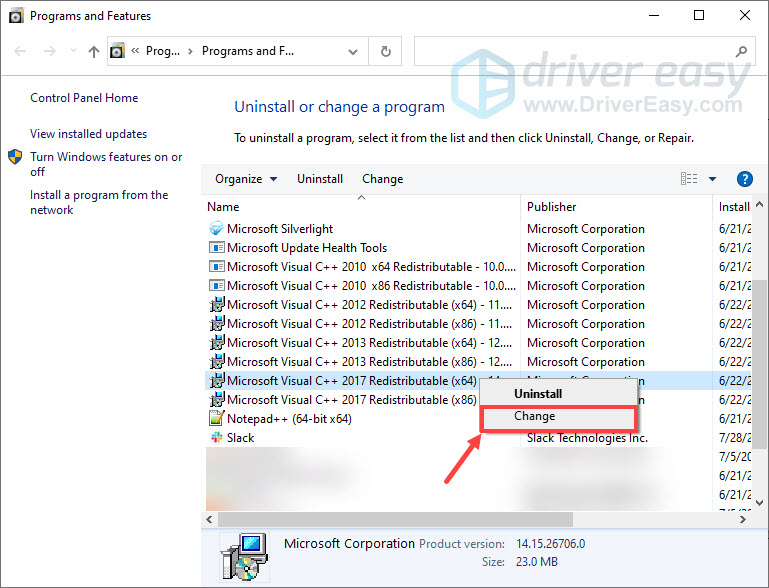
- On your keyboard, press the Windows logo key and R at the same time to invoke the Run box.
- Type appwiz.cpl and click OK.
- In Programs and Features, right-click Microsoft Visual C++ Redistributable and select Change. (You need to repeat the same process for all the listed Visual C++ Redistributable packages, but you can skip 2008 and older versions.)
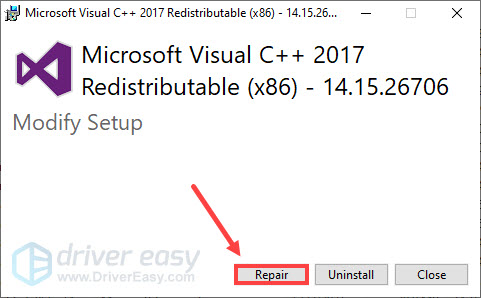
- In the pop-up window, click Repair. Then wait a few minutes for the repairing process to finish.
- After finishing the process, click Close.
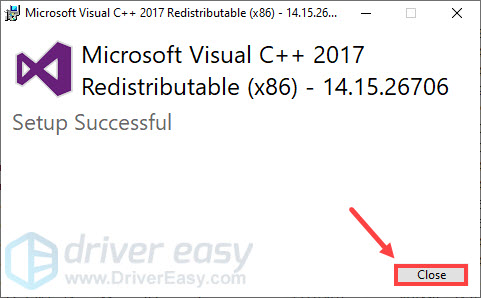
Check to see if GeForce overlay now works on your computer.
If repairing Microsoft Visual C++ Redistributable package doesn’t solve your problem, try the next fix below.
Fix 9: Install a Media Feature Pack
If you’re a Windows 10 N user, you can try installing a Media Feature Pack to fix the GeForce overlay not working issue, since Media-related features are largely absent from Windows 10 N versions.
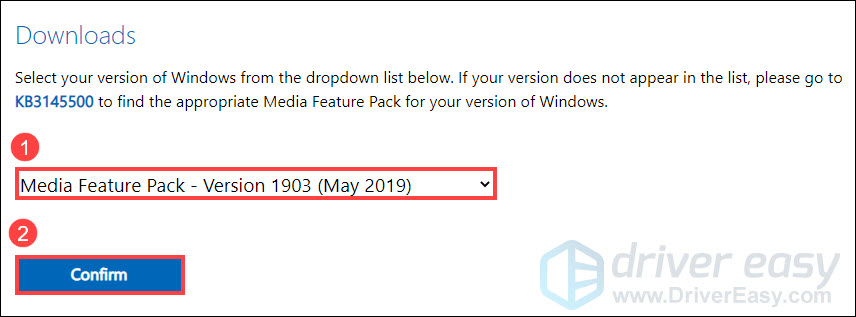
- Go to the Microsoft Download page for Media Feature Pack.
- Under Downloads, select the appropriate edition of Windows 10 N from the drop-down menu, then click Confirm.
- According to your Windows edition, click 32-bit Download or 64-bit Download.
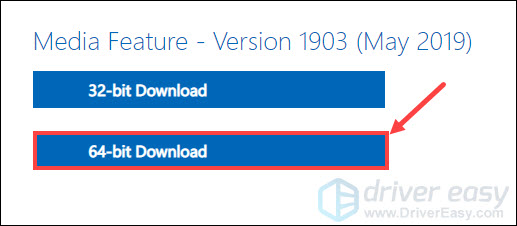
- After downloading the pack, follow the on-screen instructions to install it.
Make sure to restart your computer after installing the media feature Pack, then check if your GeForce overlay is working properly.
If this solution doesn’t work for you, check out the last fix below.
Fix 10: Reinstall GeForce Experience
If all solutions mentioned above fail to solve the problem of GeForce overlay not working, try reinstalling GeForce Experience as a last resort. To do so:
- On your keyboard, press the Windows logo key and R at the same time to invoke the Run box.
- Type appwiz.cpl and click OK.
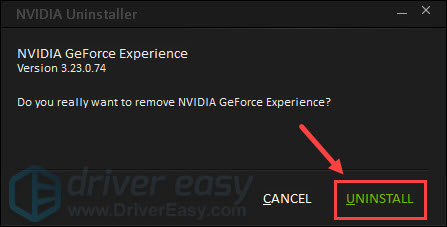
- Right-click GeForce Experience and select Uninstall/Change.
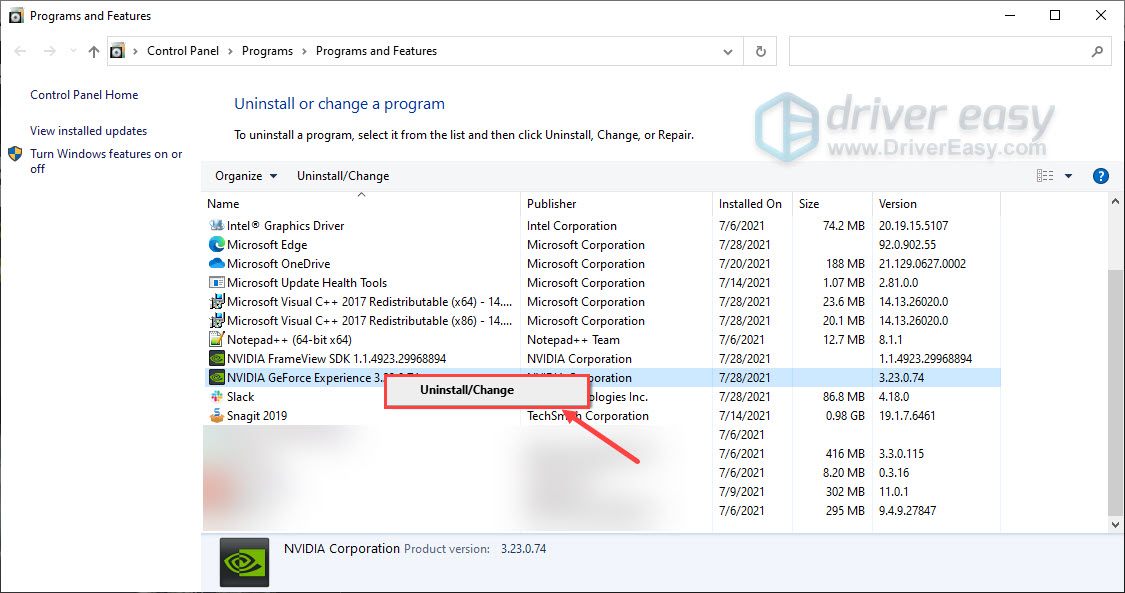
- In the pop-up window, click UNINSTALL.
- Go to the GeForce Experience official website to download the latest version of the program.
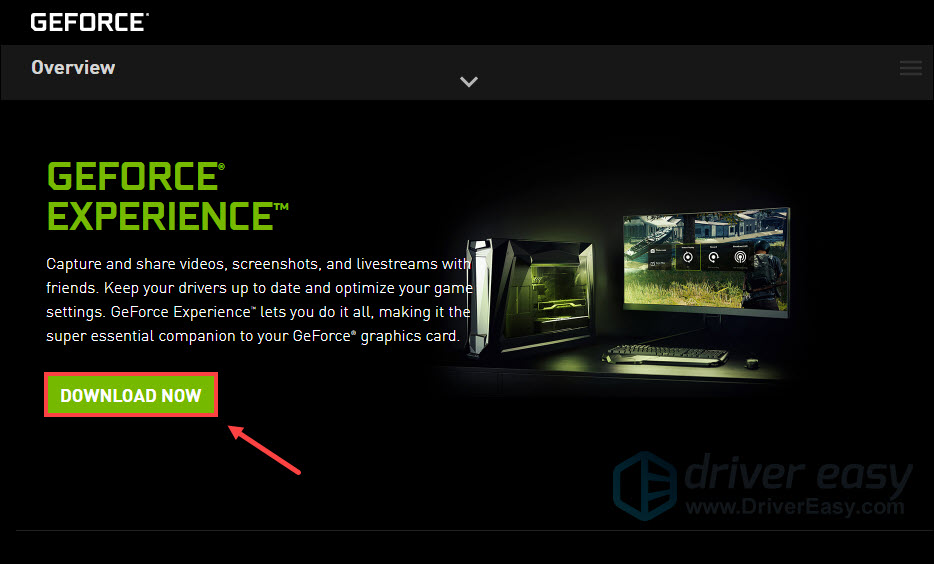
- After downloading, follow the on-screen instructions to install GeForce Experience.
Now you can check to see if your GeForce overlay is working.
So there you’ve it, the 10 fixes you can try to fix GeForce overlay not working. Hopefully, this post helped. If you have any questions or ideas, feel free to leave us a comment below.