


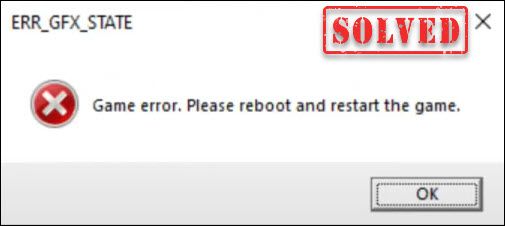
Players have been reported encountering an error ERR_GFX_STATE while trying to launch the game Red Dead Redemption 2. Then the game crashes. If it also happened to you, you should be able to fix it by trying the methods in this post.
Try these fixes
You may not need to try them all; simply work your way down the list until you find the one that works.
- Disable overclocking
- Clean update your graphics driver
- Verify game files
- Change the default graphics API to DirectX 12 from Vulkan
- Disable fullscreen optimization
- Delete SGA files
- Specify launch arguments
1. Disable overclocking
If you’re using MSI Afterburner or other GPU tweaking programs, you’re more likely to get this error message. The game engine doesn’t really support cards that are overclocked. And overclocking can cause game instability and thus the game might crash. So to fix it, you should disable any overclocking settings for your CPU and/or GPU.
2. Clean update your graphics driver
If downloading didn’t help, your faulty or outdated graphics driver may be the culprit and generate the ERR_GFX_STATE error. To fix it, you can try to do a clean update of the graphics card driver. You can use DDU (Display Driver Uninstaller), a great tool that does a pretty good job removing all the older or faulty display driver files on your computer.
To do a clean reinstallation of the display card driver with DDU:
- Download and search for the execution file of the display card driver from the website of your GPU manufacturer:
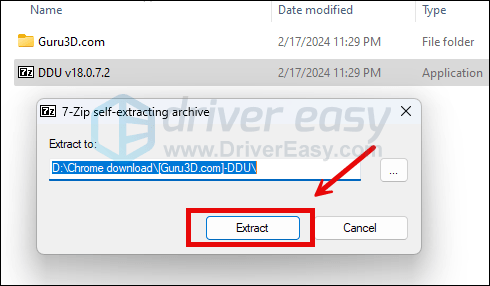
- Download DDU from the official download page. Then unzip the folder, and double-click the DDU file to further extract the execution file.
- Boot your computer into Safe Mode as instructed here: Start Safe Mode using the System Configuration tool
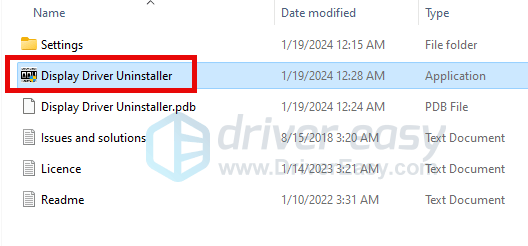
- When in Safe Mode, go to the folder where you unzip the DDU execution file. Double-click to run Display Driver Uninstaller.
- Select GPU and your GPU manufacturer on the right side. Then click Clean and restart.
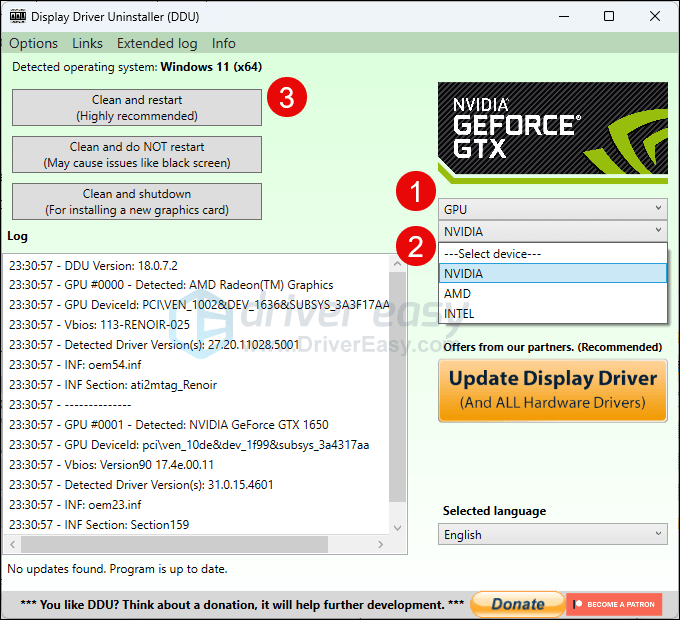
- Your computer should restart when the old driver files for your graphics card are cleaned.
- Double-click the setup file for the display card driver you’ve downloaded from step 1 to run the driver installation.
- Restart your computer afterward.
If you don’t have the time, patience, or computer skills to update drivers manually, you can do it automatically with Driver Easy.
Driver Easy will automatically recognize your system and find the correct drivers for it. You don’t need to know exactly what system your computer is running, you don’t need to risk downloading and installing the wrong driver, and you don’t need to worry about making mistakes when installing.
You can update your drivers automatically with either the 7 days free trial or the Pro version of Driver Easy. It takes just 2 clicks, and you get full support and a 30-day money-back guarantee with the Pro version:
- Download and install Driver Easy.
- Run Driver Easy and click the Scan Now button. Driver Easy will then scan your computer and detect any problem drivers.

- Click the Activate & Update button next to the flagged device to automatically download and install the correct version of this driver.
Or click Update All to automatically download and install the correct version of all the drivers that are missing or out of date on your system (You’ll need the Pro version for this – when you select Update All, you’ll get a prompt to upgrade. If you’re not prepared to purchase the Pro version yet, Driver Easy provides a 7-day trial at no cost, granting access to all Pro features like fast downloads and easy installation. No charges will occur until after your 7-day trial period ends.)
- After updating, restart your computer to take effect.
After updating your drivers, restart your computer for them to take effect. Then launch your game to check if it worked.
3. Verify game files
Corrupted or missing files could also relate to the Red Dead Redemption 2 ERR_GFX_STATE error. To see if this is the case, you can verify your game files on:
Epic Games Launcher
To verify the game’s files on Epic Games Launcher:
- On Epic Game Launcher, find Red Dead Redemption 2 in your Library. Click the three dots on the right side of the game line and select Manage.
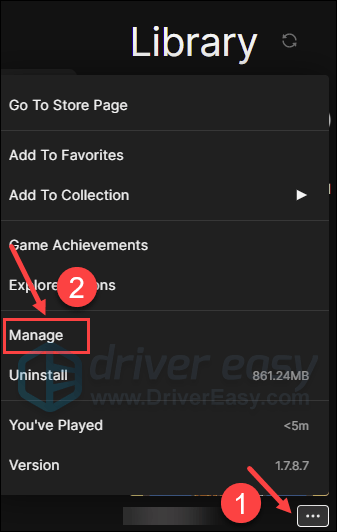
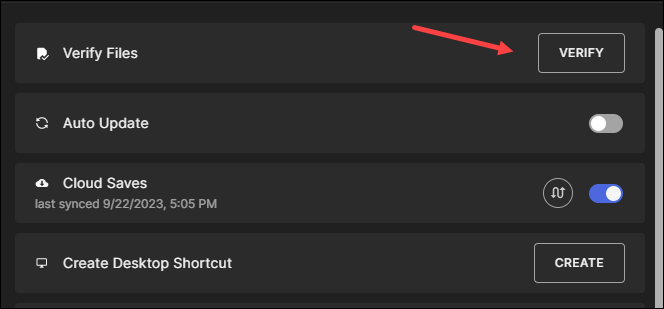
- Click Verify to start verifying the game files.
- Wait for validation to complete. (It may take a while to verify all your files.)
- When the validation is done, run your Red Dead Redemption 2 again to see if the ERR_GFX_STATE error remains.
Steam
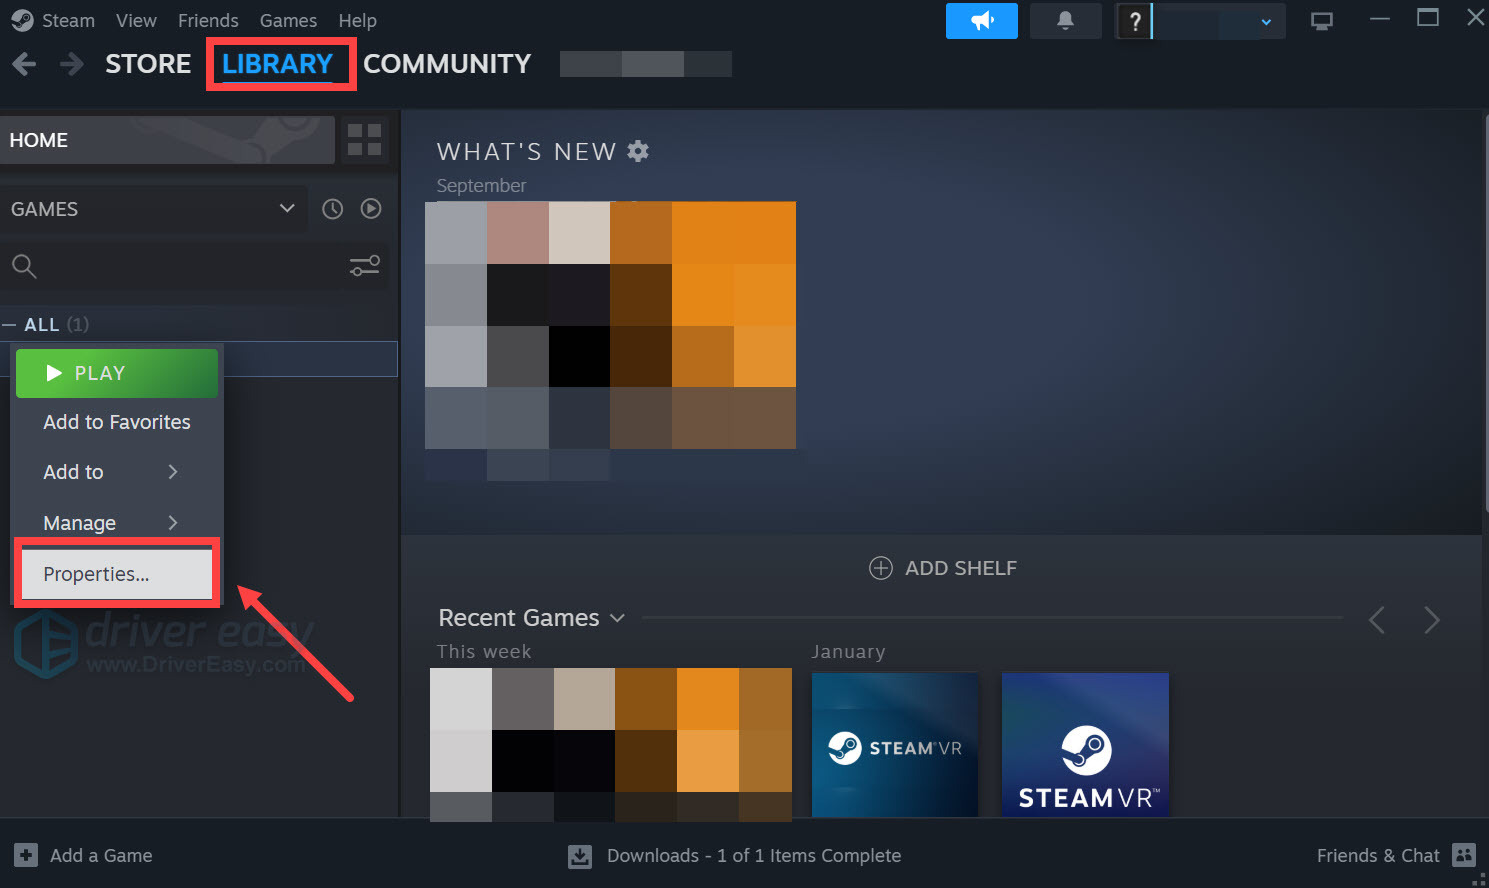
- Launch Steam.
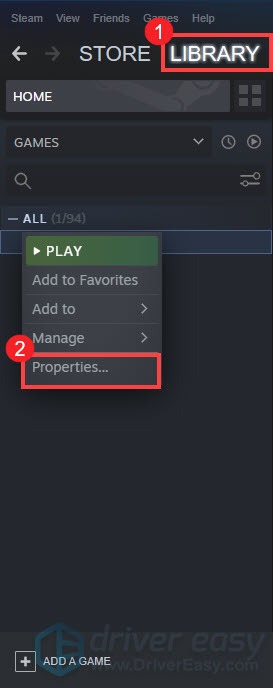
- In the LIBRARY, right-click on Red Dead Redemption 2 and select Properties from the drop-down menu.
- Select the Installed Files tab and click on the Verified integrity of game files button.
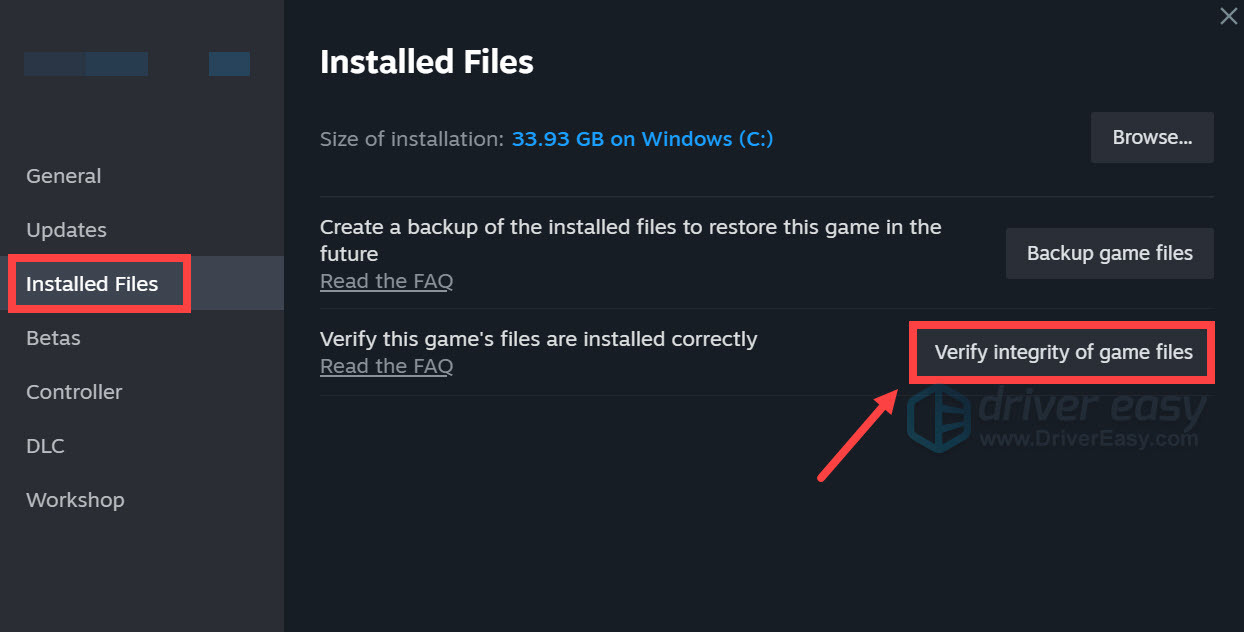
- Steam will verify the game’s files – this process may take several minutes.
- When the verification is done, check to see if the Red Dead Redemption 2 still has the ERR_GFX_STATE error. If so, please move on to the next fix.
Rockstar Games Launcher
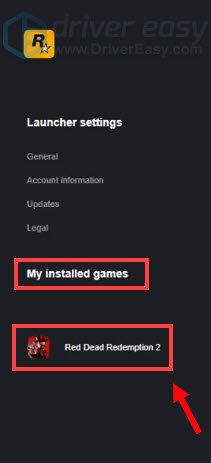
- Open Rockstar Games Launcher.
- Click SETTINGS, then find Red Dead Redemption 2 in the My installed game list, and click the VERIFY INTEGRITY button next to the Verify game file integrity option.
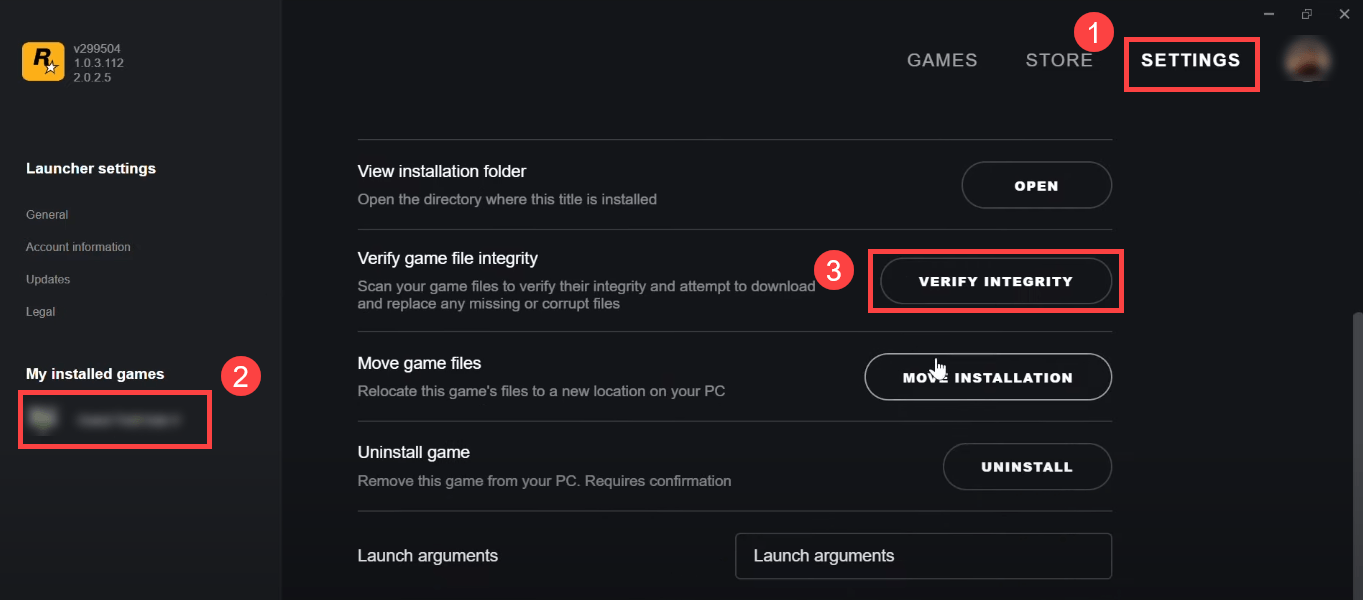
- Wait for the process to finish.
- When the verification is done, check to see if the Red Dead Redemption 2 still has the ERR_GFX_STATE error. If so, please move on to the next fix.
4. Change the default graphics API to DirectX 12 from Vulkan
According to users in the comment section, changing the Vulkan to DX12 in the API settings file fixes the ERR_GFX_STATE error in Red Dead Redemption 2 for them. To see if this does wonders for you:
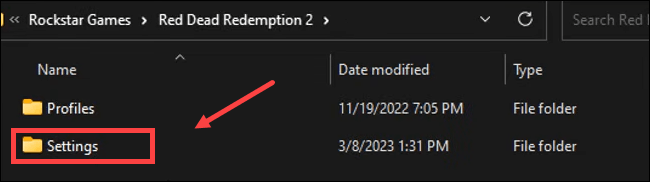
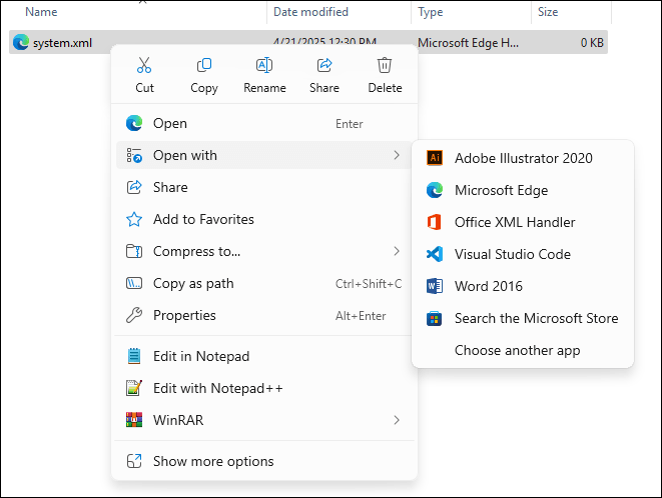
- Go to C:\Users\(your user name)\Documents\Rockstar Games\Red Dead Redemption 2\Settings.
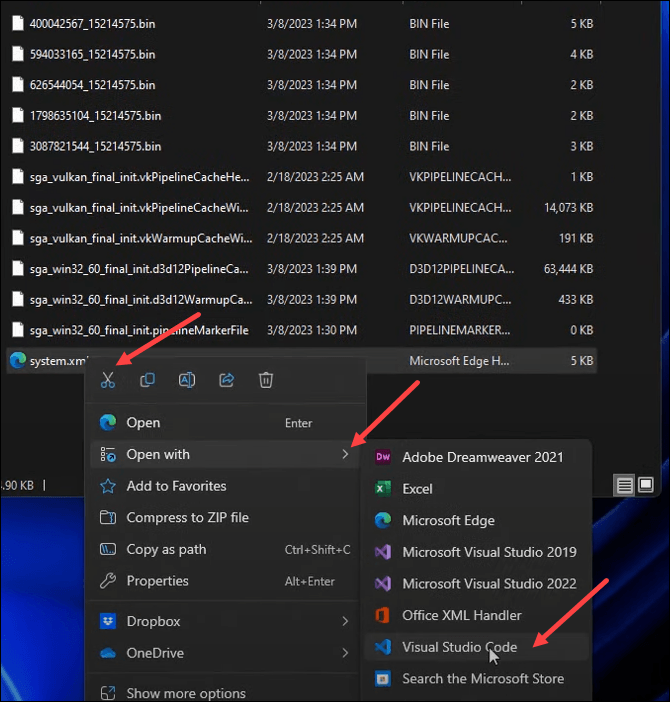
- Right-click the system.xml file and open it with an editor. Here, we use Visual Studio Code, but you can go with Notepad, Notepad++ or any other similar editor.
- Change the API Settings from Vulkan to DX12.
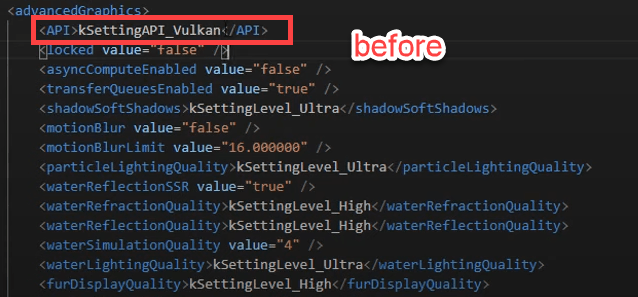
- Save the change.
Do not have the Settings folder? No worries!
What you have to do is navigate to C:\Users\(your user name)\Documents\Rockstar Games\Red Dead Redemption 2\, then:
- Right-click on the empty space and select New > Folder. Then name it Settings.
- Open it, right-click on the empty space and select New > Text Document. Then name it system.xml.
When prompted, click Yes to confirm. - Once done, open it with either your Notepad, Notepad++, or Visual Studio Code.
Then copy and paste the following code into your xml file. Note that within the <videoCardDescription> tag, you should replace NVIDIA GeForce 4070 Ti with your own graphics card model.
<?xml version="1.0" encoding="UTF-8" ?>
<rage__fwuiSystemSettingsCollection>
<version value="37" />
<configSource>kSettingsConfig_Auto</configSource>
<graphics>
<tessellation>kSettingLevel_Ultra</tessellation>
<shadowQuality>kSettingLevel_Ultra</shadowQuality>
<farShadowQuality>kSettingLevel_Ultra</farShadowQuality>
<reflectionQuality>kSettingLevel_Ultra</reflectionQuality>
<mirrorQuality>kSettingLevel_Ultra</mirrorQuality>
<ssao>kSettingLevel_Ultra</ssao>
<textureQuality>kSettingLevel_Ultra</textureQuality>
<particleQuality>kSettingLevel_Ultra</particleQuality>
<waterQuality>kSettingLevel_Custom</waterQuality>
<volumetricsQuality>kSettingLevel_Custom</volumetricsQuality>
<lightingQuality>kSettingLevel_Ultra</lightingQuality>
<ambientLightingQuality>kSettingLevel_Ultra</ambientLightingQuality>
<anisotropicFiltering value="4" />
<dlssIndex value="2" />
<dlssQuality value="2" />
<dlssSharpen value="0.350000" />
<fsr2Index value="0" />
<fsr2Sharpen value="0.350000" />
<taa>kSettingLevel_High</taa>
<fxaaEnabled value="false" />
<msaa value="3" />
<graphicsQualityPreset value="1.000000" />
<hdr value="true" />
<hdrIntensity value="100" />
<hdrPeakBrightness value="1000" />
<hdrFilmicMode value="true" />
<gamma value="15" />
<hdrSettingsMigrated value="true" />
</graphics>
<advancedGraphics>
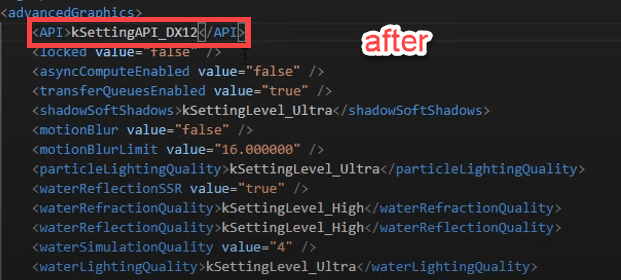
<API>kSettingAPI_DX12</API>
<locked value="false" />
<asyncComputeEnabled value="false" />
<transferQueuesEnabled value="true" />
<shadowSoftShadows>kSettingLevel_Ultra</shadowSoftShadows>
<motionBlur value="false" />
<motionBlurLimit value="16.000000" />
<particleLightingQuality>kSettingLevel_Ultra</particleLightingQuality>
<waterReflectionSSR value="true" />
<waterRefractionQuality>kSettingLevel_High</waterRefractionQuality>
<waterReflectionQuality>kSettingLevel_High</waterReflectionQuality>
<waterSimulationQuality value="4" />
<waterLightingQuality>kSettingLevel_Ultra</waterLightingQuality>
<furDisplayQuality>kSettingLevel_High</furDisplayQuality>
<maxTexUpgradesPerFrame value="5" />
<shadowGrassShadows>kSettingLevel_High</shadowGrassShadows>
<shadowParticleShadows value="true" />
<shadowLongShadows value="true" />
<directionalShadowsAlpha value="false" />
<worldHeightShadowQuality value="1.000000" />
<directionalScreenSpaceShadowQuality value="1.000000" />
<ambientMaskVolumesHighPrecision value="true" />
<scatteringVolumeQuality>kSettingLevel_Ultra</scatteringVolumeQuality>
<volumetricsRaymarchQuality>kSettingLevel_Ultra</volumetricsRaymarchQuality>
<volumetricsLightingQuality>kSettingLevel_Ultra</volumetricsLightingQuality>
<volumetricsRaymarchResolutionUnclamped value="true" />
<terrainShadowQuality>kSettingLevel_Ultra</terrainShadowQuality>
<damageModelsDisabled value="false" />
<decalQuality>kSettingLevel_High</decalQuality>
<ssaoFullScreenEnabled value="true" />
<ssaoType value="0" />
<ssdoSampleCount value="4" />
<ssdoUseDualRadii value="false" />
<ssdoResolution>kSettingLevel_Low</ssdoResolution>
<ssdoTAABlendEnabled value="true" />
<ssroSampleCount value="2" />
<snowGlints value="true" />
<POMQuality>kSettingLevel_Ultra</POMQuality>
<probeRelightEveryFrame value="false" />
<scalingMode>kSettingScale_Mode1o1</scalingMode>
<reflectionMSAA value="3" />
<lodScale value="1.000000" />
<grassLod value="3.000000" />
<pedLodBias value="0.000000" />
<vehicleLodBias value="0.000000" />
<sharpenIntensity value="4.000000" />
<treeQuality>kSettingLevel_Ultra</treeQuality>
<deepsurfaceQuality>kSettingLevel_High</deepsurfaceQuality>
<treeTessellationEnabled value="true" />
</advancedGraphics>
<video>
<adapterIndex value="0" />
<outputIndex value="0" />
<resolutionIndex value="18" />
<screenWidth value="2560" />
<screenHeight value="1440" />
<resolutionIndexWindowed value="18" />
<screenWidthWindowed value="2560" />
<screenHeightWindowed value="1440" />
<refreshRateIndex value="3" />
<refreshRateNumerator value="164956" />
<refreshRateDenominator value="1000" />
<windowed value="0" />
<vSync value="1" />
<tripleBuffered value="true" />
<ReflexSettings>kSettingReflex_On_Boost</ReflexSettings>
<pauseOnFocusLoss value="false" />
<constrainMousePointer value="false" />
</video>
<videoCardDescription>NVIDIA GeForce RTX 4070 Ti</videoCardDescription>
</rage__fwuiSystemSettingsCollection>
Once done, save the file and see if the ERR_GFX_STATE error in Red Dead Redemption 2 remains. If so, please move on.
5. Disable fullscreen optimization
The ERR_GFX_STATE error often stems from conflicts between Red Dead Redemption 2 and Windows’ display management features. Disabling fullscreen optimization ensures the game runs in true fullscreen mode, granting it exclusive control over the display and reducing potential conflicts that can lead to crashes.
Steps to disable fullscreen optimization when using:
Epic Games Launcher
- Open the Epic Games Launcher and click Library.
- Click the three dots next to the Red Dead Redemption 2 title and select Manage.
- On the Installation tab, click the folder icon.
- Right-click on RDR2.exe and select Properties.
- On the Compatibility tab, check Run this program as administrator and disable full screen optimization. Then click Apply > OK.
Steam
- Open the Steam Launcher and click LIBRARY.
- Right-click Red Dead Redemption 2 and select Properties.
- Click on the Local Files tab, then click on Browse….
- Right-click on RDR2.exe and select Properties.
- On the Compatibility tab, check Run this program as administrator and disable full screen optimization.
- Click Apply > OK.
Rockstar Games Launcher
- Open the Rockstar Games Launcher, then click Settings.
- Click Red Dead Redemption 2 under My Installed Games
- Click Open under View installation folder.
- Right-click on RDR2.exe and click Properties.
- On the Compatibility tab, click Run this program as administrator and disable full screen optimization. Then click Apply > OK.
6. Delete SGA files
Files with the extension SGA are created for the game. They are compressed files often containing maps or large groups of related files. But there are situations that these files cause crashing or other errors in your game. So to fix it, you should delete them. To do so, simply follow the instructions below:
- Go to C:\Users\(your user name)\Documents\Rockstar Games\Red Dead Redemption 2\Settings.
- Now you can see three files that begin with sga. These are the files that cause the error. So you need to delete them. And your game would not crash again.
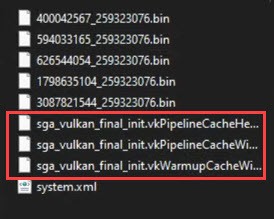
If deleting these files didn’t work for you, you can alternatively create three empty text files of size 0B and make those files read-only. Also, change the names to sga_xxx accordingly. This might be very specific to your setup and the true root cause you’re having.
7. Specify launch arguments
Command line arguments are extra commands you can use when launching your game so that the game’s functionality will change. To get rid of the ERR_GFX_STATE error, you can define launch arguments to make your game run with certain parameters.
To do this, simply click on the link below based on the launcher you’re using:
Rockstar Games Launcher
- Open your Rockstar Games Launcher and select Settings.
- Under My installed Games, select Red Dead Redemption 2.
- Scroll down to Launch arguments. In the text box, add -ignorpipelinecache.

- Now launch your game to check if it did the trick.
Epic Games Launcher
- Open your Epic Games Launcher. On the bottom-left side, click on Settings.
- Scroll down to Red Dead Redemption 2. Tick the box Additional Command Line Arguments.
- In the text box, add -ignorepipelinecache.
- Return to the Main Menu and launch your game to check if it did the trick.
Steam Launcher
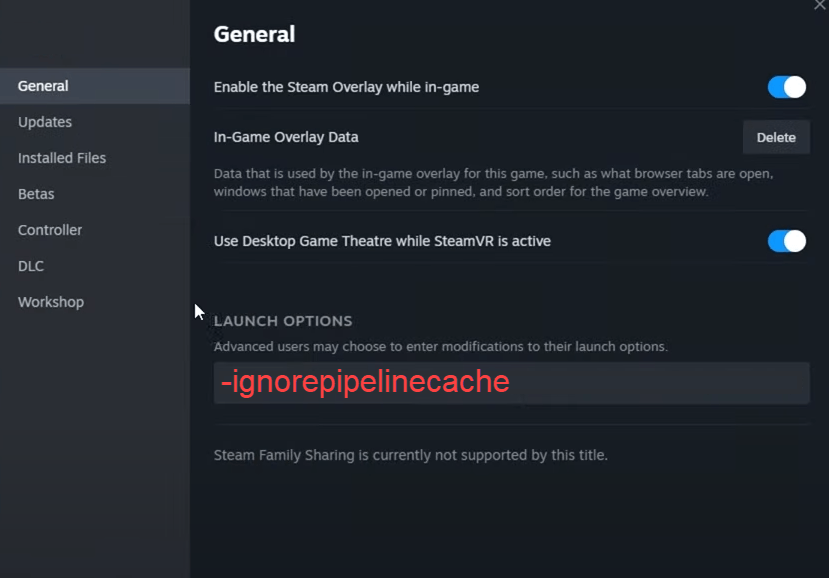
- Open your Steam client. Under LIBRARY, right-click on Red Dead Redemption 2 and select Properties.
- Under the launch options, add -ignorepipelinecache. Then save and try to launch Red Dead Redemption 2 to see if the error remains.
To conclude, there are different bugs that cause this same error message. It can happen if your GPU is overclocked, it can happen if your RAM is overclocked. Players can get it randomly. It appears to just be a generic message and that’s why there are so many solutions that only work for a small number of people. But I hope the fixes in this post can help you resolve the problem and you can play your game smoothly.