


Is your computer always lagging or freezing, especially when many programs running at the same time period? Don’t worry. We’ve got you covered! This post shows you easy fixes for computer lagging issues.
Why is my computer lagging?
Generally speaking, the insufficient system resources will cause your computer lagging. Meanwhile, the outdated software and operating system will bring bugs to your computer, so it gets lagging.
Sometimes it’s hard to identify the exact cause for lagging computer, but still there is something you can do to get rid of the slow/lagging computer.
Try these fixes:
- Restart your computer
- Run System File Checker
- Update available drivers
- Limit background programs
- Free up more disk space
- Run Disk Defragment
- Check for malware and virus
Method 1: Restart your computer
Since many technical problems can be resolved by restarting, it never hurts to restart your computer if it’s been lagging. Often this will reduce the lag.
If you seldom shut down your computer, it’s recommended to restart your computer constantly so your computer won’t get lagging.
Method 2: Run System File Checker
System File Checker is a built-in Windows feature that scans and repairs corrupted system files. Your lag computer may be caused by corrupted system files, so you can run SFC:
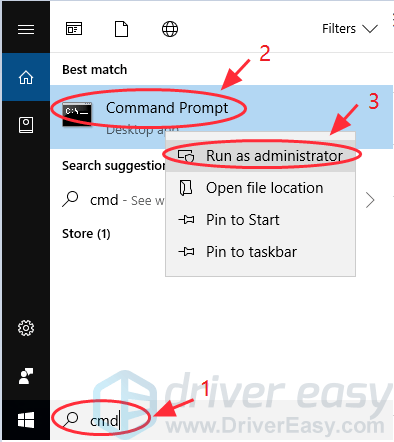
- Type cmd in the taskbar search box. Right-click Command Prompt (or cmd if you’re using Windows 7) to select Run as administrator, and then click Yes to confirm.
- Once you see the command prompt, type sfc /scannow and press Enter.
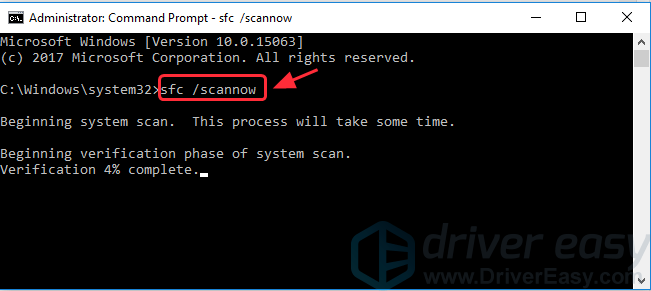
- Windows will now verify the system files, and automatically fix any issues.
- Once verification is complete, exit the Command Prompt.
Restart your PC and see if it works better.
Method 3: Update available drivers
Hardware conflicts or outdated device drivers is always regarded as a main cause of the lagging computer. So you should install the latest and correct device drivers in your computer.
There are two ways to update device drivers: manually and automatically.
Manual driver update – You can go to your graphics card manufacturer’s website, find the correct driver, and install it in your computer. Be sure to install drivers that are compatible with the operating system running in your computer, This requires time and computer skills.
Automatic driver update – If you don’t have time or patience, you can do it automatically with Driver Easy.
Driver Easy will detect the drivers condition in your computer, and install the correct drivers for your PC. More importantly, with Driver Easy, you don’t need to struggle figuring out the Operating System, and you don’t need to worry about making mistakes while processing. That will tremendously save your time and patience.
- Download and install Driver Easy.
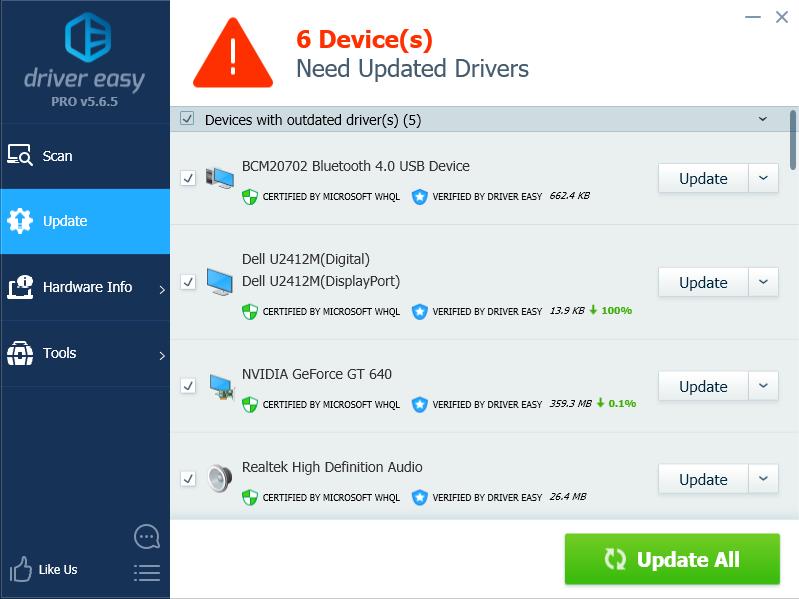
- Run Driver Easy and click Scan Now. Driver Easy will detect the problem drivers in your computer.

- Click Update button next to the driver name to download the correct graphics card driver (you can do that with the FREE version), then install it in your computer.
Or click Update All to automatically download and install the correct version of all the problem drivers (you can do that with Pro version, and you will be prompted to upgrade when you click Update All).
- Restart your computer to take effect.
Method 4: Limit background programs
Too many programs and services running in the background will slow down your computer without doubt. All you need to do is to limit the programs running in your computer.
Step 1: Uninstall unnecessary applications
You may install some applications that you seldom use. If that’s the case, uninstall them to free up more space and system resources.
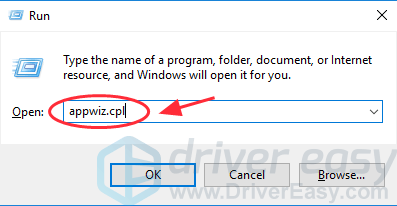
- On your keyboard, press the Windows logo key
and R at the same time to invoke the Run box.
- Type appwiz.cpl and click OK.
- In the program list, select the program that you seldom, and uninstall it.
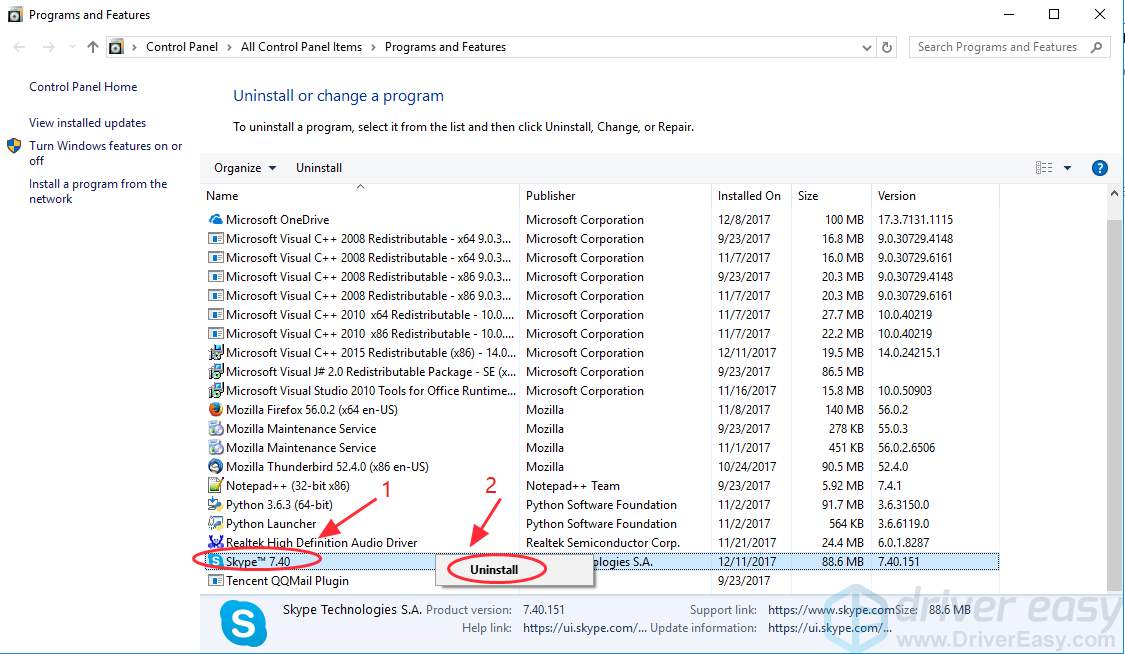
You may need to repeat this if there are more than one applications to be uninstalled.
- After uninstalling, restart your computer to have a refresh.
Step 2: Limit startup programs
Many programs will require to run at startup, and this will help you launch the programs quickly when you open them. However, this can slow down your computer to a crawl. You should disable the startup programs that is not necessary.
If you’re using Windows 10, Windows 8, and Windows 8.1
If you’re using Windows 7, Windows XP and Windows Vista
If you’re using Windows 10, Windows 8, and Windows 8.1
You can disable startup programs in Task Manager:
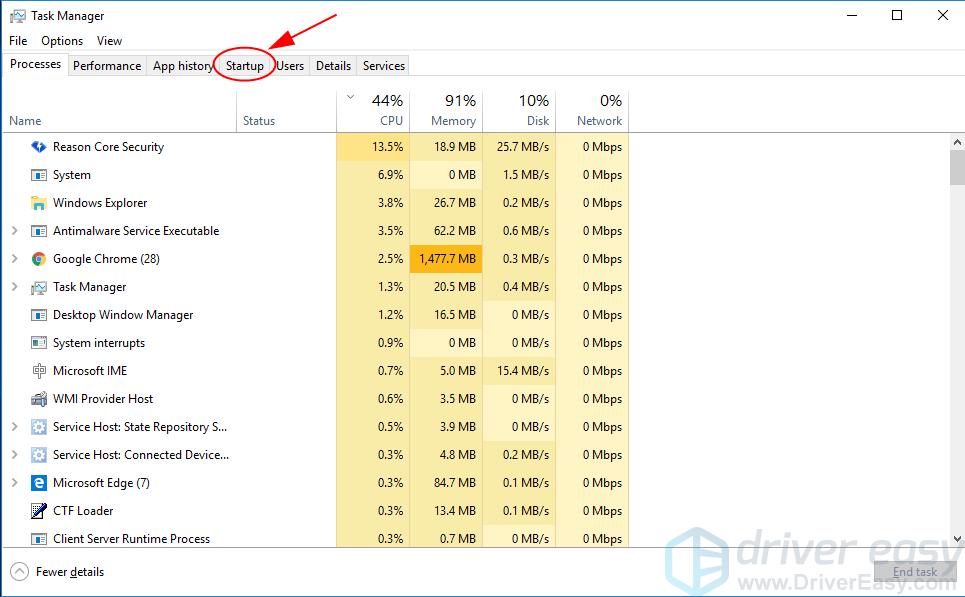
- On your keyboard, press the Ctrl key, Shift key and Esc key at the same time to invoke Task Manager.
- Click the Startup tab. And you’ll see the list of the startup items.
- Select the program that’s no need to run at startup, and click Disable.
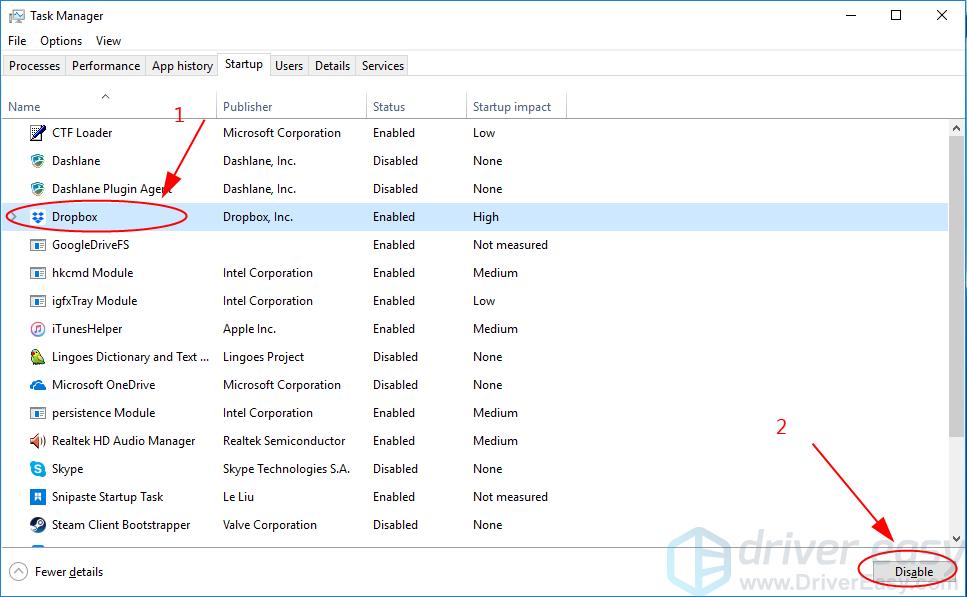
You’ll need to repeat this to disable more than one startup items.
- Restart your computer and it should be able to boot faster.
If you’re using Windows 7, Windows XP and Windows Vista:
You can disable startup programs in MSCONFIG:
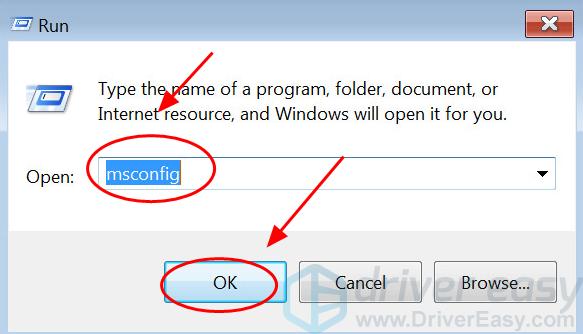
- On your keyboard, press the Windows logo keyand R at the same time.
- Type msconfig and click OK.
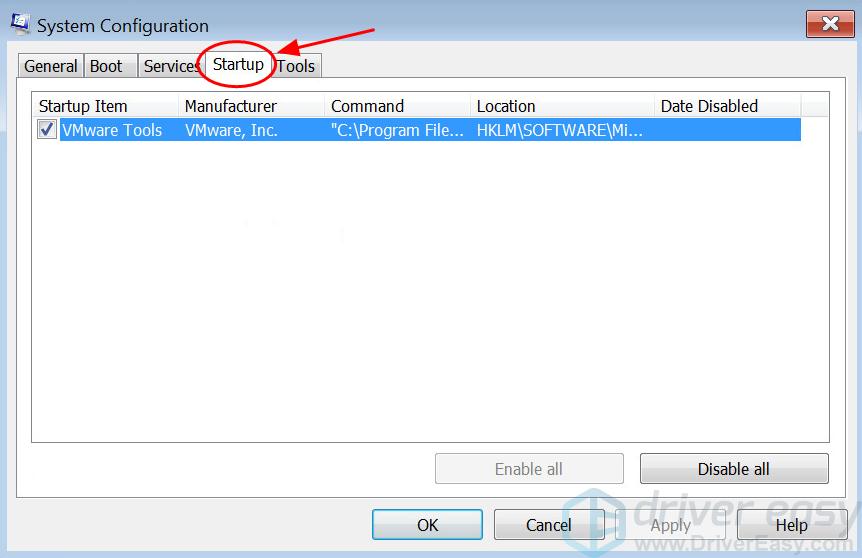
- Click the Startup tab.
- Select the programs you want to disable and click Disable. Then click Apply and OK to save.
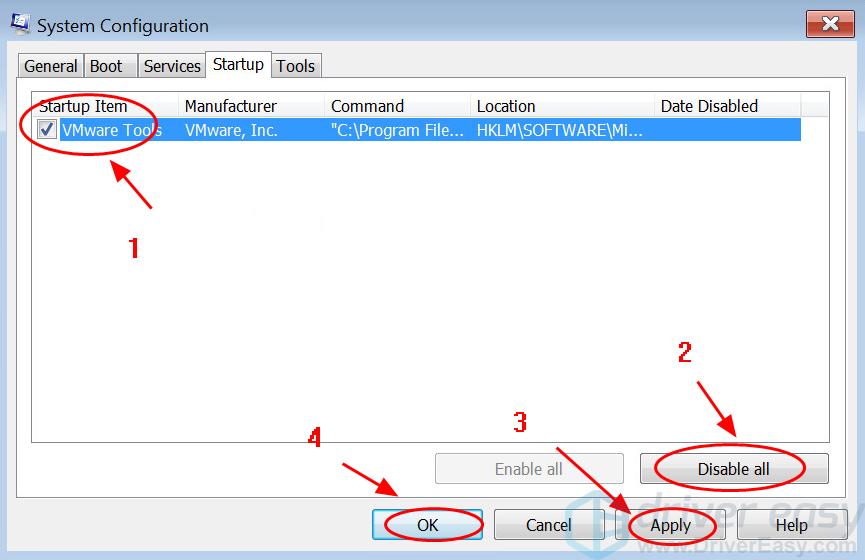
- Restart your computer to take effect, and your computer should boot faster.
Method 5: Free up disk space
You can clean up your hard disk to spare more free space, and this can fix the computer lagging issues.
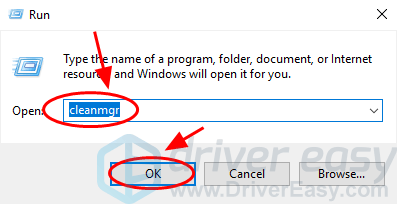
- On your keyboard, press the Windows logo key and R at the same time to invoke the Run box.
- Type cleanmgr and click OK.
- Check the box next to the files that you want to clean up, and click Clean up system files.
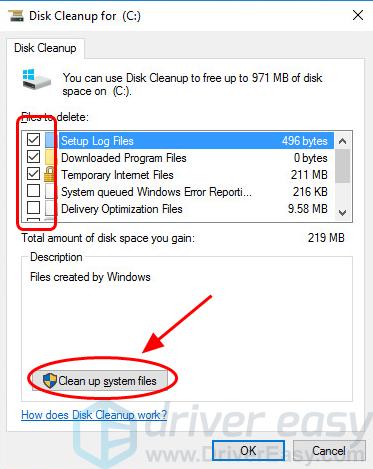
- Wait for a few minutes to calculate, then click OK and Delete files to confirm.
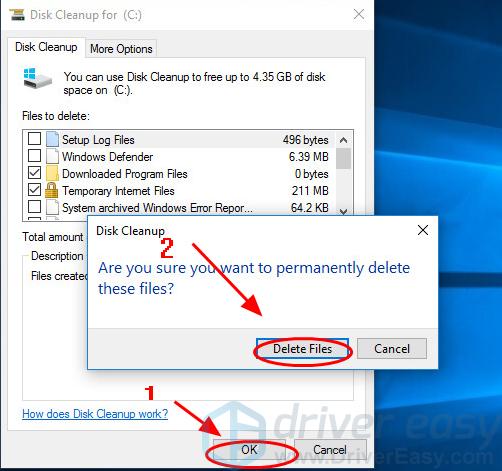
- Wait for a while to complete and restart your PC.
Method 6: Run Disk Defragment
Fragmentation makes it harder and more slowly for your hard disk to run the processes, so Disk Defragment is necessary to reorganize the data and make your laptop faster.
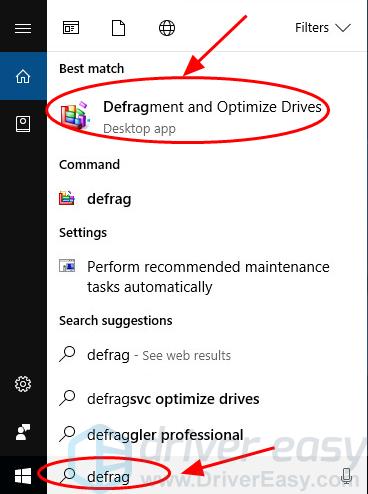
- In the Search box at the Start button, type defrag, and click Defragment and Optimize Drives.
- Select a drive, and click Analyze (or Analyze disk), then it will start analyzing the fragmentation. (You can’t click Analyze or Analyze disk if you have installed SSD, then you can skip this step.)
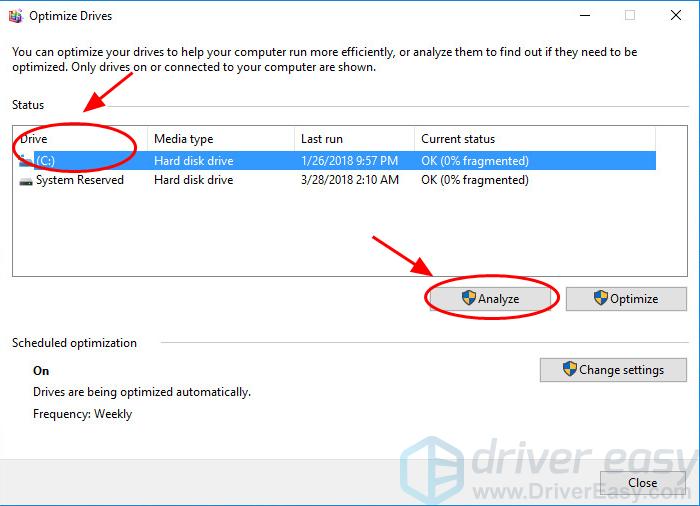
- After analysis completed, click Optimize (or Defragment disk), and wait for a few minutes to finish.
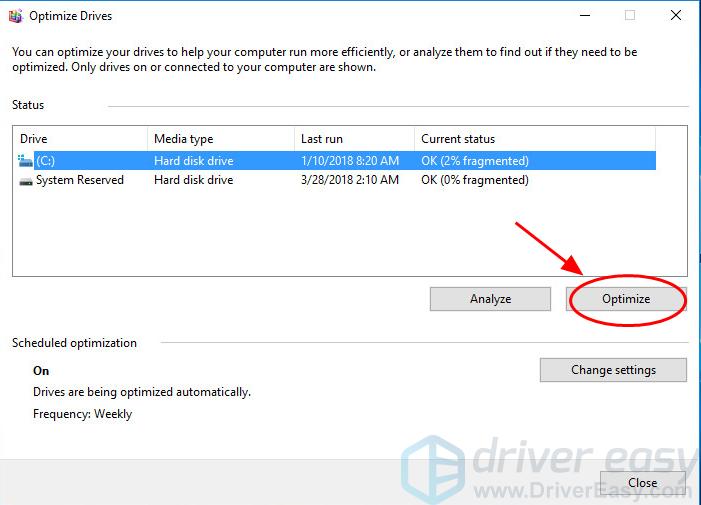
- Close the window and reboot.
This should reduce the computer lags.
Method 7: Check for malware and virus
Sometimes the malware or virus can lead to your computer lagging or freezing. So it’s necessary to run the virus scan with the anti-virus program.
So run a virus scan across your entire Windows system. Yes, it will take some time to complete, but it’s worth it. Unfortunately, Windows Defender may not detect it, so it’s worth trying another antivirus application such as Avira and Panda.
If any malware has been detected, follow the instructions provided by the antivirus program to fix it.
So there you have it – Hope these solutions helps you with the lagging computer. If you have any questions or want to share your experience, feel free to add a comment below and let us know.