


If you get NVIDIA Windows Kernel Mode driver stopped responding error, don’t worry. You can fix the problem with one of the methods below.
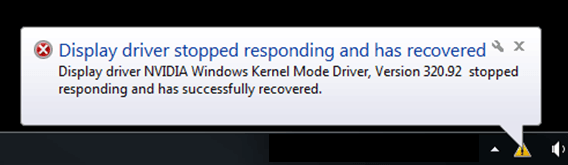
The full error message is as follows:
Display driver stopped responding and has recovered
Display driver NVIDIA Windows Kernel Mode Driver, Version xxx stopped responding and has successfully recovered.
We’ve put together three methods for you to fix the problem. You may not have to try them all; just work your way down until you find the one that works for you.
Method 1: Uninstall then reinstall the graphic driver
The problem can be caused by the faulty NVIDIA graphics driver. To resolve the problem, you can try to uninstall then reinstall the NVIDIA graphics driver.
You can follow these steps to uninstall and reinstall the NVIDIA graphics driver:
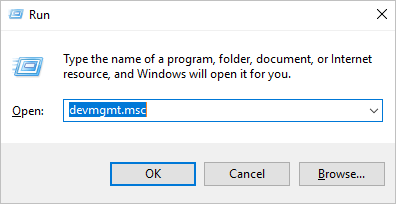
1) On your keyboard, press the Windows logo key and R at the same time to invoke the Run box.
Type devmgmt.msc and click OK to open Device Manager window.
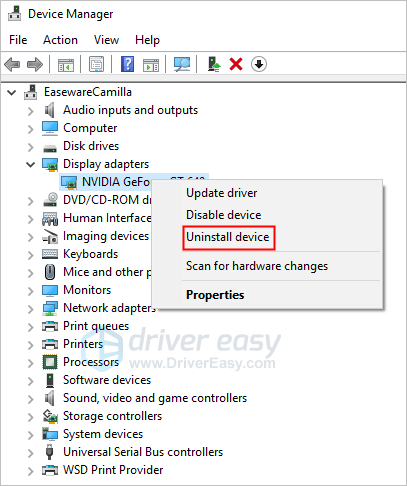
2) Expand the Display adapters branch. Right-click on the NVIDIA graphics card name and click Uninstall.
3) After uninstalling the driver, restart your PC to allow Windows to reinstall the driver automatically.
4) Check to see if the problem is resolved.
Method 2: Update the NVIDIA graphics driver
If Method 1 doesn’t work for you, you can try to update the NVIDIA graphics driver. If you don’t have the time, patience or computer skills to update the driver manually, you can do it automatically with Driver Easy.
Driver Easy will automatically recognize your system and find the correct drivers for it. You don’t need to know exactly what system your computer is running, you don’t need to risk downloading and installing the wrong driver, and you don’t need to worry about making a mistake when installing.
You can update your drivers automatically with either the FREE or the Pro version of Driver Easy. But with the Pro version it takes just 2 clicks (and you get full support and a 30-day money back guarantee):
1) Download and install Driver Easy.
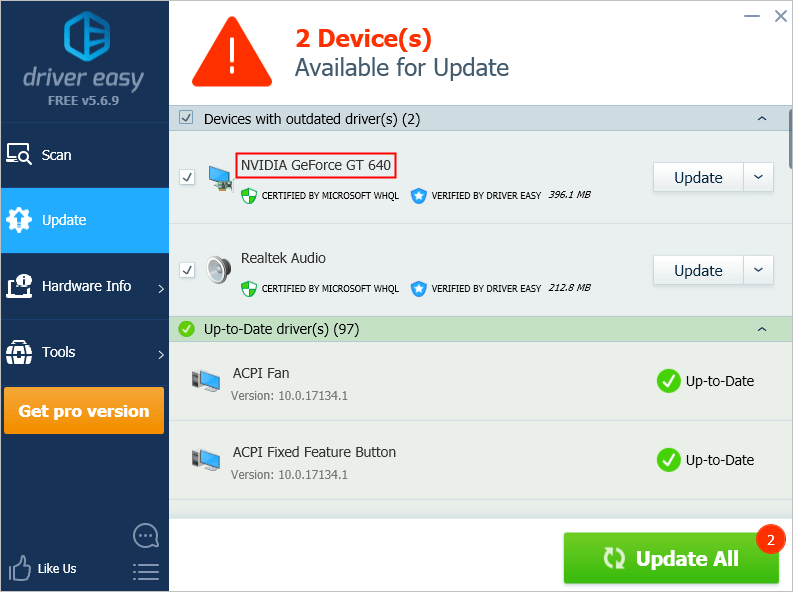
2) Run Driver Easy and click Scan Now. Driver Easy will then scan your computer and detect any problem drivers.

3) Click the Update button next to a flagged NVIDIA graphics driver to automatically download the correct version of this driver, then you can manually install it (you can do this with the FREE version).
Or click Update All to automatically download and install the correct version of all the drivers that are missing or out of date on your system (this requires the Pro version – you’ll be prompted to upgrade when you click Update All).
Method 3: Increase the GPU Processing Time
The last method you can try is to increase the GPU processing time by modifying the value of the related entry in registry.
Warning: Modifying registry incorrectly may cause serious system problems. Before you move on, we recommend you back up the registry first, then you can restore the registry if necessary. See How to Back Up and Restore Registry.
You can follow these steps to modify the registry to increase the GPU processing time:
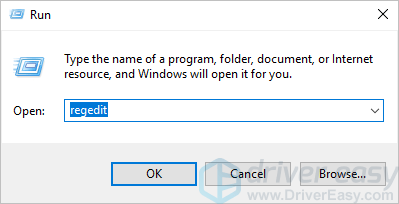
1) On your keyboard, press the Windows logo key and R key at the same time to invoke the Run box.
Type regedit and click OK to open Registry Editor.
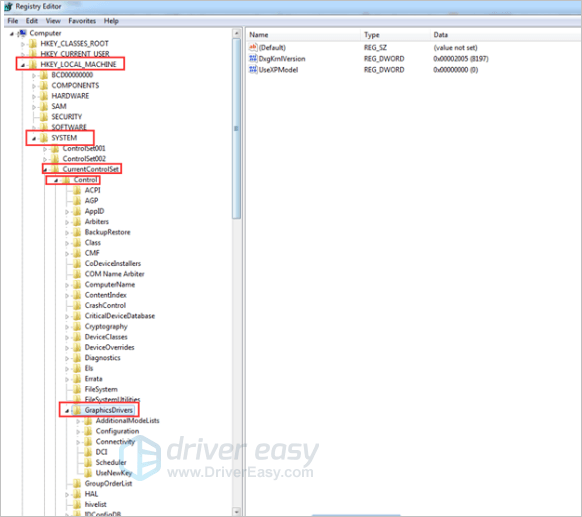
2) Browse to and then click the following registry subkey:
HKEY_LOCAL_MACHINE\SYSTEM\CurrentControlSet\Control\GraphicsDrivers
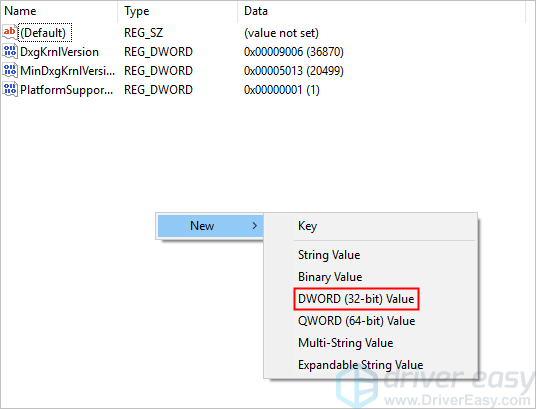
3) On the Edit menu in the right pane, right-click on the blank place. Click New, and then select the following registry value from the drop-down menu specific to your version of Windows.
If your PC is running 32-bit operating system, follow these steps:
a) Select DWORD (32-bit) Value.
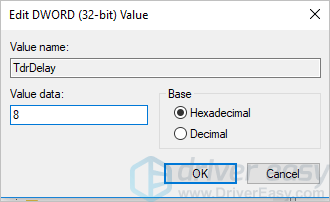
b) Type TdrDelay as the Name and click Enter.

c) Double-click TdrDelay and add “8” for the Value data and click OK.
If your PC is running 64-bit operating system, follow steps below:
a) Select QWORD (64-bit) Value.
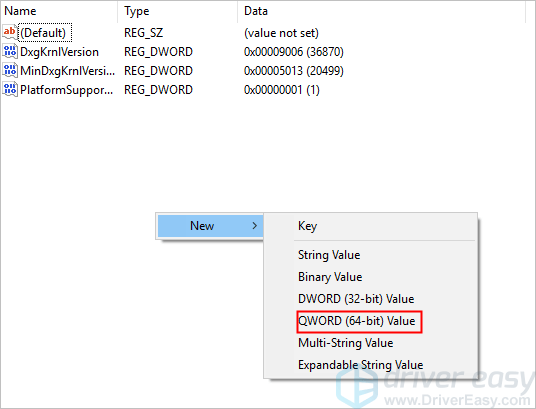
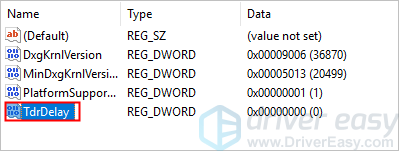
b) Type TdrDelay as the Name and click Enter.
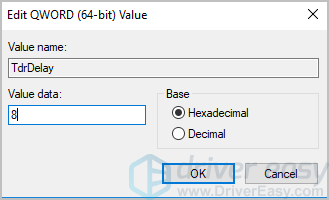
c) Double-click TdrDelay and add “8” for the Value data and click OK.
4) Restart your PC and check to see if the problem is resolved.
After modifying the registry here, if a problem occurs and you are not sure how to restore the registry, you can delete the added TdrDelay Name and restart your PC.
Hopefully the methods above help you resolve the NVIDIA Windows Kernel Mode Driver Stopped Responding issue. If you have any questions, ideas or suggestion, feel free to leave your comments below.
