


NVIDIA driver not installing no matter how many times you attempt to install it? You’re not alone. The NVIDIA driver installation may fail due to a range of causes, but don’t worry. You just need a few steps to fix this problem.
Fixes to try:
Here is a full list of solutions for the NVIDIA drivers not installing issue. You don’t have to try them all. Simply work from the top down until you find the one that does the trick.
- Automatically install your NVIDIA driver
- Clean install the NVIDIA driver
- Update Windows
- Temporarily disable antivirus
- Use Display Driver Uninstaller (DDU)
Fix 1 – Automatically install your NVIDIA driver
Installing the graphics driver on PC can be time-consuming and error-prone for users who don’t have much computer skills. If you’re not comfortable playing around with drivers manually, it’s recommended you install the NVIDIA drivers automatically with Driver Easy.
Driver Easy is a powerful tool that detects, downloads and installs any driver updates that your computer needs. You don’t need to know exactly what system your computer is running, you don’t need to be troubled by the wrong driver you would be downloading, and you don’t need to worry about making a mistake when installing.
- Download and install Driver Easy.
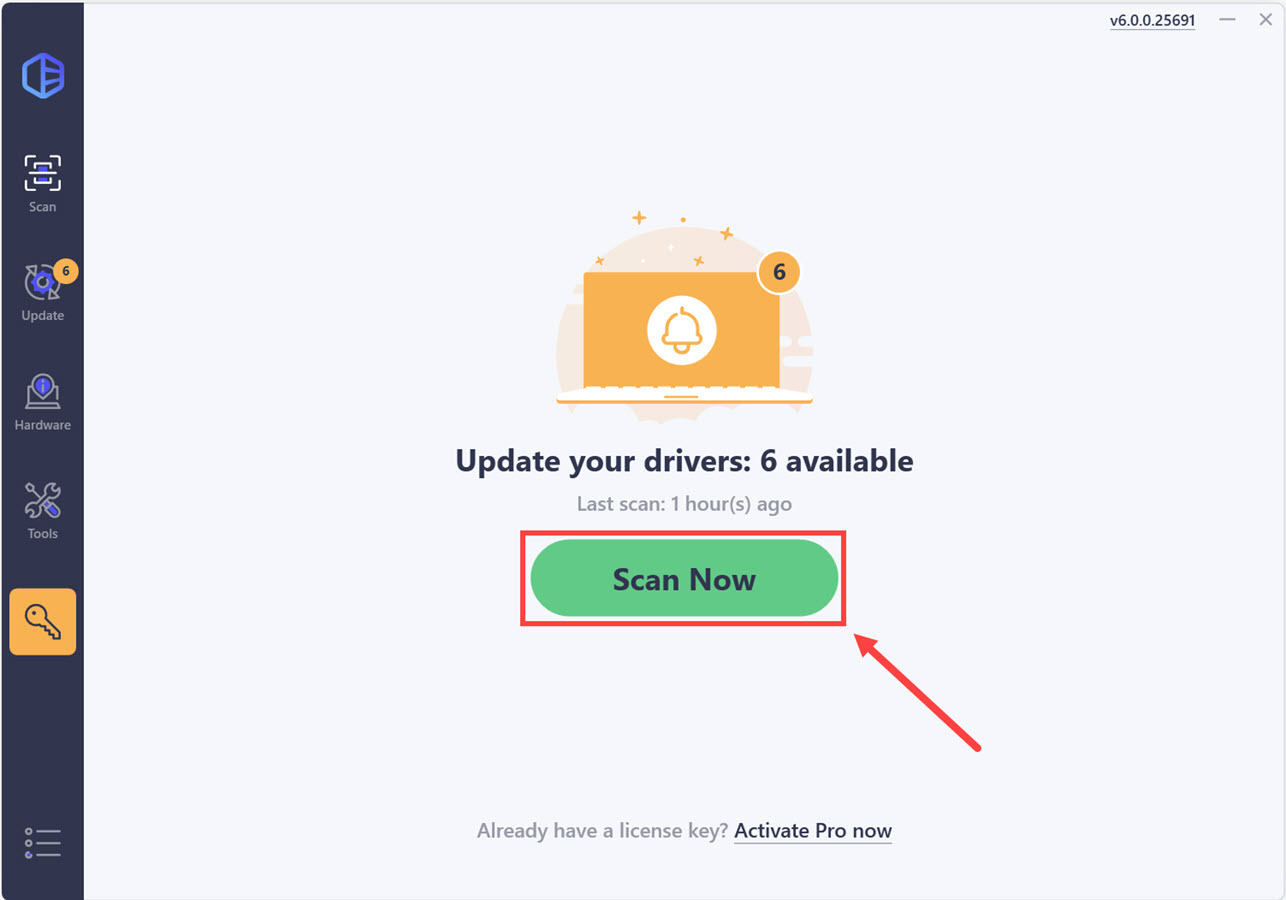
- Run Driver Easy and click the Scan Now button. Driver Easy will then scan your computer and detect any problem drivers.
- Click the Activate & Update button next to the NVIDIA driver to automatically download and install the correct version of this driver..
Or click Update All to automatically download and install the correct version of all the drivers that are missing or out of date on your system. (You’ll need the Pro version for this – when you select Update All, you’ll get a prompt to upgrade. If you’re not prepared to purchase the Pro version yet, Driver Easy provides a 7-day trial at no cost, granting access to all Pro features like fast downloads and easy installation. No charges will occur until after your 7-day trial period ends.)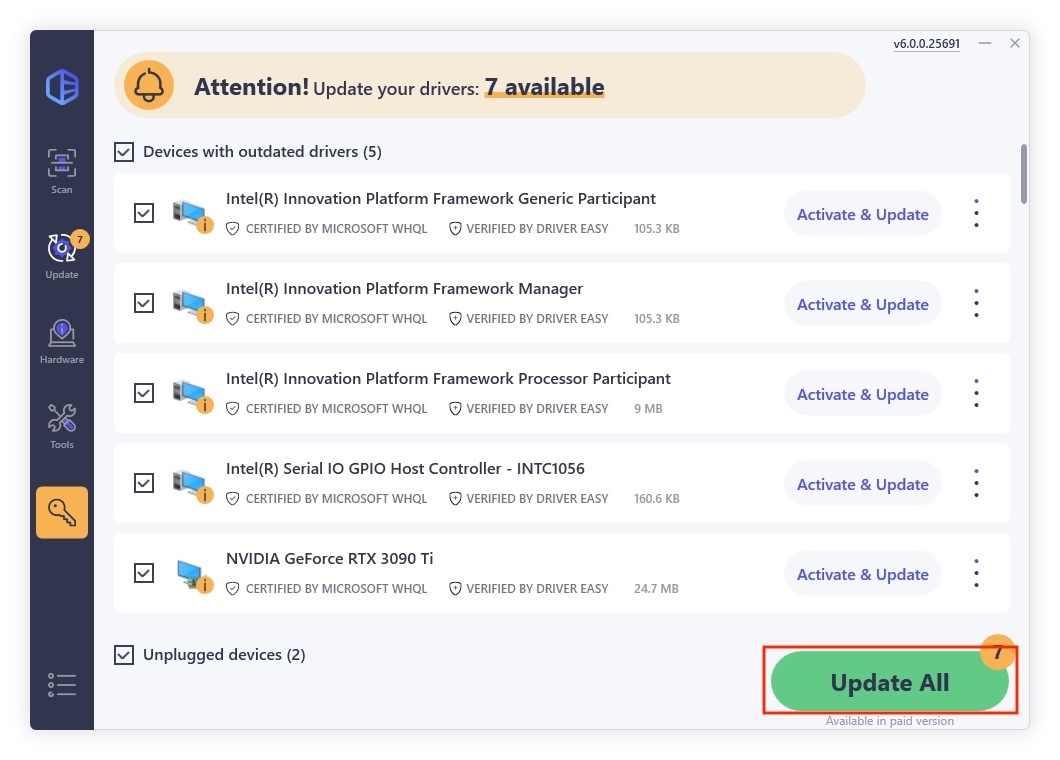
After restarting the computer, you should be getting the latest NVIDIA driver. If the driver still doesn’t function properly, check out the next method below.
Fix 2 – Clean install of the driver
If you’re using the GeForce Experience app to update your graphics driver but it’s not installing or working as intended, consider downloading the driver itself from the official NVIDIA website and performing a clean installation. Before getting started, make sure you stop all the NVIDIA-related programs or files. Here’s how:
End NVIDIA processes
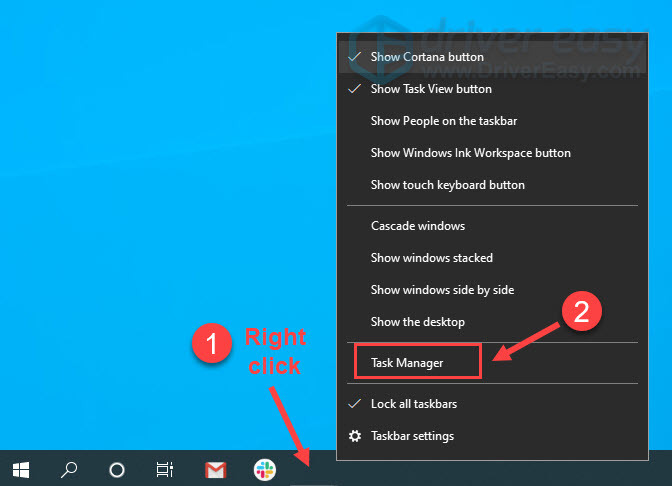
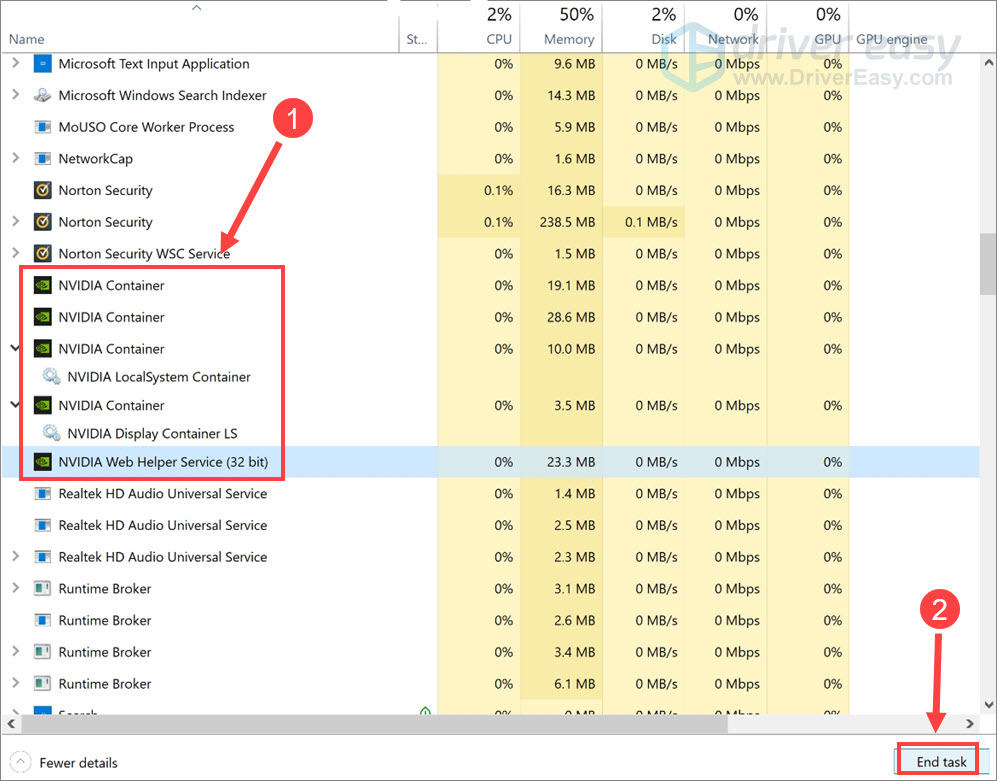
- Right-click any empty space on your taskbar and click Task Manager.
- Select processes that are associated with NVIDIA, which should have NVIDIA in the name, and click End Task one by one.
Delete extra files
- On your keyboard, press the Windows logo key and R at the same time to invoke the File Explorer.
- Navigate to the following folders and delete the files.
C:\Program Files\NVIDIA Corporation
C:\Program Files (x86)\NVIDIA Corporation
C:\Windows\System32\DriverStore\FileRepository\nv_lh document
C:\Windows\System32\DriverStore\FileRepository\nvoclock document
C:\Windows\System32\DriverStore\FileRepository\nvdsp.inf document
Clean install the NVIDIA driver
- Go to the NVIDIA driver download page.
- Choose the Product Type, Product Series and Product appropriately, and then click SEARCH.To download the optimized driver for the latest games, choose Game Ready Drivers next to Download Type, or you can select Studio Drivers for the design purposes.
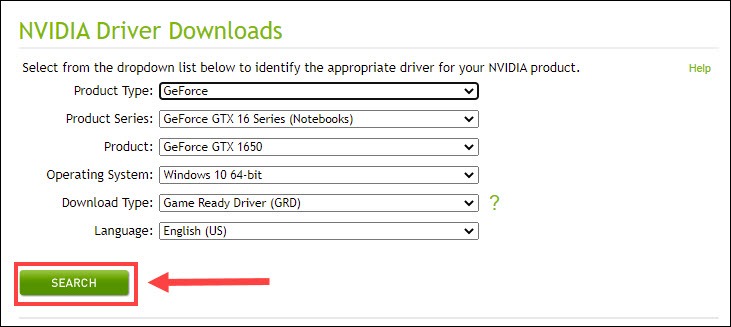
- Check if the operating system is detected correctly. If yes, click DOWNLOAD.
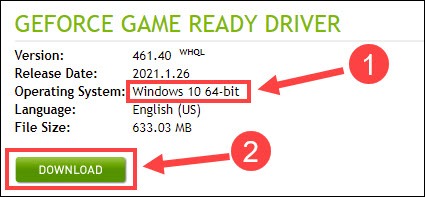
- Once done, right-click the downloaded file and select Run as administrator. Then specify the folder that the driver installer is to be installed.
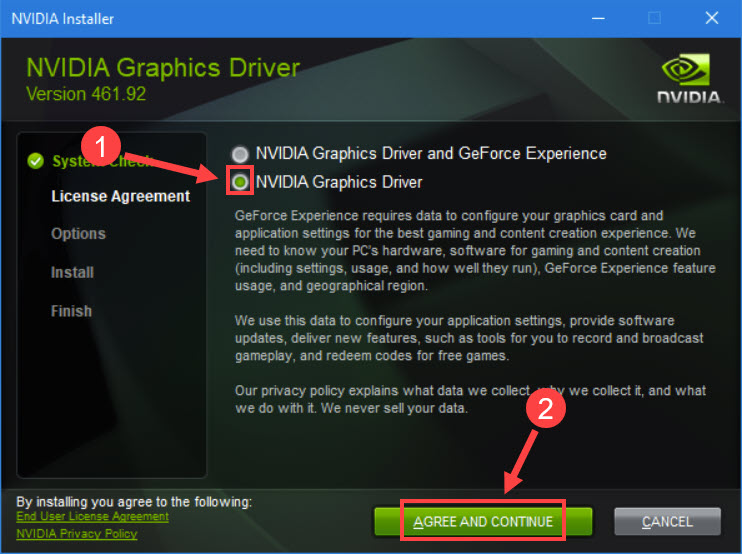
- Choose NVIDIA Graphics Driver and click AGREE AND CONTINUE.
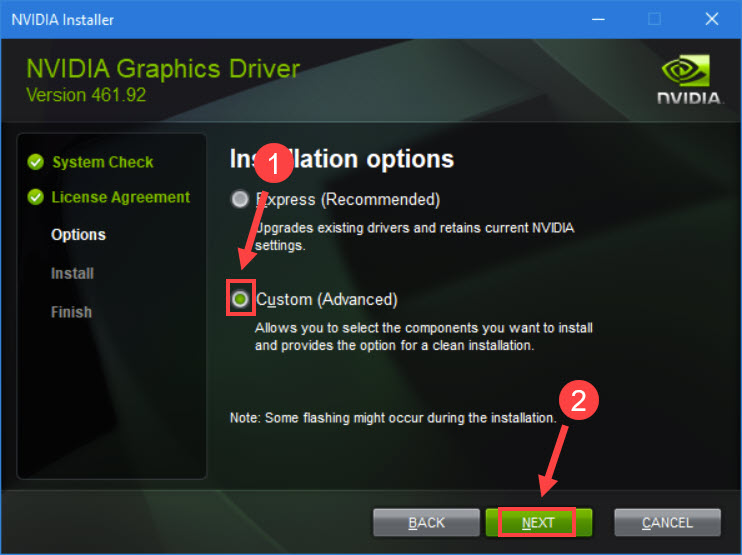
- Tick Custom (Advanced) and click NEXT.
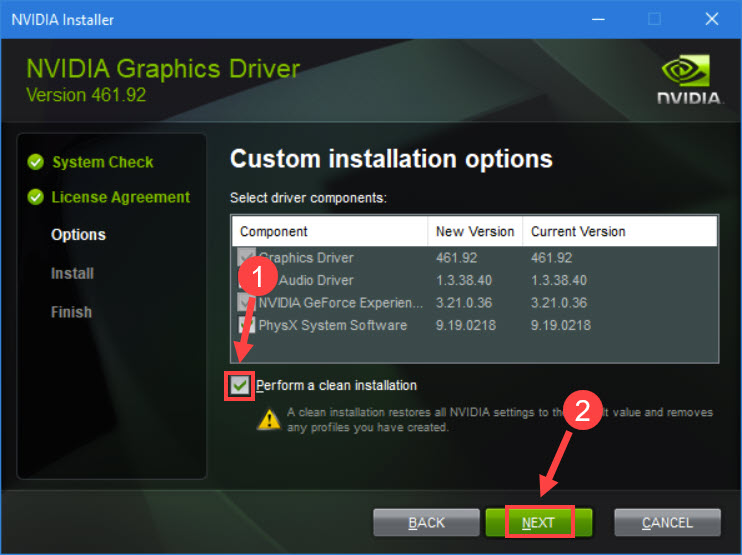
- Tick Perform a clean installation and click NEXT.
After you finish installing, reboot the machine for the changes to take effect and test if your NVIDIA driver is back on track. If not, move on to the third fix.
Fix 3 – Update Windows
An outdated operating system can cause driver installation issues. Before installing the NVIDIA driver, update Windows to the latest version:
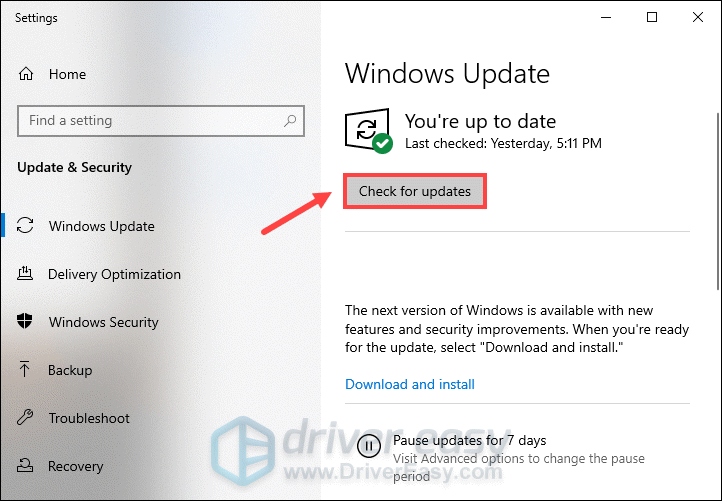
- On your keyboard, press the Windows logo + I keys simultaneously to open Settings.
- If you’re on Windows 10, navigate to Update & Security; If you’re on Windows 11, navigate to Windows Update.
Win10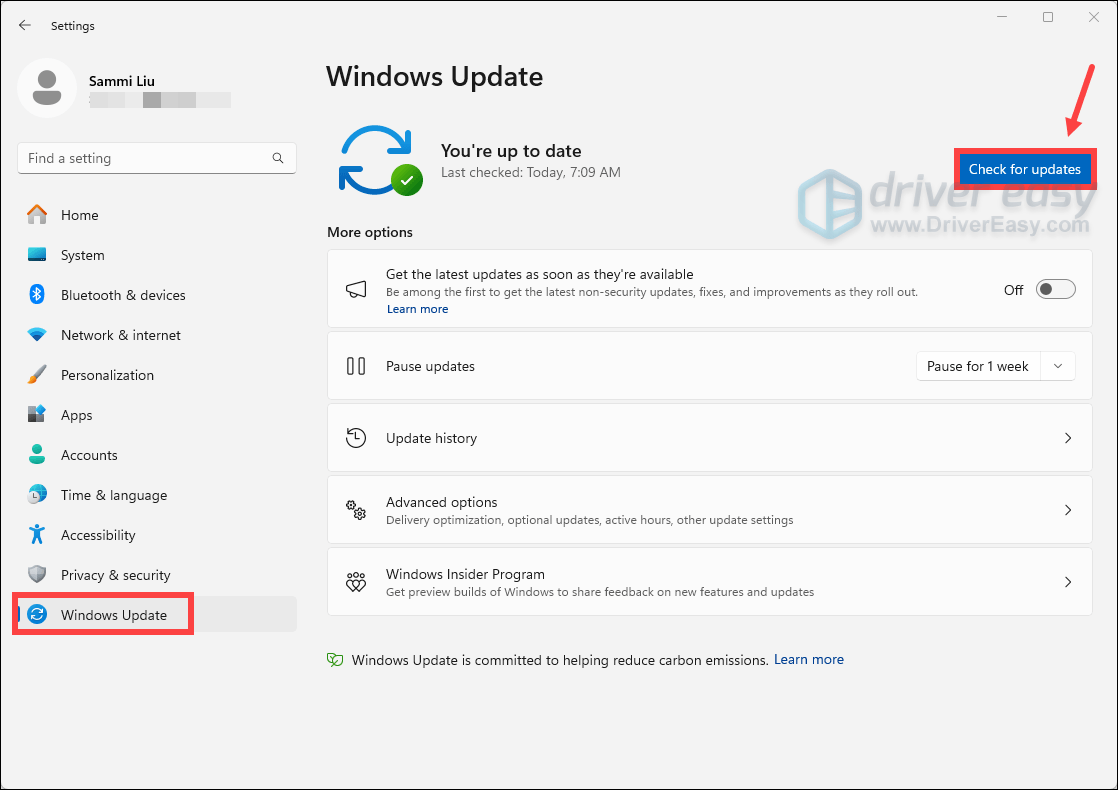
Win11
Fix 4 – Temporarily disable antivirus
The program you’re running in the background, whether it’s a GPU monitoring utility or antivirus software, might conflict with your NVIDIA driver installer and prevent it from launching. To see if that’s the case, you can temporarily disable those background programs and install the NVIDIA driver again. If the installation goes smoothly, then congrats!
Fix 5 – Use Display Driver Uninstaller (DDU)
Display Driver Uninstaller (DDU) is a utility designed to thoroughly remove graphics drivers from your system, ensuring that no residual files or settings interfere with new installations. This can be particularly useful when standard uninstallation methods fail or when switching between different GPU brands, such as from AMD to NVIDIA. If your attempts toinstall drivers have failed, DDU can assist in clearing out corrupted installations.
To use DDU:
- Download Display Driver Uninstaller (DDU) software and extract the file.
- Open the executable file and run extract program.
- Reboot into Windows safe mode.
- Go to the DDU extract path and double-click the Display Driver Uninstaller.exe to open DDU.
- Click Close in the Options window.
- Select device type to GPU and select device to the one you previously used.
- Click Clean and restart or Clean and Shutdown depending on your needs.
- Wait for the software to finish the process and auto reboot Windows to the normal mode or shutdown.
Till then proceed to install the latest drivers for your GPU.
If the problem persists, there might be a hardware issue with your graphics card. Test the card in another system to verify its functionality.
So this is how to resolve the NVIDIA drivers not installing problem. If you have any questions or suggestions, feel free to leave a comment and we’ll be glad to help.