


Are you experiencing a red screen issue with your Windows computer? It’s definitely an irking issue, and you’re surely not the only one. But don’t worry, this issue can be fixed…
Step 1: Enter your Windows system normally
If your computer restart normally, move to Step 2.
Way 1: Hard reset your computer
This is the first thing you should try when your computer didn’t restart or couldn’t enter the Windows system normally.
To hard reset your device:
- Press and hold the power button of your computer until it’s turned off.
- Disconnect the power cable and the battery (if any) from your computer.
- Leave your computer for over 1 minute.
- Re-connect the power cable (and the battery) to your computer.
- Turn on your computer.
Then check to see if you can get into the Windows system as usual. If not, don’t worry, try to enter safe mode.
Way 2: Enter safe mode
Safe mode is a diagnostic mode of Windows. Your red screen may not occur in safe mode. When your Windows system is in safe mode, it’s running with a minimal set of drivers and services. This is easier for you to identify the problem.
If you’re able to enter safe mode and see your screen, try the fixes below to get rid of your red screen issue.
Step 2: Try these fixes
The aim of fixes is to prevent red screen error from appearing again.
When you enter the Windows system normally, try these fixes. You may not have to try them all; just work your way down the list until you find the one that works for you.
- Undo your recent changes
- Check your hardware devices
- Stop Overclocking
- Update your device drivers
- Repair system files
- Update your BIOS
- Revert your system from a restore point
- Reset or reinstall Windows
Fix 1: Undo your recent changes
Does your red screen issue occur when you’ve made changes to your computer or connected any devices to your computer?
If that’s the case for you, try undoing these changes. Then see if this gets rid of your red screen issue.
Hopefully it does. But if not, move on to the fix below.
Fix 2: Check your hardware devices
Perhaps your red screen problem is caused by your hardware issue. You should take a look at your hardware devices to check for any hardware problems. There are a few things you should do:
Check for connection issues
Check if all your connections (cable/power/…) are working properly. You may need to try using different ports or cables to fix connection issues.
Try a different display
Test your computer with another display (monitor/TV/…) to see if your red screen issue is not caused by your display.
Reinstall your memory
It is also possible that your red screen issue is happening because the memory (RAM) on your computer isn’t working properly. To fix this issue, you can try reinstalling your memory:
- Turn off your computer and disconnect the power cable and the battery (if any) from it.
- Remove the cover on your computer. (You may need to check the manual or the official guides of your product for instructions on how to do this.)
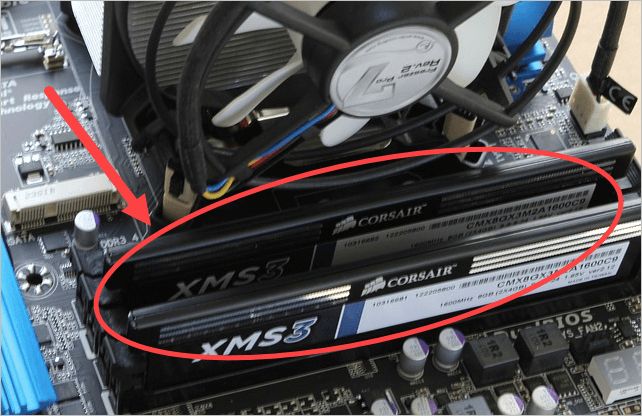
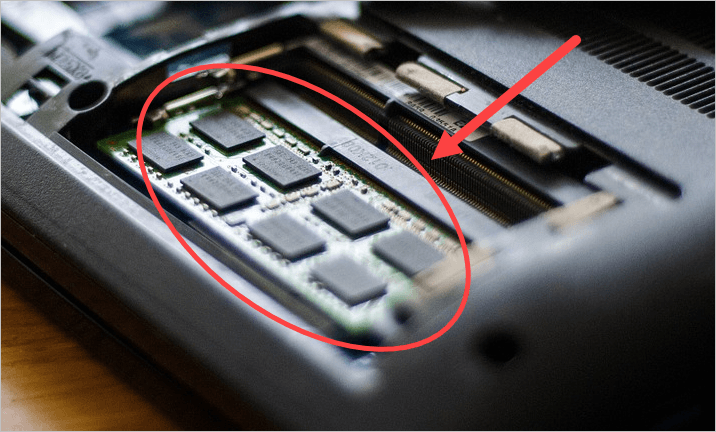
- Remove the memory from your computer. (Check out the screenshots below to see what memory looks like)
- Rub the golden contact of your memory with an eraser. (This can clean the golden contact of your memory.)
- Install the memory back to your computer.
- Place the cover back to your computer.
- Connect the power cable and the battery back to your computer.
- Turn on your computer and see if your issue is fixed.
Hopefully, this fix helped you get rid of your issue.
Fix 3: Stop Overclocking
If you’re overclocking your computer to get an instant speed boost, you may need to stop it. This activity will increase the usage of hardware and increase heat which may lead to the red screen issue.
So, if your computer is overclocking when the red screen appears, you need to stop overclocking.
To do this, you need to enter the BIOS system, then set settings back to default.
Fix 4: Update your device drivers
Perhaps you’re having the red screen issue because you’re using a wrong device driver or it’s out of date. If that’s the case for you, you should update your device drivers on your computer.
There are two ways you can update your drivers: manually and automatically.
Option 1 – Manually– You’ll need some computer skills and patience to update your drivers this way, because you need to find exactly the right the driver online, download it and install it step by step.
OR
Option 2 – Automatically (Recommended)– This is the quickest and easiest option. It’s all done with just a couple of mouse clicks – easy even if you’re a computer newbie.
Option 1 – Download and install the driver manually
You can download the drivers from the manufacturer’s official website. Search for the model you have and find the correct driver that suits your specific operating system. Then download the driver manually.
Option 2 – Automatically update drivers
If you don’t have time or patience to manually update your drivers, you can do it automatically with Driver Easy.
Driver Easy will automatically recognize your system and find the correct drivers for it. You don’t need to know exactly what system your computer is running, you don’t need to risk downloading and installing the wrong driver, and you don’t need to worry about making a mistake when installing.
You can update your drivers automatically with either the 7-day free trial or the Pro version of Driver Easy. But with the Pro version it takes just 2 clicks (and you get full support and a 30-day money back guarantee):
- Download and install Driver Easy.
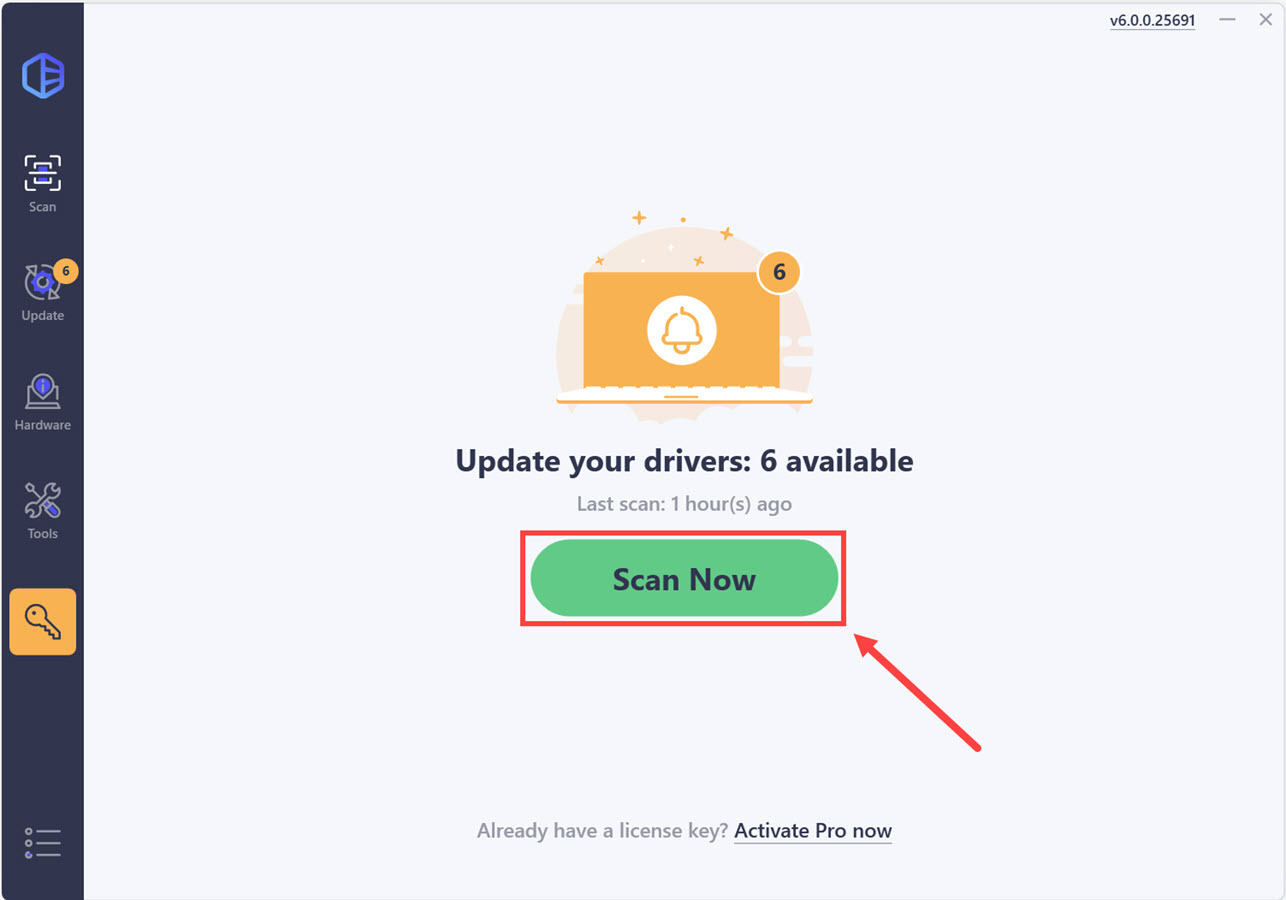
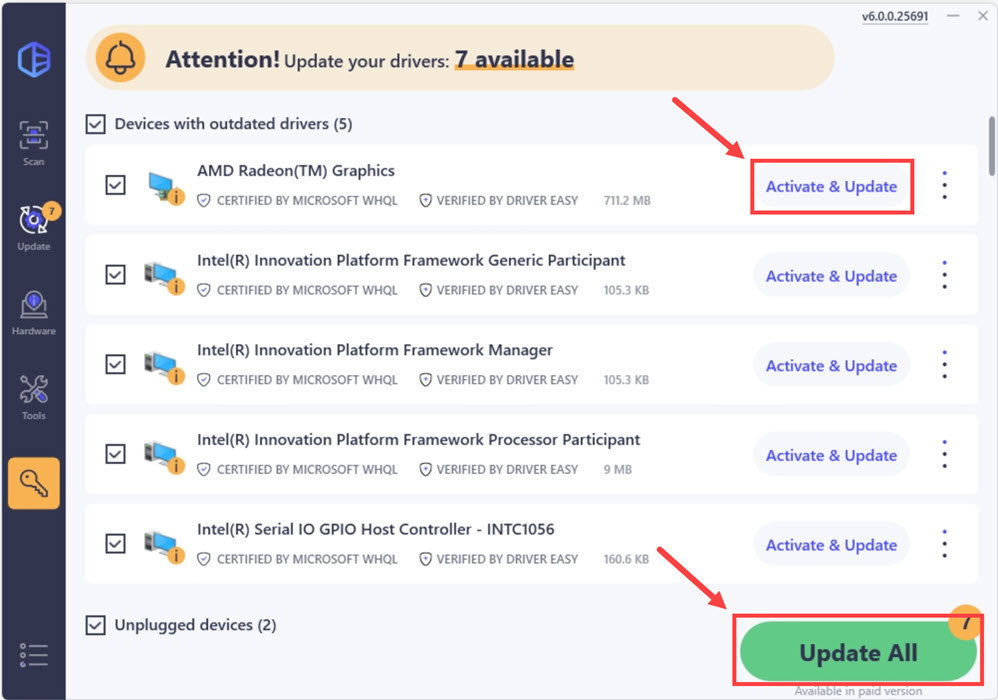
- Run Driver Easy and click the Scan Now button. Driver Easy will then scan your computer and detect any problem drivers.
- Click Update All to automatically download and install the correct version of all the drivers that are missing or out of date on your system. (Note: Upon selecting the ‘Update All’ option, you will be asked to upgrade to the Pro version. A 7-day free trial, including all Pro features like high-speed download and one-click install, is available if you’re not ready for the Pro version yet. Rest assured, you won’t incur any charges until after the 7-day trial.)
Be sure to attach the URL of this article if needed for more expedient and efficient guidance.
Fix 5: Repair system files
The dreaded red screen often appears when Windows encounters critical system errors. One common cause is corrupted or missing system files. To see if they are the culprit, you can use Windows built-in tools to run a system file repair.
System File Checker (SFC)
SFC is a built-in Windows utility that scans for and automatically repairs corrupted or missing system files. It works by comparing your system files against a cached version of the original Windows files, replacing any damaged ones it finds.
Here is how to run an SFC scan:
- On your keyboard, press the Windows logo key and R key at the same time to invoke the Run box.
- Type cmd and press Shift+Ctrl+Enter together on your keyboard to open Command Prompt in the administrator mode.
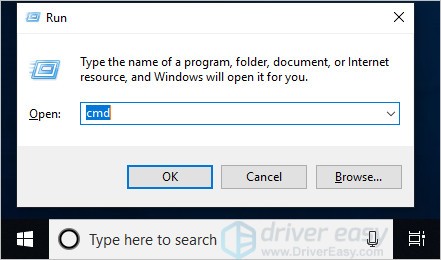
Note: Do NOT click OK or just press the Enter key as that won’t allow you to open Command Prompt in the administrator mode. - Type sfc /scannow (or copy-paste) and press Enter. Then wait for the verification is 100% complete.
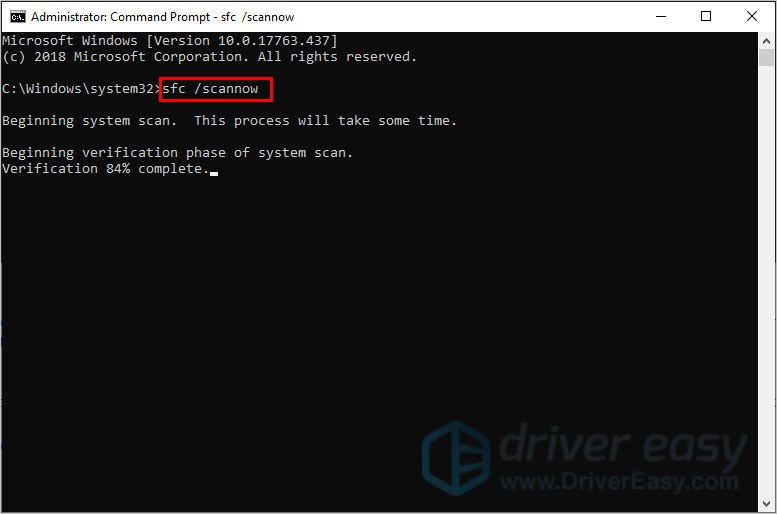
- Restart your computer to check the red screen issue is fixed or not.
If the result indicates there are broken files but SFC can’t fix it, you can run DISM commands for deeper examine and repair.
Deployment Image Servicing and Management (DISM)
DISM is a more advanced repair tool that can fix problems that SFC can’t handle. While SFC repairs individual files, DISM repairs the entire Windows component store, which can fix deeper system corruption issues. It connects to Windows Update to download clean copies of system files.
How to use the DISM tool:
1) On your keyboard, press the Windows logo key to open the Start menu.
2) Type cmd. Right-click Command Prompt from the results and select Run as administrator.
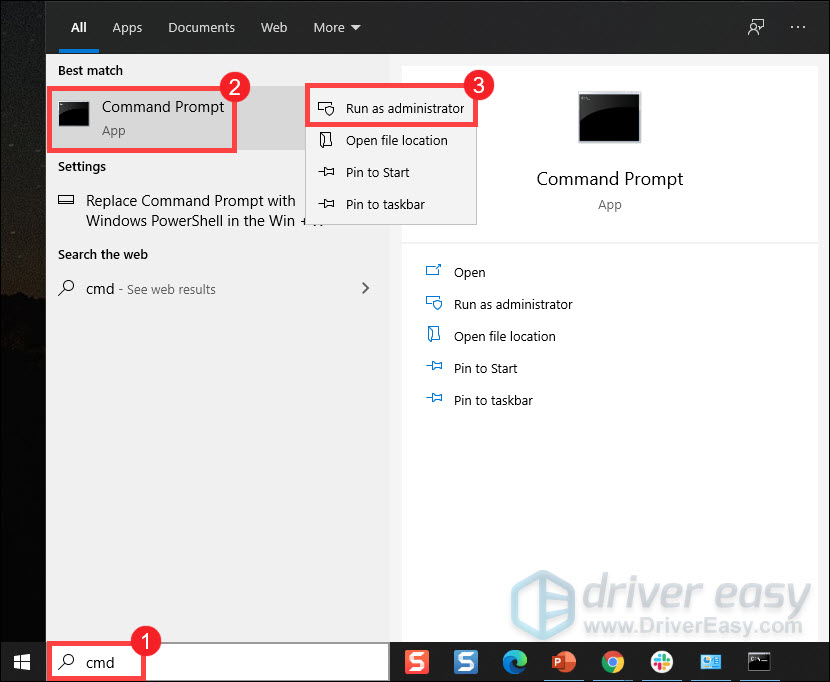
3) When you receive a user account control prompt, click Yes.
4) At the command prompt, type the following command and press Enter on your keyboard.
DISM.exe /Online /Cleanup-image /Restorehealth

Do not close this Command Prompt window until the verification is 100% complete.
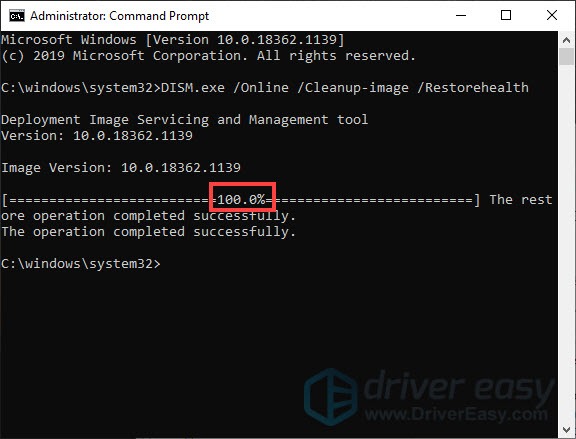
Once it’s finished, close the window and restart your computer to check if it works.
Fix 6: Update your BIOS
BIOS (Basic Input/Output System) performs the hardware initialization and jumpstarts the processes during the booting process of your computer. In some cases, the red screen on Windows 10 may be related to it. To fix it, we could try updating our BIOS.
Because different motherboard manufacturers have different instructions, the steps below are an overall guide.
- On your keyboard, press the Windows logo key and R at the same time, then copy & paste msinfo32 into the box and press Enter.
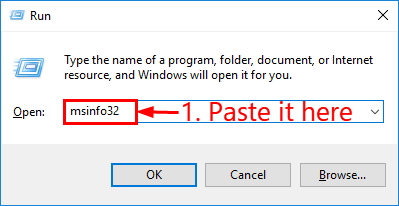
- In the information in BIOS Version/Date and go to the manufacturer’s official website.
- Check out the Support (or Download) section and search for the latest BIOS update.
- Download the file and install it properly.
- Restart your computer and check if this red screen error appears or not.
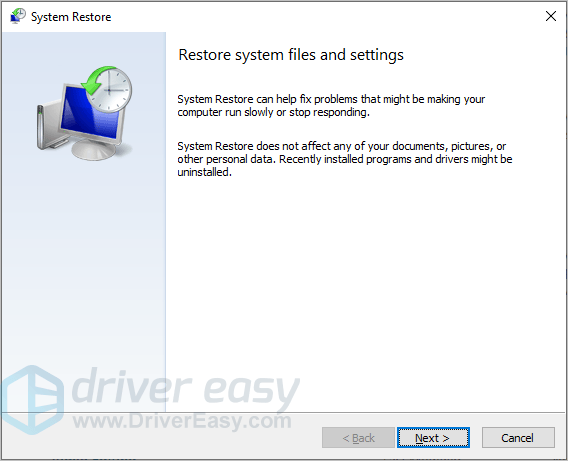
Fix 7: Revert your system from a restore point
You can also fix your red screen issue by reverting your Windows system to a previous state. You do this with System Restore. Here’s how:
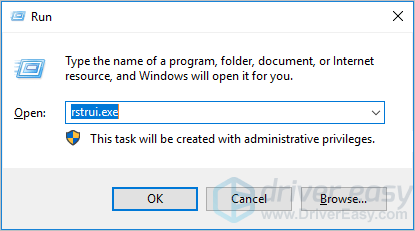
- On your keyboard, press the Windows logo key and R to open the Run dialog.
- Type rstrui.exe in the Run box, then press Enter.
- Follow the on-screen instructions of the System Restore wizard to restore your system from a restore point.
Fix 8: Reset or reinstall Windows
If all else fails, you may have to reset Windows, or maybe even reinstall it together. We all know reinstalling will delete all the data on your hard drive, you have to back up all your important files before doing it.
But treat these options as a last resort, because they both take quite a long time.
If this works for you, you should see your computer screen again. But if not, don’t worry, there are still other fixes for you to try…